Posts with «arduino hacks» label

Sorter Uses Cardboard to Organize Card Hoard

If you collect trading cards of any kind, you know that storage quickly becomes an issue. Just ask [theguymasamato]. He used to be really into trading cards, and got back into it when his kids caught the bug. Now he’s sitting on 10,000+ cards that are largely unorganized except for a few that made it into sleeve pages.  They tried to go through them by hand, but only ended up frustrated and overwhelmed. Then he found out about [Michael Portera]’s Pi-powered LEGO card sorter and got all fired up to build a three-part system that feeds cards in one by one, scans them, and sorts them into one of 22 meticulously-constructed cardboard boxes.

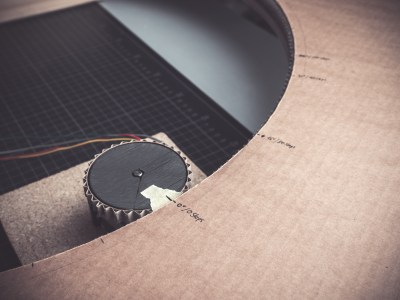
[theguymasamato]’s card sorter is the last stop for a card after the feeder has fed it in from the pile and the scanner has scanned it. The sorter lazy Susans around on a thrust bearing, which is driven by a 3D printed drive wheel attached to a stepper. The stepper is controlled with an Arduino.

Here’s where it gets crazy: the drive wheel and timing belt are made from the flutes of corrugated cardboard. As in, he used that wavy bit in the middle as gear teeth. Every one of those cardboard teeth is fortified with wood glue, a time-consuming process he vows to never repeat. Instead, [theguymasamato] recommends using shims to shore them up as he did in the card feeder. The whole thing was originally going to be made from cardboard. It proved to be too mushy to support the thrust bearing, so [theguymasamato] switched to MDF.

Right now, the sorter is homed via button press, but future plans for the device include an IR break beam switch. We’re excited for the scanner and can’t wait to see the whole system put together. While [theguymasamato] works on that, position yourself past the break to watch the build video.

Color Sensor Demystified

When [millerman4487] bought a TCS230-based color sensor, he was expecting a bit more documentation. Since he didn’t get it, he did a little research and some experimentation and wrote it up to help the rest of us.

The TCS3200 uses an 8×8 array of photodiodes. The 64 diodes come in four groups of 16. One group has a blue filter, one has green and the other has a red filter. The final set of diodes has no filter at all. You can select which group of diodes is active at any given time.

Sixteen photodiodes have blue filters, 16 photodiodes have green filters, 16 photodiodes have red filters, and 16 photodiodes are clear with no filters. The four types (colors) of photodiodes are interdigitated to minimize the effect of non-uniformity of incident irradiance. All photodiodes of the same color are connected in parallel. Pins S2 and S3 are used to select which group of photodiodes (red, green, blue, clear) are active.

The output of the array is a frequency that corresponds to the light intensity measured by one bank of photodiodes. You’ll need to make several pulse input measurements to compute the color and [millernam4487] provides code for it. You may, however, need to calibrate the device before you get good results.

We’ve looked at color sensors before, of course. They can even unlock doors.

Hack a Day 23 Jan 19:30

Arduino Tachometer Clock Fires on All Cylinders

We’re certainly no strangers to unique timepieces around these parts. For whatever reason, hackers are obsessed with finding new and interesting ways of displaying the time. Not that we’re complaining, of course. We’re just as excited to see the things as they are to build them. With the assumption that you’re just as enamored with these oddball chronometers as we are, we present to you this fantastic digital tachometer clock created by [mrbigbusiness].

The multi-function digital gauge itself is an aftermarket unit which [mrbigbusiness] says you can get online for as little as $20 from some sites. All he needed to do was figure out how to get his Arduino to talk to it, and come up with some interesting way to hold it at an appropriate viewing angle. The mass of wires coming out of the back of the gauge might look intimidating, but thanks to his well documented code it shouldn’t be too hard to follow in his footsteps if you were so inclined.

Hours are represented by the analog portion of the gauge, and the minutes shown digitally were the speed would normally be displayed. This allows for a very cool blending of the classic look of an analog clock with the accuracy of digital. He’s even got it set up so the fuel indicator will fill up as the current minute progresses. The code also explains how to use things like the gear and high beam indicators, so there’s a lot of room for customization and interesting data visualizations. For instance, it would be easy to scrap the whole clock idea and use this gauge as a system monitor with some modifications to the code [mrbigbusiness] has provided.

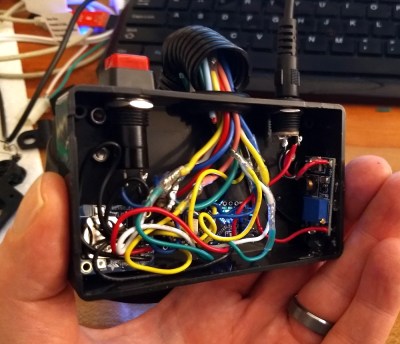
The gauge is mounted to a small project box with some 3D printed brackets and bits of metal rod, complete with a small section of flexible loom to cover up all the wires. Overall it looks very slick and futuristic without abandoning its obvious automotive roots. Inside the base [mrbigbusiness] has an Arduino Nano, a DS1307 RTC connected via I2C, a voltage regulator, and a push button to set the time. It’s a perfectly reasonable layout, though we wonder if it couldn’t be simplified by using an ESP8266 and pulling the time down with NTP.

We’ve seen gauges turned into a timepiece before, but we have to admit that this is probably the most practical realization we’ve seen of the idea yet. Of course if you want to outfit the garage with something a bit more authentic, you can always repurpose a Porsche brake rotor.

Arduino RC Transmitter For Homebrew Projects

The field of radio control has benefited much from the onward march of technology. Where a basic 2-channel setup would once have cost hundreds of dollars, it’s now possible to get a high-end 2.4GHz 9-channel rig for well under $100, shipped to your door. However, the vast majority of these systems are closed-source and built for purpose. Sometimes, there are benefits to doing things your own way, and that’s precisely what this project does.

At its heart, it’s a simple combination. An Arduino Pro Mini talks to a NRF24L01 which handles the wireless communication. At that point, it’s up to you – throw in as few or as many controls as you like. For this build, [HowToMechatronics] has gone with a twin-stick setup, with a pair of potentiometers and twin toggle switches to round out the options.

The build comes in handy, as it’s possible to program in whatever features you may need for a given project. [HowToMechatronics] has used it to control a hexapod robot, among other projects. It’s a build that shows that with cheap and readily available parts, it’s possible to whip up a custom solution to suit your needs.

If this topic interests you.it’s worth saying that even those closed source radio control products can sometimes be hacked.

[Thanks to Baldpower for the tip!]

Bad Apple!! Via The Arduino Mega

The Arduino Mega is a useful tool for the maker. Generally, once one has come up with plans for blinking LEDs that require more IO than is available on the Arduino Uno, one graduates to the Mega and goes for broke. However, it’s not typically what we’d consider as our first choice for video work. [Stephane] begs to differ, and coded this Bad Apple!! demo for the Arduino Mega 2560.

For those unfamiliar, video on the Arduino is actually somewhat of a solved problem – merely requiring a pair of resistors and some nifty code. The real meat of this hack is the video storage itself. It’s been done before, but by streaming data off an SD card or serial link. [Stephane] was determined to store everything on the Arduino itself, and thus the hack begun. Video data is stored as 1 bit per pixel, as it’s a simple black and white video as per the original inspiration. LZ77 compression was used to cram the data down without requiring too much RAM, which is a limited resource on the Mega. It’s video only, as the Mega is tapped out handling 3 minutes and 39 seconds of video storage, but future work may include syncing with a second Arduino to deliver the soundtrack.

It’s a hack that shows off [Stephane]’s ability to get impressive performance out of limited platforms. We’ve seen this before, with his excellent Star Fox port to the Arduboy. Video after the break.

Arduino Fights Fire with… Water?

We don’t think we’d want to trust our fire safety to a robot carrying a few ounces of water, but as a demonstration or science project, [Tinker Guru’s] firefighting robot was an entertaining answer to the question: “What do I do with that flame sensor that came in the big box of Arduino sensors I bought from China?” You can see a video of the device below.

You can see, it is a pretty standard two-wheel robot with the drive wheels to the rear and a skid plate up front. There are a flame sensor and a water pump up forward, as well. You can probably guess, the device notices a flame and rushes to squirt water on it.

That got us thinking, though. What would it take to build a real robot fireman? Turns out you don’t have to look hard to find out there are several out there already. The Thermite robot seems to have a lot of traction — in the market, that is, although its oversized treads probably give it good traction in that way, too. Most of the robots don’t carry their own water, and there’s even one — THOR — that looks like a human. Well, as much as a pie looks like a cake, anyway.

Interestingly, none seem to carry any sort of chemical fire extinguisher. Of course, we’ve seen cases where water was the best, anyway. If you want a slightly more practical home build — but only slightly — check out [Ivan’s] robot that holds a liter of water.

A Smartwatch You Can Easily Build Yourself

The concept of a smartwatch was thrown around for a long time before the technology truly came to fruition. Through the pursuit of miniaturisation, modern smartwatches are sleek, compact, and remarkably capable for their size. Companies such as Apple and Samsung throw serious money into research and development, but that doesn’t mean you can’t create something of your own. [Electronoobs] has done just that, with this Arduino-based smartwatch build.

The brain of the watch is that hacker staple, the venerable ATmega328, most well known for its use in the Arduino Uno and Nano platforms. An FTDI module is used for USB communication, making programming the board a snap. Bluetooth communication is handled by another pre-built module, and a smartphone app called Notiduino handles passing notifications over to the watch.

This is a build that doesn’t do anything crazy or difficult to understand, but simply combines useful parts in a very neat and tidy way. The watch is impressively thin and compact for a DIY build, and has a host of useful functions without going overboard.

We’ve seen other DIY builds in this space, too – such as this ESP8266-based smartwatch. Video after the break.

Voice Controlled Camera for Journalist in Need

Before going into the journalism program at Centennial College in Toronto, [Carolyn Pioro] was a trapeze performer. Unfortunately a mishap in 2005 ended her career as an aerialist when she severed her spinal cord,  leaving her paralyzed from the shoulders down. There’s plenty of options in the realm of speech-to-text technology which enables her to write on the computer, but when she tried to find a commercial offering which would let her point and shoot a DSLR camera with her voice, she came up empty.

[Taras Slawnych] heard about [Carolyn’s] need for special camera equipment and figured he had the experience to do something about it. With an Arduino and a couple of servos to drive the pan-tilt mechanism, he came up with a small device which Carolyn can now use to control a Canon camera mounted to an arm on her wheelchair. There’s still some room for improvement (notably, the focus can’t be controlled via voice currently), but even in this early form the gadget has caught the attention of Canon’s Canadian division.

With a lavalier microphone on the operator’s shirt, simple voice commands like “right” and “left” are picked up and interpreted by the Arduino inside the device’s 3D printed case. The Arduino then moves the appropriate servo motor a set number of degrees. This doesn’t allow for particularly fine-tuned positioning, but when combined with movements of the wheelchair itself, gives the user an acceptable level of control. [Taras] says the whole setup is powered off of the electric wheelchair’s 24 VDC batteries, with a step-down converter to get it to a safe voltage for the Arduino and servos.

As we’ve seen over the years, assistive technology is one of those areas where hackers seem to have a knack for making serious contribution’s to the lives of others (and occasionally even themselves). The highly personalized nature of many physical disabilities, with specific issues and needs often unique to the individual, can make it difficult to develop devices like this commercially. But as long as hackers are willing to donate their time and knowledge to creating bespoke assistive hardware, there’s still hope.

[Thanks to Philippe for the tip.]

Machine Learning on Tiny Platforms Like Raspberry Pi and Arduino

Machine learning is starting to come online in all kinds of arenas lately, and the trend is likely to continue for the forseeable future. What was once only available for operators of supercomputers has found use among anyone with a reasonably powerful desktop computer. The downsizing isn’t stopping there, though, as Microsoft is pushing development of machine learning for embedded systems now.

The Embedded Learning Library (ELL) is a set of tools for allowing Arduinos, Raspberry Pis, and the like to take advantage of machine learning algorithms despite their small size and reduced capability. Microsoft intended this library to be useful for anyone, and has examples available for things like computer vision, audio keyword recognition, and a small handful of other implementations. The library should be expandable to any application where machine learning would be beneficial for a small embedded system, though, so it’s not limited to these example applications.

There is one small speed bump to running a machine learning algorithm on your Raspberry Pi, though. The high processor load tends to cause small SoCs to overheat. But adding a heatsink and fan is something we’ve certainly seen before. Don’t let your lack of a supercomputer keep you from exploring machine learning if you see a benefit to it, and if you need more power than just one Raspberry Pi you can always build a cluster to get your task done just a little bit faster, too.

Thanks to [Baldpower] for the tip!

Arduino and Pi Share Boardspace

A Raspberry Pi Zero (W) and Arduino are very different animals, the prior has processing power and connectivity while the latter has some analog to digital converters (ADCs) and nearly real-time reactions. You can connect them to one another with a USB cable and for many projects that will happily wed the two. Beyond that, we can interface this odd couple entirely through serial, SPI, I2C, and logic-level signaling. How? Through a device by [cburgess] that is being called an Arduino shield that supports a Pi0 (W). Maybe it is a cape which interfaces with Arduino. The distinction may be moot since each board has a familiar footprint and both of them are found here.

Depending on how they are set up and programmed, one can take control over the other, or they could happily do their own thing and just exchange a little information. This board is like a marriage counselor between a Raspberry Pi and an Arduino. It provides the level-shifting so they don’t blow each other up and libraries so they can speak nicely to one another. If you want to dig a bit deeper into this one, design files and code examples are on available.

Perhaps we’ll report on this board at the heart of a pinball machine retrofit, a vintage vending machine restoration, or maybe a working prop replica from the retro bar in Back to the Future II.