Posts with «3d printing» label

Why buy a soldering station when you can build one instead?

As with many products, if you want the best, you’ll pay top dollar for it. After seeing that the supposed best soldering station on the market sells for $500, YouTuber GreatScott! decided to instead purchase the iron and tip for a total of around $100, then reverse-engineer how the station should work.

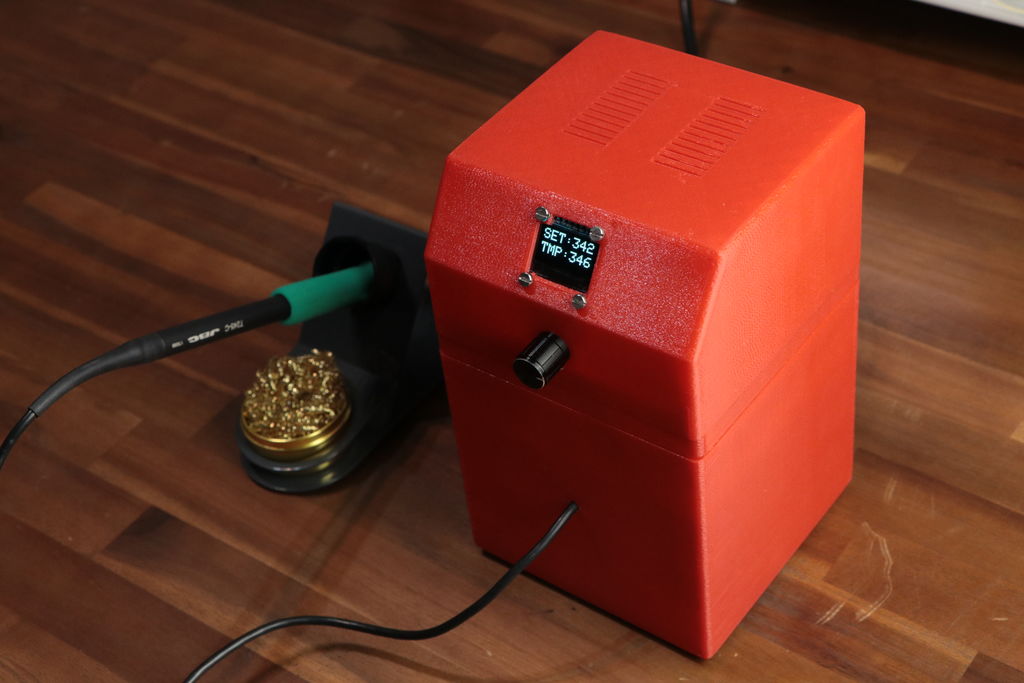
From there, he used an Arduino Pro Mini along with a little OLED screen to display the temperature, and a toroidal transformer as well as several other components to power and complete his build. Finally, he 3D-printed a nice red enclosure and attached everything together, making his own custom soldering station.

You can see more on this station’s Instructables write-up, and check out GreatScott!’s channel for other interesting projects!

Turn and film your projects in style with this $8 DIY device

Using an Arduino along with some 3D-printed and salvaged parts, hacker “notionSunday” made an excellent photo turntable for under $10.

In a masterful display of converting one man’s junk into another man’s treasure, notionSunday used a VCR head as a very smooth-looking bearing surface for a small turntable. A DVD-ROM drive motor, a potentiometer from an old TV, and screws and wires from other electronics rounded out the internals of this build, as well as an Arduino Pro Mini with an H-bridge driver for control. All of this was placed inside of 3D-printed housing, then a disk was added to the top for other contraptions to rest on.

You can see it in action around the 8:00 mark in the video below. What really sticks out are the 3D-printed circumference markers, apparently there to indicate the speed of rotation or to hypnotize viewers. Check out notionSunday’s YouTube channel for more interesting projects, or his website for more pictures and code.

Testing microswitches with a (not quite) Useless Machine

Pete “Raster” Prodoehl shows how to test microswitches with an Arduino Uno.

As referenced in his write-up, Prodoehl needed a way to test microswitches that he’d be using for an exhibit. After all, when something is on display, the last thing you want is to have to replace components. Inspired by how Consumer Reports tests things, he decided to build his own setup with a counter and 3D-printed “pusher.”

What he found was that when you’re testing the life span of a component made to work over and over, your testing components have to also be robust enough to handle the very gradual abuse. It’s an interesting exercise, and something that engineers in manufacturing have to deal with constantly. Getting something to work once or even a times is neat, but getting it to function thousands of times for a test or otherwise takes a different way of thinking!

You can see more about this project on Prodoehl’s page here, and check out the video compilation below for a quick overview.

Tertiarm - low cost, 3d printed robot arm based on Ikea lamp

Primary image

What does it do?

Move things, push buttons, etc.

Cost to build

Embedded video

Finished project

Complete

Number

Time to build

Type

URL to more information

Weight

read more

Let's Make Robots 07 Feb 15:54

Tertiarm - low cost, 3d printed robot arm based on Ikea lamp

Primary image

What does it do?

Move things, push buttons, etc.

Cost to build

Embedded video

Finished project

Complete

Number

Time to build

Type

URL to more information

Weight

read more

Let's Make Robots 07 Feb 15:54

Tertiarm - low cost, 3d printed robot arm based on Ikea lamp

Primary image

What does it do?

Move things, push buttons, etc.

Cost to build

Embedded video

Finished project

Complete

Number

Time to build

Type

URL to more information

Weight

read more

Let's Make Robots 07 Feb 15:54

Converting a coffee maker into a 3D printer

Heavy duty coffee makers are good for, well, making coffee. On the other hand, if you were to look at the frame without the preconception of what it can do, you might notice that there is space on top where equipment could be attached, and space on the bottom with a built-in heating pad on which to place an object… in other words, a perfect 3D printer frame!

Tropical Labs realized this, and turned the ordinary household appliance into a delta printer with three steppers for motion and another to feed the printing media. An Arduino Mega serves as the brains of the operation along with a popular RAMPS 1.4 shield.

Frame aside, it’s a neat mechanism, and definitely worth checking out. You can see more about the project on Hackaday.io.

Annoy Your Neighbors with MIDI Musical Siren

[Yannick], aka [Gigawipf] brings us this (mostly) musical delicacy: a 3D-printed siren that’s driven by a brushless quadcopter motor, and capable of playing (mostly) any music that you’ve got the MIDI score for. This is a fantastic quickie project for any of you out there with a busted quad, or even some spare parts, and a 3D printer. Despite the apparent level of difficulty, this would actually be a great quickie weekend build.

First stop is Thingiverse, for the Mini Air Raid Siren model. Start that printing and get to work on the electronics. For the MIDI-to-ESC (electronic speed controller) conversion, any Arduino with USB support (ATmega32u4 or ARM boards) will work. The important bit is that you can run the MIDI-USB library. All that remains is a MIDI-to-servo pulse conversion and lookup table. Here’s [Yannick]’s file, but we’re guessing that you’ll want to tune your own siren.

How well does it work? See the videos below. Short notes, as well as note-offs, tax the quad motor’s ability to stop the siren rotor immediately. There’s a nice portamento effect as it ramps up between notes as well. You’ll need to pick your repertoire accordingly.

We have a strange affinity for musical sirens, so we’ll readily admit that [Yannick] had us at the word “spinning”. This is an easy project, with a pretty cool result. As far as we know, there’s only one 3D-printed, MIDI-controlled siren in the world, but it shouldn’t be hard to scale the siren model up or down to make different registers and effects. So who’s up for an entire symphony of these things?


Filed under: musical hacks
Hack a Day 30 Jan 03:00

A 3D-printed e-drum pad

After making his first drum with a laser cutter, Ryo Kosaka redesigned it as a 3D-printed structure so more people could build it.

If you’d like to practice playing the drums, but would rather not disturb your family, roommate, neighbors, dog, etc., then an electronic version is probably a good idea. Since you’re reading our blog, making one would be even better!

Although details on how it was interfaced software-wise with the Arduino Uno aren’t included in his log, the drum itself looks quite good. It’s 3D-printed out of several individual pieces, which are glued together using thick paper to help hold everything intact. The sectioned design means that you only need a 120mm x 120mm print area to produce this 8-inch drum pad.

Kosaka also goes into how to set up the piezo sensor for drum use in his write-up, which should be quite useful for this design, or even something derived from it. You can check out the project page for more details as well as Thingiverse for the print files. Additionally, Kosaka recommends this Rockband controller to MIDI Instructable or this one featuring a homemade electronic drum kit.

3D Print and Program This Adorable Bipedal Arduino Bot

Build an Arduino-powered, 3D-printed, moon-walking bot with preprogrammed and custom gaits.

Read more on MAKE

The post 3D Print and Program This Adorable Bipedal Arduino Bot appeared first on Make: DIY Projects and Ideas for Makers.