

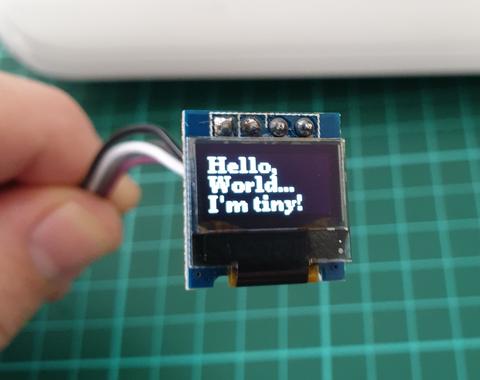
A tiny tiny 0.49″ 64 x 32 Graphic I2C OLED Display with Arduino
In this article we look at the tiny 0.49″ 64×32 graphic OLED from PMD Way. It is a compact and useful display, that only requires a small amount of time to get working with your Arduino or compatible board.
The purpose of this guide is to get your display successfully operating with your Arduino, so you can move forward and experiment and explore further types of operation with the display.
This includes installing the Arduino library, making a succesful board connection and running a demonstration sketch. So let’s get started!
Connecting the display to your Arduino
The display uses the I2C data bus for communication, and is a 5V and 3.3V-tolerant board.
Arduino Uno to Display
GND ---- GND (GND)

5V/3.3V- Vcc (power supply, can be 3.3V or 5V)

A5 ----- SCL (I2C bus clock)

A4 ----- SDA (I2C bus data)
I2C pinouts vary for other boards. Arduino Leonard uses D2/D3 for SDA and SCL or the separate pins to the left of D13. Arduino Mega uses D20/D21 for SDA and SCL. If you can’t find your I2C pins on other boards, email admin at tronixstuff dot com for assistance.
Installing the Arduino library
To install the library – simply open the Arduino IDE and select Manage Libraries… from the Tools menu. Enter “u8g2” in the search box, and after a moment it should appear in the results as shown in the image below. Click on the library then click “Install”:

After a moment the library will be installed and you can close that box.
Now it’s time to check everything necessary is working. Open a new sketch in the IDE, then copy and paste the following sketch into the IDE (you may find the “view raw” link at the end useful):
Your display should go through the demonstration of various font sizes and so on as shown in the video below:
You can see how we’ve used a different font in the sketch – at lines 19, 30 and 38. The list of fonts included with the library are provided at https://github.com/olikraus/u8g2/wiki/fntlistall.
Note that the initial location for each line of text (for example in line 20):
u8g2.drawStr(0, 5, "Hello,"); // write something to the internal memory
The x and y coordinates (0,5) are for the bottom-left of the first character.
If you want to display values, not text – such as integers, use:
u8g2.print();
… an example of which is show around line 49 in the example sketch.
Where to from here?
Now it’s time for you to explore the library reference guide which explains all the various functions available to create text and graphics on the display, as well as the fonts and so on. These can all be found on the right-hand side of the driver wiki page.
And that’s all for now. This post brought to you by pmdway.com – everything for makers and electronics enthusiasts, with free delivery worldwide.
To keep up to date with new posts at tronixstuff.com, please subscribe to the mailing list in the box on the right, or follow us on twitter @tronixstuff.
[original story: Tronixstuff]