Posts with «weather» label

A traditional weather house gets a smart upgrade

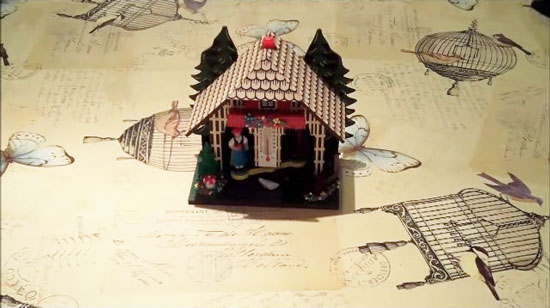
The “Enchanted Cottage” is a project by Andy Clark with the aim of upgrading a traditional  german “wetter haus”  with a new mechanism and electronics running on Arduino Yún:

The mechanics were replaced with a servo and 3D printed parts designed to make the movement linear rather than arcing as in the traditional approach. The figures were fitted with magnets so that they could move without any obvious form of propulsion.
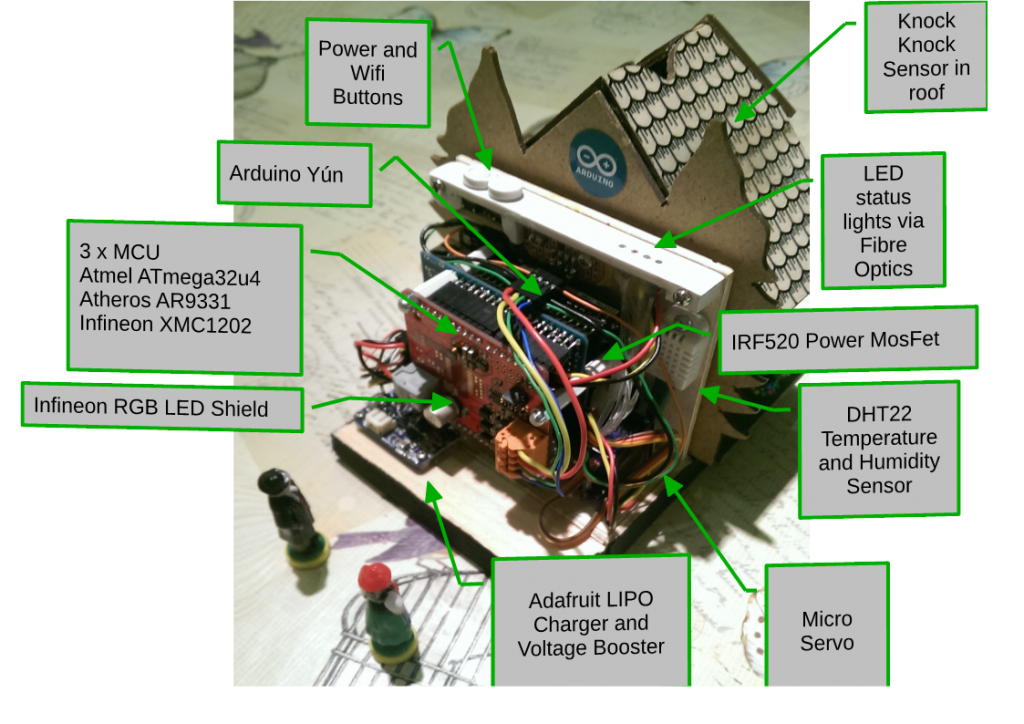
The electronics were based on an Arduino Yún, custom prototyping shield and an Infineon RGB LED driver shield. The whole thing is powered by a rechargable LiPo battery and a module from AdaFruit. Because the Arduino was deep in the middle of the house, I used fibre optics to bring the light to the top panel. A sensor was added into the roof so you could simply tap it to get it to update the forecast for you.

The project was build over a period of 16 weeks, the mechanical aspects were completed first and the 3D printing took several goes to get it right. The electronics build was fairly straightforward but fitting everything onto the proto shield was challenging and the high clearance for the Yún was also a challenge. The software was written as I went along with demo programs created to test each part. Getting the Yún to work on low power was fairly straightforward but getting a secure and validated HTTPS connection took a few attempts. tried to put as much of the processing into the Python script so that the C++ code was just handling the control. All in all a challenging project that pushed the Yún to it’s limits.

Learn more about the project on Andy’s blog.

Arduino Blog 07 Aug 18:06

Weather Reporter - Temboo, Ethernet and Arduino


Arduino is well known for the large variety of sensors / modules that can be connected. It is quite easy to hook up a temperature or humidity sensor to get instant feedback about the surrounding environmental conditions. However, sometimes you do not have a temperature sensor. Sometimes you have a sensor, but would like to know the temperature in other cities ! Or you would like to know what the temperature will be tomorrow?

Well now you can !!

All you need is a Temboo account, an internet connection and the following components:

Parts Required


Project Description


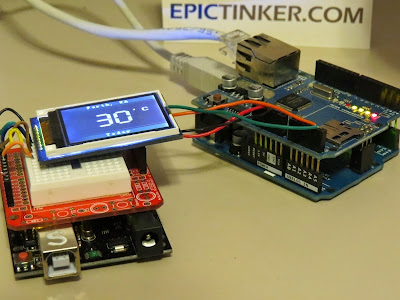
An Arduino UNO (and Ethernet Shield) queries Yahoo using a Temboo account, and retrieves weather information. The data is filtered and processed, and then passed on to another Arduino UNO to be displayed on a TFT LCD module. Two Arduino UNOs are used because the Ethernet library and the UTFT library are both memory hungry, and together consume more memory than one Arduino UNO can handle. Yes - I could have used a different board such as the Arduino MEGA, but where is the fun in that ?? This project will teach you many things:
  • How to use an Ethernet Shield with a Temboo account to retrieve internet data
  • How to use a TFT LCD module (ITDB02-1.8SP)
  • How to reduce memory consumption when using the UTFT library
  • How to power two Arduinos with a single USB cable
  • How to transmit data from one Arduino to another (via jumper wires)
All of this and a whole lot more !!


Video

Have a look at the following video to see the project in action.


You will need to create a Temboo account to run this project:

Temboo Account Creation

Step 1:

Visit the Temboo website : https://www.temboo.com/ Create an account by entering a valid email address. Then click on the Sign Up button.


Step 2:

Verify your email address by clicking on the link provided in the email sent by Temboo.


Step 3:

You will be directed to the account setup page: Create an Account Name, and Password for future access to your Temboo Account Check the terms of service and if you agree, then tick the box Press the Go! button


Step 4:

You will then encounter the "Welcome!" screen:


Step 5:

Navigate to the top right of the screen and select the LIBRARY tab


Step 6:

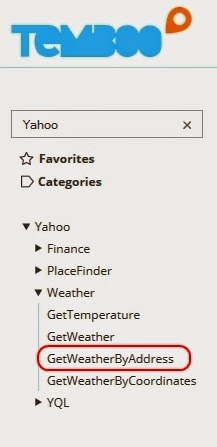
On the left hand side you will see a list of choreos. Type Yahoo into the search box on the top left of the screen. Navigate to the GetWeatherByAddress Choreo by clicking on...     Yahoo _ Weather _ GetWeatherByAddress


Step 7:

Turn the IoT Mode to ON (in the top right of screen)


Step 8:

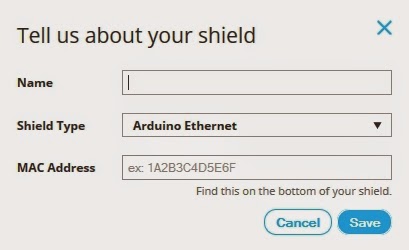
What's your platform / device? : Arduino How is it connected? : Arduino Ethernet   The following popup box will appear:


Step 9:

Name: EthernetShield - you can choose any name. Letters and numbers only. No spaces. Shield Type: Arduino Ethernet MAC Address : You can normally find the MAC address of the Ethernet shield on the underside. Enter the MAC address without the hyphens. Then click SAVE.


Step 10:

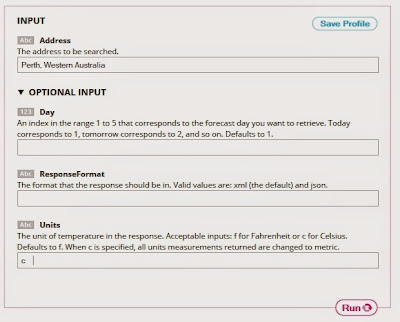
Move to the INPUT section. Enter the Address of the place you want the Temperature for. Address = Perth, Western Australia Expand the Optional INPUT for extra functionality Units = c - If you want the temperature in Celcius.


Step 11:

This will automatically generate some Arduino CODE and a HEADER FILE. Don't worry about the Arduino code for now... because I will provide that for you. However, you will need the automatically generated HEADER file. I will show you what to do with that soon. So don't lose it !'


Temboo Library Install

The Temboo library will need to be installed before you copy the Arduino code in the sections below. To install the Temboo library into your Arduino IDE, please follow the link to their instructions:   Installing the Temboo Arduino Library


UTFT Library Install

Download the UTFT library from this site: http://www.henningkarlsen.com/electronics/library.php?id=51 Once downloaded and extracted. Go into the UTFT folder and look for the memorysaver.h file. Open this file in a text editor, and "uncomment" all of the TFT modules that are not relevant to this project. I disabled all of the TFT modules except the last 3 (which made reference to ST7735) - see picture below. The TFT module we are using in this project is the ITDB02-1.8SP from ITEAD Studio. Save the memorysaver.h file, and then IMPORT the library into the Arduino IDE as per the normal library import procedure.   If you do not modify the memorysaver.h file, the Arduino SLAVE sketch will not compile.


Arduino Code (MASTER)

  This project uses 2 Arduino UNOs. One will be the Master, and one will be the Slave. The following code is for the Arduino MASTER.   Open up the Arduino IDE. (I am using Arduino IDE version 1.6) Paste the following code into the Arduino IDE code window.   PLEASE NOTE: You may need to change some of the lines to accomodate your INPUTS from step 10. Have a look around line 36 and 37.  
  1
2
3
4
5
6
7
8
9
10
11
12
13
14
15
16
17
18
19
20
21
22
23
24
25
26
27
28
29
30
31
32
33
34
35
36
37
38
39
40
41
42
43
44
45
46
47
48
49
50
51
52
53
54
55
56
57
58
59
60
61
62
63
64
65
66
67
68
69
70
71
72
73
74
75
76
77
78
79
80
81
82
83
84
85
86
87
88
89
90
91
92
93
94
95
96
97
98
99
100
101
102
103
104
105
106
107
108
109
110
111
112
113
114
115
116
117
118
119
120
121
122
123
124
125
126
127
128
129
130
131
132
132
133
134
135
136
137
138
139
140
141
142
143
144
145
146
147
148
149
150
151
152
153
154
155
156
157
158
159
160
161
162
163
164
165
166
167
168
169
170
171
172
173
174
175
176
177
178
179
180
181
182
183
184
185
186
187


/* ===============================================================================
      Project: Weather Reporter: Temboo, Ethernet, Arduino
        Title: ARDUINO MASTER: Get temperature from Yahoo using Temboo
       Author: Scott C
      Created: 27th February 2015
  Arduino IDE: 1.6.0
      Website: http://arduinobasics.blogspot.com/p/arduino-basics-projects-page.html
  Description: The following sketch was designed for the Arduino MASTER device. 
               It will retrieve temperature/weather information from Yahoo using your
               Temboo account (https://www.temboo.com/), which will then be sent to the
               Arduino Slave device to be displayed on a TFT LCD module.
               
   Libraries : Ethernet Library (that comes with Arduino IDE)
               Temboo Arduino Library - https://www.temboo.com/sdk/arduino
               
   Temboo Library installation instructions for Arduino: 
               https://www.temboo.com/arduino/others/library-installation

  You will also need to copy your Temboo Account information into a new tab and call it TembooAccount.h.
  Please follow the instructions on the ArduinoBasics blog for more information.
---------------------------------------------------------------------------------- */

#include <SPI.h>
#include <Dhcp.h>
#include <Dns.h>
#include <Ethernet.h>
#include <EthernetClient.h>
#include <Temboo.h>
#include "TembooAccount.h" // Contains Temboo account information - in a new tab.
#include <Wire.h>

byte ethernetMACAddress[] = ETHERNET_SHIELD_MAC; //ETHERNET_SHIELD_MAC variable located in TembooAccount.h
EthernetClient client;

String Address = "Perth, Western Australia"; // Find temperature for Perth, Western Australia
String Units = "c"; // Display the temperature in degrees Celcius

String ForeCastDay[7]; //String Array to hold the day of the week
String ForeCastTemp[7]; //String Array to hold the temperature for that day of week.

int counter1=0; //Counters used in FOR-LOOPS.
int counter2=0;

boolean downloadTemp = true; // A boolean variable which controls when to query Yahoo for Temperature information.


void setup() {
  Wire.begin(); // join i2c bus : Used to communicate to the Arduino SLAVE device.
 
  // Ethernet shield must initialise properly to continue with sketch.
  if (Ethernet.begin(ethernetMACAddress) == 0) {
    while(true);
  }
  
  //Provide some time to get both Arduino's ready for Temperature Query.
    delay(2000);
}


void loop() {
  if (downloadTemp) {
    downloadTemp=false; //Stop Arduino from Querying Temboo repeatedly
    getTemperature();       //Retrieve Temperature data from Yahoo
    transmitResults();      //Transmit the temperature results to the Slave Arduino
  }
}


/* This function will Query Yahoo for Temperature information (using a Temboo account) */

void getTemperature(){
    TembooChoreo GetWeatherByAddressChoreo(client);

    // Invoke the Temboo client
    GetWeatherByAddressChoreo.begin();

    // Set Temboo account credentials
    GetWeatherByAddressChoreo.setAccountName(TEMBOO_ACCOUNT); //TEMBOO_ACCOUNT variable can be found in TembooAccount.h file or tab
    GetWeatherByAddressChoreo.setAppKeyName(TEMBOO_APP_KEY_NAME); //TEMBOO_APP_KEY_NAME variable can be found in TembooAccount.h file or tab
    GetWeatherByAddressChoreo.setAppKey(TEMBOO_APP_KEY); //TEMBOO_APP_KEY variable can be found in TembooAccount.h file or tab

    // Set Choreo inputs
    GetWeatherByAddressChoreo.addInput("Units", Units); // Set the Units to Celcius
    GetWeatherByAddressChoreo.addInput("Address", Address); // Set the Weather Location to Perth, Western Australia

    // Identify the Choreo to run
    GetWeatherByAddressChoreo.setChoreo("/Library/Yahoo/Weather/GetWeatherByAddress");

    // This output filter will extract the expected temperature for today
    GetWeatherByAddressChoreo.addOutputFilter("Temperature", "/rss/channel/item/yweather:condition/@temp", "Response");
    
    // These output filters will extract the forecasted temperatures (we need to know the day and temperature for that day)
    GetWeatherByAddressChoreo.addOutputFilter("ForeCastDay", "/rss/channel/item/yweather:forecast/@day", "Response");
    GetWeatherByAddressChoreo.addOutputFilter("ForeCastHigh", "/rss/channel/item/yweather:forecast/@high", "Response");

    // Run the Choreo;
    GetWeatherByAddressChoreo.run();

    //Reset our counters before proceeding
    counter1 = 0;
    counter2 = 0;
    
    while(GetWeatherByAddressChoreo.available()) {
      // This will get the first part of the output
      String name = GetWeatherByAddressChoreo.readStringUntil('\x1F');
      name.trim(); // get rid of newlines

      // This will get the second part of the output
      String data = GetWeatherByAddressChoreo.readStringUntil('\x1E');
      data.trim(); // get rid of newlines

      //Fill the String Arrays with the Temperature/Weather data
      if (name == "Temperature") {
        ForeCastDay[counter1] = "Today";
        ForeCastTemp[counter2] = data;
        counter1++;
        counter2++;
      }
      
      if(name=="ForeCastDay"){
        ForeCastDay[counter1] = data;
        counter1++;
      }
      
      if(name=="ForeCastHigh"){
        ForeCastTemp[counter2] = data;
        counter2++;
      }
    }
  
    //Close the connection to Temboo website
    GetWeatherByAddressChoreo.close();
  }


  /* This function is used to transmit the temperature data to the Slave Arduino */
  
  void transmitResults(){
    char tempData[10];
    int tempStringLength = 0;
    
    //Modify the current temp to "Now"
    ForeCastDay[0] = "Now";
    
    //Send * to Slave Arduino to prepare for Temperature Transmission
    Wire.beginTransmission(4); // Transmit to device #4 (Slave Arduino)
    Wire.write("*");
    delay(500);
    Wire.endTransmission();
    delay(500);
    
    //Send the temperatures on the Slave Arduino to be displayed on the TFT module.
    for (int j=0; j<20; j++){
      for (int i=0; i<6; i++){
        memset(tempData,0,sizeof(tempData));   //Clear the character array
        String tempString = String(ForeCastDay[i] + "," + ForeCastTemp[i] + ".");
        tempStringLength = tempString.length();
        tempString.toCharArray(tempData, tempStringLength+1);
        Wire.beginTransmission(4); // Transmit to device #4 (Slave Arduino)
        Wire.write(tempData);
        delay(1000);
        Wire.endTransmission();
        delay(4000);
      }
    }
    
    /* ----------------------------------------------------------------------
    // You can use this to send temperature results to the Serial Monitor.
    // However, you will need a Serial.begin(9600); statement in setup().
    
    Serial.println("The Current Temperature is " + ForeCastTemp[5] + " C");
    Serial.println();
    Serial.println("The Expected Temperature for");
    for (int i=0; i<5; i++){
      Serial.println(ForeCastDay[i] + " : " + ForeCastTemp[i] + " C");
    }
    ---------------------------------------------------------- */
  }


Select "New Tab" from the drop-down menu on the top right of the IDE. Name the file: TembooAccount.h

Paste the contents of the HEADER file from the Temboo webpage (Step 11 above) into the TembooAccount.h tab. If you do not have the TembooAccount.h tab with the contents of this HEADER file next to your Arduino Master sketch, then it will NOT work.  
Make sure to SAVE the Arduino Sketch and upload the code to the Arduino (MASTER)


Arduino Code (SLAVE)

  This project uses 2 Arduino UNOs. One will be the Master, and one will be the Slave. The following code is for the Arduino SLAVE.   Make sure to disconnect the Arduino MASTER from your computer, and keep it to one side. Connect the Arduino SLAVE to your computer, and upload the following code to it. Make sure to create a new sketch for this code (File _ New).  
  1
2
3
4
5
6
7
8
9
10
11
12
13
14
15
16
17
18
19
20
21
22
23
24
25
26
27
28
29
30
31
32
33
34
35
36
37
38
39
40
41
42
43
44
45
46
47
48
49
50
51
52
53
54
55
56
57
58
59
60
61
62
63
64
65
66
67
68
69
70
71
72
73
74
75
76
77
78
79
80
81
82
83
84
85
86
87
88
89
90
91
92
93
94
95
96
97
98
99
100
101
102
103
104
105
106
107
108
109
110
111
112
113
114
115
116
117
118
119
120
121
122
123
124
125
126
127
128
129
130
131
132
133
134
135
136
137
138
139
140
141
142
143
144
145
146
147
148
149
150
151
152
153
154
155
156
157
158
159
160
161
162
163
164
165
166
167
168
169
170
171
172
173
174
175
176
177
178
179
180
181
182
183
184
185
186
187
188
189
190
191
192
193
194
195
196
197


/* ===============================================================================
      Project: Weather Reporter: Temboo, Ethernet, Arduino
        Title: ARDUINO SLAVE: Display temperature on TFT LCD Module
       Author: Scott C
      Created: 27th February 2015
  Arduino IDE: 1.6.0
      Website: http://arduinobasics.blogspot.com/p/arduino-basics-projects-page.html
  Description: The following sketch was designed for the Arduino SLAVE device. 
               It will receive temperature information from the Arduino MASTER
               and then display this information on the ITDB02-1.8SP TFT LCD 
               Module. Please read the important notes below.

----------------------------------------------------------------------------------
NOTES:
This sketch makes use of the UTFT.h library from : 
http://www.henningkarlsen.com/electronics/library.php?id=51
Please note: You will need to modify the memorysaver.h file in the UTFT folder 
with a text editor to disable any unused TFT modules. This will save memory, 
and allow you to run this sketch on an Arduino UNO. I disabled all TFT modules in
that file except the last 3 (which made reference to ST7735).
I used a ITDB02-1.8SP TFT LCD Module from ITEAD Studio.
PinOut:

Arduino SLAVE      ITDB02-1.8SP TFT
         3.3V ---- VDD33
 Digital9 (D9)---- CS
 Digital8 (D8)---- SCL
 Digital7 (D7)---- SDA
 Digital6 (D6)---- RS
 Digital5 (D5)---- RST
          GND ---- GND
           5V ---- VIN

Usage: UTFT myGLCD(<model code>, SDA, SCL, CS, RST, RS);
Example: UTFT myGLCD(ITDB18SP,7,8,9,5,6);

-----------------------------------------------------------------------------------
This sketch also makes use of the Wire.h library. 
The Wire.h library comes with the Arduino IDE.
This enables communication between Arduino Master and Arduino Slave.
PinOut:

Arduino MASTER      Arduino SLAVE
   Analog4(A4) ---- Analog4 (A4) 
   Analog5(A5) ---- Analog5 (A5) 
           GND ---- GND

-----------------------------------------------------------------------------------
The Arduino Slave is powered by the Arduino Master:
PinOut:

Arduino MASTER      Arduino SLAVE
            5V ---- VIN

==================================================================================
*/

#include <UTFT.h>
#include <Wire.h>

//Declare all of the fonts
extern uint8_t SmallFont[];
extern uint8_t BigFont[];
extern uint8_t SevenSegNumFont[];

// Usage: UTFT myGLCD(<model code>, SDA, SCL, CS, RST, RS);
UTFT myGLCD(ITDB18SP,7,8,9,5,6);

boolean tempDisplay = false; //Helps with processing the data from the Arduino MASTER
boolean readTemp = false; //Helps to differentiate the day from the temperature values
String dayOfWeek=""; //Variable used to hold the Day of the Week
String tempReading=""; //Variable used to hold the Temperature for that day

String Units = "'C "; //Display Temperature in Celcius
String Address = "Perth, WA"; //Address to show at top of Display


void setup(){
  // Initialise the TFT LCD
  myGLCD.InitLCD();
  initialiseLCD();
  delay(5000);
  
  //Setup the Serial communication between the Arduino MASTER and SLAVE
  Wire.begin(4); // join i2c bus with address #4
  Wire.onReceive(receiveEvent); // register event
}


void loop(){
  delay(50);
}


/*
  This function initialises the TFT LCD, and draws the initial screen.
*/
void initialiseLCD(){
  //Clear the screen
  myGLCD.clrScr();
  
  //Draw the borders (top and bottom)
  myGLCD.setColor(25, 35, 4);
  myGLCD.fillRect(0, 0, 159, 13);
  myGLCD.fillRect(0, 114, 159, 127);
  myGLCD.drawLine(0,18,159,18);
  myGLCD.drawLine(0,109,159,109);
  
  //Header and Footer Writing
  myGLCD.setColor(255, 255, 255);
  myGLCD.setBackColor(25, 35, 4);
  myGLCD.setFont(SmallFont);
  myGLCD.print("arduinobasics", CENTER, 1);
  myGLCD.print("blogspot.com", CENTER, 114);
}


/* This function executes whenever data is received from Arduino master
   It will ignore all data from the Master until it receives a '*' character.
   Once this character is received, it will call the receiveTemp() function
   in order to receive Temperature data from the Arduino Master.
*/
void receiveEvent(int howMany){
  if(tempDisplay){
    receiveTemp();
  }else{
    while(0 < Wire.available()){
      char c = Wire.read(); // receive byte as a character
      if(c=='*'){ // Searching for a '*' character
        tempDisplay=true; // If '*' received, then call receiveTemp() function
      }
    }
  }
}


/* This function is used to receive and process the Temperature data 
   from the Arduino Master and pass it on to the  displayTemp() funtion.
*/
void receiveTemp(){
  tempReading="";
  dayOfWeek = "";
  
  while(0 < Wire.available()){
    char c = Wire.read(); // receive byte as a character
    if(readTemp){
      if(c=='.'){ // If a . is detected. It is the end of the line.
        readTemp=false;
      }else{
        tempReading=tempReading+c;
      }
    }else{
      if(c==','){
      } else {
        dayOfWeek=dayOfWeek+c;
      }
    }
    if(c==','){
      readTemp=true;
    }
  }
  displayTemp();
}


/*
  Display the Temperature readings on the TFT LCD screen.
*/
void displayTemp(){
  //Clear the writing on top and bottom of screen
  myGLCD.setColor(25, 35, 4);
  myGLCD.fillRect(0, 0, 159, 13);
  myGLCD.fillRect(0, 114, 159, 127);
  
  //Small writing on top and bottom of screen
  myGLCD.setColor(255, 255, 255);
  myGLCD.setBackColor(25, 35, 4);
  myGLCD.setFont(SmallFont);
  myGLCD.print(Address, CENTER, 1);
  myGLCD.print(dayOfWeek, CENTER, 114);
  
  //Write the big temperature reading in middle of screen
  myGLCD.setBackColor(0, 0, 0);
  myGLCD.setFont(SevenSegNumFont);
  myGLCD.print(tempReading, CENTER, 40);
  
  //Write the Units next to the temperature reading
  myGLCD.setFont(BigFont);
  myGLCD.print(Units, RIGHT, 40);
}


Wiring it up

Once the code has been uploaded to both Arduinos (Master and Slave), I tend to label each Arduino so that I don't mix them up. You will notice an 'S' marked on the SLAVE in some of the photos/videos. Then it is time to piggy-back the shields onto the Arduinos and wire them up. Make sure you disconnect the USB cable from the Arduinos before you start doing this.


Step 1: Ethernet Shield

Place the Ethernet shield onto the Arduino MASTER. Connect an Ethernet cable (RJ45) to the Ethernet shield. The other end will connect to your internet router.


Step 2: Arduino SLAVE and TFT LCD module

 
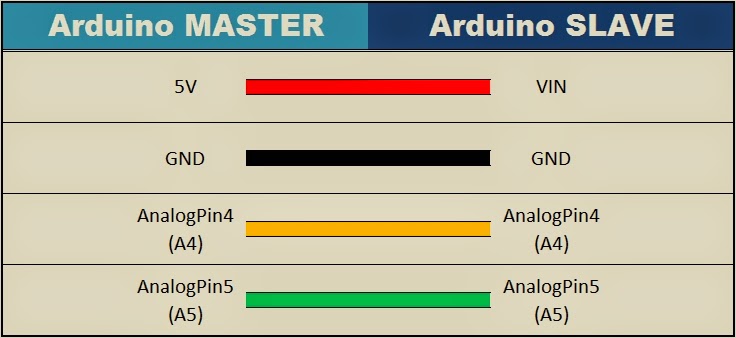
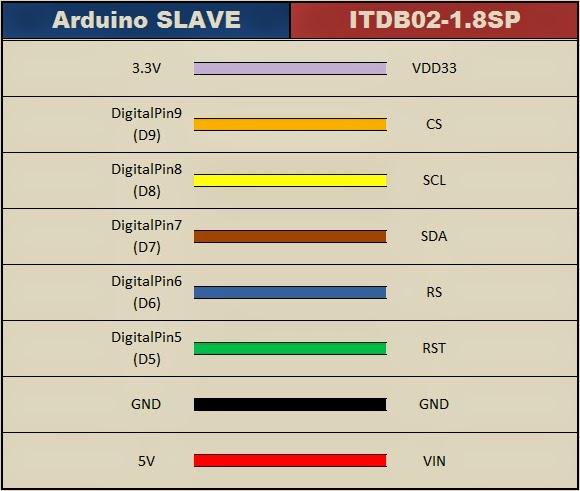
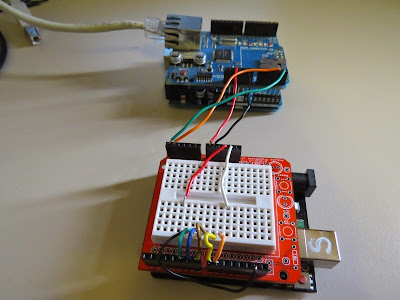
You can either wire up the TFT LCD module on a breadboard, or you can use a ProtoShield with mini-breadboard. It doesn't really matter how you hook it up, but make sure you double check the connections and the TFT specifications before you power it up. I have powered the Arduino Slave by connecting it to the Arduino Master (see fritzing sketch below).  
There is no reason why you couldn't just power the slave seperately. In fact this is probably the safer option. But I read that this power-sharing setup was ok, so I wanted to give it a go. I have no idea whether it would be suitable for a long term power project... so use it at your own risk. I tried using 4 x AA batteries to power this circuit, but found that the LCD screen would flicker. So then I tried a 9V battery, and noticed that the 5V voltage regulator was heating up more than I felt comfortable with. In the end, I settled with the USB option, and had no further issues. I am sure there are other possible options, and feel free to mention them in the comments below.  
Use the following fritzing sketch and tables to help you wire this circuit up.


Fritzing sketch


Arduino MASTER to SLAVE connection table


Arduino SLAVE to ITDB02-1.8SP TFT LCD


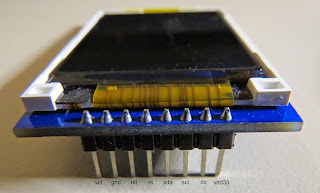
ITDB02-1.8SP TFT LCD Module Pictures


Project Pictures


If you like this page, please do me a favour and show your appreciation :

 
Visit my ArduinoBasics Google + page.
Follow me on Twitter by looking for ScottC @ArduinoBasics.
Have a look at my videos on my YouTube channel.


However, if you do not have a google profile...
Feel free to share this page with your friends in any way you see fit.

Arduino Tutorials – Chapter 16 – Ethernet

Learn how to connect your Arduino to the outside world via Ethernet

This is chapter sixteen of our huge Arduino tutorial seriesUpdated 06/12/2013

In this chapter we will introduce and examine the use of Ethernet networking with Arduino over local networks and the greater Internet. It will be assumed that you have a basic understanding of computer networking, such as the knowledge of how to connect computers to a hub/router with RJ45 cables, what an IP and MAC address is, and so on. Furthermore, here is a good quick rundown about Ethernet.

Getting Started

You will need an Arduino Uno or compatible board with an Ethernet shield that uses the W5100 Ethernet controller IC (pretty much all of them):

…or consider using a Freetronics EtherTen – as it has everything all on the one board, plus some extras:

Furthermore you will need to power the board via the external DC socket – the W5100 IC uses more current than the USB power can supply. A 9V 1A plug pack/wall wart will suffice. Finally it does get hot – so be careful not to touch the W5100 after extended use. In case you’re not sure – this is the W5100 IC:

Once you have your Ethernet-enabled Arduino, and have the external power connected – it’s a good idea to check it all works. Open the Arduino IDE and selectFile > Examples > Ethernet > Webserver. This loads a simple sketch which will display data gathered from the analogue inputs on a web browser. However don’t upload it yet, it needs a slight modification.

You need to specify the IP address of the Ethernet shield – which is done inside the sketch. This is simple, go to the line:

IPAddress ip(192,168,1, 177);

And alter it to match your own setup. For example, in my home the router’s IP address is 10.1.1.1, the printer is 10.1.1.50 and all PCs are below …50. So I will set my shield IP to 10.1.1.77 by altering the line to:

IPAddress ip(10,1,1,77);

You also have the opportunity to change your MAC address. Each piece of networking equipment has a unique serial number to identify itself over a network, and this is normall hard-programmed into the equipments’ firmware. However with Arduino we can define the MAC address ourselves.

If you are running more than one Ethernet shield on your network, ensure they have different MAC addresses by altering the hexadecimal values in the line:

byte mac[] = { 0xDE, 0xAD, 0xBE, 0xEF, 0xFE, 0xED };

However if you only have one shield just leave it be. There may be the very, very, statistically rare chance of having a MAC address the same as your existing hardware, so that would be another time to change it.

Once you have made your alterations, save and upload the sketch. Now open a web browser and navigate to the IP address you entered in the sketch, and you should be presented with something similar to the following:


What’s happening? The Arduino has been programmed to offer a simple web page with the values measured by the analogue inputs. You can refresh the browser to get updated values.

At this point – please note that the Ethernet shields use digital pins 10~13, so you can’t use those for anything else. Some Arduino Ethernet shields may also have a microSD card socket, which also uses another digital pin – so check with the documentation to find out which one.

Nevertheless, now that we can see the Ethernet shield is working we can move on to something more useful. Let’s dissect the previous example in a simple way, and see how we can distribute and display more interesting data over the network. For reference, all of the Ethernet-related functions are handled by the Ethernet Arduino library. If you examine the previous sketch we just used, the section that will be of interest is:

 for (int analogChannel = 0; analogChannel < 6; analogChannel++) 
          {
            int sensorReading = analogRead(analogChannel);
            client.print("analog input ");
            client.print(analogChannel);
            client.print(" is ");
            client.print(sensorReading);
            client.println("<br />");       
          }
          client.println("</html>");

Hopefully this section of the sketch should be familiar – remember how we have used serial.print(); in the past when sending data to the serial monitor box? Well now we can do the same thing, but sending data from our Ethernet shield back to a web browser – on other words, a very basic type of web page.

However there is something you may or may not want to  learn in order to format the output in a readable format – HTML code. I am not a website developer (!) so will not delve into HTML too much.

However if you wish to serve up nicely formatted web pages with your Arduino and so on, here would be a good start. In the interests of simplicity, the following two functions will be the most useful:

client.print(" is ");

Client.print (); allows us to send text or data back to the web page. It works in the same way as serial.print(), so nothing new there. You can also specify the data type in the same way as with serial.print(). Naturally you can also use it to send data back as well. The other useful line is:

client.println("<br />");

which sends the HTML code back to the web browser telling it to start a new line. The part that actually causes the carriage return/new line is the <br /> which is an HTML code (or “tag”) for a new line. So if you are creating more elaborate web page displays, you can just insert other HTML tags in the client.print(); statement. If you want to learn more about HTML commands, here’s a good tutorial site. Finally – note that the sketch will only send the data when it has been requested, that is when it has received a request from the web browser.

Accessing your Arduino over the Internet

So far – so good. But what if you want to access your Arduino from outside the local network?

You will need a static IP address – that is, the IP address your internet service provider assigns to your connection needs to stay the same. If you don’t have a static IP, as long as you leave your modem/router permanently swiched on your IP shouldn’t change. However that isn’t an optimal solution.

If your ISP cannot offer you a static IP at all, you can still move forward with the project by using an organisation that offers a Dynamic DNS. These organisations offer you your own static IP host name (e.g. mojo.monkeynuts.com) instead of a number, keep track of your changing IP address and linking it to the new host name. From what I can gather, your modem needs to support (have an in-built client for…) these DDNS services. As an example, two companies are No-IP andDynDNS.com. Please note that I haven’t used those two, they are just offered as examples.

Now, to find your IP address… usually this can be found by logging into your router’s administration page – it is usually 192.168.0.1 but could be different. Check with your supplier or ISP if they supplied the hardware. For this example, if I enter 10.1.1.1 in a web browser, and after entering my modem administration password, the following screen is presented:

What you are looking for is your WAN IP address, as you can see in the image above. To keep the pranksters away, I have blacked out some of my address.

The next thing to do is turn on port-forwarding. This tells the router where to redirect incoming requests from the outside world. When the modem receives such a request, we want to send that request to the port number of our Ethernet shield. Using the:

EthernetServer server(125);

function in our sketch has set the port number to 125. Each modem’s configuration screen will look different, but as an example here is one:

So you can see from the line number one in the image above, the inbound port numbers have been set to 125, and the IP address of the Ethernet shield has been set to 10.1.1.77 – the same as in the sketch.

After saving the settings, we’re all set. The external address of my Ethernet shield will be the WAN:125, so to access the Arduino I will type my WAN address with :125 at the end into the browser of the remote web device, which will contact the lonely Ethernet hardware back home.

Furthermore, you may need to alter your modem’s firewall settings, to allow the port 125 to be “open” to incoming requests. Please check your modem documentation for more information on how to do this.

Now from basically any Internet connected device in the free world, I can enter my WAN and port number into the URL field and receive the results. For example, from a phone when it is connected to the Internet via LTE mobile data:

So at this stage you can now display data on a simple web page created by your Arduino and access it from anywhere with unrestricted Internet access. With your previous Arduino knowledge (well, this is chapter sixteen) you can now use data from sensors or other parts of a sketch and display it for retrieval.

Displaying sensor data on a web page

As an example of displaying sensor data on a web page, let’s use an inexpensive and popular temperature and humidity sensor – the DHT22. You will need to install the DHT22 Arduino library which can be found on this page. If this is your first time with the DHT22, experiment with the example sketch that’s included with the library so you understand how it works.

Connect the DHT22 with the data pin to Arduino D2, Vin to the 5V pin and GND to … GND:

Now for our sketch – to display the temperature and humidity on a web page. If you’re not up on HTML you can use online services such as this to generate the code, which you can then modify to use in the sketch.

In the example below, the temperature and humidity data from the DHT22 is served in a simple web page:

#include <SPI.h>
#include <Ethernet.h>

// for DHT22 sensor
#include "DHT.h"
#define DHTPIN 2
#define DHTTYPE DHT22

// Enter a MAC address and IP address for your controller below.
// The IP address will be dependent on your local network:
byte mac[] = {   0xDE, 0xAD, 0xBE, 0xEF, 0xFE, 0xED };
IPAddress ip(10,1,1,77);

// Initialize the Ethernet server library
// with the IP address and port you want to use 
// (port 80 is default for HTTP):
EthernetServer server(125);
DHT dht(DHTPIN, DHTTYPE);

void setup() 
{
  dht.begin();
 // Open serial communications and wait for port to open:
  Serial.begin(9600);
   while (!Serial) {
    ; // wait for serial port to connect. Needed for Leonardo only
  }
  // start the Ethernet connection and the server:
  Ethernet.begin(mac, ip);
  server.begin();
  Serial.print("server is at ");
  Serial.println(Ethernet.localIP());
}

void loop() 
{
  // listen for incoming clients
  EthernetClient client = server.available();
  if (client) {
    Serial.println("new client");
    // an http request ends with a blank line
    boolean currentLineIsBlank = true;
    while (client.connected()) {
      if (client.available()) {
        char c = client.read();
        Serial.write(c);
        // if you've gotten to the end of the line (received a newline
        // character) and the line is blank, the http request has ended,
        // so you can send a reply
        if (c == 'n' && currentLineIsBlank) 
        {
          // send a standard http response header
          client.println("HTTP/1.1 200 OK");
          client.println("Content-Type: text/html");
          client.println("Connection: close");  // the connection will be closed after completion of the response
	  client.println("Refresh: 30");  // refresh the page automatically every 30 sec
          client.println();
          client.println("<!DOCTYPE HTML>");
          client.println("<html>");

          // get data from DHT22 sensor
          float h = dht.readHumidity();
          float t = dht.readTemperature();
          Serial.println(t);
          Serial.println(h);

          // from here we can enter our own HTML code to create the web page
          client.print("<head><title>Office Weather</title></head><body><h1>Office Temperature</h1><p>Temperature - ");
          client.print(t);
          client.print(" degrees Celsius</p>");
          client.print("<p>Humidity - ");
          client.print(h);
          client.print(" percent</p>");
          client.print("<p><em>Page refreshes every 30 seconds.</em></p></body></html>");
          break;
        }
        if (c == 'n') {
          // you're starting a new line
          currentLineIsBlank = true;
        } 
        else if (c != 'r') {
          // you've gotten a character on the current line
          currentLineIsBlank = false;
        }
      }
    }
    // give the web browser time to receive the data
    delay(1);
    // close the connection:
    client.stop();
    Serial.println("client disonnected");
  }
}

It is a modification of the IDE’s webserver example sketch that we used previously – with a few modifications. First, the webpage will automatically refresh every 30 seconds – this parameter is set in the line:

client.println("Refresh: 30");  // refresh the page automatically every 30 sec

… and the custom HTML for our web page starts below the line:

// from here we can enter our own HTML code to create the web page

You can then simply insert the required HTML inside client.print() functions to create the layout you need.

Finally – here’s an example screen shot of the example sketch at work:

You now have the framework to create your own web pages that can display various data processed with your Arduino.

Remote control your Arduino from afar

We have a separate tutorial on this topic, that uses the teleduino system.

Conclusion

So there you have it, another useful way to have your Arduino interact with the outside world. Stay tuned for upcoming Arduino tutorials by subscribing to the blog, RSS feed (top-right), twitter or joining our Google Group. And if you enjoyed the tutorial, or want to introduce someone else to the interesting world of Arduino – check out my book (now in a third printing!) “Arduino Workshop” from No Starch Press.

Arduino Tutorials – Chapter 16 – Ethernet

Learn how to connect your Arduino to the outside world via Ethernet

This is chapter sixteen of our huge Arduino tutorial seriesUpdated 06/12/2013

In this chapter we will introduce and examine the use of Ethernet networking with Arduino over local networks and the greater Internet. It will be assumed that you have a basic understanding of computer networking, such as the knowledge of how to connect computers to a hub/router with RJ45 cables, what an IP and MAC address is, and so on. Furthermore, here is a good quick rundown about Ethernet.

Getting Started

You will need an Arduino Uno or compatible board with an Ethernet shield that uses the W5100 Ethernet controller IC (pretty much all of them):

…or consider using a Freetronics EtherTen – as it has everything all on the one board, plus some extras:

Furthermore you will need to power the board via the external DC socket – the W5100 IC uses more current than the USB power can supply. A 9V 1A plug pack/wall wart will suffice. Finally it does get hot – so be careful not to touch the W5100 after extended use. In case you’re not sure – this is the W5100 IC:

Once you have your Ethernet-enabled Arduino, and have the external power connected – it’s a good idea to check it all works. Open the Arduino IDE and selectFile > Examples > Ethernet > Webserver. This loads a simple sketch which will display data gathered from the analogue inputs on a web browser. However don’t upload it yet, it needs a slight modification.

You need to specify the IP address of the Ethernet shield – which is done inside the sketch. This is simple, go to the line:

IPAddress ip(192,168,1, 177);

And alter it to match your own setup. For example, in my home the router’s IP address is 10.1.1.1, the printer is 10.1.1.50 and all PCs are below …50. So I will set my shield IP to 10.1.1.77 by altering the line to:

IPAddress ip(10,1,1,77);

You also have the opportunity to change your MAC address. Each piece of networking equipment has a unique serial number to identify itself over a network, and this is normall hard-programmed into the equipments’ firmware. However with Arduino we can define the MAC address ourselves.

If you are running more than one Ethernet shield on your network, ensure they have different MAC addresses by altering the hexadecimal values in the line:

byte mac[] = { 0xDE, 0xAD, 0xBE, 0xEF, 0xFE, 0xED };

However if you only have one shield just leave it be. There may be the very, very, statistically rare chance of having a MAC address the same as your existing hardware, so that would be another time to change it.

Once you have made your alterations, save and upload the sketch. Now open a web browser and navigate to the IP address you entered in the sketch, and you should be presented with something similar to the following:


What’s happening? The Arduino has been programmed to offer a simple web page with the values measured by the analogue inputs. You can refresh the browser to get updated values.

At this point – please note that the Ethernet shields use digital pins 10~13, so you can’t use those for anything else. Some Arduino Ethernet shields may also have a microSD card socket, which also uses another digital pin – so check with the documentation to find out which one.

Nevertheless, now that we can see the Ethernet shield is working we can move on to something more useful. Let’s dissect the previous example in a simple way, and see how we can distribute and display more interesting data over the network. For reference, all of the Ethernet-related functions are handled by the Ethernet Arduino library. If you examine the previous sketch we just used, the section that will be of interest is:

for (int analogChannel = 0; analogChannel < 6; analogChannel++) 
          {
            int sensorReading = analogRead(analogChannel);
            client.print("analog input ");
            client.print(analogChannel);
            client.print(" is ");
            client.print(sensorReading);
            client.println("<br />");       
          }
          client.println("</html>");

Hopefully this section of the sketch should be familiar – remember how we have used serial.print(); in the past when sending data to the serial monitor box? Well now we can do the same thing, but sending data from our Ethernet shield back to a web browser – on other words, a very basic type of web page.

However there is something you may or may not want to  learn in order to format the output in a readable format – HTML code. I am not a website developer (!) so will not delve into HTML too much.

However if you wish to serve up nicely formatted web pages with your Arduino and so on, here would be a good start. In the interests of simplicity, the following two functions will be the most useful:

client.print(" is ");

Client.print (); allows us to send text or data back to the web page. It works in the same way as serial.print(), so nothing new there. You can also specify the data type in the same way as with serial.print(). Naturally you can also use it to send data back as well. The other useful line is:
client.println("<br />");

which sends the HTML code back to the web browser telling it to start a new line. The part that actually causes the carriage return/new line is the <br /> which is an HTML code (or “tag”) for a new line. So if you are creating more elaborate web page displays, you can just insert other HTML tags in the client.print(); statement. If you want to learn more about HTML commands, here’s a good tutorial site. Finally – note that the sketch will only send the data when it has been requested, that is when it has received a request from the web browser.

Accessing your Arduino over the Internet

So far – so good. But what if you want to access your Arduino from outside the local network?

You will need a static IP address – that is, the IP address your internet service provider assigns to your connection needs to stay the same. If you don’t have a static IP, as long as you leave your modem/router permanently swiched on your IP shouldn’t change. However that isn’t an optimal solution.

If your ISP cannot offer you a static IP at all, you can still move forward with the project by using an organisation that offers a Dynamic DNS. These organisations offer you your own static IP host name (e.g. mojo.monkeynuts.com) instead of a number, keep track of your changing IP address and linking it to the new host name. From what I can gather, your modem needs to support (have an in-built client for…) these DDNS services. As an example, two companies are No-IP andDynDNS.com. Please note that I haven’t used those two, they are just offered as examples.

Now, to find your IP address… usually this can be found by logging into your router’s administration page – it is usually 192.168.0.1 but could be different. Check with your supplier or ISP if they supplied the hardware. For this example, if I enter 10.1.1.1 in a web browser, and after entering my modem administration password, the following screen is presented:

What you are looking for is your WAN IP address, as you can see in the image above. To keep the pranksters away, I have blacked out some of my address.

The next thing to do is turn on port-forwarding. This tells the router where to redirect incoming requests from the outside world. When the modem receives such a request, we want to send that request to the port number of our Ethernet shield. Using the:

EthernetServer server(125);

function in our sketch has set the port number to 125. Each modem’s configuration screen will look different, but as an example here is one:

So you can see from the line number one in the image above, the inbound port numbers have been set to 125, and the IP address of the Ethernet shield has been set to 10.1.1.77 – the same as in the sketch.

After saving the settings, we’re all set. The external address of my Ethernet shield will be the WAN:125, so to access the Arduino I will type my WAN address with :125 at the end into the browser of the remote web device, which will contact the lonely Ethernet hardware back home.

Furthermore, you may need to alter your modem’s firewall settings, to allow the port 125 to be “open” to incoming requests. Please check your modem documentation for more information on how to do this.

Now from basically any Internet connected device in the free world, I can enter my WAN and port number into the URL field and receive the results. For example, from a phone when it is connected to the Internet via LTE mobile data:

So at this stage you can now display data on a simple web page created by your Arduino and access it from anywhere with unrestricted Internet access. With your previous Arduino knowledge (well, this is chapter sixteen) you can now use data from sensors or other parts of a sketch and display it for retrieval.

Displaying sensor data on a web page

As an example of displaying sensor data on a web page, let’s use an inexpensive and popular temperature and humidity sensor – the DHT22. You will need to install the DHT22 Arduino library which can be found on this page. If this is your first time with the DHT22, experiment with the example sketch that’s included with the library so you understand how it works.

Connect the DHT22 with the data pin to Arduino D2, Vin to the 5V pin and GND to … GND:

Now for our sketch – to display the temperature and humidity on a web page. If you’re not up on HTML you can use online services such as this to generate the code, which you can then modify to use in the sketch.

In the example below, the temperature and humidity data from the DHT22 is served in a simple web page:

#include <SPI.h>
#include <Ethernet.h>

// for DHT22 sensor
#include "DHT.h"
#define DHTPIN 2
#define DHTTYPE DHT22

// Enter a MAC address and IP address for your controller below.
// The IP address will be dependent on your local network:
byte mac[] = {   0xDE, 0xAD, 0xBE, 0xEF, 0xFE, 0xED };
IPAddress ip(10,1,1,77);

// Initialize the Ethernet server library
// with the IP address and port you want to use 
// (port 80 is default for HTTP):
EthernetServer server(125);
DHT dht(DHTPIN, DHTTYPE);

void setup() 
{
  dht.begin();
 // Open serial communications and wait for port to open:
  Serial.begin(9600);
   while (!Serial) {
    ; // wait for serial port to connect. Needed for Leonardo only
  }
  // start the Ethernet connection and the server:
  Ethernet.begin(mac, ip);
  server.begin();
  Serial.print("server is at ");
  Serial.println(Ethernet.localIP());
}

void loop() 
{
  // listen for incoming clients
  EthernetClient client = server.available();
  if (client) {
    Serial.println("new client");
    // an http request ends with a blank line
    boolean currentLineIsBlank = true;
    while (client.connected()) {
      if (client.available()) {
        char c = client.read();
        Serial.write(c);
        // if you've gotten to the end of the line (received a newline
        // character) and the line is blank, the http request has ended,
        // so you can send a reply
        if (c == '\n' && currentLineIsBlank) 
        {
          // send a standard http response header
          client.println("HTTP/1.1 200 OK");
          client.println("Content-Type: text/html");
          client.println("Connection: close");  // the connection will be closed after completion of the response
	  client.println("Refresh: 30");  // refresh the page automatically every 30 sec
          client.println();
          client.println("<!DOCTYPE HTML>");
          client.println("<html>");

          // get data from DHT22 sensor
          float h = dht.readHumidity();
          float t = dht.readTemperature();
          Serial.println(t);
          Serial.println(h);

          // from here we can enter our own HTML code to create the web page
          client.print("<head><title>Office Weather</title></head><body><h1>Office Temperature</h1><p>Temperature - ");
          client.print(t);
          client.print(" degrees Celsius</p>");
          client.print("<p>Humidity - ");
          client.print(h);
          client.print(" percent</p>");
          client.print("<p><em>Page refreshes every 30 seconds.</em></p></body></html>");
          break;
        }
        if (c == '\n') {
          // you're starting a new line
          currentLineIsBlank = true;
        } 
        else if (c != '\r') {
          // you've gotten a character on the current line
          currentLineIsBlank = false;
        }
      }
    }
    // give the web browser time to receive the data
    delay(1);
    // close the connection:
    client.stop();
    Serial.println("client disonnected");
  }
}

It is a modification of the IDE’s webserver example sketch that we used previously – with a few modifications. First, the webpage will automatically refresh every 30 seconds – this parameter is set in the line:

client.println("Refresh: 30");  // refresh the page automatically every 30 sec

… and the custom HTML for our web page starts below the line:

// from here we can enter our own HTML code to create the web page

You can then simply insert the required HTML inside client.print() functions to create the layout you need.

Finally – here’s an example screen shot of the example sketch at work:

You now have the framework to create your own web pages that can display various data processed with your Arduino.

Remote control your Arduino from afar

We have a separate tutorial on this topic, that uses the teleduino system.

Conclusion

So there you have it, another useful way to have your Arduino interact with the outside world. Stay tuned for upcoming Arduino tutorials by subscribing to the blog, RSS feed (top-right), twitter or joining our Google Group. And if you enjoyed the tutorial, or want to introduce someone else to the interesting world of Arduino – check out my book (now in a third printing!) “Arduino Workshop” from No Starch Press.

The post Arduino Tutorials – Chapter 16 – Ethernet appeared first on tronixstuff.

Cryoscope gadget simulates tomorrow's weather today (video)

This multi-layered device can't shower you with hail or tan your outdoor-deprived complexion, regrettably. What it can do though, is deliver a direct haptic sensation of how warm or cold it'll be tomorrow, just in case you decide to venture out of your bedroom. An Arduino controller pulls in forecast data from the web and uses it to adjust a Peltier element and a cooling fan, which are housed along with a heat sink inside a neat and tactile aluminum box. The Cryoscope is the handiwork of industrial design student Robb Godshaw, and it's the reason he already knew he'd be wearing a skinny t-shirt and stripey socks in the video after the break.

Continue reading Cryoscope gadget simulates tomorrow's weather today (video)

Cryoscope gadget simulates tomorrow's weather today (video) originally appeared on Engadget on Mon, 06 Feb 2012 08:28:00 EST. Please see our terms for use of feeds.

Permalink | Email this | Comments

How to connect a weather station WS2355 (or WS2300) to Weather Underground with Arduino

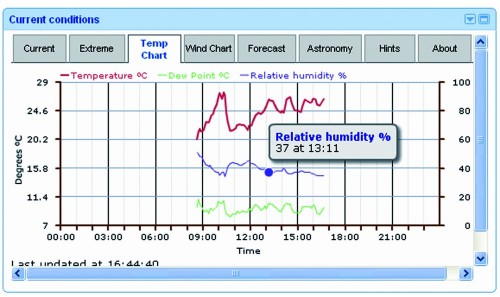
Our weather station LIVE
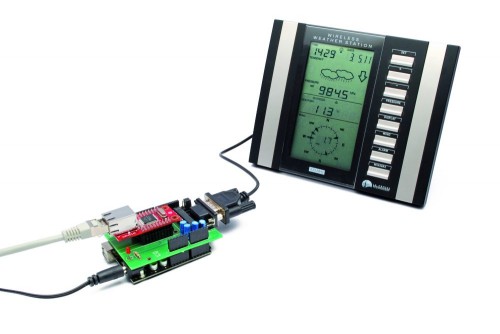
 

There are several softwares that enable the publication of the weather data of a professional weather station, but they all work on PC, so we should connect the weather station to a computer and leave it on, the idea is not good because the computer takes up space and consumes a lot. At a time when we should spare the energy, its not a good thing.
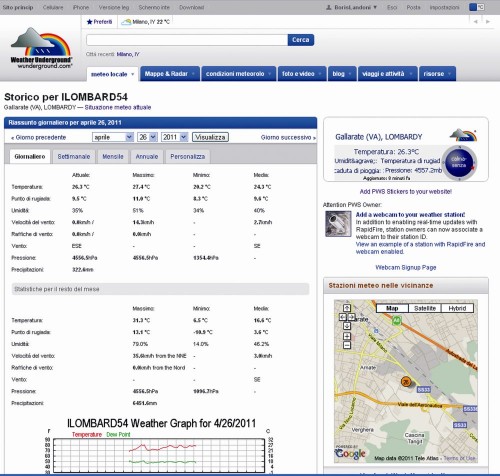
The project we’re talking about instead operates as a stand-alone application and allows you to publish the weather station data independently on http://www.wunderground.com, “forgetting” the PC consumption and even the desk space.
Arduino controls the dialogue with the weather station to acquire the data and also the Ethernet interface to transfer them, by making the necessary connection to the Internet via ADSL, passing by a router pointing to the IP address of the Weather Underground site and transferring information using the TCP / IP.


Our project

This circuit reads data from a weather station with serial interface and upload the data collected on http://www.wunderground.com.
Not all stations are equal, therefore, our circuit can not be universal but it is indicated specifically for stations La Crosse WS2355, WS2300 or WS2350.

The choice of weather station WS23xx was dictated primarily by a consideration: it has a convenient serial interface to connect and dialogue with a microcontroller such as Arduino.
We chose www.wunderground.com site because it allows anyone to upload their weather data, but also to monitor the temperature, humidity, pressure, wind etc. on line. Also on this site there are many widgets that allow you to integrate data in website or blog.
An example is the Widget for the home page of Google.
The data sent by users are publicly available, then from the home page we can specify the geographic area that interests us and we will see a screen that lists all of the corresponding stations.
How does it work?
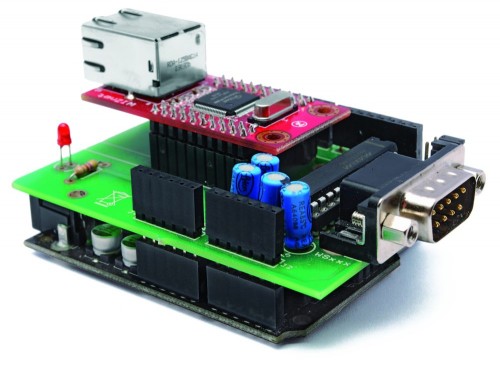
The system has two circuit: one is the famous Arduino UNO and the other is a shield that integrates the Ethernet module WIZnet (you may, of course, use the the original Ethernet Shield), as well as a TTL/RS232 logic level converter MAX238 type. The converter allows you to adapt the serial levels of weather station to the TTL levels of Arduino.
Please be aware that the communication port of the weather station is not a simple RS232, because it has no ground reference. The DTR line must have a negative voltage while the RTS must be positive. The lack of common ground leads to the hypothesis (remember that there is no official document) that these two lines are taken as a reference of logic levels used in communication. It is a system that not only allows the use of serial connections relatively long, but also gives the opportunity to agree devices with different voltage levels on the serial port.
To communicate with La Crosse, the speed of the serial device (in our case, the Arduino module) must be set to 2,400 bps, with blocks of 8 bits, no parity and one stop bit (2400-8-N-1).
The memory map of the weather station, like many other unofficial information on the WS2355 is on the site http://www.lavrsen.dk/foswiki/bin/view/Open2300/WebHome.


The hardware
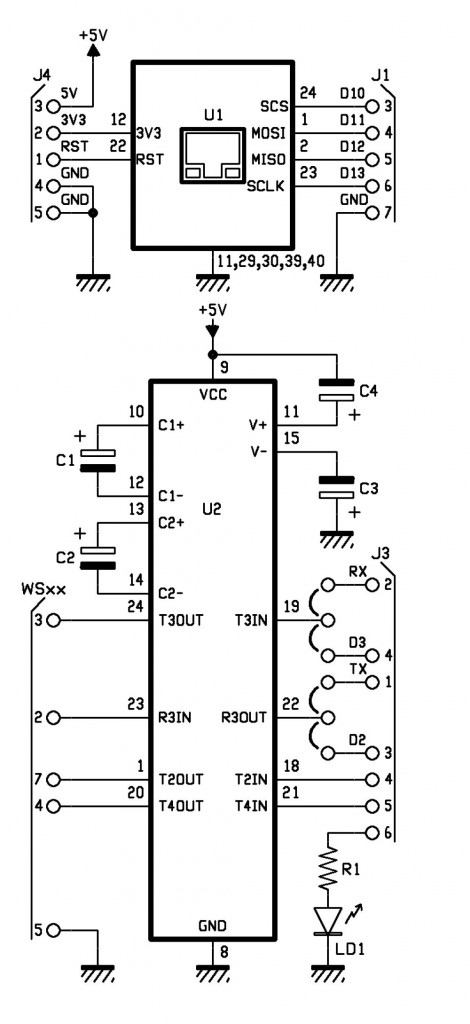
The jumpers on the lines T3IN and R3OUT (respectively RS232/TTL converter output and RS232/TTL converter input) let you choose which lines use for Arduino communication: we give you the opportunity to choose if use the serial hardware TXD and RXD or the two I/O digital D2 and D3 emulating a serial port with the appropriate library that can be downloaded from the website http://arduiniana.org/libraries/newsoftserial.
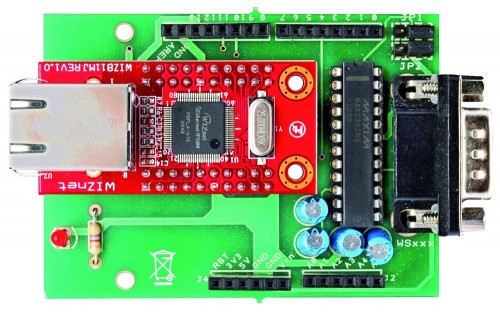
 

R1: 470 ohm
C1: 1 µF 100 VL
C2: 1 µF 100 VL
C3: 1 µF 100 VL
C4: 1 µF 100 VL
U1: WIZNET
U2: MAX238CNG
LD1: led 3 mm red

- socket 12+12
- Strip male 3 via (2 pz.)
- Jumper (2 pz.)
- Strip female/male 6 via (2 pz.)
- Strip female/male 8 via(2 pz.)
- Strip female 10 via (4 pz.)
- DB9 male
- PCB


The sketch

/*

****************************************************************
*  Name    : Personal Weather Station to wunderground.com      *
*  Author  : Landoni Boris                                     *
*  www.open-electronics.org                                    *
*  blog.elettronicain.it                                       *
*  www.futurashop.it                                           *
****************************************************************

http://wiki.wunderground.com/index.php/PWS_-_Upload_Protocol#Example_URL

action [action=updateraw] -- always supply this parameter to indicate you are making a weather observation upload
ID [ID as registered by wunderground.com]
PASSWORD [PASSWORD registered with this ID, case sensative]
dateutc - [YYYY-MM-DD HH:MM:SS (mysql format)] In Universal Coordinated Time (UTC) Not local time
winddir - [0-360 instantaneous wind direction]
windspeedmph - [mph instantaneous wind speed]
humidity - [% outdoor humidity 0-100%]
tempf - [F outdoor temperature]
rainin - [rain inches over the past hour)] -- the accumulated rainfall in the past 60 min
indoortempf - [F indoor temperature F]
indoorhumidity - [% indoor humidity 0-100]
softwaretype - [text] ie: WeatherLink, VWS, WeatherDisplay

windgustmph - [mph current wind gust, using software specific time period]
windgustdir - [0-360 using software specific time period]
windspdmph_avg2m  - [mph 2 minute average wind speed mph]
winddir_avg2m - [0-360 2 minute average wind direction]
windgustmph_10m - [mph past 10 minutes wind gust mph ]
dewptf- [F outdoor dewpoint F]
dailyrainin - [rain inches so far today in local time]
baromin - [barometric pressure inches]
weather - [text] -- metar style (+RA)
clouds - [text] -- SKC, FEW, SCT, BKN, OVC
soiltempf - [F soil temperature]
 * for sensors 2,3,4 use soiltemp2f, soiltemp3f, and soiltemp4f
soilmoisture - [%]
* for sensors 2,3,4 use soilmoisture2, soilmoisture3, and soilmoisture4
leafwetness  - [%]
+ for sensor 2 use leafwetness2
solarradiation - [W/m^2]
UV - [index]
visibility - [nm visibility]

http://weatherstation.wunderground.com/weatherstation/updateweatherstation.php?ID=KCASANFR5&PASSWORD=XXXXXX&dateutc=2000-01-01+10%3A32%3A35&winddir=230&windspeedmph=12&windgustmph=12&tempf=70&rainin=0&baromin=29.1&dewptf=68.2&humidity=90&weather=&clouds=&softwaretype=vws%20versionxx&action=updateraw

mappa ws2300

Command	Hex Digit	  	Command	Hex Digit
82	 0	  	 A2	 8
86	 1	  	 A6	 9
8A	 2	  	 AA	 A
8E	 3	  	 AE	 B
92	 4	  	 B2	 C
96	 5	  	 B6	 D
9A	 6	  	 BA	 E
9E	 7	  	 BE	 F

*/

#include <SPI.h>
#include <Ethernet.h>
#include <EEPROM.h>
#include <NewSoftSerial.h>

byte mac[] = {  0xDE, 0xAD, 0xBE, 0xEF, 0xFE, 0xED };
byte ip[] = { 192,168,0,145 };
byte server[] = { 38,102,136,125 }; // http://weatherstation.wunderground.com/

#define UPDATE_INTERVAL            300000    // if the connection is good wait 60 seconds before updating again - should not be less than 5
unsigned long update=0;

NewSoftSerial mySerial(2, 3);   //NewSoftSerial mySerial(rx,tx);

const int ledPin = 6; // the pin that the LED is attached to
const int rts = 4;
const int dtr = 5;
String id = "xxxxxxx";
String PASSWORD = "xxxxxxx";
boolean upload=1;
boolean leggicontinuo=0;

Client client(server, 80);

void setup() {
  Ethernet.begin(mac, ip);

  digitalWrite(ledPin, LOW);
  // initialize serial communication:
  Serial.begin(2400);
  Serial.println("Goodmorning WS2300!");
  // set the data rate for the NewSoftSerial port
  mySerial.begin(2400);

  // initialize the LED pin as an output:
  pinMode(ledPin, OUTPUT);
  pinMode(rts, OUTPUT);
  pinMode(dtr, OUTPUT);

  digitalWrite(rts, HIGH);
  digitalWrite(dtr, LOW);
  delay(2000);
  digitalWrite(rts, LOW);
  digitalWrite(dtr, HIGH);

  for (int i=0;i<10;i++){
    digitalWrite(ledPin, HIGH);
    delay(200);
    digitalWrite(ledPin, LOW);
    delay(200);
  }

}

void loop() {

  int incomingByteSer;      // a variable to read incoming serial data into
  // see if there's incoming serial data:
  if (Serial.available() > 0) {
    // read the oldest byte in the serial buffer:
    incomingByteSer = Serial.read();
    // if it's a capital H (ASCII 72), turn on the LED:
    Serial.flush();
    if (incomingByteSer == 'o') {
      String data=getTime();
      Serial.print("ora ");
      Serial.println(data);
    }  

    if (incomingByteSer == 'd') {
      String data=getDay();
      Serial.print("giorno ");
      Serial.println(data);
    }
    if (incomingByteSer == 't') {
      String data=getTemp(1);
      Serial.print("temperatura interna F ");
      Serial.println(data);
    } 

    if (incomingByteSer == 'T') {
      String data=getTemp(0);
      Serial.print("temperatura esterna F ");
      Serial.println(data);
    } 

    if (incomingByteSer == 'h') {
      String data=getHum(1);
      Serial.print("umidità interna ");
      Serial.println(data);
    } 

    if (incomingByteSer == 'H') {
      String data=getHum(0);
      Serial.print("umidità esterna ");
      Serial.println(data);
    } 

    if (incomingByteSer == 'p') {
      String data=getPress(1);
      Serial.print("pressione hPa ");
      Serial.println(data);
    } 

    if (incomingByteSer == 'P') {
      String data=getPress(0);
      Serial.print("pressione Hg ");
      Serial.println(data);
    } 

    if (incomingByteSer == 'w') {
      String data=getWind(0);
      Serial.print("wind speed mph ");
      Serial.println(data);     

    } 

    if (incomingByteSer == 'W') {
      String data=getWind(1);
      Serial.print("wind dir ");
      Serial.println(data);
    } 

    if (incomingByteSer == 'r') {
      String data=getRain(1);
      Serial.print("rain 1 ");
      Serial.println(data);
    } 

    if (incomingByteSer == 'R') {
      String data=getRain(0);
      Serial.print("rain 24 ");
      Serial.println(data);
    }  

    if (incomingByteSer == 'e') {
      String data=getDew();
      Serial.print("dew point ");
      Serial.println(data);
    } 

    if (incomingByteSer == 'U') {
      readws();
    } 

    if (incomingByteSer == 'u') {
      pubblica();
    }

    if (incomingByteSer == 'a') {
      if (upload==1){
        upload=0;
        Serial.println("Disattivo l'upload automatico ");
      }
      else
      {
        upload=1;
        Serial.println("Attivo l'upload automatico ");
      }
    }

    if (incomingByteSer == 'A') {
      if (leggicontinuo==1){
        leggicontinuo=0;
        Serial.println("Disattivo lettura continua ");
      }
      else
      {
        leggicontinuo=1;
        Serial.println("Attivo lettura continua ");
      }
    }

    // if it's an L (ASCII 76) turn off the LED:
    if (incomingByteSer == 'L') {
      digitalWrite(ledPin, LOW);
    }
  }

  if (upload==1){
    if (millis() < update) update = millis();
      if ((millis()% 1000) < 2){
        delay (100);
        Serial.print(".");
      }
        if ((millis() - update) > UPDATE_INTERVAL){
            update = millis();
            readws();
            pubblica();
            Serial.println("tempo impiegato per fare la pubblicazione: ");
            Serial.println(millis()-update);
        }
  }

  if (leggicontinuo==1){
    if (millis() < update) update = millis();
      if ((millis()% 1000) < 2){
        delay (100);
        Serial.print(".");
      }
        if ((millis() - update) > UPDATE_INTERVAL){
            update = millis();
            readws();
        }
  }

}

void pubblica()
{

  int timeout=0;
  int skip=0;
  String inString="";
  digitalWrite(ledPin, HIGH);
  Serial.print("connecting  ");

  if (client.connect()) {

    Serial.println("connected");
    //client.println("GET / HTTP/1.0");
    Serial.print("GET /weatherstation/updateweatherstation.php?");//modificare qua.
    client.print("GET /weatherstation/updateweatherstation.php?");//modificare qua.
    pubbws();
    client.println(" HTTP/1.0");
    Serial.println(" HTTP/1.0");

    Serial.print("HOST: ");
    client.print("HOST: ");
    client.println("http://www.wunderground.com");
    Serial.println("http://www.wunderground.com");
    client.println();
  } else {
    Serial.println("connection failed");
  }
  while (!client.available() && timeout<50)
  {
    timeout++;
    Serial.print("Time out ");
    Serial.println(timeout);
    delay(100);
  }

  while (client.available())
  {
        char c = client.read();
          if ((inString.length())<150){ inString.concat(c);}
  }         

  client.flush();

      if ((inString.length())>5)
      {
              Serial.print("Risposta ");
              Serial.print(inString);
      }              

   if (!client.connected())
   {
        Serial.println("disconnecting.");
        client.stop();
        delay (1000);
   }
   digitalWrite(ledPin, LOW);

}

void readws(){

      Serial.println("URL ");
      Serial.print("http://weatherstation.wunderground.com/weatherstation/updateweatherstation.php?");
      String temp =getDay();
      String temp1=getTime();
      if ((temp.length()>6) && (temp1.length()>4)){
        Serial.print("ID=");
        Serial.print(id);
        Serial.print("&PASSWORD=");
        Serial.print(PASSWORD);
        Serial.print("&dateutc=");
        Serial.print(temp);
        Serial.print("+");
        Serial.print(temp1);
        scrivimem(temp,0);
        scrivimem(temp1,20);
      }
      else
      {
        Serial.println("Lettura data/ora non riuscita torno");
        return;
      }
      temp=getWind(1);
      if (temp.length()>1){
        Serial.print("&winddir=");
        Serial.print(temp);
        scrivimem(temp,40);
      }
      temp=getWind(0);
      if (temp.length()>2){
        Serial.print("&windspeedmph=");
        Serial.print(temp);
       scrivimem(temp,60);
      }
      temp=getTemp(0);
      if (temp.length()>3){
        Serial.print("&tempf=");
        Serial.print(temp);
        scrivimem(temp,80);
      }
      temp=getRain(1);
      if (temp.length()>2){
        Serial.print("&rainin=");
        Serial.print(temp);
        scrivimem(temp,100);
      }
      temp=getRain(0);
      if (temp.length()>2){
        Serial.print("&dailyrainin=");
        Serial.print(temp);
        scrivimem(temp,120);
      }
      temp=getHum(0);
      if (temp.length()>1){
        Serial.print("&humidity=");
        Serial.print(temp);
        scrivimem(temp,140);
      }
      temp=getDew();
      if (temp.length()>1){
        Serial.print("&dewptf=");
        Serial.print(temp);
        scrivimem(temp,160);
      }
      temp=getPress(0);
      if (temp.length()>1){
        Serial.print("&baromin=");
        Serial.print(temp);
        scrivimem(temp,180);
      }
}

void pubbws(){
      String temp =leggimem(0);
      String temp1=leggimem(20);
      if ((temp.length()>6) && (temp1.length()>4)){
        Serial.print("ID=");
        Serial.print(id);
        Serial.print("&PASSWORD=");
        Serial.print(PASSWORD);
        Serial.print("&dateutc=");
        Serial.print(temp);
        Serial.print("+");
        Serial.print(temp1);
        client.print("ID=");
        client.print(id);
        client.print("&PASSWORD=");
        client.print(PASSWORD);
        client.print("&dateutc=");
        client.print(temp);
        client.print("+");
        client.print(temp1);
      }
      else
      {
        Serial.println("Lettura data/ora non riuscita torno");
        return;
      }
      temp=leggimem(40);
      if (temp.length()>1){
        Serial.print("&winddir=");
        Serial.print(temp);    

        client.print("&winddir=");
        client.print(temp);
      }    

      temp=leggimem(60);
      if (temp.length()>2){
        Serial.print("&windspeedmph=");
        Serial.print(temp);        

        client.print("&windspeedmph=");
        client.print(temp);
      }   

      temp=leggimem(80);
      if (temp.length()>3){
        Serial.print("&tempf=");
        Serial.print(temp);

        client.print("&tempf=");
        client.print(temp);
      }   

      temp=leggimem(100);
      if (temp.length()>2){
        Serial.print("&rainin=");
        Serial.print(temp);       

        client.print("&rainin=");
        client.print(temp);
      }   

      temp=leggimem(120);
      if (temp.length()>2){
        Serial.print("&dailyrainin=");
        Serial.print(temp);       

        client.print("&dailyrainin=");
        client.print(temp);
      }   

      temp=leggimem(140);
      if (temp.length()>1){
        Serial.print("&humidity=");
        Serial.print(temp);        

        client.print("&humidity=");
        client.print(temp);
      }   

      temp=leggimem(160);
      if (temp.length()>1){
        Serial.print("&dewptf=");
        Serial.print(temp);        

        client.print("&dewptf=");
        client.print(temp);        

      }   

      temp=leggimem(180);
      if (temp.length()>1){
        Serial.print("&baromin=");
        Serial.print(temp);        

        client.print("&baromin=");
        client.print(temp);        

      } 

        Serial.print("&windgustmph=0.00");
        client.print("&windgustmph=0.00");
        Serial.print("&action=updateraw");
        client.print("&action=updateraw");

}

void scrivimem(String dataStr, int pos){

  for (int i=0; i<dataStr.length();i++)
  {
    EEPROM.write((pos+i),dataStr[i]);
  }
  EEPROM.write((pos+dataStr.length()),'#');
  for (int i=pos;i<(pos+50);i++)
  {
    if (EEPROM.read(i)=='#')
    {
      break;
    }
  }

}

String leggimem(int pos){
  int lung=0;
  char dataStr[15];

  for (int i=0;i<15;i++)
  {
    dataStr[i]=0;
  }
  for (int i=pos;i<(pos+20);i++)
  {
    lung++;
    if (EEPROM.read(i)=='#')
    {
      break;
    }
    char c=EEPROM.read(i);
    dataStr[i-pos]=(c); 

  }
  dataStr[lung]='\0';
  return(dataStr);
}

String Leggi (int mem[]) {
    String inString;
    char inChar [3];
    int incomingByte=0;      // a variable to read incoming serial data into
    int time=0;
    String chk;
     while ((incomingByte!=2) && (time<20)){
          time++;
          mySerial.print(byte(06));
          delay(20); 

            if ((mySerial.available() > 0) && (time<20)) {
              delay(30);
              time++;
              incomingByte = mySerial.read();
              inString.concat(incomingByte);
            }
      }

     inString="";
     time=0;
     inString.concat("00"); //aggiungo due cifre
     mySerial.flush();
     if (time>18){
          return("0\0");
     }  

      for (int i=0; i<2; i++){

          if (inString.length()>8){
            chk=(inString.substring(4,8));
          }
          inString="";
          inString.concat("00"); //aggiungo due cifre
          for (int tmp=0; tmp<5; tmp++){
            mySerial.print(byte(mem[tmp]));
            while ((mySerial.available() == 0) && (time<100)){
             delay(30);
             time++;
            }
            if (time>98){
              return("0\0");
              break;  

            }        

            if (mySerial.available() > 0) {
              incomingByte = mySerial.read();
            }

            time=0;
           //delay(200);
               while ((mySerial.available() > 0) && time<200 ) {
                    time++;
                    delay(20);
                    incomingByte = mySerial.read();
                    if (tmp<4){
                      if (tmp!=((incomingByte & B11110000)/B10000)){
                          return("0\0");
                          break;
                      }
                    }
                    if (tmp==4){
                      sprintf(inChar, "%02X", incomingByte);
                      inString.concat(inChar);
                    }
               }
           }

      }
        if (chk!=(inString.substring(4,8)))
        {
          return("0\0");

        }
        inString=inString.trim();
        if (inString.length()>16){
          inString=(inString.substring(0,15));
        }
        return(inString);
}

String getTime(){

      String dataStr="";
      int my_array[] = {0x82,0x8A,0x82,0x82,0xDA};  //0200
      String inString;

        for (int ritenta=0; ritenta<10; ritenta++){
           dataStr="";
            inString=Leggi(my_array);
            if (inString.length()>5){
                //data= inString.substring(4,6);  //estraggo i decimali della temperatura
                dataStr.concat(inString.substring(6,8));  //estraggo l'ora
                dataStr.concat(":");
                dataStr.concat(inString.substring(4,6));  //estraggo i minuti
                dataStr.concat(":");
                dataStr.concat(inString.substring(2,4));  //estraggo i secondi
                if (((inString.substring(6,8))<23 && (inString.substring(6,8))>=0)&&((inString.substring(4,6))<60 && (inString.substring(4,6))>=0) && ((inString.substring(2,4))<60 && (inString.substring(2,4))>=0)) {
                    break;
                }
                else {
                  dataStr="";
                }

             }
             else
             {
                 delay(500);
             }
        }
      return(dataStr);
}

String getDay(){
      String inString;
      String dataStr="";
      int my_array[] = {0x82,0x8A,0x8E,0xAE,0xEE};
        for (int ritenta=0; ritenta<10; ritenta++){
            dataStr="";
            inString=Leggi(my_array);
            if (inString.length()>5){
                dataStr.concat("20");
                dataStr.concat(inString.charAt(13));
                dataStr.concat(inString.charAt(10));
                dataStr.concat("-");
                dataStr.concat(inString.charAt(11));
                dataStr.concat(inString.charAt(8));
                dataStr.concat("-");
                dataStr.concat(inString.charAt(9));
                dataStr.concat(inString.charAt(6));
                if (((inString[13]<='9' && inString[13]>='0')&&(inString[10]<='9' && inString[10]>='0')) && ((inString[11]<='1' && inString[11]>='0')&&(inString[8]<='9' && inString[8]>='0')) && ((inString[9]<='3' && inString[9]>='0')&&(inString[6]<='9' && inString[6]>='0'))) {
                    break;
                }
                else {
                  dataStr="";
                }
           }
           else
           {
               delay(500);
           }
        }
      return(dataStr);
}

String getTemp(int dato){
      String inString;
      String dataStr="";
      //String dataStr;
      char cdata [10];
      int lung=0;
      char buff[10];
      int my_array[6];

      if (dato==1){
        my_array[0] = (0x82);
        my_array[1] = (0x8E);
        my_array[2] = (0x92);
        my_array[3] = (0x9A);
        my_array[4] = (0xFA);
      }
       else
      {
        my_array[0] = (0x82);
        my_array[1] = (0x8E);
        my_array[2] = (0x9E);
        my_array[3] = (0x8E);
        my_array[4] = (0xFA);
      }
        for (int ritenta=0; ritenta<10; ritenta++){
            dataStr="";
            inString=Leggi(my_array);
            if (inString.length()>5){
                (inString.substring(4,6)).toCharArray(buff,3);
                dataStr.concat((atoi(buff))-30);
                dataStr.concat(".");
                dataStr.concat(inString.substring(2,4));  //estraggo le decine e unità della temperatura
               if (((inString[4]<='9' && inString[4]>='0')&&(inString[5]<='9' && inString[5]>='0')) && ((inString[2]<='9' && inString[2]>='0')&&(inString[3]<='9' && inString[3]>='0'))) {
                   break;
                }
                else {
                  dataStr="";
                }
           }
           else
           {
              delay(500);
           }
        }
      if (dataStr.length()>2)
      {

        dataStr.toCharArray(cdata, dataStr.length()+1);
          float fdata=(atof(cdata)*1.800+32.000);
          if (fdata<1000){lung=7;}
          if (fdata<100){lung=6;}
          if (fdata<10){lung=5;}
          dtostrf(fdata,lung,3,cdata);
          dataStr=cdata;
      }
      else
      {
        dataStr="";
      }

      return(dataStr);
}

String getHum(int dato){
      String dataStr="";
      String inString;
      int my_array[6];
      if (dato==1){
        my_array[0] = (0x82);
        my_array[1] = (0x8E);
        my_array[2] = (0xBE);
        my_array[3] = (0xAE);
        my_array[4] = (0xDA);
      }
       else
      {
        my_array[0] = (0x82);
        my_array[1] = (0x92);
        my_array[2] = (0x86);
        my_array[3] = (0xA6);
        my_array[4] = (0xDA);
      }
        for (int ritenta=0; ritenta<10; ritenta++){
            dataStr="";
            inString=Leggi(my_array);
            if (inString.length()>5){
                dataStr.concat(inString.substring(2,4));  //estraggo le decine e unità della temperatura
               if ((inString[2]<='9' && inString[2]>='0')&&(inString[3]<='9' && inString[3]>='0')) {
                   break;
                }
                else {
                  dataStr="";
                }
           }
           else
           {
               delay(500);
           }
        }
      return(dataStr);
}

String getPress(int dato){
      String dataStr="";
      String inString;
      int my_array[6];
      if (dato==1){
        my_array[0] = (0x82);
        my_array[1] = (0x96);
        my_array[2] = (0xBA);
        my_array[3] = (0x8A);
        my_array[4] = (0xD6);
      }
       else
      {
        my_array[0] = (0x82);      //press hg
        my_array[1] = (0x96);
        my_array[2] = (0xB6);
        my_array[3] = (0xB6);
        my_array[4] = (0xD6);
      } 

        for (int ritenta=0; ritenta<10; ritenta++){
            dataStr="";
            inString=Leggi(my_array);
            if (inString.length()>5){
                dataStr.concat(inString.charAt(7));
                dataStr.concat(inString.charAt(4));
                dataStr.concat(inString.charAt(5));
                if (dato==1){
                  dataStr.concat(inString.charAt(2));
                  dataStr.concat(".");
                  dataStr.concat(inString.charAt(3));
                }
                else
                {
                  dataStr.concat(".");
                  dataStr.concat(inString.charAt(2));
                  dataStr.concat(inString.charAt(3));
                }

                if ((inString[7]<='9' && inString[7]>='0')&&(inString[4]<='9' && inString[4]>='0') && (inString[5]<='9' && inString[5]>='0')&&(inString[2]<='9' && inString[2]>='0') && (inString[2]<='9' && inString[2]>='0')) {
                  break;
                }
                else {
                  dataStr="";
                }
           }
           else
           {
              delay(500);
           }
        }
      return(dataStr);

}

String getWind(int dato){
      String dataStr="";
      char cdata [10];
      int lung=0;
      String inString;
      char buff[10];
      int my_array[] = {0x82,0x96,0x8A,0x9E,0xF2};
        for (int ritenta=0; ritenta<10; ritenta++){
            dataStr="";
            inString=Leggi(my_array);
            if (inString.length()>5){
              if (dato==0){
                 dataStr.concat(inString.charAt(7));
                 buff[0]=inString[4];
                 buff[1]=inString[5];
                 int tmp=(strtol(buff,NULL,16));
                 if (tmp<=9){
                   dataStr.concat("0");
                 }

                 dataStr.concat(tmp); // converts a HEX string to long
                 dataStr.concat(dataStr.charAt(2));
                 dataStr.setCharAt(2, '.');
                if ((inString[4]<='9' && inString[4]>='0')&&(inString[5]<='9' && inString[5]>='0')) {
                  break;
                }
                else {
                  dataStr="";
                }
              }
              else
              {
                 buff[0]=inString[6];
                 buff[1]=0;
                 int tmp=((strtol(buff,NULL,16))*22.5);
                 dataStr.concat(tmp);
                if ((tmp>=0)&&(tmp<=360)) {
                  break;
                }
                else {
                  dataStr="";
                  ritenta=0;
                }
              }
           }
           else
           {
               delay(500);
           }
        }

      if (dato==0){    //se richiedo la velocità convertoin miglia orarie    

           if (dataStr.length()>2)
           {
                  dataStr.toCharArray(cdata, (dataStr.length()+1));
                  float fdata=(atof(cdata)*2.23);
                  if (fdata<1000){lung=6;}
                  if (fdata<100){lung=5;}
                  if (fdata<10){lung=4;}
                  dtostrf(fdata,lung,2,cdata);
                  dataStr=cdata;
          }
          else
          {
            dataStr="";
          }
      }

      return(dataStr);
}

String getRain(int dato){
       String dataStr="";
      char cdata [10];
      int lung=0;
      String inString;
            int my_array[6];
      if (dato==1){      //pioggia 1 ora
        my_array[0] = (0x82);
        my_array[1] = (0x92);
        my_array[2] = (0xAE);
        my_array[3] = (0x92);
        my_array[4] = (0xDA);
      }
       else
      {
        my_array[0] = (0x82);      //0497
        my_array[1] = (0x96);
        my_array[2] = (0xA6);
        my_array[3] = (0x9E);
        my_array[4] = (0xD6);
      }
        for (int ritenta=0; ritenta<10; ritenta++){
            dataStr="";
            inString=Leggi(my_array);
            if (inString.length()>5){
                dataStr.concat(inString.substring(6,8));
                dataStr.concat(inString.substring(4,6));
                if ((inString[6]<='9' && inString[6]>='0')&&(inString[7]<='9' && inString[7]>='0') && (inString[4]<='9' && inString[4]>='0')&&(inString[5]<='9' && inString[5]>='0') && (inString[2]<='9' && inString[2]>='0')&& (inString[3]<='9' && inString[3]>='0')) {
                  break;
                }
                else {
                  dataStr="";
                }
           }
           else
           {
               delay(500);
           }
        }

         if (dataStr.length()>2)
      {  

          dataStr.toCharArray(cdata, (dataStr.length()+1));
            //Serial.print("cdata ");
            //Serial.println(cdata);
          float fdata=(atof(cdata)*2.54);  //in pollici
          if (fdata<1000){lung=6;}
          if (fdata<100){lung=5;}
          if (fdata<10){lung=4;}
          dtostrf(fdata,lung,2,cdata);
          dataStr=cdata;
      }
      else
      {
        dataStr="";
      }

      return(dataStr);
}

String getDew(){

      String inString;
      String dataStr="";
      char cdata [10];
      int lung=0;
      char buff[10];

      //Serial.println("leggo pioggia 1h ");
      int my_array[] = {0x82,0x8E,0xB2,0xBA,0xFA};
        for (int ritenta=0; ritenta<10; ritenta++){
            dataStr="";
            inString=Leggi(my_array);
            if (inString.length()>5){            

                (inString.substring(4,6)).toCharArray(buff,3);
                dataStr.concat((atoi(buff))-30);
                dataStr.concat(".");
                dataStr.concat(inString.substring(2,4));  //estraggo le decine e unità della temperatura
               if (((inString[4]<='9' && inString[4]>='0')&&(inString[5]<='9' && inString[5]>='0')) && ((inString[2]<='9' && inString[2]>='0')&&(inString[3]<='9' && inString[3]>='0'))) {
                   break;
                }
                else {
                  dataStr="";
                }
           }
           else
           {
              delay(500);
           }
        }

      if (dataStr.length()>2)
      {

          dataStr.toCharArray(cdata, dataStr.length()+1);
          float fdata=(atof(cdata)*1.800+32.000);
            if (fdata<1000){lung=7;}
            if (fdata<100){lung=6;}
            if (fdata<10){lung=5;}
            dtostrf(fdata,lung,3,cdata);

          dataStr=cdata;
            }
      else
      {
        dataStr="";
      }

      return(dataStr);
}

For the connection we uses the serial port pins 2 and 3 of module Arduino for this reason we have used the library NewSoftSerial that lets you emulate a UART using the generic contact I/O such as serial lines.
Periodically, the Arduino microcontroller polls the weather station and stores the data for the date, time, outside temperature, outside humidity, wind speed and direction, rain fell in one hour and 24 hours, the atmospheric pressure and dew point. The constant UPDATE_INTERVAL defines after how many seconds Arduino public the data collected on the site www.wunderground.com.
In order to publish the data of the control unit on this site, as already mentioned, you must have an account, once registered, there is assigned an ID that will be introduced during the connection to the site in order to proceed with publication.
In the sketch for the Arduino you must enter your ID and password, so that the publication will be successful, otherwise our system will point to the site but will not get access.
For the publication of data is sufficient to recall the page http://weatherstation.wunderground.com/weatherstation/updateweatherstation.php,
passing data to the URL. For example, you have to compose a string like this:

http://weatherstation.wunderground.com/weatherstation/updateweatherstation.php?ID=KCASANFR5&PASSWORD=XXXXXX&dateutc=2000-01-01+10&winddir=230&windspeedmph=12&windgustmph=12&tempf=70&rainin=0&baromin=29.1&dewptf=68.2&humidity=90&weather=&clouds=&softwaretype=vws%20versionxx&action=updateraw.

As you see, the user ID and password are inserted in the string. The data temperature should be expressed in Fahrenheit degrees and the wind speed must be in mph (miles per hour). The conversion of the data read by the control unit is made directly from the sketch, so as to spare you the burden to proceed with the manual calculation.

The use of the site www.wunderground.com for the publication of meteorological data is free and subject only to the rules of the provider, there are also advanced features, including the addition of photos and images from a webcam filming on location is the weather station and sent through the Internet.


Arduino kit beams low-fi Google Weather to VGA screens

Looking for another way to use that aging VGA CRT screen hogging space in the closet? Try making your own dedicated weather screen by mixing together Google's meteorological data stream and some Arduino magic. It looks like parsing that Google Weather data was a bit of a challenge on the miniscule 2KB of RAM, but a tinkerer going by the handle Zmashiah has managed to do it. He's even managed to cram in a few extra graphical flourishes, including icons and background themes that change depending on the temperature and time of day. The entirely PC-free device grabs the data through an Ethernet connection and flashes up all the weather goodness in stunning VGA. Any meteorological mavens reading this can grab the full shopping list and procedure at the Instructables link below.

Arduino kit beams low-fi Google Weather to VGA screens originally appeared on Engadget on Tue, 22 Nov 2011 08:31:00 EST. Please see our terms for use of feeds.

Permalink | Email this | Comments