Posts with «wearable hacks» label

Strapping an Apple II to Your Body

Now that the Apple wristwatch is on its way, some people are clamoring with excitement and anticipation. Rather than wait around for the commercial product, Instructables user [Aleator777] decided to build his own wearable Apple watch. His is a bit different though. Rather than look sleek with all kinds of modern features, he decided to build a watch based on the 37-year-old Apple II.

The most obvious thing you’ll notice about this creation is the case. It really does look like something that would have been created in the 70’s or 80’s. The rectangular shape combined with the faded beige plastic case really sells the vintage electronic look. It’s only missing wood paneling. The case also includes the old rainbow-colored Apple logo and a huge (by today’s standards) control knob on the side. The case was designed on a computer and 3D printed. The .stl files are available in the Instructable.

This watch runs on a Teensy 3.1, so it’s a bit faster than its 1977 counterpart. The screen is a 1.8″ TFT LCD display that appears to only be using the color green. This gives the vintage monochromatic look and really sells the 70’s vibe. There is also a SOMO II sound module and speaker to allow audio feedback. The watch does tell time but unfortunately does not run BASIC. The project is open source though, so if you’re up to the challenge then by all means add some more functionality.

As silly as this project is, it really helps to show how far technology has come since the Apple II. In 1977 a wristwatch like this one would have been the stuff of science fiction. In 2015 a single person can build this at their kitchen table using parts ordered from the Internet and a 3D printer. We can’t wait to see what kinds of things people will be making in another 35 years.


Filed under: clock hacks, wearable hacks
Hack a Day 09 Apr 00:01

Hat-Mounted Clock Requires Mirror For Wearer To Tell Time

[gfish] was planning on attending Burning Man and wanted to make something unique (and useful) to wear. He decided on a hat/clock hybrid. Just slapping a clock on a hat would be too easy, though. [gfish] wanted his hat to change time zones both via manual switches or physical location.

On the front of the hat there are 2 hands, as most clocks have. Each one is attached to one of two concentric shafts that run to the back of the hat. Each hand is individually controlled by an RC vehicle servo. Those of you familiar with RC servos know that a servos’ max rotation is about 180 degrees and is certainly not enough for a full revolution required by the clock. To fix this, there is a 3:1 gear set that allows a 120 degree rotation of the servo to move the clock hand a full 360 degrees. With this method, each hand can’t move past 12 and instead has to quickly move counter-clockwise to get where it needs to be in order to again start its journey around the clock face.

Mounted inside the hat there is an Arduino that controls the clock, a GPS shield to determine location and an RTC to maintain accurate time. Mounted on the side of the hat is a control panel that contains an overall on/off switch as well as a rotary switch for selecting a specific timezone or for engaging GPS mode. The whole thing is powered by a 9 volt battery.

If you like unnecessarily complicated top hats, check out this WiFi enabled message displaying one.


Filed under: clock hacks, wearable hacks
Hack a Day 14 Feb 21:00

Making MicroView Wordy

Despite the MicroView shipping a ton of units, we haven’t seen many projects using this tiny Arduino and OLED display in a project. Never fear, because embedded systems engineer, podcaster, and Hackaday Prize judge [Elecia White] is here with a wearable build for this very small, very cool device.

The size and shape of the MicroView just cried out to be made into a ring, and for that, [Elicia] is using air-drying bendy polymer clay. To attach the clay to the MicroView, [Elecia] put some female headers in a breadboard, and molded the clay over them into a ring shape. It works, and although [Elecia] didn’t do anything too tricky with the headers and clay, there are some interesting things you could do running wires through the clay.

What does this ring do? It’s a Magic 8 Ball, a game of Pong controlled by an accelerometer, a word-of-the-day thing (with definitions), all stuffed into a brass silicon, OLED, and clay knuckle. Video below.

If you’re wondering, Turbillion (n). A whirl; a vortex.


Filed under: wearable hacks
Hack a Day 12 Dec 12:00

Nikes With Power Laces, Just in Time for Next Year

With the world’s first hoverboard being shown a few days ago, we’re on the verge of the fabulous world of tomorrow from Back to the Future. Hoverboards are cool, but there’s a wealth of other cool technology from the far-off year of 2015: Mr. Fusions, inflatable pizza, Dustbusters, and of course, Nikes with power laces. [Hunter] just built them, and with the right shoes, to boot.

[Hunter] is using the BttF-inspired Nike Air Mag shoes for this build, along with a few bits of electronics – an Arduino pro mini, a force sensing resistor, and a motor. The build began by carving out a notch in the back of the shoe for the electronics. A small bit of fishing line goes around the shoe, providing the power behind the power laces.

A force sensitive resistor under the heel of the insole tells the microcontroller when a foot is inside the shoe, and a rotary encoder on the motor shaft makes sure all the power lace cycles are the same. It’s not quite the same as the shoe seen on screen – the lower laces can’t be replicated and it’s certainly not as fast as the BttF shoes, but it does work, and as far as shoelaces are concerned, they work well.

Videos below.


Filed under: wearable hacks

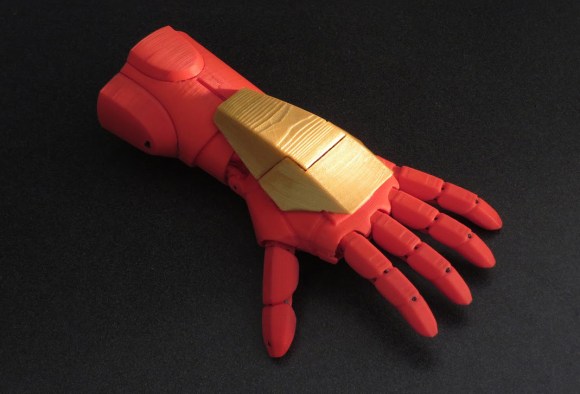
3D Printing Goes Hand in Hand with Iron Man Inspired Prosthetic

It’s exciting how much 3D printing has enabled us to produce pretty much any shape for any purpose on the fly. Among the most thoughtful uses for the technology that we’ve seen are the many functioning and often beautiful prosthetics that not only succeed in restoring the use of a limb, but also deliver an air of style and self-expression to the wearer. The immediate nature of the technology allows for models to be designed and produced rapidly at a low-cost, which works excellently for growing children. [Pat Starace’s] Iron Man inspired 3D printed hand and forearm are a perfect example of such personality and expert engineering… with an added dash of hacker flair.

With over twenty years of experience in animatronics behind him, [Starace] expertly concealed all of the mechanical ligaments within the design of his arm, producing a streamline limb with all the nuance of lifelike gesture. It was important that the piece not only work, but give the wearer that appropriate super hero-like feeling while wearing it. He achieves this with all the bells and whistles hidden within the negative space of the forearm, which give the wearer an armory of tricks up their sleeve. Concealed in the plating, [Starace] uses an Arduino and accelerometer to animate different sets of LEDs as triggered by the hand’s position coupled with specific voice commands. Depending on what angle the wrist is bent at, the fingers will either curl into a fist and reveal hidden ‘lasers’ on the back of the hand, or spread open around a pulsing circle of light on the palm when thrust outward.

The project took [Starace] quite a bit of time to print all the individual parts; around two days worth of time. This however is still considered quick in comparison to the custom outfitting and production of traditional prosthetics… not to mention, the traditional stuff wouldn’t have LEDs. This piece has a noble cause, and is an exciting example of how 3D printing is adding a level of heroism to everyday life.

Thank you Julius for pointing out this awesome project to us!


Filed under: Arduino Hacks, wearable hacks

A Better Google Glass For $60 (This One Folds)

For [Tony]‘s entry for The Hackaday Prize, he’s doing something we’ve all seen before – a head mounted display, connected to a Bluetooth module, displaying information from a smartphone. What we haven’t seen before is a cheap version of this tech, and a version of Google Glass that folds – you know, like every other pair of glasses on the planet – edges this project over from ‘interesting’ to ‘nearly practical’.

For the display, [Tony] is using a 0.96″ OLED connected to an Arduino Nano. This screen is directed into the wearer’s eye with a series of optics that, along with every other part of the frame, was 3D printed on a Solidoodle 2. The frame itself not only folds along the temples, but also along the bridge, making this HMD surprisingly compact when folded up.

Everything displayed on this head mounted display is controlled by  either an Android phone or a Bluetooth connection to a desktop. Using relatively simple display means [Tony] is limited to text and extremely simple graphics, but this is more than enough for some very interesting applications; reading SMS messages and checking email is easy, and doesn’t overpower the ‘duino.


The project featured in this post is an entry in The Hackaday Prize. Build something awesome and win a trip to space or hundreds of other prizes.

Filed under: 3d Printer hacks, wearable hacks

Hacked e-cigarette vaporizer can send smells…in space!

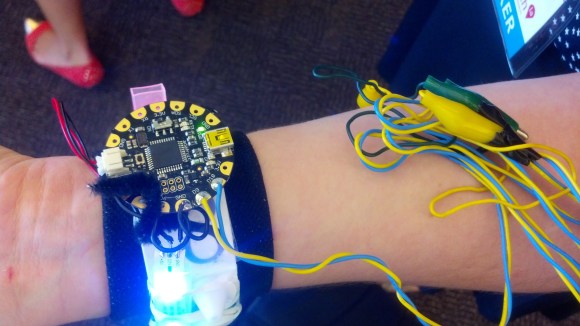
This 3D printed scent distributor was put together by eight people from three states during the 2014 NYC NASA Space Apps Challenge. The team went on to take 1st place in the competition.

The project is called Senti8 and uses a FLORA Arduino micro-controller and a Neopixel LED strip purchased from Adafruit. A smartphone mobile app then remotely connects to the device allowing the user to choose which scent they would like to send to their friend, who is also wearing one of the wristbands.

They came up with the idea by simply asking an American astronaut named [Doug Wheelock] what he missed the most while travelling through the boundless reaches of outer space. To their surprise, he said that the thing he missed the most was his sense of smell.

Originally, the project was envisioned to be a wearable technology for space tourism. But over time, the project morphed into a wristband that would allow people to remember places or planets visited. Even memories unique to those places through scent could be experimented with.

One of the team members, [Brooks], was spotted wearing the Senti8 at the Wearable Tech LA conference in Pasadena, CA on July 17, 2014. The LED lights lining the outside could be seen all the way across the large auditorium as she chatted up with local Crashspace members as they prepared to present their design-oriented hacks to the public.

She gave an interview demoing the wristband which can be seen in the video posted below:

The Senti8 Intro video can be see here as well:


Filed under: wearable hacks

Track Your Dog With This DIY GPS Harness

Have you ever wondered how far your dog actually runs when you take it to the park? You could be a standard consumer and purchase a GPS tracking collar for $100 or more, or you could follow [Becky Stern's] lead and build your own simple but effective GPS tracking harness.

[Becky] used two FLORA modules for this project; The FLORA main board, and the FLORA GPS module. The FLORA main board is essentially a small, sewable Arduino board. The GPS module obviously provides the tracking capabilities, but also has built-in data logging functionality. This means that [Becky] didn’t need to add complexity with any special logging circuit. The GPS coordinates are logged in a raw format, but they can easily be pasted into Google Maps for viewing as demonstrated by [Becky] in the video after the break. The system uses the built-in LED on the FLORA main board to notify the user when the GPS has received a lock and that the program is running.

The whole system runs off of three AAA batteries which, according to [Becky], can provide several hours of tracking. She also installed a small coin cell battery for the GPS module. This provides reserve power for the GPS module so it can remember its previous location. This is not necessary, but it provides a benefit in that the GPS module can remember it’s most recent location and therefore discover its location much faster.


Filed under: gps hacks, wearable hacks
Hack a Day 07 Jun 21:01

Cadence Meter Proves Wearable Development Is All About Just Doing It


The tech involved in the fitness world really empowers athletes, whether they’re serious or not, to improve their performance by providing empirical evidence. The Striker project focuses on cadence, which is the frequency of strides when running, or revolutions when pedaling. It uses a force sensitive resistor in the shoe to measure footfalls or power strokes.

The concept behind the device is solid, and there are consumer-grade devices already on the market that are capable of performing the same functions. In fact, a Garmin device is used to help measure the accuracy of the system. But we love to see bootstrapped projects, and this one distinguishes itself not only in finished product, but in the process itself. To us it screams: “What are you waiting for, build a prototype and then iterate!”.

The larger image above shows the earliest working version which is just a piece of fabric that wraps around the forearm to hold a 4-digit 7-segment display. The wire following the arm of the wearer snakes all the way down to the shoe to connect with the force sensor. The image to the right is the first wireless version of the readout. But the project has already seen at least two more versions after this one, mostly using SparkFun components.

We think this is but one example of the kind of stuff we want to see as contenders for The Hackaday Prize. The project uses Open Design and it’s arguably a connected device because the sensor and readout connect to each other (but ideally you’d want to add more connectivy to get at the data). The open nature of the build could lead to leaps forward in the technology by affording talented people wider development access.


Filed under: wearable hacks

Flexible Arduino Sure to Be A Hit


Wearable, lightweight hacks have long been dominated by the Lilypad. This will probably change with the introduction of the Printoo. Using printable circuit technology, the Printoo takes a modular approach to enable hackers, makers, and engineers alike to construct flexible circuits that can be put on almost anything, including paper!

Powered by the all too familiar ATmega328, the Printoo core module is fully compatible with the Ardunio IDE. The modular design enables functionality with several other printed devices including displays, batteries, sensors and even LED strips to make many different projects possible. One of the most interesting modules is the 1.5 volt, 500 micron thick electrochromic display.

Be sure to check out their Kickstarter, which has a nice video that demonstrates the project. If funded, they will be available in October in case you want to get your hands on one. Or feel free to make your own. Just be sure to let us know if you do!


Filed under: Arduino Hacks, wearable hacks