We’re not sure if there’s any single characteristic that qualifies someone as a hacker. After all, we’re a pretty eclectic bunch, with skills that range all over the map, and what one person feels is trivial, others would look upon as black magic. But there’s one thing we’re sure of: if you find yourself reading the original POST code for the PC-XT motherboard just to get a keyboard working, you’re pretty much our kind of people.
That was the position [Anders Nielsen] found himself in as work progresses on his “PC-XT from Scratch” project, which seeks to build a working mid-80s vintage IBM Model 5160 using as many period-correct parts as possible. The first installment of the series featured the delicate process of bringing the motherboard up, lest the magic smoke was released. After seeing some life out of the old board, [Anders] needed a little IO, specifically video and keyboard. The video side of the equation was relatively trivial, with an early-90s VGA card from eBay — not exactly period correct, but good enough to get something to display.
The keyboard was another matter entirely. It’s not too much of a chore to find a keyboard that’ll talk to a PC-AT, but the PC-XT had an entirely different protocol, not to mention that chunky 5-pin DIN connector. As with many things, the solution involved building an adapter out of an Arduino, but the process was not exactly low-friction. First, there was the question of dealing with the open-collector outputs on the keyboard, which required code changes. Next, [Anders] broke out the oscilloscope to check waveforms, and found a weird 9-Hz square wave on top of the keyboard clock signal. That ended up being a sign that the keyboard was stuck in a manufacturing test mode, according to a read-through of the power on self-test (POST) source code. A tiny tweak of the Arduino code got everything working.
We’ve got to say that we’re loving this deep dive into the internals of a piece of computer history. [Anders] teased the next step, which will use an empty ROM socket on an old network card to load some assembly code onto the XT. We’re very much looking forward to that exploit.
If you’ve laid hands on a retro analog TV, have the restoration bug, and you plan to make the final project at least somewhat period-correct, you face a bit of a conundrum: what are you going to watch? Sure, you can serve up just about any content digitally these days, but some programs just don’t feel right on an old TV. And even if you do get suitably retro programming, streaming isn’t quite the same as the experience of tuning your way through the somewhat meager selections as we did back in the analog days.
But don’t worry — this Raspberry Pi TV simulator can make your streaming experience just like the analog TV experience of yore. It comes to us from [Rodrigo], who found a slightly abused 5″ black-and-white portable TV that was just right for the modification. The battery compartment underneath the set made the perfect place to mount a Pi, which takes care of streaming a variety of old movies and shorts. The position of the original tuning potentiometer is read by an Arduino, which tells the Pi which “channel” you’re currently tuned to.
Composite video is fed from the Pi’s output right into the TV’s video input, and the image quality is just about what you’d expect. But for our money, the thing that really sells this is the use of a relay to switch the TV’s tuner back into the circuit for a short bit between channel changes. This gives a realistic burst of static and snow, just like we endured in the old days. Hats off to [Rodrigo] for capturing everything that was awful about TV back in the day — Mesa of Lost Women, indeed! — but still managing to make it look good.
It’s surprisingly easy to misjudge tips that come into the Hackaday tip line. After filtering out the omnipresent spam, a quick scan of tip titles will often form a quick impression that turns out to be completely wrong. Such was the case with a recent tip that seemed from the subject line to be a flight simulator cockpit. The mental picture I had was of a model cockpit hooked to Flight Simulator or some other off-the-shelf flying game, many of which we’ve seen over the years.
I couldn’t have been more wrong about the project that Grant Hobbs undertook. His cockpit simulator turned out to be so much more than what I thought, and after trading a few emails with him to get all the details, I felt like I had to share the series of hacks that led to the short video below and the story about how he somehow managed to build the set despite having no previous experience with the usual tools of the trade.
A Novel and a Film
Grant has been making short films for a while, mainly in collaboration with John Dwyer, an author of historical novels. Grant’s shorts are used as promos for John’s books, and nicely capture the period and settings of John’s novels. Most of these films required little in the way of special sets, relying instead on stock footage and vintage costumes to achieve their look and feel. John’s latest novel would change all that.
Called Mustang, the novel centers on a hotshot fighter pilot in WWII. Grant’s vision for the short to promote the book was inspired by the recent Christopher Nolan film Dunkirk, which featured intricate sequences filmed in the cockpit of a Spitfire. Granted wanted a similar look, and began arranging to use a real P-51 Mustang for filming. That presented immediate problems. First, there aren’t that many of the vintage aircraft left, and those that are still flying usually have anachronistic instruments in the cockpit, like GPS. Also, Grant wanted the instruments to respond as if the plane were airborne, and to have the shadows cast by the canopy into the cockpit suggest aerial maneuvers. Such an effect would be difficult to achieve with a plane stuck on a runway.
That’s when Grant realized that a gimballed cockpit simulator was needed. It could have a period-accurate dashboard, be positioned outdoors to take advantage of natural daylight and real backgrounds rather than CGI, and could be pitched, rolled and yawed to simulate flight. It would be perfect, and it would save the project. There was just one problem: he had no idea how to build it.
Helping Hands
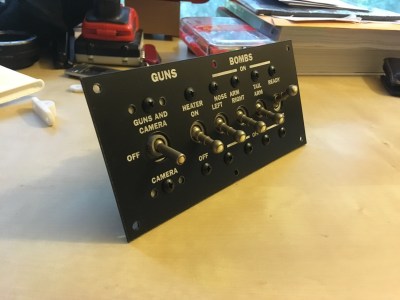
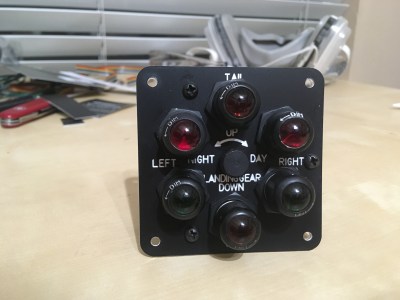
Wisely, Grant turned to his local hackerspace, Dallas Maker Space, for help. There he found not only the tools he lacked, but kindred spirits with the necessary skills and the willingness to share them. They started working on the cockpit instrument panel, which ended up including a combination of actual flight hardware and mocked-up instruments. The fake instruments used steppers and an Arduino to drive the needles, which were controlled by a custom iPad app that was used to animate them live during filming. The real instruments, like the artificial horizon and turn-and-slip indicator, were powered by a vacuum pump and responded to the movements of the simulator on its gimbals.
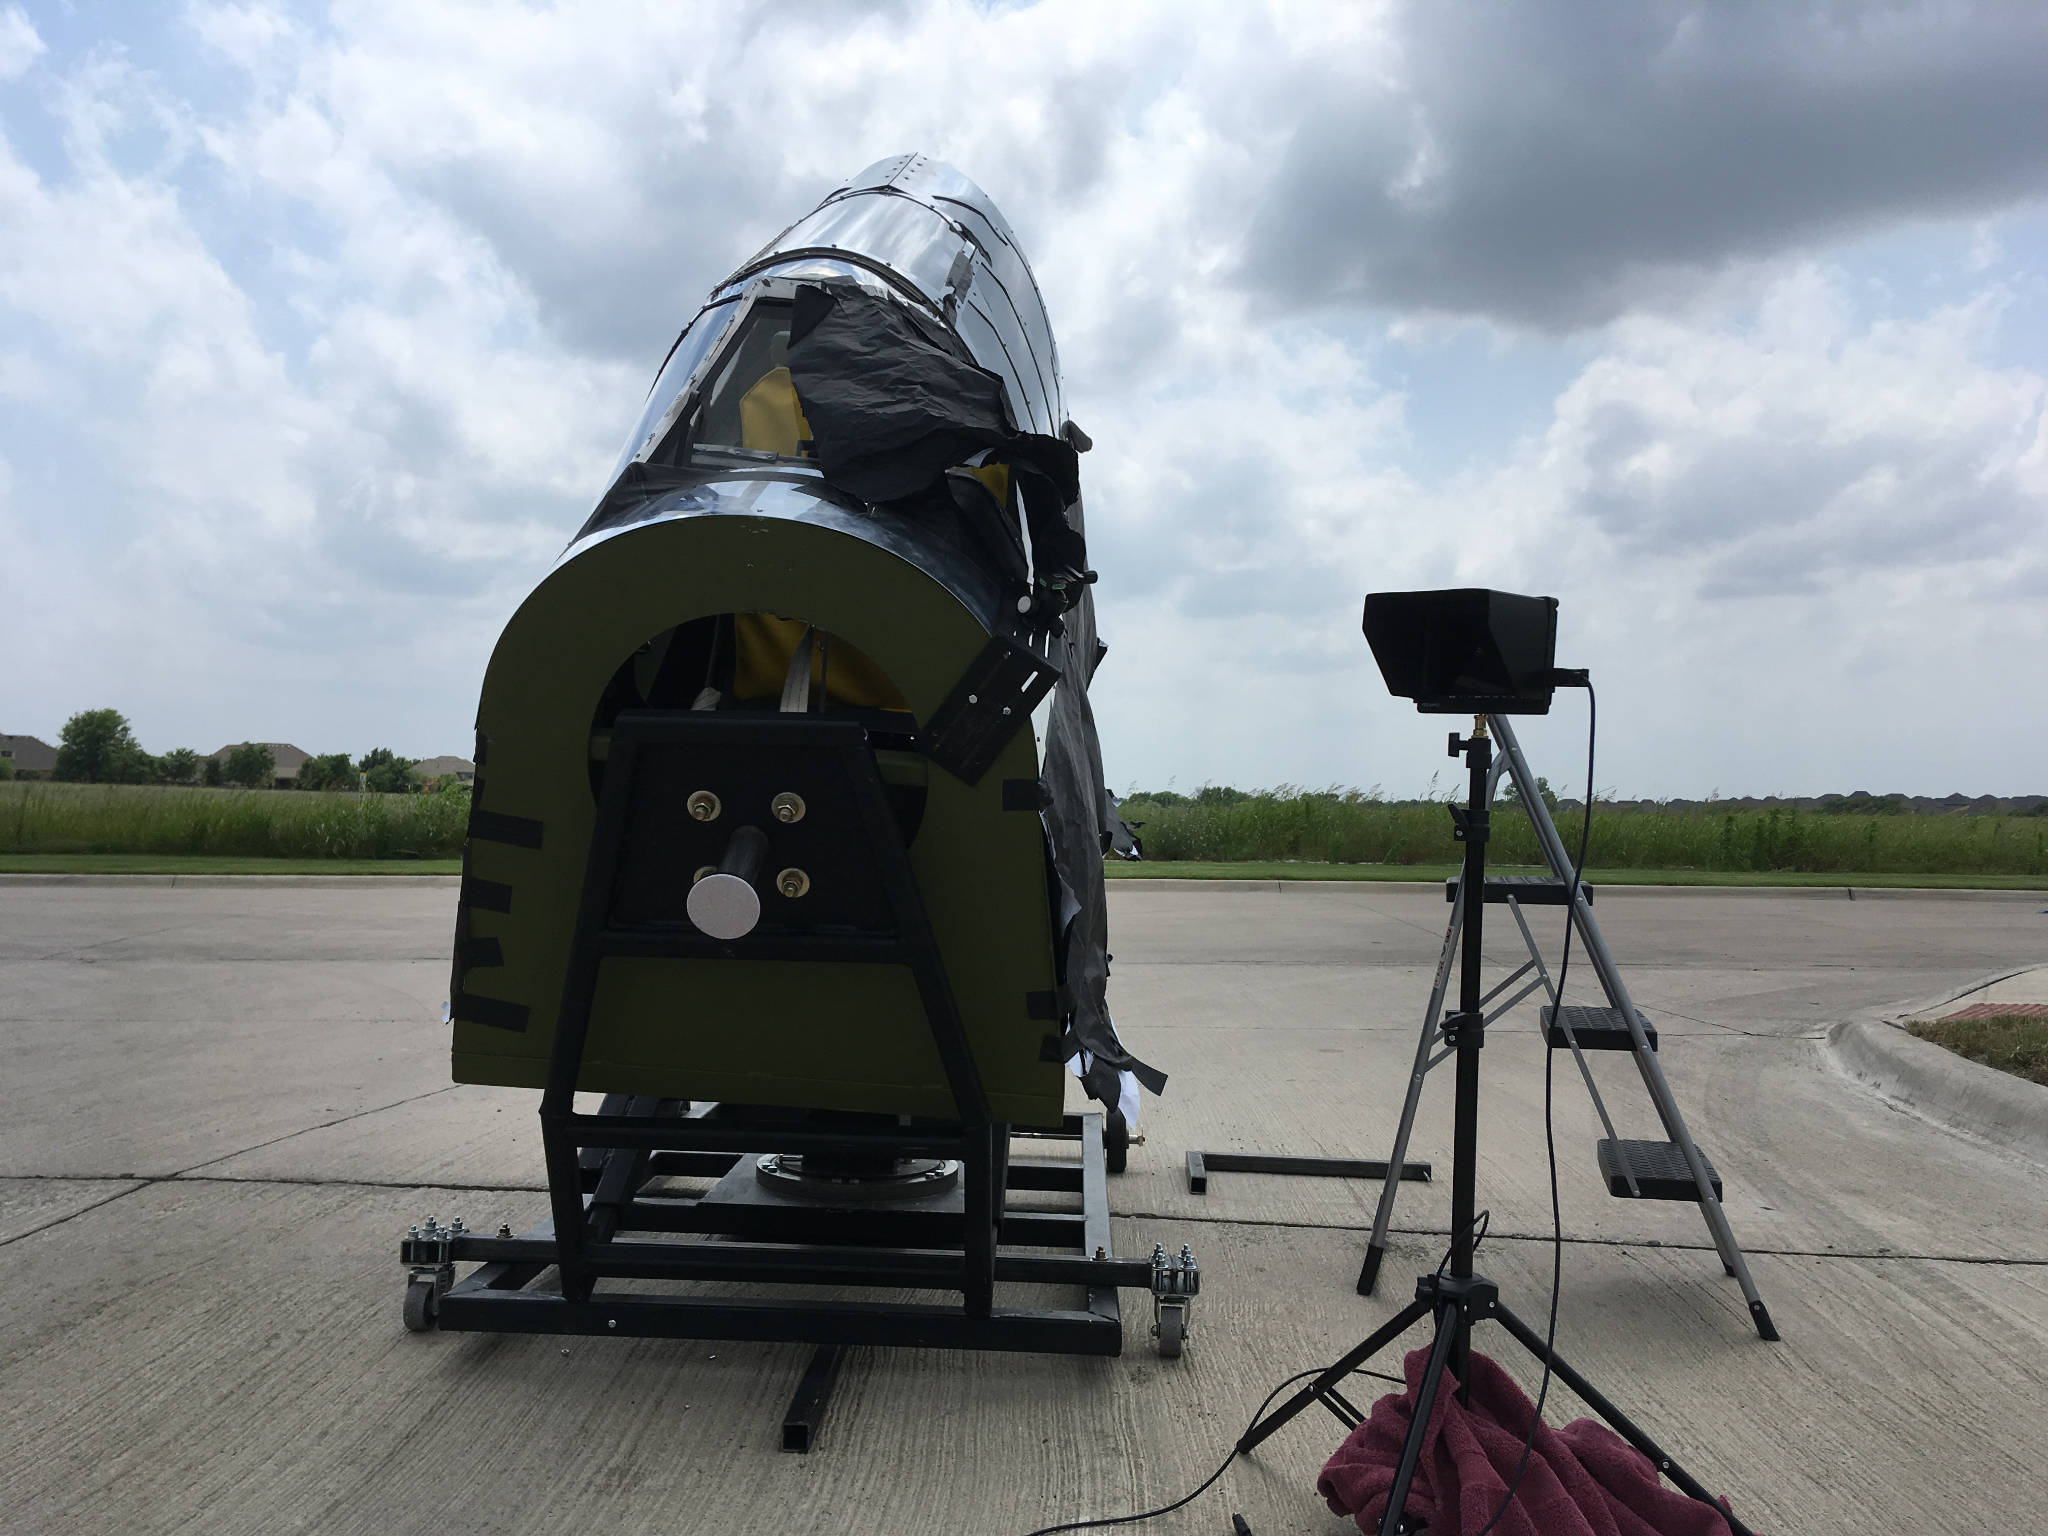
The gimballed cockpit set for exterior shots. The wide horizon and natural lighting combined with the 3-DOF gimbal make for a very realistic effect.
Mounting this convincing panel into something was an entirely different undertaking. Grant relied heavily on the experience of DMS members to design a structure strong enough to support the actor and allow for the motion needed to create a convincing effect. The cockpit mockup, made from plasma-cut sheet metal and plywood, is mounted to a heavy-duty three-axis gimbal, including a massive bearing from a pallet jack for the yaw axis.
Set and talent, ready for action.
Grant had originally planned to place the mockup on a mountaintop for shooting, much as the Spitfire mockup from Dunkirk was placed on the edge of a cliff to give an unobstructed horizon to simulate flying over the English Channel. When that proved logistically challenging, he set up on an airport runway and used clever camera blocking to avoid shooting the horizon. Grips manually moved the simulator while Grant manipulated the fake instruments and filmed the results, which I think speak for themselves. If only the budget – and on-set safety – would have supported simulating the massive four-blade Mustang propeller, the illusion would have been complete.
I really enjoyed digging into this project and all the hacks that it entailed. Movie magic is as much about hacking as anything else, at least behind the cameras, and it’s good to see what’s possible with a limited budget. We recently featured a low-budget but high-style sci-fi movie set build, and we’ve gone in-depth with a playback designer for the Netflix series Lost in Space, both in these pages and as a Hack Chat.
While the “M” in MIDI stands for “musical”, it’s possible to use this standard for other things as well. [s-ol] has been working on a VJ setup (mixing video instead of music) using various potentiometer-based hardware and MIDI to interface everything together. After becoming frustrated with drift in the potentiometers, he set out to outfit the entire rig with custom-built encoders.
[s-ol] designed the rotary-encoder based boards around an FPGA. It monitors the encoder for changes, controls eight RGB LEDs per knob, and even does capacitive touch sensing on the aluminum knob itself. The FPGA communicates via SPI with an Arduino master controller which communicates to a PC using a serial interface. This is [s-ol]’s first time diving into an FPGA project and it looks like he hit it out of the park!.
Even if you’re not mixing video or music, these encoders might be useful to any project where a standard analog potentiometer isn’t accurate or precise enough, or if you just need something that can dial into a specific value quickly. Potentiometers fall short in many different ways, but if you don’t want to replace them you might modify potentiometers to suit your purposes.
Sphero's been amusing us with its collection of robotic balls, like its adorable BB-8, for eight years. But lately the company has been getting away from the toy aspect of its products and embracing its educational potential. It's had an app that can be used to program many of its current bots for a while now, but that's only for budding coders — what do kids interested in hardware have to tinker with? Indeed, Sphero is about to release its first robot specifically made to be physically modded, called the RVR.
Sphero's been amusing us with its collection of robotic balls, like its adorable BB-8, for eight years. But lately the company has been getting away from the toy aspect of its products and embracing its educational potential. It's had an app that can be used to program many of its current bots for a while now, but that's only for budding coders — what do kids interested in hardware have to tinker with? Indeed, Sphero is about to release its first robot specifically made to be physically modded, called the RVR.
There’s no limit to the amount of work some people will put into avoiding work. For instance, why bother to get up from your YouTube-induced vegetative state to adjust the volume when you can design and build a remote to do it for you?
Loath to interrupt his PC streaming binge sessions, [miroslavus] decided to take matters into his own hands. When a commercially available wireless keyboard proved simultaneously overkill for the job and comically non-ergonomic, he decided to build a custom streaming remote. His recent microswitch encoder is prominently featured and provides scrolling control for volume and menu functions, and dedicated buttons are provided for play controls. The device reconfigures at the click of a switch to support Netflix, which like YouTube is controlled by sending keystrokes to the PC through a matching receiver. It’s a really thoughtful design, and we’re sure the effort [miroslavus] put into this will be well worth the dozens of calories it’ll save in the coming years.
The Arduino is the standard for any introduction to microcontrollers. When it comes to displaying video, the bone stock Arduino Uno is severely lacking. There’s just not enough memory for a framebuffer, and it’s barely fast enough to race the beam. If you want video from an Arduino, it’s either going to be crappy, or you’re going to need some magic chips to make everything happen.
[MagicWolfi]’s 2017 Hackaday Prize entry consists of an video display shield that would be so easy to use that, according to the project description, it could be a substitute for the classic Blink sketch.
The project centers around the VLSI VS23S010D-L chip, which packs 1 Megabit SPI SRAM with serial and parallel interfaces. An integrated video display sends the composite video signal to display, with the mode depending on how many colors and what resolution is desired: for instance, at 640×400 you can display 16 colors. As he describes it, not 4K video but definitely Joust. The chip expects 3.3 V logic so he made use of a MC74LVX50 hex buffer to tailor the Arduino’s 5 V. Currently he’s working on revision two of the shield, which will include SPI flash memory.
You can follow along with the project on Hackaday.io or the current shield design can be found in [MagicWolfi]’s GitHub repository.
Today on In Case You Missed It: Pairing an Arduino with a skateboard produces the Sick Ollie Machine, capable of measuring angular and X-,Y- or Z-axis accelerations to measure who is hitting their tricks the hardest. Courtesy of Josh Sheldon, the ollie machine uses an Arduino beneath the trucks of the board paired with a relay to measure the stats of each trick. Those who are producing truly sick ollies are rewarded with a chime from the attached cowbell.
Meanwhile, over at CERN a set of robot twins have been enlisted to provide live video feeds and environmental measurements for the massive underground complex. The robots, called TIM twins for Train Inspection Monorail, move along a -- you guessed it -- overhead rail that runs throughout the facility in order to monitor stats like oxygen concentration and radiation emissions.
Also, don't forget to check out what happens when a frog is run through Google's Deep Dream project (which is easily the weirdest sentence I've written yet today). As always, please share any interesting tech or science videos you find by using the #ICYMI hashtag on Twitter for @mskerryd.