Learn how to tweet from your Arduino.
This is chapter thirty of our huge Arduino tutorial series. Updated 16/06/2014
In this article you will learn how to send messages from an Ethernet-enabled Arduino to twitter. For the uninitiated who may be thinking “what is all this twitter nonsense about?”, twitter is a form of microblogging.
You can create a message with a maximum length of 140 characters, and broadcast this on the twitter service. For people to receive your messages (or tweets) they also need to be a member of twitter and choose to subscribe to your tweets.
Generally people will use the twitter service using one of two methods: either using a web browser, or using the twitter application on a smartphone or tablet computer. For example, here is a typical web browser view:

… and here is an example of a twitter application running on an Android OS smartphone:

The neat thing about twitter on a mobile device is that if your username is mentioned in a tweet, you will be notified pretty well immediately as long as you have mobile data access. More on that later. In some areas, you can set twitter to send tweets from a certain user to your mobile phone via SMS – however if doing so be careful to confirm possible charges to your mobile phone account.
Finally, if you are worried about privacy with regards to your tweets, you can set your account to private and only allow certain people to follow your tweets.
So let’s get started.
First of all – you will need a twitter account. If you do not have one, you can sign up for one here. If you already have a twitter account, you can always open more for other uses – such as an Arduino.
For example, my twitter account is @tronixstuff, but my demonstration machine twitter account is @tronixstuff2. Then I have set my primary account to follow my machine’s twitter account.
Now log into twitter with using the account you will have for your Arduino and visit this page and get yourself a token by following the Step One link. The process will take you through authorising the “tweet library” page to login to your twitter account – this is ok. It will then present you with a long text called a “token”, for example:

Save your token somewhere safe, as you will need to insert it into your Arduino sketch. Finally, don’t give it to others as then they will be able to post onto twitter using your account. Next, follow step two from the same page – which involves download and installation of the required Arduino library.
Now for the hardware.
You will need an Arduino Uno or compatible board with an Ethernet shield that uses the W5100 Ethernet controller IC (pretty much all of them) – or consider using a Freetronics EtherTen – as it has everything all on the one board, plus some extras:

Furthermore you will need to power the board via the external DC socket – the W5100 IC uses more current than the USB power can supply. A 9V 1A plug pack/wall wart will suffice. Finally it does get hot – so be careful not to touch the W5100 after extended use. In case you’re not sure – this is the W5100 IC:
 If you’re looking for an Arduino-twitter solution with WiFi, check out the Arduino Yún tutorials.
From this point it would be a good idea to check your hardware is working. To do so, please run the webserver example sketch as explained in chapter sixteen (Ethernet). While you do that, we’ll have a break…

Sending your first tweet
If you want your Arduino to send a simple tweet consider the following sketch. We have a simple function tweet() which simply sends a line of text (which has a maximum length of 140 characters). Don’t forget to update your IP address, MAC address and token:
// Simple twitter interface
#include <SPI.h>
#include <Ethernet.h>
#include <Twitter.h>
// Alter IP address to suit your own network!
byte mac[] = { 0xDE, 0xAD, 0xBE, 0xEF, 0xFE, 0xED }; // create MAC address for ethernet shield
byte ip[] = { 192, 168, 0, 99}; // choose your own IP for ethernet shield
Twitter twitter("aaaaaaa"); // replace aaaaaaa with your token
void setup()
{
delay(5000);
Ethernet.begin(mac, ip);
Serial.begin(9600);
}
void tweet(char msg[])
{
Serial.println("connecting ...");
if (twitter.post(msg))
{
// Specify &Serial to output received response to Serial.
// If no output is required, you can just omit the argument, e.g.
// int status = twitter.wait();
int status = twitter.wait(&Serial);
if (status == 200)
{
Serial.println("OK.");
}
else
{
Serial.print("failed : code ");
Serial.println(status);
}
}
else
{
Serial.println("connection failed.");
}
}
void loop()
{
delay(1000);
tweet("Purple monkey dishwasher");
do{} while(1>0); // endless loop
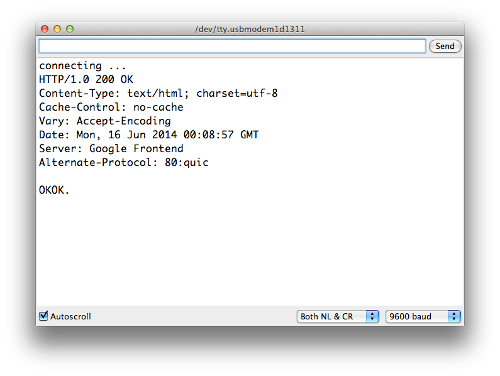
}You can check the status of the tweeting via the serial monitor. For example, if the tweet was successful you will see:

However if you try to send the same tweet more than once in a short period of time, or another error takes place – twitter will return an error message, for example:

And finally if it works, the tweet will appear:

Previously we mentioned that you can be alerted to a tweet by your mobile device. This can be done by putting your own twitter account name in the contents of the tweet.
For example – my normal twitter account is @tronixstuff. If I put the text “@tronixstuff” in the text tweeted by my Arduino’s twitter account – the twitter app on my smartphone will let me know I have been mentioned – as shown in the following video:
You may have noticed in the video that a text message arrived as well – that service is a function of my cellular carrier (Telstra) and may not be available to others. Nevertheless this is a neat way of getting important messages from your Arduino to a smart phone or other connected device.
Sending data in a tweet
So what if you have a sensor or other device whose data you want to know about via twitter? You can send data generated from an Arduino sketch over twitter without too much effort.
In the following example we’ll send the value from analogue pin zero (A0) in the contents of a tweet. And by adding your twitter @username you will be notified by your other twitter-capable devices:
// Simple twitter interface

#include <SPI.h>
#include <Ethernet.h>
#include <Twitter.h>

// Alter IP address to suit your own network!
byte mac[] = {   0xDE, 0xAD, 0xBE, 0xEF, 0xFE, 0xED }; // create MAC address for ethernet shield
byte ip[] = {   192, 168, 0, 99}; // choose your own IP for ethernet shield
Twitter twitter("aaaaaaa"); // replace aaaaaaa with your token

int analogZero;
char tweetText[140];

void setup()
{
  delay(5000);
  Ethernet.begin(mac, ip);
  Serial.begin(9600);
}

void tweet(char msg[])
{
  Serial.println("connecting ...");
  if (twitter.post(msg))
  {
    // Specify &Serial to output received response to Serial.
    // If no output is required, you can just omit the argument, e.g.
    // int status = twitter.wait();
    int status = twitter.wait(&Serial);
    if (status == 200)
    {
      Serial.println("OK.");
    }
    else
    {
      Serial.print("failed : code ");
      Serial.println(status);
    }
  }
  else
  {
    Serial.println("connection failed.");
  }
}

void loop()
{
  // get some data from A0.
  analogZero=analogRead(0);

  // assemble message to send. This inserts the value of "analogZero" into the variable "tweetText" at point %d
  sprintf(tweetText, "Pin analogue zero reads: %d. @username.", analogZero); // change @username to your twitter account name

  delay(1000);
  tweet(tweetText);
  do{ }
  while(1>0); // endless loop
}
You may have noticed a sneaky sprintf function in void loop(). This is used to insert the integer analogZero into the character array tweetText that we send with the tweet() function. And the results of the example:

So you can use the previous sketch as a framework to create your own Arduino-powered data twittering machine. Send temperature alerts, tank water levels, messages from an alarm system, or just random tweets to your loved one.
Conclusion
So there you have it, another useful way to send information from your Arduino to the outside world. Stay tuned for upcoming Arduino tutorials by subscribing to the blog, RSS feed (top-right), twitter or joining our Google Group. Big thanks to @neocat for their work with the twitter Arduino libraries.
And if you enjoyed the tutorial, or want to introduce someone else to the interesting world of Arduino – check out my book (now in a third printing!) “Arduino Workshop” from No Starch Press.

In the meanwhile have fun and keep checking into tronixstuff.com. Why not follow things on twitter, Google+, subscribe for email updates or RSS using the links on the right-hand column? And join our friendly Google Group – dedicated to the projects and related items on this website. Sign up – it’s free, helpful to each other – and we can all learn something.
The post Arduino Tutorials – Chapter 30 – twitter appeared first on tronixstuff.


 If you’re looking for an Arduino-twitter solution with WiFi, check out the