This year, Maker Faire Shenzhen 2019 will be focusing on the theme “To the Heart of Community, To the Cluster of Industry”. With a full chain events for technological innovations, you can look forward to the Maker Summit Forum, Maker Booths (includes highlights and performances), as well as Innovation workshops. […]
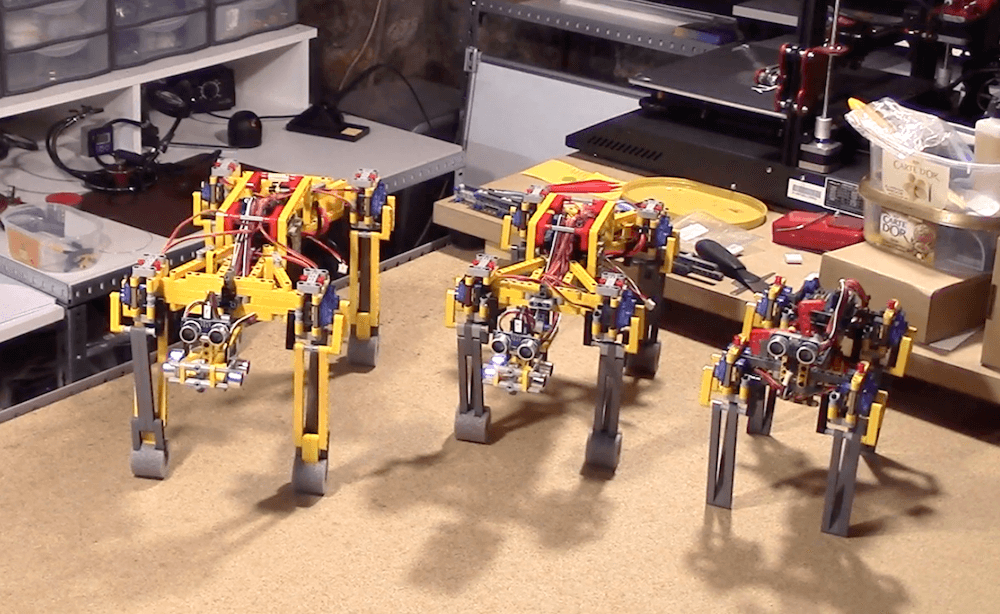
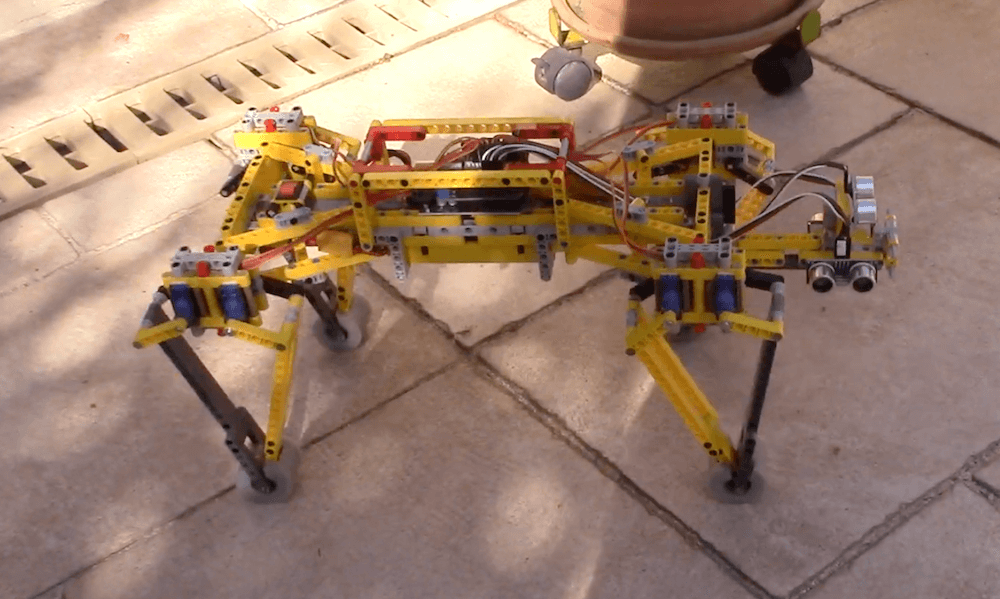
YouTuber Oracid1 has developed a unique family of four-legged robots, dubbed “FiveBarQuads.”
The quadrupeds all feature ultrasonic sensing for navigation and a body made out of LEGO components — and as seen in the first video below, his latest (and largest) version is able to navigate quite nicely on its own. It’s even able to traverse a grate and maneuver around a potted plant, though chair legs are understandably a bit tricky.
The robots use an Arduino Uno for control along with a total of 16 micro servos in its shoulders (four each) in order to move the limbs. Two servos are employed to actuate each upper linkage for the legs, which are attached to bottom sections, and finally to the feet portion through a series of joints. This allows for an interesting locomotion capability that could be applicable in a variety of situations.
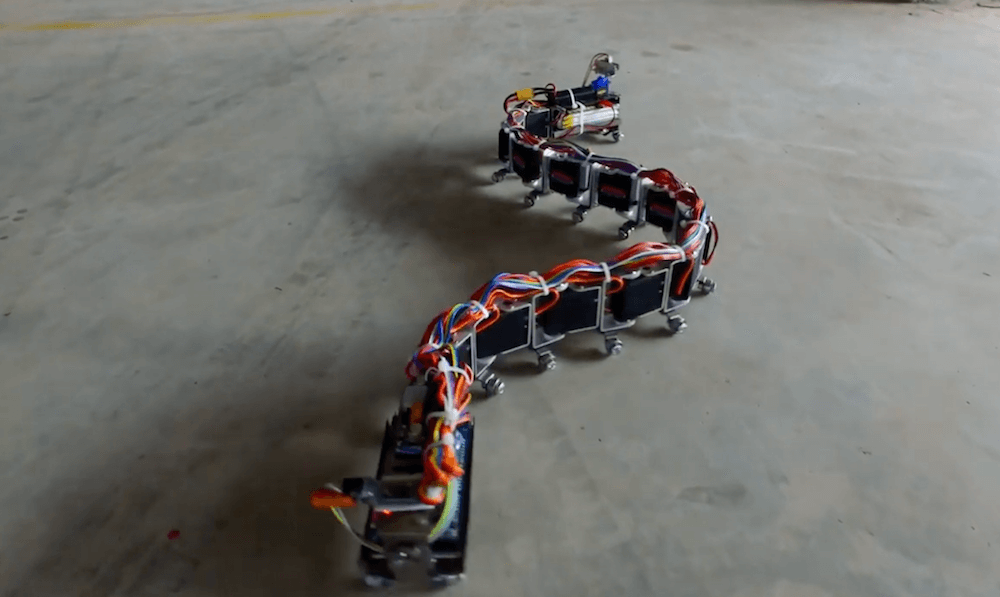
What has a dozen servos, a camera, and an Arduino Mega for a brain? Nevon Projects’ snake-bot, of course!
This impressive robot uses a total of 12 servos for locomotion and can travel across a variety of surfaces under the control of Android app, or autonomously via a sensor mounted to a smaller servo on the head.
The snake’s electronics are split up between a head section that houses batteries and the sensor, and a tail bearing electronics including the Arduino.
The project is available as a kit, or could certainly provide inspiration for your own project if you want to start from scratch. Check it out oscillating across the ground on tiny rollers in the video below, along with a surprising transformation into a square shape at just before the 1:45 mark.
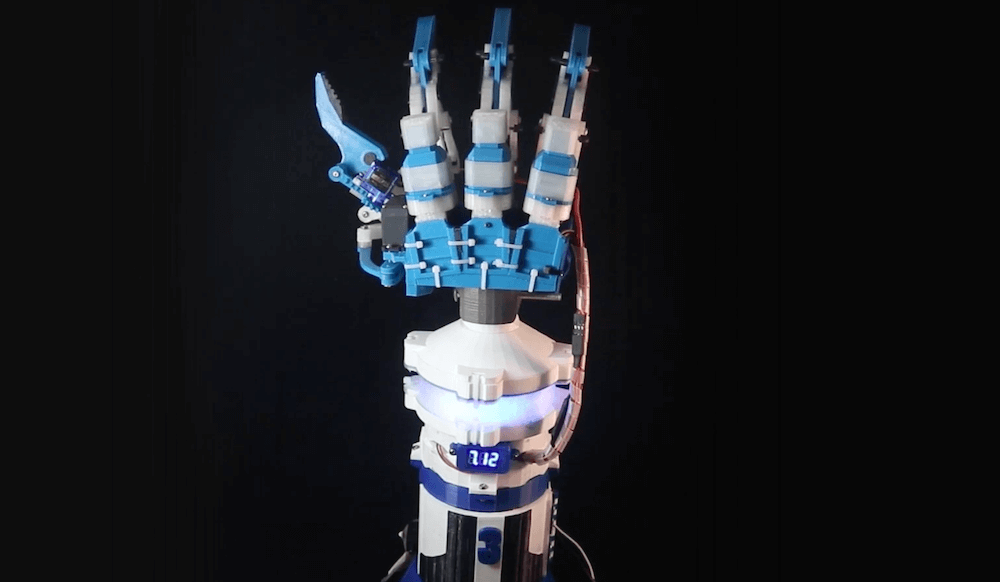
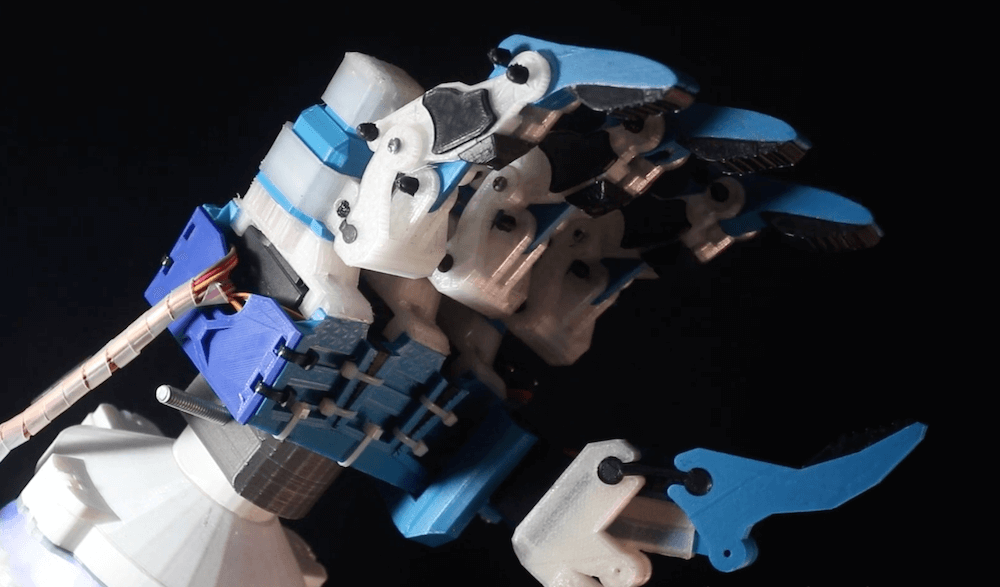
Gray Eldritch (AKA The Technomanc3r) has been working on a robotic hand for some time now, and has settled (so far) on a design with three independent servo-actuated fingers and a thumb. He’s also implemented a wrist assembly to rotate it back and forth, with an Arduino Uno hidden inside for an entirely self-contained gripper unit.
Each of the three fingers is controlled by a single MG996R servo, as is the wrist, while the thumb adds a second SG90 servo to allow it to move on two axes. The fingers are modular, so they can be swapped out as needed, and you even change the thumb position for ambidextrous operation.
It remains to be seen what Eldritch plans to do with the gripper, but it looks brilliant by itself in the video below.
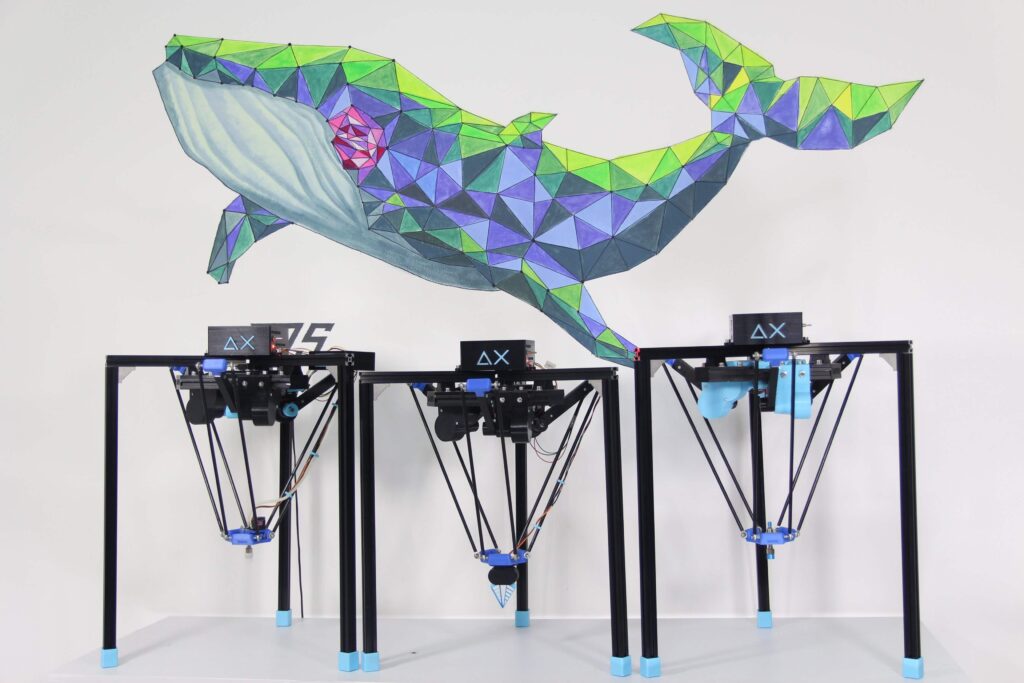
If you’ve ever seen a delta 3D printer work, you’ve certainly been amazed at the careful coordination of three motors to accurate position a carriage. While impressive in this role, delta robots can be used for much more, from laser engraving, to pick-and-place operations, to automated phone testing, or even playing the piano.
To make these systems a bit more accessible, Doan Hong Trung has developed an open source delta robot — dubbed Delta X — based on an Arduino Mega and a RAMPS 1.4 board that can do all of these jobs and more.
Details on the modular kit are available here, along with many more clips of it in action. It’s slated to debut on Kickstarter soon, and you can sign up on deltaxrobot.com to be notified when it launches. Design files for the build will be released when successfully funded.
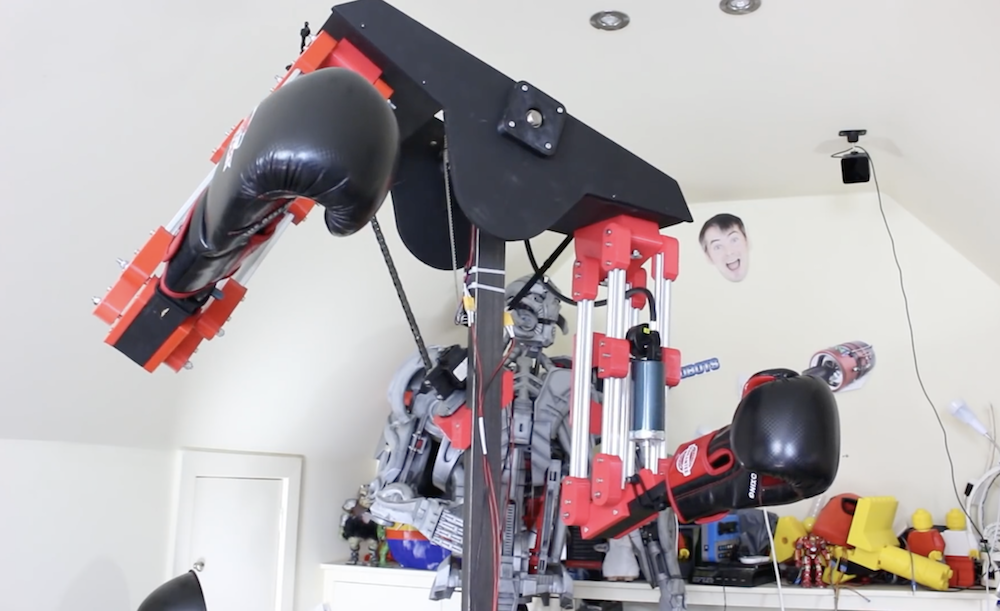
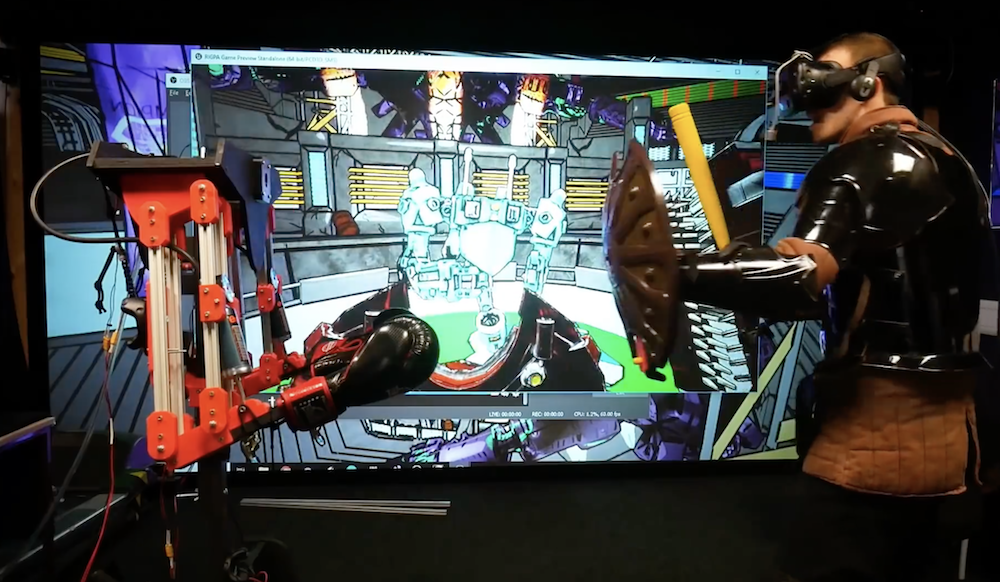
VR environments are meant to be immersive, but if you’ve ever thought what was missing is being actually pummeled by robotic fists, then James Bruton’s newest project could be just the thing.
Bruton recently teamed up with students from Portsmouth University to build a robot that works in the real world, and coordinates its movements with a virtual setting displayed on the human’s headset.
The robot itself is controlled by an Arduino Mega, and features a differential (tank) drive with encoders for feedback. Shoulders can tilt from left to right, and the actual punching motion is handled by pneumatic actuators built from modified bicycle pumps. Robo-fists are covered by boxing gloves to keep humans relatively safe, and flesh-based competitors are given a small shield and sword-bat with which to fight back!
I worked on this project with final year degree students in Computer Games Technology at Portsmouth University CCI faculty. The robot hardware is controlled over a serial interface, the team built an VR game which controls the robot, so when you get hit in VR you get hit in real life! The robot is tracked back into VR with Vive trackers so it stays in sync.
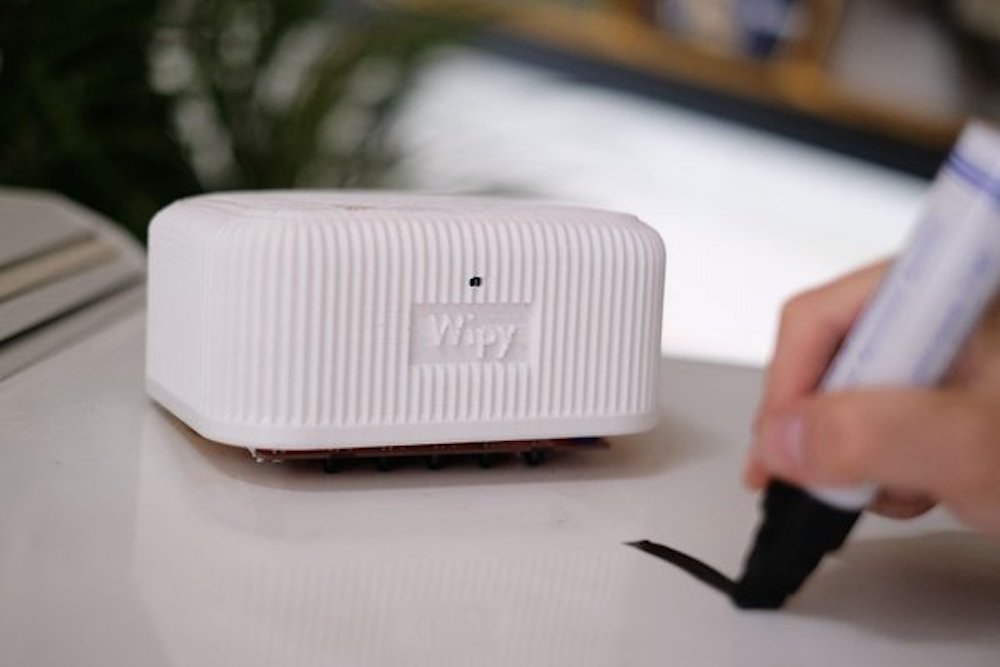
If you have to do a lot of drawing on a whiteboard, you also have to clean it. Why not have a robot do this instead? That’s the idea behind Wipy, an Arduino Uno-based robot that uses magnets to stick it to the board, plus grippy wheels and motors to power it across your scribbles.
Wipy employs an array of IR sensors that enable it to act as a line follower, along with a time-of-flight (ToF) sensor to detect your hand on the board. While one might assume this sensing arrangement would prevent it from erasing your work-in-progress, it annoyingly allows it to start erasing immediately when you start drawing on the board. At least it has a cute LED face!
Did you ever get tired of cleaning the whiteboard? Have you ever wondered how much your life would improve if a robot could do this for you? You now have the chance to make this a reality with Wipy: the overly motivated whiteboard cleaner. Wipy will properly clean your embarrassingly bad drawings, and it will even do it with a cute smile. You don’t even need to activate it! It will just clean the board when you least expect it… Uhhh…*cough cough*…we, of course, mean: when you need it most!
– Our future friend will be able to stick to the board using magnets and is able to move through space using grippy wheels.
– It will be able to follow a line and erase it using a line-following sensor and a sponge.
– Wipy has the ability to measure the distance to your hand using a time-of-flight sensor.
– We will give Wipy a cute personality using a small OLED screen.
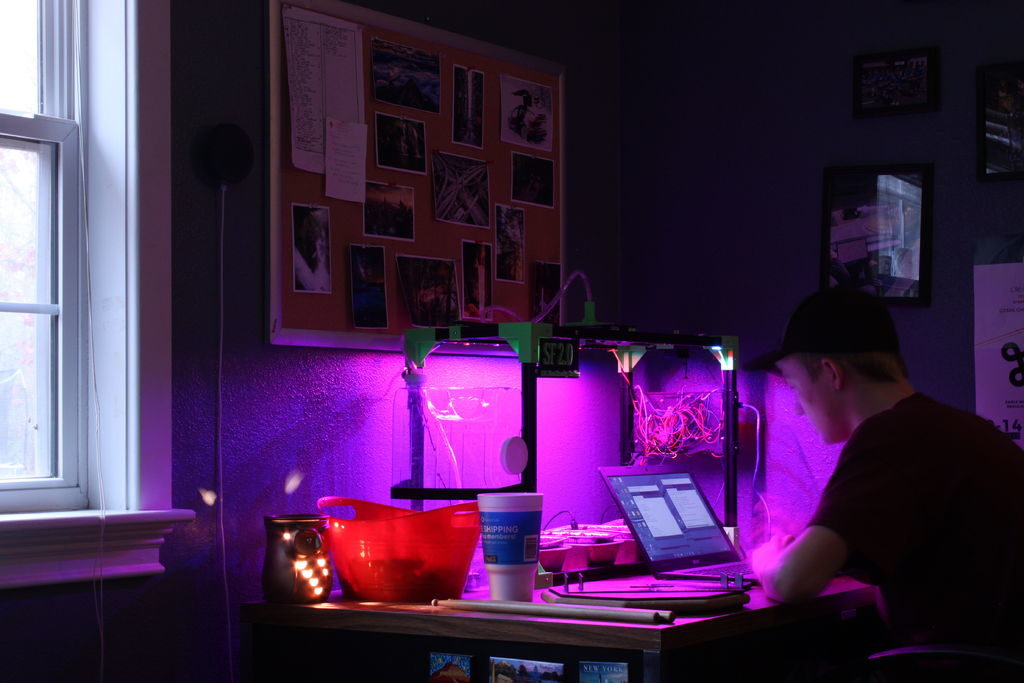
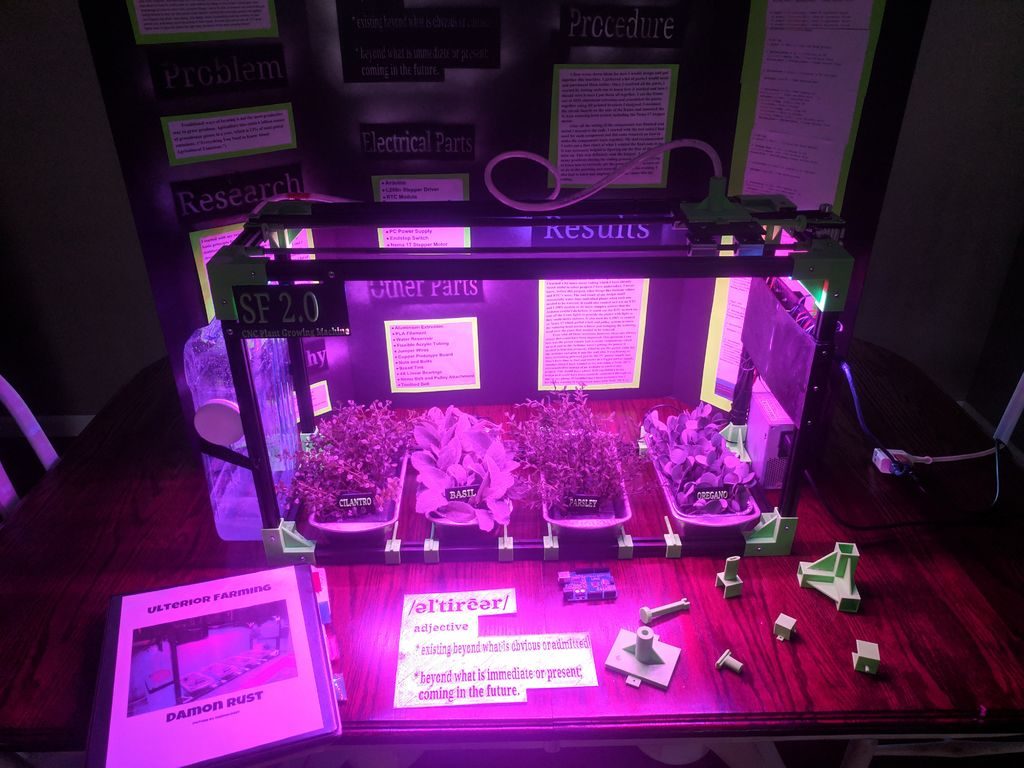
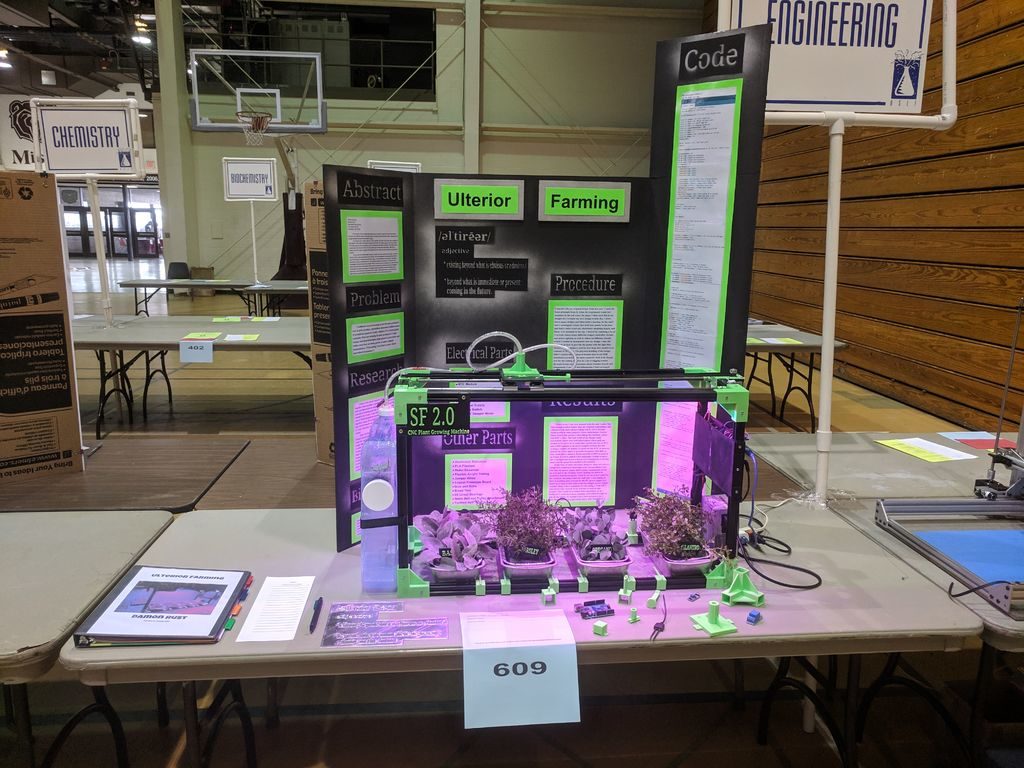
Do you like plants, but not so much the tending to and watering them? If that sounds like you, then you might be interested in your own CNC growing machine. The system—created by 15-year-old maker “daily3dprinting”—is controlled by an Arduino Uno, and uses a single stepper motor to pull a watering head into position based on hygrometer readings.
A relay is used to turn the grow light on at 6am and off at 8pm, and another to activate the unit’s water pump. A third relay is employed to power off the L298N stepper driver when not needed.
The project took home second place in the math and engineering category at daily3dprinting’s high school science fair, and more info on the build is available in its write-up here.
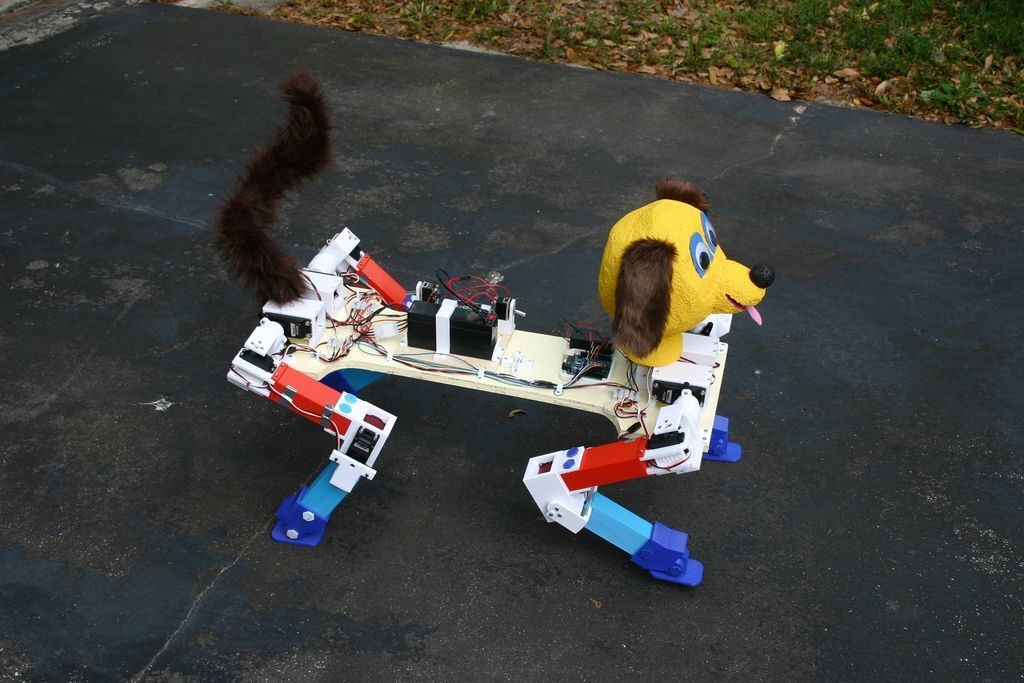
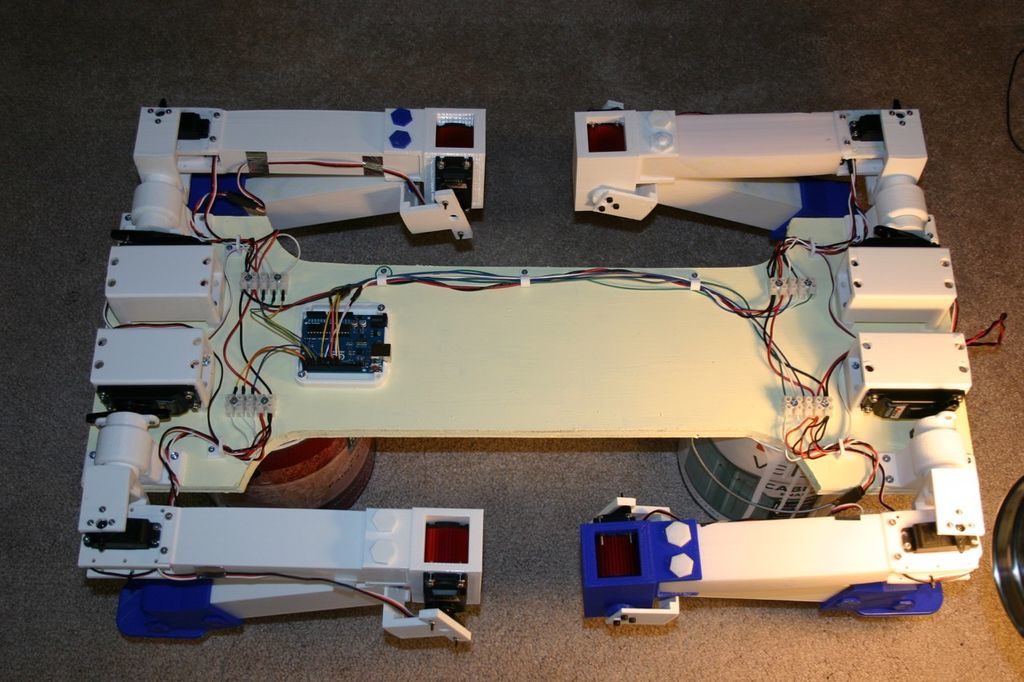
Would you like a dog? Would you like a robot dog? If so, then this build by Michael Rigsby could be a great starting point.
Rigbsy’s robotic pet features four servo-driven legs, with two-axis shoulder movement, as well as an articulated knee joint. As seen in the video below, it’s capable of picking itself up off the ground, and can then walk using a slow side-to-side gait.
An Arduino Uno uses the majority of its I/O pins to control the legs, and as of now, it travels forward with no directional control or sensor input.
Instructions for the project, along code and 3D print files, are available in Rigsby’s write-up.
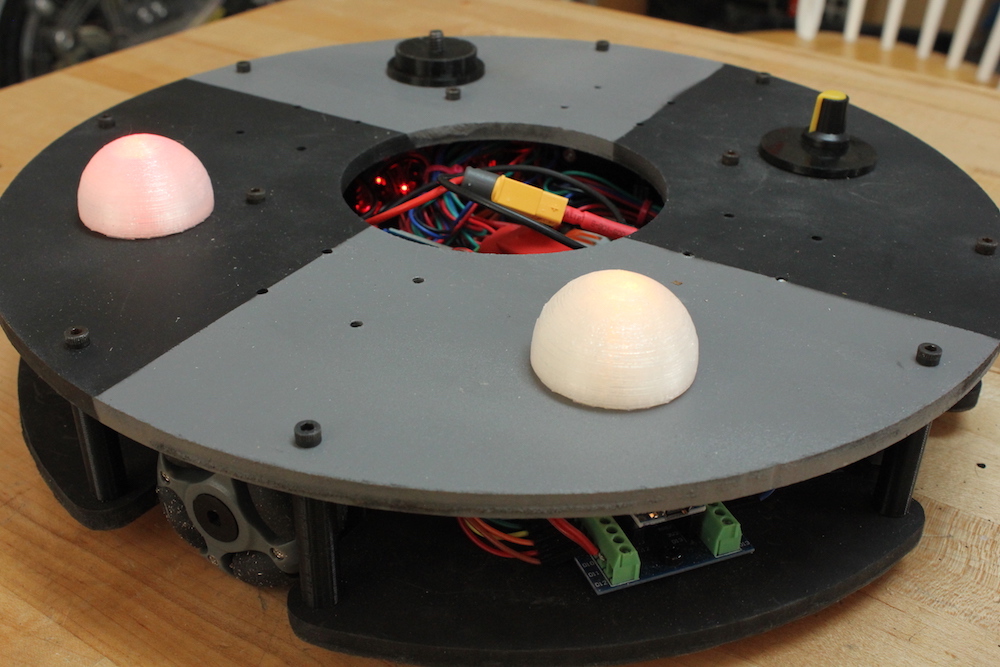
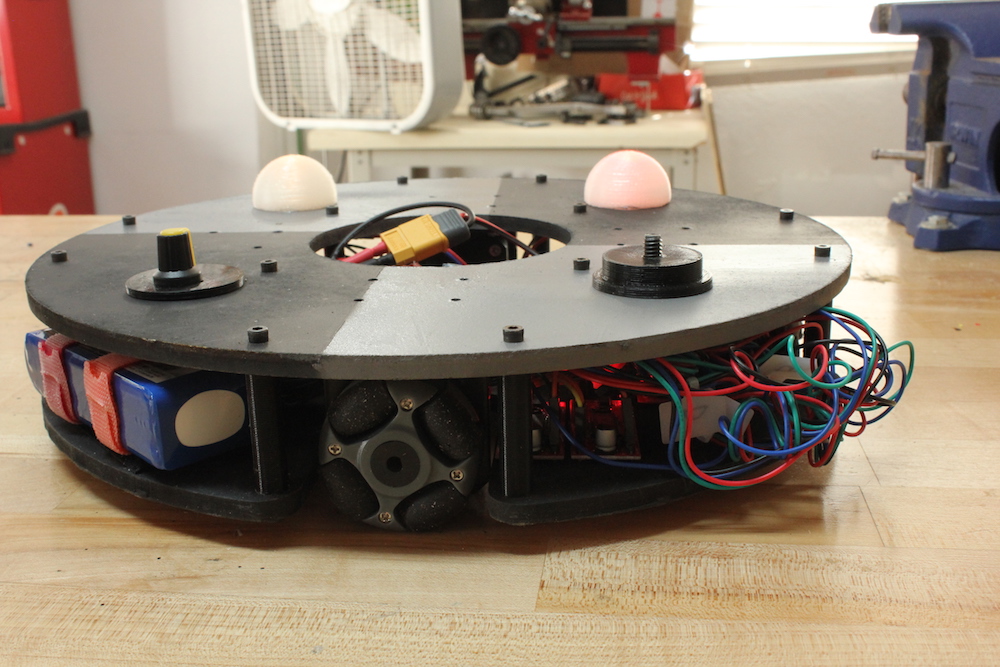
When we last saw this omni robot by Jeremy S. Cook, it was lurching around under Arduino Nano and Bluetooth command. After much work, he finally has it to a state where it rolls nicely on a flat surface—even carrying a little strandbeest at just after 8:30 in the demo video.
The biggest revision for the robot was new “grippier” wheels, but electronics were also enhanced, including a LiPo battery (with a voltage divider monitoring circuit), potentiometer for speed control, and LED eyes.
Changes were facilitated by a screw terminal board attached to the Nano, which minimized solder work, while keeping the robot’s wiring secure. More details and code are available here, while the upgrade/troubleshooting process can be seen in the video below.


 This year, Maker Faire Shenzhen 2019 will be focusing on the theme “To the Heart of Community, To the Cluster of Industry”. With a full chain events for technological innovations, you can look forward to the Maker Summit Forum, Maker Booths (includes highlights and performances), as well as Innovation workshops. […]