More design feedback
My friend, Steve, who has done a lot of PC board design, looked at my design and provided some detailed feedback and some questions for me.
First, he noticed that one of my ICs did not have a bypass capacitor, and that one of the other bypass capacitors was badly routed. I’d been worried about that myself, so having it be his first comment told me I really had to fix it.
He also suggested that all the logic GND signals have only a single point of contact with the motor GND signal, to avoid ground loops. I’d not thought about ground loops, and realized that I had a redundant contact make a ground loop that ran through the Arduino board! I removed the extra ground routing and re-routed the logic ground wires to run to connect to the end of the motor ground so that they were as separated as possible from the noise injected by the motors.
He asked me several questions about heat dissipation, also, but I was ready for those. The TLE-5205 chips I’m using have only 400 milli-ohms of on-resistance (for high and low legs added), so at 2.5A (where I expect to use them) they should be dissipating 1W. With a junction-to-ambient thermal resistance of 65ºK/W, I should see a temperature rise of no more than 65º, up to 90ºC. That is pretty hot, but well below the 150ºC limit. If I add a chunk of aluminum as a heat sink, the temperature rise should be much less.
Steve also noticed a problem with the 74*32 and 74*594 parts on the board. One was given as 74HCT32 and the other as 74LS594. He recommended that both be 74HC series, which is really what I intended, but the 74xx-us Eagle library had not included that technology for those parts. I went into the library and added the HC and HCT technologies (just a button click!), so that the parts are now properly labeled.
My other friend, Gabriel, suggested that if I went with the $33 4pcb.com board, I could perhaps put multiple boards on the panel and cut them apart with board shears at work. I’ve never seen board shears, but I understand that the Jack Baskin School of Engineer has some that I could use. I picture them as looking like a heavy-duty paper guillotine, making one cut across the board at right angles to the edge. (Gabriel says that is indeed what it looks like.)
Of course, since I’m at the maximum design size (8cm×10cm) for the freeware version of Eagle, I’ll have to find a tool to panelize the design. Gabriel suggested Gerbtool to do the panelizing (the same tool that Steve was using to look at the designs, and the one that they teach students to use in computer engineering and electrical engineering courses), but that is a Windows-only, license-fee tool. I wanted to do this task with free tools as much as possible (not only because I’m cheap, but so that other hobbyists could try the same things), and I have a strong aversion to Windows.
I looked around for a free tool (now that I knew that the keywords were “Gerber panelization”) and found GerbMerge, which is free, open-source software written in pure Python 2.4, which should be installable on any Mac OS X, Linux, or Windows machine. I’ll try downloading it tomorrow and see whether 4pcb.com will accept the output. Since my design is only 8cm×10cm, I could put 4 boards down in 17cm×21cm, which at 55.34 sq-in is still under their 60 sq-in limit.
If I can get 4 boards for $33+shipping from a high-quality fab like 4pcb.com, I’ll be happy. At some later date, I’ll probably release the design through BatchPCB, which would allow others to make copies for about $31 each, but probably not until I’ve tested the board myself and gotten the robotics club to solder one up successfully. I need to make up a bill of materials for populating the board and put in an order with Digi-Key. The expensive parts are the switching regulator and the H-bridges, which will come to about $70, I think. I’ll probably buy a set of parts for myself, but ask Infineon and TI if they will donate samples for the high-school robotics club. I’ll be happy if we come out of this project with two fully populated working boards for under $200 in parts (counting my time as freely donated volunteer time).
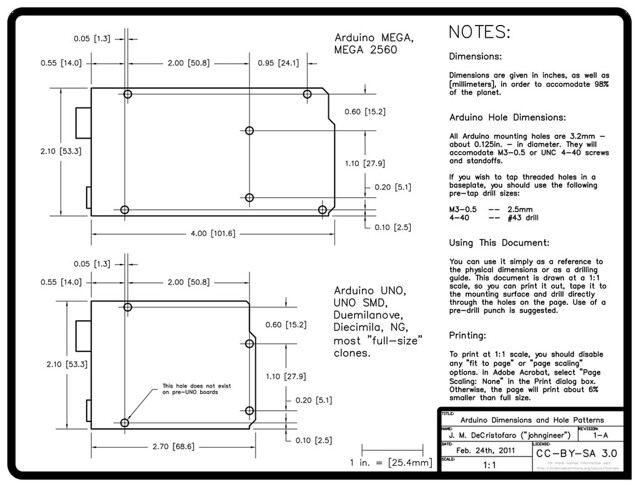
Filed under: Hexmotor H-bridge board, Printed Circuit Boards, Robotics Tagged: Arduino, motor controller, Printed circuit board, robotics


 Mylène gave me a pointer to a