Posts with «music» label

Building a flamethrower guitar with Genuino 101

In support of the TBS show “America’s Greatest Makers,” YouTuber/plumber/stuntman/inventor Colin Furze recently took on the challenge of turning a bass guitar into a flamethrower with the help of a Genuino 101. Because after all, there’s nothing more metal than fire bursting as a rockstar shreds on-stage.

To bring this project life, Fruze added a pair of modified blow torches to the neck of the guitar and sawed off part of the instrument’s base to fit in the firing mechanisms. As you can see in his tutorial video below, the body is equipped with a gas reservoir on top, solenoid valves, a few switches, a gas supply to the blow torches, an inlet pipe, and some other components.

He even converted his amp to house a gas tank, along with a speaker, the Genuino board and a relay shield that enables the Maker to synchronize flames to certain musical patterns and sequences.

It goes without saying that you may not want to try this at home…

SMOMID is a Mega-powered MIDI guitar

Nick Demopoulos is a guitarist, sound designer and musician. He is also a Maker and the creator of the “SMOMID” — an Arduino Mega-based MIDI instrument that resembles a touch-sensitive guitar with several joysticks and other sensors. Not only does it just look cool, it can even flash LEDs in sync with the music being played for some wild effects and visual feedback for the performer.

This instrument was created out of necessity because despite the fact that the guitar is the most popular instrument in the world, there are almost no guitar-like midi controllers commercially available. The SMOMID is not a guitar, nor is it a substitute for a guitar, but rather it is a new and unique interface. Like all musical instruments, it has its strengths and weaknesses, and requires patience and practice to master.

Its software allows the performer to control numerous aspects of a performance, including the playing of melodies and harmonies, the direction and pattern of a melody, controlling beats, controlling bass lines, triggering samples, manipulating audio files, and more. All aspects of a performance can be controlled from the grid on the fret board and the buttons on the instrument body. Additionally several custom made synths can be chosen as sounds and several tunings are available. The instrument can be played like a fretted guitar, like a fretless guitar, with twelve notes to the octave, or other variations like twenty four or forty three notes to the octave. In addition to emitting sound, the SMOMID also emits light that is rhythmically in sync with the music the instrument is then creating. The lights also provide visual feedback for a performer that can indicate if an effect is engaged, the rhythm of a delay or the section of a composition among other facets of a performance. The SMOMID connects to any device or software that can receive MIDI information via a USB cable and is bus-powered.

You can read all about the project here, and check out some SMOMID performances below!

Turn body movement into music with Arduino

Calvin Cherry has created a wearable instrument programmed to respond to body movement. The Maker, who is a grad student at the University of Wisconsin-Madison, calls his device “Music from Motion,” or “mFM.” It consists of small electronic sensors Velcro-ed onto his wrists and ankles that, with every move, alter a synthesized track playing on a loop over a set of speakers.

Various motions correspond to different sounds. For instance, increasing the pace with his left foot adds more drum. Picking up the movement with his right foot throws in a cymbal. When he rotates his right hand, it makes the track a bit woozier through an audio mixing process called flanging. When he moves his left hand, it prompts a wah-wah effect.

And what would a musician be without his or her fans? Cherry points out that there are specific triggers, including an audio clip of a roaring crowd whenever he claps his hands. According to a recent article, there’s a monitor that displays real-time information on the music — an interface he devised with Pure Data.

At the heart of the project lies a Raspberry Pi and Arduinos. An Arduino on the sensor receives data relating to how quickly the body parts are accelerating, and wirelessly sends that information over radio to a small device housed inside a LEGO case. That receiver features a Raspberry Pi that translates the acceleration data into an output — the changes in the audio itself.

Cherry hopes to make mFM open-source in the near future, so he could see what other Makers are able to do with it. You can read all about the project here.

(Photo: Saiyna Bashir / The Capital Times)

Koka’s Beat Machines are electromechanical instruments

Whereas most musicians would prefer to program their beats on a computer, Koka Nikoladze has elected to take a different approach. The Norway-based violinist/composer/tech developer is the inventor of handmade analog beat making machines that use springs, coils, wood and metal to create sounds.

The instruments — known as Koka’s Beat Machines — are manually programmable to produce different kinds of rhythmic and melodic patterns. The newest member of the family is a bit more electromechanical, featuring an Arduino to amplify the notes and connect the various components inside the device’s wooden housing. There’s also a light on the front that flashes to each unique beat.

You can watch the second of Koka’s Beat Machines in action below.

Play some tunes on a 13-note MIDI laser harp

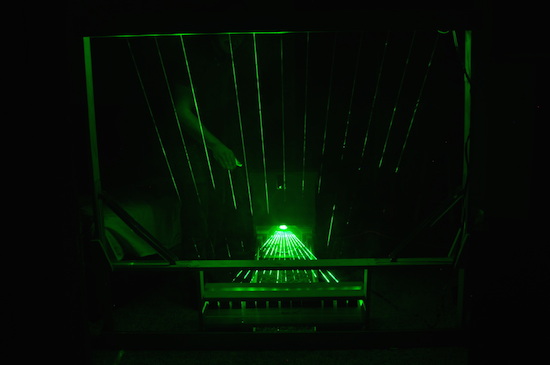
Nowadays, it seems like instruments come in all different shapes and sizes. Take Jon Bumstead’s an electronic harp, for example, that plays music by blocking laser beams — similar to how a musician would pluck a stick on the real thing.

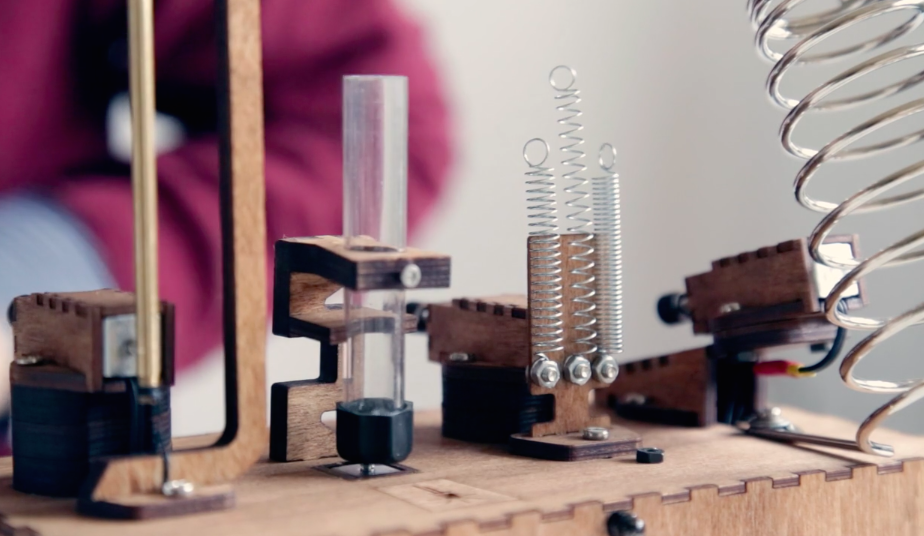
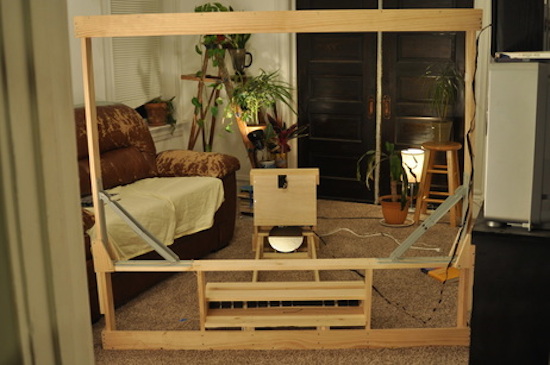
The project consists of a laser diode, an Arduino, a galvo, several mirrors to reflect the beams, 13 photoresistors and a couple 3D-printed components for the mounts. The harp’s large frame is made up of three wooden parts that can be folded with a few hinges and held in place with 18 bolts, while the electronics are secured in a box with the galvo mounted at the top.

This laser harp has thirteen strings. To generate these strings, a laser beam is moved to thirteen different position (for thirteen different strings/notes) by moving a mirror galvanometer. The mirror galvanometer, or galvo for short, is a mirror that can quickly move to different positions depending on a control voltage that is sent to it. At the end of each laser beam is a photoresistor that is used to detect if a beam is blocked. When this is detected, a note is played. I also needed the laser beam to be turned off when moving positions so that it appeared as though there were thirteen distinct positions and not a continuous sheet of light.

To generate these signals, I used an Arduino. One of the greatest challenges of the project was creating  an analog output that was fast enough to move the galvo (and laser beam) so that it appeared like there were really thirteen different beams and not a single beam being moved to different positions. I constructed a 4-bit R2R digital to analog converter (DAC). The digital output of pins 8-11 incremented thirteen times (for the thirteen positions), and the DAC generated an analog voltage ranging from 0 to 4V. I then amplified this signal  and ran it through a differential amplifier to get an analog voltage from around -7 to 7 volts for the galvo. The laser diode was synchronized with the galvo using the Arduino.

According to the Maker, the harp can be programmed to direct the beam to any position at any speed. And not only can you put on your very own laser show, but you can control the type of MIDI signal being created as well.

This laser harp is really a MIDI controller (i.e. it does not have its own sound engine). You can select whatever type of MIDI signal you desire. I chose to select middle C to the C one octave higher in frequency. Another MIDI instrument or reader (I used by Macbook Pro and Garageband) must then be used to actually create audio signals that could be played through speakers.

You can see it action in the video below!

Transform an Ikea Side Table into a Music Visualizer

Use some LEDs to upgrade a $10 Ikea side table into a centerpiece that bumps and jives to the beat of your tunes. Get your freq on!

Read more on MAKE

The post Transform an Ikea Side Table into a Music Visualizer appeared first on Make: DIY Projects and Ideas for Makers.

Build a Small, Custom USB MIDI Foot Board with Arduino

If you're playing for an audience you don't want to spend your set looking at a screen. See how one musician made this MIDI foot board for performances.

Read more on MAKE

The post Build a Small, Custom USB MIDI Foot Board with Arduino appeared first on Make: DIY Projects and Ideas for Makers.

Listen to the hypnotic sound of a red crystal


Red is an optic-sound electronic object that uses simple light sources and optical elements to create audiovisual performance. The machine was named as a color because at the center of the work there is a red glass crystal and a flexible Fresnel lens. Dmitry Morozov aka :: vtol: : created it using Arduino with pure data and python scripts:

The project includes many reworked electronic devices – a CD-rom, an old scanner, reused electric motors. Multiple moving elements provide wide variability for rather primitive optical elements. It is accomplished by constant change of focal length between the light source, crystal and lens, as well as by changing the crystal’s tilt angle and mechanical distortion of the lens. The object works autonomously, by algorithm with many accidental events tied to feedback, with sensors defining the position of various mechanical elements in relation to the range of their movement. The sound part has up to 4 voices which depend on the activity of various elements. The sound is also in direct interaction with actual position of those elements, and basically is voicing the process of movement, brightness of light, and intensity of the piece.

Watch how it works in this hypnotic video:

Arduino Blog 11 Apr 21:59

Learning What Sounds Are Made of Using Sound Blocks

This Arduino-based learning tool shows you how sounds are constructed

Read more on MAKE

The post Learning What Sounds Are Made of Using Sound Blocks appeared first on Make: DIY Projects and Ideas for Makers.

Go Behind the Scenes of Installing an Interactive LED Art Exhibit

Nick Squires details his time spent using his maker skills to produce an interactive art installation and performance.

Read more on MAKE

The post Go Behind the Scenes of Installing an Interactive LED Art Exhibit appeared first on Make: DIY Projects and Ideas for Makers.