Posts with «leonardo» label

Hack an old typewriter with Arduino for digital input

Mechanical typewriters are, for the most part, a thing of the past. Though the tactile feedback of these machines is interesting, as is the ability to directly mark on a piece of paper, they lack the important ability to input instructions into a modern computer. Konstantin Schauwecker, not satisfied with this analog-only output, decided to retrofit a German Olympia Monica typewriter as a unique digital user input device.

To accomplish this, he created a PCB with phototransistors that sense when the linkages for each key are pushed down. The result is a keyboard that functions perfectly well as a manual typewriter, and pushes this data to a computer using an Arduino Leonardo.

I modified a vintage type writer to function as a USB keyboard using an Arduino and 50 phototransistors. The typewriter is a German Olympia Monica that I bought at a local flea market. For this project I created a simple PCB that carries the phototransistors and several multiplexers and decoders. The PCB is connected to the Arduino through a ribbon cable. I used an Arduino Leonardo, which can function as a USB input device.

Check out Schauwecker’s write-up for more info on this clever build.

An experimental game with a conductive rubber band controller

RubberArms is an experimental rubber band game, created by Robin Baumgarten at the Global Game Jam 2017 in Yverdon-les-Bains, Switzerland.

The controller uses a conductive rubber cord from Adafruit that changes resistance as it’s stretched. This resistance is measured by an Arduino Micro/Leonardo (or a Teensy 3.2), which acts as a USB joystick sending signals to Unity3D. (The game is coded in Unity3D using Spring Joints and Line Renderers.)

At this point, the game is a simple prototype where you control the distance of two characters whose arms stretch whenever you stretch the rubber band, throwing little ‘Bleps’ around. You can read more about RubberArms on Baumgarten’s page, as well as his earlier project “Line Wobbler” here.

Get your DDR on with an Arduino dance pad

Alex of the YouTube channel “Super Make Something” is a huge fan of Dance Dance Revolution (DDR), and still has to play the game whenever he steps foot into an arcade. However, with the number of arcades slowly declining, the Maker has decided to bring that experience into his living room with a USB DDR dance pad.

And yes, you could always buy a metal dance pad but rather than spend $300, why not build your own? That is exactly what Alex has done using some easy-to-find materials: a 35″ x 35” slab of plywood for the base, four 1” x 35” pieces of wood for the border, five 11” x 11” pieces of MDF for the stationary panels, four 9″ x 9” pieces of cardboard for the riser panels, 12 metal button contacts out of aluminum, four 11” x 11” MDF button pads, acrylic sheets for the dance surface, and plenty of paint and graphics for the finishing touch.

The dance pad itself is based on pull-up resistors and an Arduino Leonardo, which is housed inside a 3D-printed enclosure. The Arduino includes an ATmega32U4 chip that can be programmed to act as a USB input device. The working principle here is that the MCU sends out a keystroke every time a button panel is stepped on. Alex provides a more in-depth breakdown of how it works in the video below! Meanwhile, the Arduino code can be downloaded here.

Quickie USB Keyboard Device

There are a ton of applications that we use that can benefit from keyboard shortcuts, and we use ’em religiously. Indeed, there are some tasks that we do so often that they warrant their own physical button. And the only thing cooler than custom keyboards are custom keyboards that you’ve made yourself.

Which brings us to [Dan]’s four-button Cherry MX USB keypad. It’s not really all that much more than four keyswitch footprints and an AVR ATmega32u4, but that plus some software is all you really need. He programs the Arduino bootloader into the chip, and then he’s using the Arduino Leonardo keyboard libraries. Bam! Check out the video below.

We see this design much more as a demo or collection of building-blocks than necessarily a one-size-fits-all solution. You might need five buttons, or want a different layout, or… It’s all open-source, so go nuts. And you’re not limited to key-clicks either — mouse buttons or even multiple scripted actions are within easy reach.

Building a special-function USB keypad or gaming device used to be hard work. But today between hardware and software design availability, it’s child’s play. Whether you need a footboard, a single-handed chording keyboard, or even just to update an old typewriter, the ability to control the input device that we use for eight hours per day is liberating. Experiment!


Filed under: Arduino Hacks, peripherals hacks

Presenting the Internet of Trash Cans !

This was gonna happen – sooner or later. [matthewhallberg] built a “Smart” trash can that is connected to the Internet and can be controlled by its own Android App. We’re not sure if the world needs it, but he wanted one and so built it. He started it out on a serious note, but quickly realized the fun part of this build – check out his funny Infomercial style video after the break.

The build itself is uncomplicated and can be replicated with ease. A servo motor helps flip the lid open and close. This is triggered by an ultrasonic ping sensor, which responds when someone waves a hand in front of the trash can. A second ping sensor helps inform the user when it is full and needs to be emptied. A Leonardo with the Idunio Yun shield helps connect the trash can to the internet. An mp3 shield connected to a set of powered computer speakers adds voice capability to the trash can, allowing it to play back pre-recorded sound clips. Finally, a Bluetooth module lets him connect it to an Android phone and the companion app controls the trash can remotely.

For the IoT side of things, [matthewhallberg] uses a Temboo account to send an email to the user when the trash can is full. The Arduino sketch, a header file to configure the Temboo account, and the Android application can all be downloaded from his blog. If this project inspires you, try building this awesome Robotic trash can which catches anything that you throw near it  or read the barcodes off the trash being thrown out and update the grocery list.


Filed under: Arduino Hacks, home hacks, internet hacks

A rec&play loop station for little musicians

The Interaction Awards  published the shortlisted projects for 2016 and up to five finalists in each category will be announced during the event on Friday evening, March 4, 2016. In the Expressing category, showcasing projects enabling self expression and/or creativity there is a project called Step representing an innovative and engaging way of approaching music production for children between 6 and 100 years old.

Step runs on an Arduino and has been created by Federico Lameri, Sandro Pianetti at the Master of Advanced Studies in Interaction Design in Lugano under the supervision of Massimo Banzi and Giorgio Olivero of Todo.

To prototype the user experience we’ve used an Arduino Leonardo connected to a processing sketch that handle the recording and playback features. Using a Mux Shield 2 we managed connecting 25 IR sensors, 16 LEDs, 1 knob and a button to a single Arduino board. We needed a quick and effective way to test the experience and by using Arduino we managed to design and build the whole product in three weeks.

Most of the music toys on the market are trying to fake the sounds and the experience of real instruments. Step has a different approach as it’s designed to give children the opportunity to create real loops and beats using whatever sounds they like from objects of everyday life.

Players can record any sounds and match them with  coloured tags, and then  create melodies, loops and and beats by placing tags on the track and by adjusting the tempo!

Check the video below to see it in action:

Industruino makes industrial automation easy, now AtHeart

Industruino’s mission is to offer industrial automation components that have the simplicity of Arduino at its core. It’s created by Loic & Ainura, two product designers originally from Belgium and now based in Shenzhen, with a mission to help people make their own products, by creating an accessible platform.

Today they are officially joining the Arduino AtHeart program with Industruino Proto, a Leonardo compatible industrial controller housed in a DIN-rail enclosure, with screw connector terminals to robustly connect to sensors and actuators.

Industruino allows makers and professionals to take a breadboarded solution and make it into an enclosed finished looking product, ready for permanent installation. Watch Loics’ introduction:

With Industruino everyone can combine the strengths of Arduino with the specific requirements of industry:

We are now at the dawn of a new industrial revolution, one in which the key elements will be automation, robotics and interconnected devices. In this revolution the Arduino platform is growing to be a real contender.

We are very excited to become part of the At Heart family! It is our way to show that we are very much interlinked with the Arduino community. We are looking forward to further develop the use of Arduino in industrial applications whilst contributing back to the Arduino platform.

When you open the enclosure you will find a prototyping area to add your own components, and re-routable jumper connections, letting you connect any point to either the microcontroller’s pins or the external screw connectors. The onboard graphic LCD and membrane button panel facilitate quick UI development to visualise and input your application’s data.

Explore other tech info on Industruino website and make it yours on their store!


PteroDAQ boards

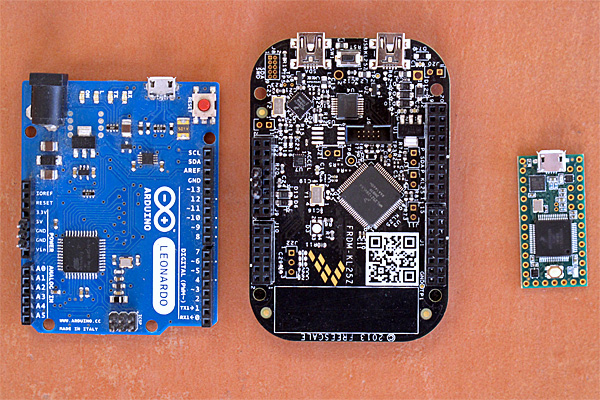
I took a photograph this afternoon of three of the boards that can be used with the PteroDAQ data acquisition system:

On the left is the Arduino Leonardo, the slowest and most expensive of the boards here. In the middle is the KL25Z, which I’ve been using in my class for a couple of years—it is the cheapest and most featureful of the boards. On the right is the Teensy 3.1 (without headers yet), which is the fastest and smallest of the supported boards.

I’m considering switching to the Teensy 3.1 for the class, despite its higher price than the KL25Z board, because adding male headers to the bottom of the board makes it possible to plug the Teensy 3.1 into a bread board, which makes for more secure wiring than running separate wires to the KL25Z board.  We don’t really need the 64 pins of the KL25Z board, we’re not mounting Arduino shields, and we’re not using the accelerometer or the touch sensor, so the main question is whether it is better to have the data-acquisition board be standalone or be inserted into a bread board. The RGB light on the KL25Z board is a nice feature for providing feedback that is missing from the other boards (which only have a single-color LED).

I’ve also thought about usefulness to the students after the course, though few of the students will go on to do anything other than PteroDAQ with the boards.  The Arduino IDE is much easier to deal with for beginners than any of the development environments for the KL25Z, and Teensyduino is pretty easy to install on top of the Arduino environment.  So if students are going to go on to do hobbyist-level programming on the boards, then an Arduino board or the Teensy 3.1 might be a better choice. Given how much more powerful the Teensy 3.1 is than the old ATMega-based Arduinos, I see no reason to recommend buying Arduino boards (though clones from China have gotten down to about $3).

Erich Styger, in a comment, mentioned that he is frustrated by the Teensy’s lack of a SWD (serial wire debug) connector, which he is used to using for debugging. Since I’m from an older generation of programmers, I don’t miss it—I’ve not used the SWD connector on the KL25Z boards (though my son has, to use the OpenSDA chip as a programmer).  For me, it is a luxury to have a serial port for getting print messages from the board—I started microprocessor programming in the days when having one or two LEDs was about all the information you got back from the board. Having debuggers like GDB was a luxury available on computers that cost thousands of dollars.

Of course, the ARM processors on the Teensy 3.1 and the FRDM KL25Z boards are very much more complicated than the old 8080A, Z80, and 6800 8-bit processors I started with, and people are writing much larger programs for them, so I can see the advantage of having a debugger. But there is a large startup cost to learning to use a debugger and setting up the complicated software development tools they expect you to use, so I’m happy recommending the very limited, but easy-to-use Arduino interface for bioengineering students who want to go a bit further.

I’m curious what my readers think about the choice between a FRDM KL25Z board and a Teensy 3.1 board for the Applied Electronics class, given that most of the students will only use the boards for that class.  What tradeoffs might I have missed?  If you were in the class, which board would you rather work with?


Filed under: Circuits course, Data acquisition Tagged: Arduino, debugger, KL25Z, Leonardo, PteroDAQ, Teensy

Tsunami: the easiest way to get started with analog signals

We are happy to announce Tsunami by Arachnid Labs has joined the Arduino At Heart Program.

Tsunami is a new powerful and flexible signal generator built on the Arduino platform and the best way to get started experimenting with analog signals.

Nick Johnson, its creator, took the versatile processor behind the Arduino Leonardo, and combined it with a Direct Digital Synthesis chip, which makes generating analog signals incredibly straightforward. He also added flexible input and output circuitry, an easy to use software library, to make working with analog signals as easy as blinking an LED.

Tsunami lowers the barriers to making music, sending and receiving data, experimenting amateur radio, and creating educational applications. It was launched successfully on KickStarter last April and you are in time to pre-order it on Crowd Supply!

Here’s a list of projects you could do:

  •  Use it as a building block for a synthesizer
  • Measure unknown signals
  • Measure the response curve of your audio amplifier
  • Implement an APRS modem
  • Generate precise clocks for other devices
  • Make a digital theremin
  • Read and write data tapes from classic computers (Commodore, Atari, etc)
  • Test filters and reactive components (capacitors, inductors, and so forth)
  • Encode and decode your own data for audio transmission
  • Teach yourself about Direct Digital Synthesis
  • Teach yourself about AC and complex impedance
  • Make your own low frequency radio transmitter

Want to know more? Meet Nick and Tsunami in this video:


What if kids could hack a ball? (Prototyped with Arduino!)

Hackaball is a smart and responsive ball that children can program to invent and play games. It was recently backed by more than 1000 people and reached the goal!

As many other projects on Kickstarter, Hackaball was initially prototyped with Arduino using sensors that detect motions like being dropped, bounced, kicked, shaken or being perfectly still.


We got in touch with its team and asked them to tell us a bit more about the creation process:

Our early versions of the ball worked with the Arduino Uno board, progressing to a breadboard Arduino and then making our own SMD designs with the Uno. In the latests prototypes we used the Arduino Leonardo and our current version runs on the Arduino Mega. Our production version will run on an ARM chip.

We hope to offer Arduino Compatibility as one of our stretch goals in the Kickstarter, so that people can buy a board and put their own code on it using the Arduino software, effectively moving one step up from the app in terms of hacking the ball and making it do what you want it to do. We also believe many adults would love an interactive ball that they can control and design their own interactions – its packed full of features! Hopefully it will also allow kids who’ve outgrown our app to experiment with our technology in a more challenging way, bringing longevity to the product.

We’ve approached the kids who’ll play with Hackaball as the future Makers. The idea of hacking and getting close to technology starts with how the ball first arrives in your home. Kids open the packaging to find the ball is broken: Hackaball has crash-landed on earth and needs to be put back together again. After their first achievement, making the ball, kids are challenged to play games, change existing ones, fix broken games and create new ones from scratch.

We specifically designed the ball and packaging to be gender neutral – making it feel accessible to both boys and girls from the very beginning. We also expanded on the ability of the ball to include both hard and soft skills – from the tactile and linear computational thinking, to the storytelling and imagination-driven game creation, teaching a new generation of Makers to combine technology and creativity. We think that the kids who play with Hackaball would move on to Arduino in their teens!


You still have some days to back the project and help them reach the stretch goals, making Hackaball even more hackable!

Arduino Blog 19 Mar 20:54