Posts with «leonardo» label

Hack a cheap remote light switch with an Arduino Leonardo

Chris Lovett used a cheap wireless remote to control his Christmas lights; however, when the fob’s A53G 12V battery died, he decided to go a different direction. Rather that just replace the battery, he hooked up an Arduino Leonardo for full lighting automation.

For this hack, he bypassed the onboard IC and instead sent a simulated signal produced by the Leonardo through the wireless transmitter. The appropriate signals were decoded by a logic analyzer, then sent using one output pin to power the transmitter and a second to output the correct pulses. Full automation was accomplished via a Python Script running on a computer to activate the Leonardo at sunset and sunrise. 

Arduino code can be found here, along with the Python script, if you’d like to try something similar.

Custom weather station enhances and modifies electronic music

While the environment is important for any musical performance, generally it’s not an active part of the show. Adrien Kaeser, though, has come up with a device called the “Weather Thingy that integrates weather directly into electronic music performances. It’s able to sense wind direction and speed, light intensity, and rain, translating this data into MIDI inputs.

The system, which was created at ECAL, consists of two parts: a compact weather station on top of a portable stand, as well as a small console with buttons and knobs to select and modify environmental effects on the music. 

Hardware for the project includes an Arduino Mega and Leonardo, a small TFT screen to display the element under control and its characteristics, an ESP32 module, a SparkFun ESP32 Thing Environment Sensor Shield, a SparkFun MIDI Shield, high speed optocouplers, rotary encoder knobs, and some buttons.

Be sure to see the demo in the video below, preferably with the sound on!

Neon skulls illuminate to the MIDI beat

LEDs, whether single-color or programmable, have enabled makers to create a wide variety of vibrant projects at a reasonable price. Neon sign projects, which require sophisticated glass making techniques as well as high voltage for control aren’t as common, but do still have their adherents. Some have even experimented with making them sound reactive.

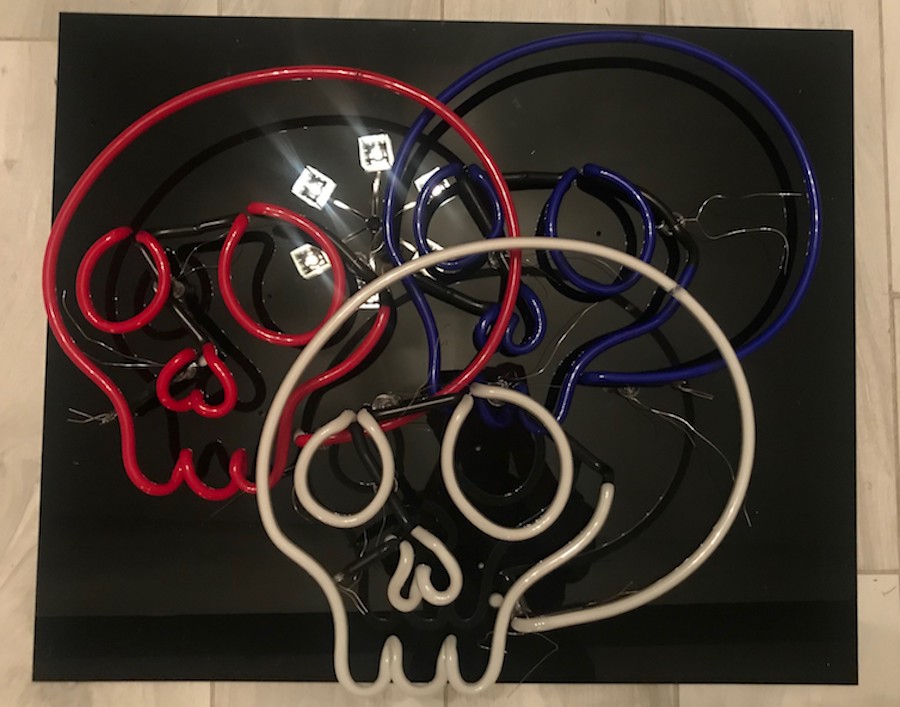
Up until now, sound control meant using a microphone to detect audio signals and flash accordingly. David Garges, however, is using an Arduino Leonardo equipped with an Olimex MIDI shield to individually activate three neon skulls, crafted by artist Dani Bonnet. 

His setup can be programmed via MIDI directly, or can use beat analysis software to activate the proper lights depending on audio output. 

There has been much desire in the Neon Art community for clean and responsive musical interaction with high-voltage Neon Signs. Currently, the existing infrastructure uses a microphone to detect audio and flash accordingly. Unfortunately, due to this method of processing the Neon always responds with a small delay. Clapping and shouting can also disrupt the interaction when using an on-board microphone.

This project solves that problem by transmitting musical data via MIDI protocol to a controller which activates then activates Neon Tubes accordingly. I have designed and built a system that takes a slightly different approach but accomplishes what the Neon Art community desires.

This project offers two performance modes: one that allows for electronic artists to perform seamlessly using MIDI instruments, and one that allows DJs to feed BPM analysis to the system to synchronize the Neon flashing with actual recorded music which enables Real-Time Audio-Controlled Neon.

Be sure to check out the demo in the video below!

Sip and puff Morse code entry with Arduino

Those that need a text entry method other than a traditional keyboard and mouse often use a method where a character is selected, then input using a sip or puff of air from the user’s mouth. Naturally this is less than ideal, and one alternative interface shown here is to instead use sip/puff air currents to indicate the dots and dashes of Morse code.

The system—which can be seen in action in the video below—uses a modified film container, along with a pair of infrared emitters and detectors to sense air movement. The device was prototyped on an Arduino Mega, and its creators hope to eventually use a Leonardo for direct computer input. 

A tube connected to a custom made bipolar pressure switch drives an Arduino which translates puffing and sucking into Morse code and then into text.

Puffs make repeating short pulses (dots) and sucks repeating longer pulses (dashes) just like ham radio amateurs do with a dual-lever paddle.

Code for this open source project can be found on GitHub.

Morse code input for Android with Arduino

Morse code may not be as widely used as in its heyday, but it still certainly has its adherents. One avid user is Tanya Finlayson, who has been using this as her method of communication for roughly 40 years. Now, with the Gboard phone keyboard supporting input via dots and dashes, the world of Android computing has been opened up to her as well.

In order to get button presses to the phone, Ken Finlayson used an Arduino Leonardo to read inputs from a trio of buttons, indicating dot, dash, and mode select. The third button allows for phone navigation in addition to text input. Because of its built-in HID capabilities via the ATmega32U4 chip, the Leonardo is a great choice for this application, demonstrated in the video below. 

Many people cannot use keyboards and touchscreens to control their digital devices. Instead, they use custom hardware switches that emulate typing, swiping, and tapping. The Android operating system provides software that allows these switches to control Android devices, and recently Google provided a new Morse Keyboard within the Gboard keyboard for people who find this method easier for text entry.

This experiment is a DIY hardware adapter that enables assistive tech developers to connect existing switch based input systems to their Android device. Once connected, 2 switch assistive systems (with an additional switch for mode switching) can control both the standard Android accessibility func

tions as well as text entry through Morse on Gboard.

This experiment is built using Arduino and is compatible with most standard assistive 2 switch systems with 1/8” mono outputs.

Arduino Blog 12 Jul 22:12

Play Striker Air Hockey on a capacitive touch surface

After discovering capacitive touch interactions with a Makey Makey device and an Arduino Leonardo, Jason Eldred realized it could also be used to control the Unity game engine. After a night of hacking, he had a basic interface that could change the scale of a virtual circle. From there, he teamed up with Alex L. Bennett to produce an art installation called Bee that invited users to interact with it by physically touching a panel to change graphics on the panel itself and a screen in front of them.

While not meant as a game per se, after more experimentation including work by Gabe Miller and Dustin Williams, this interactive display method was finally turned into a virtual air hockey table via a giant crisscrossing grid of copper tape and wires.

In the game, two players push a virtual puck projected onto a horizontal surface for colorful AR interactions at a very low cost. You can see it in action below, and read more about the project on DigiPen’s website and in Gamasutra’s recent article.

Pour Reception turns water into radio controls

Using a capacitive sensing arrangement, artists Tore Knudsen, Simone Okholm Hansen, and Victor Permild have come up with a way to interact with music with two glasses of water.

One pours water into a glass to turn the radio on. Channels can then be changed by transferring water from one glass into the other, and fine-tuned by touching the outside of container. Volume can even be adjusted by poking a finger into the water itself.

An Arduino Leonardo is used to pick up capacitive signals, and data is then sent a computer where a program called Wekinator decodes user interactions.

Pour Reception is a playful radio that strives to challenge our cultural understanding of what an interface is and can be. By using capacitive sensing and machine learning, two glasses of water are turned into a digital material for the user to explore and appropriate.

The design materials that we have available when designing digital artifacts expands along with the technological development, and with the computational machinery it is possible to augment our physical world in ways that challenges our perceptions of the objects we interact with. In this project, we aim to change the users perception of what a glass is – both cultural and technical.

You can see it in action below, and read more about project in its write-up here.

Antique organ speaks clues at an escape room

When tasked with converting an antique pump organ—sort of a miniature version of a full-sized pipe organ—into part of an escape room puzzle, hacker Alec Smecher decided to turn it into a vocal MIDI device.

To accomplish this, he embedded switches in each of the keys, then wired them into an Arduino Leonardo embedded in the 100-year-old organ to act as input to a desktop computer. Information is translated into browser commands using the Web MIDI API, which controls the Pink Trombone application in order to imitate a human vocal tract.

A common stop on an organ is called “Vox Humana”, or “Human Voice” in Latin. This is supposed to somehow sound like a choir or soloist, generally by adding a tremolo effect. It’s not effective — all pump organ stops sound like pump organ stops. I wanted to modify this stop so that engaging it would sound like a human voice — and not at all like a musical instrument.

The results–shown in the first video below–sound almost but not quite human, certainly adding to the tension and mystery of the escape room. Be sure to read more about Smecher’s project here.

Arduino Blog 17 Oct 20:25

Create a gesture control unit for your PC using Skywriter and Arduino

While keyboards are great, and custom shortcuts can make things even better, why not do away with buttons and knobs altogether, controlling your computer instead via simple gestures? Maker Ben James has done just this, creating a unique interface using a Skywriter device to pick up finger movements, along with an Arduino Leonardo to emulate a keyboard on his laptop.

Since the Skywriter can detect a number of gestures, James assigned various swipes, taps and circular motions to keyboard commands. As you can see in the video here, the results are pretty neat. 

More info on this project can be found on his blog post, and its code is available on GitHub.

Over-engineered, Arduino-powered closet lights

If you’re faced with a closet that doesn’t have any lights inside, you simply could go and find puck lights at most retail stores. But, if you’re Dillon Nichols, you buy a set of lights, and enhance them with a wired power supply and automatic Arduino control.

To accomplish this, Nichols decoded the infrared remote control signal to his puck lights using an Arduino Leonardo, then set up things up to sense the door’s opening via a physical switch and signal the lights accordingly. Now when he opens the closet, lights automatically shine down and fade out when it’s closed.

He also added a timer, so that they turn off after 10 minutes automatically if he forgets to shut the door. Looking for an over-engineered, non-permanent solution for yourself? You can check out his detailed write-up here and find the code for his build on GitHub.