Posts with «games» label

Gigantic game of Operation powered by Arduino

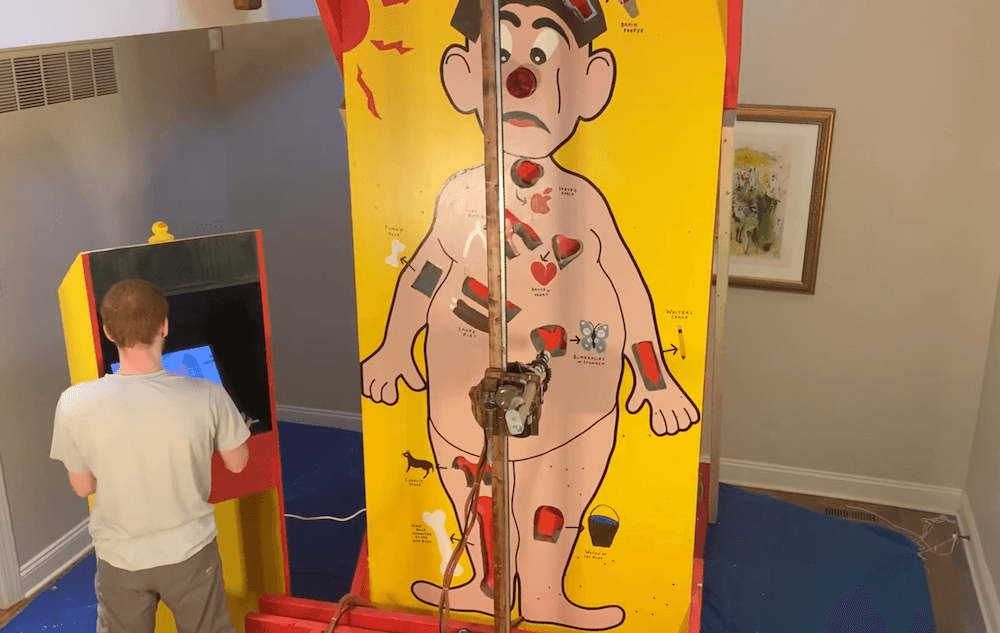
As a kid you may have played Operation, but certainly never anything like this nine-foot-tall version from SPOT Technology. This device is not only impressively large, but assists doctors in their surgical pursuits with a CNC gantry setup to pull out obstructions.

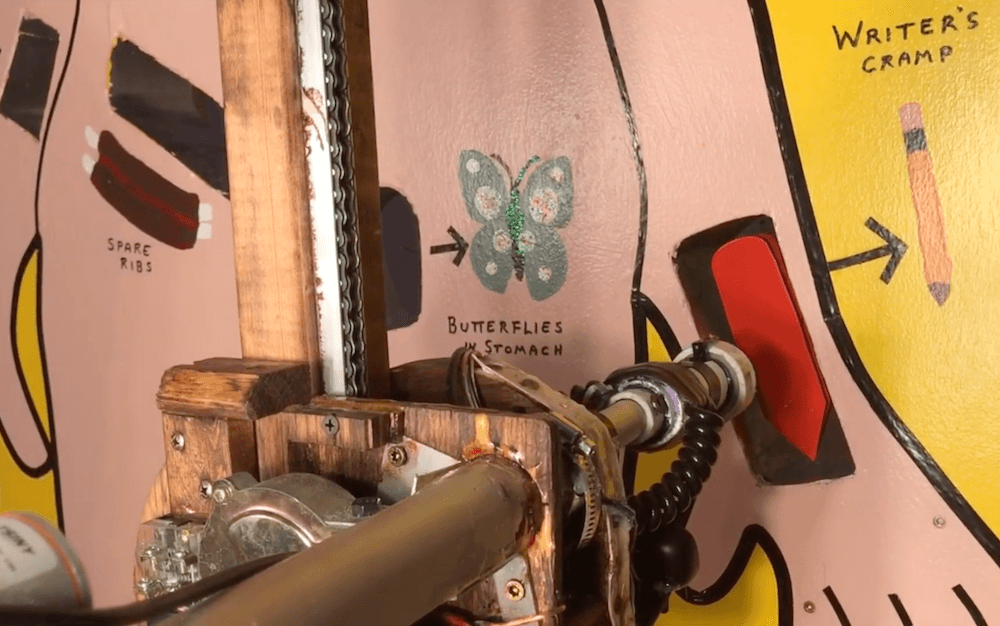
In the game, amateur surgeons control the system using a small arcade cabinet next to the patient (Sergio), moving a magnetic gripper with a joystick and buttons. A camera rides along and transmits images to the cabinet, hopefully leading to a clean extraction. If the gripper isn’t aligned correctly, a button on the plunger reports the doctors error, and Sergio’s nose lights up red to indicate a failed surgery. Two Arduino Megas are implemented, one on the CNC playfield itself, another in the cabinet.

The project will be on display at the Philadelphia Mini Maker Faire on October 6th if you’d like to see it in person.

Arduino Blog 24 Sep 20:25

A Colorful Way To Play Chess On An ATmega328

We’ve all seen those chess computers that consist out of a physical playing field, and a built-in computer that would indicate where you should put its pieces while inputting the position of your pieces in some way. These systems are usually found in a dusty cardboard box in a back room’s closet, as playing like this is fairly cumbersome, and a lot depends on the built-in chess computer.

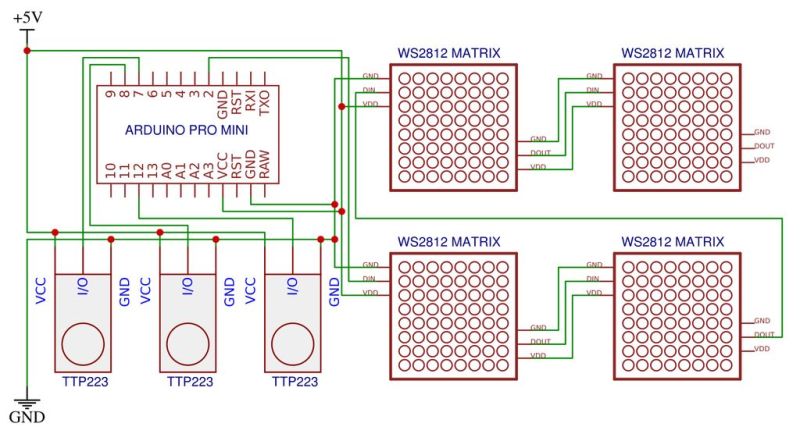
This take by [andrei.erdei] on this decades-old concept involves an ATmega328p-based Arduino Pro Mini board, a nice wooden frame, and 4 WS2812-based 65×65 mm RGB 8×8 LED matrices, as well as some TTP223 touch sensors that allow one to control the on-board cursor. This is the sole form of input: using the UP and RIGHT buttons to select the piece to move, confirm with OK, then move to the new position. The chess program will then calculate its next position and indicate it on the LED matrix.

Using physical chess pieces isn’t required either: each 4×4 grid uses a special pattern that indicates the piece that occupies it.  This makes it highly portable, but perhaps not as fun as using physical pieces. It also kills the sheer joy of building up that collection of enemy pieces when you’ve hit that winning streak. You can look at the embedded gameplay video after the break and judge for yourself.

At the core of the chess program is [H.G. Muller]’s micro-Max project. Originally ported to the Arduino Uno, this program outputs the game to the serial port. After tweaking it to use the LED matrix instead, [andrei.erdei] was then faced with the lack of memory on the board for the most common LED libraries. In the end, the FAB_LED library managed to perform the task with less memory, allowing it and the rest of the program to fit comfortably into the glorious 2 kB of SRAM that the ATmega328p provides.

Classic 8-bit chess engines are marvels of software engineering. Ever wonder how they stack up against modern chess software? Check out this article!

Insert Coin (Cell) To Play LedCade

In this era of 4K UHD game console graphics and controllers packed full of buttons, triggers, and joysticks, it’s good to occasionally take a step back from the leading edge. Take a breath and remind ourselves that we don’t always need all those pixels and buttons to have some fun. The LedCade is a μ (micro) arcade game cabinet built by [bobricius] for just this kind of minimalist gaming.

Using just three buttons for input and an 8×8 LED matrix for output, the LedCade can nevertheless play ten different games representing classic genres of retro arcade gaming. And in a brilliant implementation of classic hardware hacking humor, a player starts their game by inserting not a monetary coin but a CR2032 coin cell battery.

Behind the screen is a piezo speaker for appropriately vintage game sounds, and an ATmega328 with Arduino code orchestrating the fun. [bobricius] is well practiced at integrating all of these components as a result of developing an earlier project, the single board game console. This time around, the printed circuit board goes beyond being the backbone, the PCB sheet is broken apart and reformed as the enclosure. With classic arcade cabinet proportions, at a far smaller scale.

If single player minimalist gaming isn’t your thing, check out this head-to-head gaming action on 8×8 LED arrays. Or if you prefer your minimalist gaming hardware to be paper-thin, put all the parts on a flexible circuit as the Arduflexboy does.

The HackadayPrize2019 is Sponsored by:

Gaming on multiple CRT monitors

While you might see a CRT by the side of the street and think noting of it, Ryan Mason has come up with a novel use for five of them in a row called the Cathode MK1.  

This set uses the Unity game engine along with an Arduino board to spread games across five tube TVs arranged side-by-side. 

In order to keep project costs down, Mason’s gaming rig is restricted to displaying a game signal on one TV at a time. This makes gameplay even more interesting, especially considering that the way that each TV handles a loss of signal contributing to the experience. 

Several games are available for this unique system, including Long Pong AKA Pooooong, where a ball bounces from screen to screen as shown in the clip below.


Arduino Blog 08 Mar 20:55
arduino  featured  game  games  

Giant Connect Four Pits You Against the Computer

You can build a Connect Four solver in software, but it won’t be all that much fun. Now apply that same automation to a 15-foot-tall plywood version of the classic board game and you’ve just created a smile-making-machine for everyone within eyesight. Behold the Mono-Purpose Automated Robot Versed In Connnect4 (Marvin) which Ben and Jonathan dreamed up on their way home from Maker Faire last year, and made into their exhibit this year.

On the physical side of things they got really creative in lifting the discs and sorting them into the column chosen by the software brain of the game. A chain travels along one side with fingers every few feet. The fingers travel along the channel, lifting the discs. Those fingers are a couple of bolts, with some metal filler, all epoxied into one solid unit.

At the top of the disc elevator, and at the top position of each column in the gaming board, there are IR reflectance sensors which send feedback to the Arduino that drives the hardware. This proved a major issue during setup the day before the Faire. The reflectance sensors are just blasting out IR and not using a carrier signal. In direct sunlight, the detector was in a constant state of being tripped. After some trial and error, the logic for the sensors was flipped to detect the absence of sunlight by placing black plastic behind that top row of the board and putting duct tape over the IR emittors.

There’s a router and laptop rolled into the system. The Arduino makes an HTTP request to software on the laptop. In addition to determining where the next move should be made, the laptop is connected to a large screen which shows the current state of the gaming board. This is a head-to-head, human versus machine game. The human player drops their discs from the top of the board using a paint roller that hooks into a hole at the center of the disc. This way the player’s disc passes by the sensors, triggering the machine’s next move.

It’s a clever build and due to the sheer size it’s pretty awesome they were able to get it to the Faire from Philadelphia. Don’t miss the video after the break that shows off the fun and excitement of this gaming giant.

Arduino Powered Arcade Button Lighting Effects

As if you already weren’t agonizing over whether or not you should build your own arcade cabinet, add this one to the list of compelling reasons why you should dedicate an unreasonable amount of physical space to playing games you’ve probably already got emulated on your phone. [Rodrigo] writes in to show off his project to add some flair to the lighted buttons on his arcade controller. (Google Translate)

The wiring for this project is about as easy as you’d expect: the buttons connect to the digital inputs on the Arduino, and the LEDs on the digital outputs. When the Arduino code sees the button getting pressed, it brings the corresponding LED pin high and starts a fade out timer using the SoftPWM library by [Brett Hagman].

It’s worth noting that the actual USB interface is being done with a stand-alone controller, so the Arduino here is being used purely to drive the lighting effects. The more critical reader might argue that you could do both with a single microcontroller, but [Rodrigo] was in a classic “Use what you’ve got” situation, and already had a USB controller on hand.

Of course, fancy lit arcade buttons won’t do you much good without something to put them in. Luckily we’ve covered some fantastic looking arcade cabinets to get you inspired.

Hack a Day 20 Jul 21:00

Crawling a Dungeon, 64 Pixels at a Time

The trend in video games is toward not being able to differentiate them from live-action theatrical releases, and games studios are getting hard to tell from movie studios. But quality graphics don’t always translate into quality gameplay, and a lot can be accomplished with minimalist graphics. Turn the clock back a few decades and think about the quarters sucked up by classics like Pac-Man, Space Invaders, and even Pong if you have any doubts about that.

But even Pong had more than 64 pixels to work with, which is why this dungeon-crawler game on an 8×8 RGB matrix is so intriguing. You might think [Stolistic]’s game would be as simple as possible but think again. The video below shows it in action, and while new users will need a little help figuring out what the various colors mean, the game is remarkably engaging. The structure of the dungeon is random with multiple levels to unlock via the contents of power-up chests, and there are mobs to battle in a zoomed-in display. The game runs on an Arduino Uno and the matrix is driven by a bunch of 74HC595 shift registers.

It’s fun to see what can be accomplished with as little as possible. Looking for more low-res goodness? Check out this minimalist animated display, or a Geiger counter with a matrix display.

Hack a Day 06 May 06:00

Assemble a Robot Opponent for Air Hockey

Use JJ Robots' kit and your Android phone to build an air hockey partner who's always game.

Read more on MAKE

The post Assemble a Robot Opponent for Air Hockey appeared first on Make: DIY Projects and Ideas for Makers.

A Trove Of Arcade Projects

[Ryan Bates] loves arcade games, any arcade games. Which is why you can find claw machines, coin pushers, video games, and more on his website.

We’ve covered his work before with his Venduino project. We also really enjoyed his 3D printed arcade joystick based off the design of a commercial variant. His coin pushing machine could help some us finally live our dream of getting a big win out of the most insidious gambling machine at arcades meant for children.

Speaking of frustrating gambling machines for children, he also built his own claw machine. Nothing like enabling test mode and winning a fluffy teddy bear or an Arduino!

It’s quite a large site and there’s good content hidden in nooks and crannys, so explore. He also sells kits, but it’s well balanced against a lot of open source files if you’d like to do it yourself. If you’re wondering how he gets it all done, his energy drink review might provide a clue.


Filed under: Arduino Hacks, misc hacks, Raspberry Pi

Arcade Cabinet Build Takes Quarters, Dispenses Fun

Building an arcade cabinet seems to be a rite of passage for many hackers and woodworkers. Not that there is anything wrong with that: as this series of posts from [Alessandro] at boxedcnc shows, there is an art to doing it well.

His final build is impressive, with quality buttons, a genuine-looking banner, and even a coin slot so he can charge people to play. His build log covers both the carpentry and electronic aspects of the build, from cutting the panels to his own code for running the coin acceptor that takes your quarter (or, as he is in Italy, Euro coins) and triggers the game to play.

To extract money from his family, he used the Sparkfun COM-1719 coin acceptor, which can be programmed to send different pulses for different coins, connected to an Arduino which is also connected to the joystick and buttons. The Arduino emulates a USB keyboard and is connected to an old PC running MAME with the Attract Mode front end. It’s a quality build, down to the Bubble Bobble banner, and the coin slot means that it might even make some money back eventually.


Filed under: Arduino Hacks, classic hacks