Posts with «game» label

[Interview] Dorotea Panzarella (Emmo)

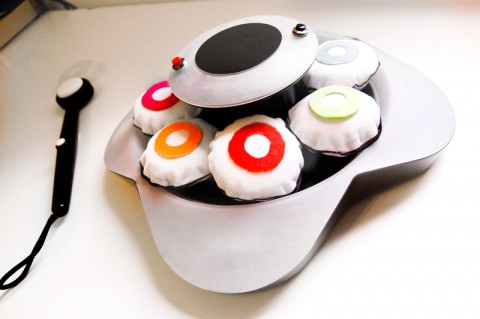
Emmo is a ludic and interactive artifact for visually impaired children (age 4-6 y.) based on RFID technology. It is meant to motivate spatial exploration and helping children to develop the capability of creating mental topological maps.
The toy includes lighting and sounding elements for a treasure hunt, a space-related memory game. This activity is improving attention and acoustic capabilities.
The goal of the game is detecting each of the seven lighting elements according to the sound. The player is helped by this “magic wand”  (finder),

Emmo’s main colours are black and white (high chromatic contrast is important to let the childern discrminate colours); lights & sound are further aid, marking different phases of the game.
The command interface is pretty simple and visible. Buttons can be distinguished by colour and shape.
The toy elements are designed in order meet childern needs and  technology requirements.

We asked Dototea Panzarella to answer few questions regarding her project.

Q: Tell us about you and your background.

I was born  in Palermo on 21/04/1985 , in Cefalù, a charming Sicilian town overlooking the sea. I learned the words “project” and “creativity” since childhood, thanks to my dad, architect, and my mother, graduated from the Academy of Fine Arts. During childhood and adolescence I experienced different things:  artistic and rhythmic gymnastics, I learned to play keyboards and I worked in summer camps for children. Not yet having a clear idea about my future, after school, I enrolled at the Liceo Classico Mandralisca Cefalu. After high school, I registered for the Bachelor in Industrial Design at the University of Palermo and I had the opportunity to participate in the Erasmus program and attend the Hochschule fuer FHNW Design and Art in Aarau (CH). In 2008 I moved to Treviso, to follow the specialist degree course in product design of the IUAV University of Venice. Lately I collaborate occasionally with a design studio in Venice, which mainly designs consumer electronics.

(interaction) design is a challenge to me beacuse involves technical-scientific and humanistic-artistic elements: every project is a new discover!

Q: When did you start working on your project and how long did it take?

I started to work on “Emmo” at the end of August 2010 to end in April 2011: 8 months of work. The first 3 months were mainly research and analysis. In December 2010, I started to define the game’s playing features. From January onwards I have dealt with the choice of electronics need for the toy, the design of the artifact itself and eventually the realization of the prototype.
I saw many toys for the stimulation of hearing, the residual vision, touch. Emmo is thought to add something new.

Q: What inspired you to make the thing you made?

The interest in the project “Emmo” is the result of my interest in the world of childhood, science of learning and psychology of perception but also of my interest in electronics and interaction design.

It all started with a workshop of 2 years of specialization at the IUAV in which the teacher (and my future thesis supervisor) asked us to design interactive artifacts. We were also required to create a prototype using Arduino. Having found the theme of the workshop quite exciting I then wanted to continue on the same track with the thesis.In the spring of 2010 I went to Barcelona (Spain) to deepen my knowledge by participating in the 9th International Conference on Interaction Design and Children. I picked up many hints. The theme of low vision was one of many that appeared in the list that I compiled and I chose it because it would give me the ability to use light and sound as real therapeutic tools.

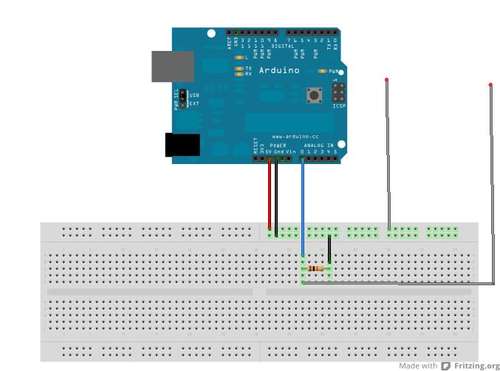
Q: How did you hear about Arduino and why you decided to use this hardware in your project?

I had already seen some Arduino projects of my friends and especially my roommate during the course of the Medienkunst FHNW.

In that circumstance I had appreciated the installations but had not yet grasped the potential of Arduino.  I’ve used in the creation of Emmo because I knew that in case of any difficulty I could find help on the web easily.


We are extremely pleased that the Arduino is used in such projects, and we are sure that the community will always give a strong support.

Many thanks to Dorotea for her kindness.


UnoJoy – A USB Joystick for Mac, PC, Linux or PS3

There are people who use the Arduino for some serious electronics related stuff.

Then, there are folks who use it just for fun. Alan Chatham and his team over at UnoJoy have developed a concept for Arduino Uno based USB Controllers.


Here is an excerpt of our interview with Alan:

Me: What made you choose the Arduino Uno as the heart of the controller? There are many development boards available which incorporate an ATmega8U2/16U2 or even 32U2.

Alan: This is easy – everyone loves Arduino!  It comes down to ease of use and reach.  Our primary goal with this project is to make a tool that is both easy to use and accessible.  There’s lots of code out there to make joysticks with other chips, but all the Atmel USB chips are surface-mount, and they all need a whole big toolchain to use. Plus, USB is super-complicated, and we want to encourage people, even non-technical ones, to spend their time thinking up really sweet new ways to play games, not trying to figure out what an HID descriptor is for.  On the reach side of things, Arduino is a perfect platform – even those of us that love our inline assembly and fuse settings tend to have an Arduino around for quick prototyping, and of course, Arduino’s a great platform for students and designers.


Me: Any problems that you faced while developing the prototype?

Alan: I think the biggest challenge we faced was to make it much easier for non-experts to do some more complicated things, like re-flash the ATmega8u2 on the Arduino. Let’s face it, any instructions that open up with ‘First, install XCode’ aren’t exactly user-friendly. In that vein, I put together some simple one-click batch files for installing the appropriate drivers on Windows and OSX, as well as ones for reflashing the ATmega8u2 chip between Arduino and UnoJoy firmwares.  It’s still not as simple as I’d like, so if anyone out there is handy with basic OSX GUI application programming, or the program installation chain on Windows, drop me a line!

In the end, we’re hoping that our code and examples can inspire other designers and builders and gamers to make some really awesome controllers. If they do, I of course encourage them to send their pictures and videos our way, at unojoy.tumblr.com!

Now, you too can make yourself a USB Joystick/ Gamepad/ Controller by choosing any form of input that the Arduino boards can understand. The source code and all the necessary download files are available at Google Code. Don’t forget to check out the Controller for Gran Turismo:


Thank you Alan for sharing a wonderful project with us.

Portal turret using MATLAB + Arduino

In the Maker’s own words:

This is the final project for my Advanced Mechatronics class at Penn State University. The robot is the skeleton of a turret from the game Portal that uses an IP webcam to track a target and fire nerf bullets at them. This is the current state of the robot as of 5/9/12, but I am currently molding a shell for the frame to make it look like the Portal turret, along with improving my code to make the tracking faster. All programming is done with MATLAB and Arduino. Enjoy!

Via:[Youtube]

Arduino Blog 10 May 20:10

Tetris using Arduino


Tribute to Tetris using Snootlab Deuligne on an… by Snootlab

Okay, it is cool to see Tetris powered by Arduino. What is even cooler is that you can build your own one!

For the English readers (like me) here is a translated version of the discussions and details in the forum, and for the lucky French readers who wont lose information in translation the details are here.

All thanks to the nice people at Snoootlab

Via:[Dailymotion]

Arduino Blog 09 May 23:06

Lie detector using Arduino

The next time you want to find out which of your little cousins ate the cookie from your jar, you can use your Arduino and everyday electronics items to make your own lie detector!

Materials needed: Arduino, aluminum foil, velcro, wire, a 10 K resistor, breadboard

A detailed step-by-step approach is taught here.

So snap on and find the cookie monster! >:)

Via:[mad-science, Dangerousprototypes]

Arduino Blog 24 Apr 11:28

Arduino + Flamethrower + Guitarhero = Rockstar

Get a little more adventurous and play with fire. Feel like a true rockstar complete with guitar (hero) and flames!

Here are the complete instructions to build one for yourself.

Via[HacknMod]

Arduino Blog 18 Apr 15:11
ar(t)duino  arduino  fire  game  

Exercise bike connects to original Mario Kart, Rainbow Road shortcut gets even trickier (video)

Canadian modder Brent Smith has managed to connect an aging exercise bike to Nintendo's perennial racer. Naturally, there's some Arduino involvement, but the whole setup plugs directly into an original SNES console -- no emulation necessary. Power-ups are accessed with a button in the center of the exercise bike's handles, each of which has a directional button for steering, while the pedals function as the acceleration button, accurate to one sixth of a rotation. According to Smith, "it's a lot harder than it looks" -- and we believe him. Watch his test-drive kart plow off-track in the video demo after the break.

Continue reading Exercise bike connects to original Mario Kart, Rainbow Road shortcut gets even trickier (video)

Exercise bike connects to original Mario Kart, Rainbow Road shortcut gets even trickier (video) originally appeared on Engadget on Mon, 16 Apr 2012 05:02:00 EST. Please see our terms for use of feeds.

Permalink | Email this | Comments

A talk about “Making things”

Michael Newman, VP of Technology at Pomp Productions, was invited to participate at the TEDxUCLA 2011 event to talk about “Making things”. Following a trip to Maker Faire and taking inspiration from mind controlled Nerf guns, Michael built a special project using Arduino, a Nerf Gun and Twilio.

[Via:Twilio]

Arduino Blog 09 Apr 13:48