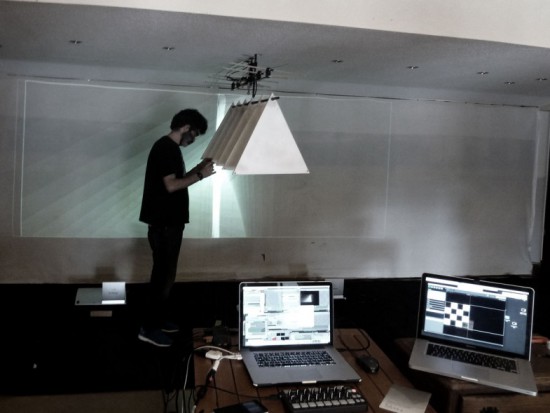
Interactive kinetic installations are always incredible to see in action, but they become even more awesome when they’re part of a performance. As in the case of Infinite Delta, which is the result of Boris Chimp 504 + Alma D’ Arame’s artistic residency at Montemor-o-Novo in Portugal.
Using Arduino boards, they built a physical structure comprised of triangular planes that swing back and forth like a pendulum, controlled by a series of servo motors. Light is projected onto the moving structures, creating patterns that are then reflected onto a nearby wall. Infinite Delta also modifies its shape in response to the movement and sound of the audience.
In Euclidean geometry any three points, when non-collinear, form a unique triangle and determine a unique plane. Nevertheless, in quantum physics the string theory proposes that fundamental particles may also have similarities with a string. It also states that the universe is infinite and in it all matter is contained. In this “multiverse”, our universe would be just one of many parallel existent universes. What would happen then if we multiply triangles infinitely? Could or would we have access to those parallel universes?
The performers augmented the physical world by overlaying it into the digital world to produce a new alternative, magic and hyper-sensorial landscape.
Our good friends over at Primo Toys have just rolled out their Montessori-approved, Arduino AtHeart coding toy for children ages 3 and up. The Cubetto Playset, which you may remember from its incredibly successful Kickstarter campaign, is a screenless system powered by a revolutionary coding language made of colorful blocks that lets kids write their first computer programs.
The playset consists of a friendly wooden robot named Cubetto, a physical programming console, a set of expandable coding blocks, a collection of illustrated maps, and an activity book. It’s the first programming toy of its kind to work without a digital interface or display, enabling children to explore the world of coding through storytelling, adventure and collaboration–even before they can read or write.
By placing the blocks in different patterns on the control panel, kids can create sequences of instructions that program the robot’s movement. In the process, they develop computational thinking skills that help them understand the basic principles of coding–all of this, in a very age-appropriate way that respects a child’s natural way of learning.
The London-based startup, which was founded by Filippo Yacob and Matteo Logli, is a graduate of the PCH Highway1 accelerator and has had the support of high-profile names including our very own Massimo Banzi and Randi Zuckerberg.
Cubetto is now available for purchase on its website for $225, or $245 when bundled with the Cubetto Activity Pack, which offers four additional world maps and matching story books. Check it out here!
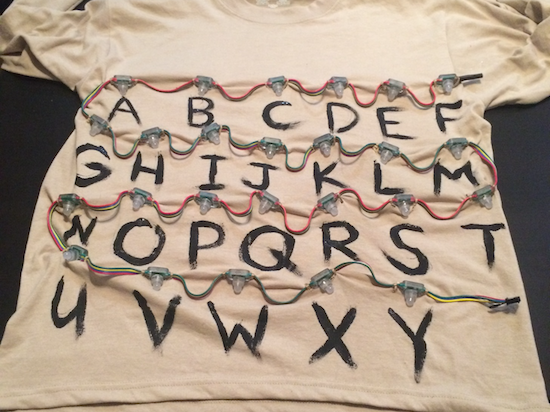
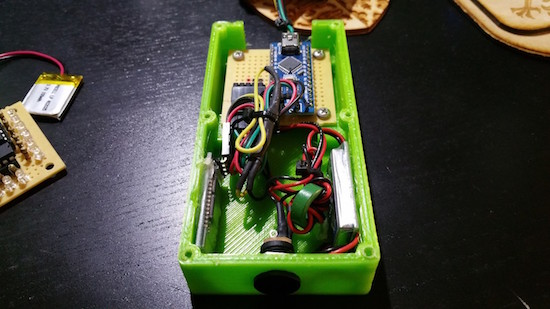
The Netflix series Stranger Things has become a fan-favorite for Makers, especially for those looking to recreate a light-up alphabet wall of their own. While we’ve seen some awesome attempts over the last couple of weeks, Imgur user “MrWalkway” has decided to create a more portable version in the form of his Halloween costume.
The show-inspired costume uses an Adafruit LED strand, an Arduino Nano, a Bluetooth receiver, a battery, and some other components to allow his shirt to accept different messages and light patterns. The instructions are sent from a Bluetooth terminal on his phone over a serial connection to the Arduino.
As you can see on the project’s Imgur page, the electronics are all housed within a 3D-printed control box that gets tucked away in his pocket while the 25 LEDs are stitched to the inside of the shirt.
In case you missed it, the big news is that a minimal Arduino core is up and working on the ESP32. There’s still lots left to do, but the core functionality — GPIO, UART, SPI, I2C, and WiFi — are all up and ready to be tested out. Installing the library is as easy as checking out the code from GitHub into your Arduino install, so that’s exactly what I did.
I then spent a couple days playing around with it. It’s a work in progress, but it’s getting to the point of being useful, and the codebase itself contains some hidden gems. Come on along and take a sneak peek.
The Core
An Arduino isn’t worth very much unless it can talk to the outside world, and making the familiar Arduino commands work with the ESP32’s peripheral hardware is the job of the core firmware. As of this writing, GPIO, WiFi, SPI and I2C were ready to test out. GPIO means basically digitalWrite() and digitalRead() and there’s not much to say — they work. WiFi is very similar to the ESP8266 version, and aside from getting the ESP32 onto our home WiFi network, I didn’t push it hard yet. When other libraries come online that use WiFi, I’ll give it a second look.
SPI
The SPI routines in the ESP32 Arduino port both work just fine. I tested it out by connecting a 25LC256 SPI EEPROM to the chip. The ESP’s extremely flexible hardware peripheral routing matrix allows it to assign the SPI functions to any pins, but the Arduino implementation is preset to a default pinout, so you just need to look it up, and hook up MOSI to MOSI and so on. As of now, it only uses one of the ESP32’s two free SPI units.
With SPI, some of the weirdness of using Arduino on a powerful chip like the ESP32 start to poke through. To set the speed of the SPI peripheral, you can use the familiar SPI_CLOCK_DIV_XX macros, only they’re scaled up to match the ESP32’s faster CPU clock speed. The end result is that SPI_CLOCK_DIV_16 gives you a 1 MHz SPI bus on either the 16 MHz Uno or the 240 MHz ESP32, which is probably what you want for compatibility with old code. But 240 divided by 16 is not 1. In retrospect, the macros would be better defined in terms of the desired frequency rather than the division factor, but you can’t go back in time.
There were also two extra definitions that I had to add to the program to make it run, but they’ve both been streamlined into the mainline in the last eighteen hours. That’s the deal with quickly evolving, openly developed software. One day you write that the macro MSBFIRST isn’t defined, and before you can go to press, it’s defined right there in Arduino.h. Great stuff!
I2C: The Wire
The I2C (“Wire”) library has also gotten the ESP32 treatment, and worked just as it should with an LM75 temperature sensor. This is my standard I2C test device, because it lets you read a few registers by default, but you can also send the sensor a few configuration options and read them back out. It’s not a particularly demanding device, but when it works you know the basics are working. And it did.
The ESP’s dedicated I2C pins are on GPIO 21 and 22 for data and clock respectively. Some I2C implementations will use the microcontroller’s pullup resistors to pull the I2C bus lines high, so I tested that out by pulling the 10 KOhm resistors out. The ESP stopped getting data back instantly, so that answers that. Don’t forget your pullup resistors on the I2C lines and all is well. Otherwise, it’s just connecting up two wires, double-checking the I2C device address, and reading in the data. That was easy.
External Libraries
More than half of the reason to use Arduino is the wide range of external, add-on libraries that make interfacing with all sorts of hardware easy and painless. Many of these libraries are built strictly on top of the Arduino core, and should “just work”. Of course, when you’re actually coding this close to the hardware, nothing is going to be as portable as it is a few layers of abstraction higher up on your desktop computer. Let’s go test this hypothesis out.
El Cheapo IL9341 TFT Display
Uno Lauging at ESP32
Since the SPI library works out of the box, the other various libraries that depend on it should as well, right? Well, kinda. I wasted an afternoon, and still failed. Why? I have a cheapo ILI9341 screen that only works with an old TFTLCD library, rather than with the nice Adafruit_ILI9341 libs. The former is so full of AVR-specific voodoo that it completely fails to compile, and is probably easier to re-write from scratch for the ESP32 than make work in its present form. The Adafruit library compiles fine, because it only depends on the SPI library, but it doesn’t work with my lousy screen.
Going repeatedly back and forth between these two libraries, my LCD experiment ended in tears and frustration: I couldn’t make either of them work. I scoped out the SPI data on a logic analyser, and it looked good, but it wasn’t drawing on the screen. At this point, a full line-by-line protocol analysis would have been needed, and that’s a few days worth of work. If I just wanted a running ILI9341 driver, I would go grab [Sprite_tm]’s NES emulator demo and use the one there, but it’s not Arduinified yet, so it’s out of bounds for the scope of this article.
DHT22 Humidity and Temperature Sensor
The Way It Should Work: Three Wires and Ten Lines of Code
Seeking a quick-and-dirty success, and beaten down by hours of hacking away for naught, I pulled a DHT22 sensor out of the eBay bin, and cloned Adafruit’s DHT library. Of course it didn’t compile straight out of the box, but there were only a couple of things that were wrong, and both turned out to be easily fixable.
ESP32’s Arduino didn’t have a microsecondsToClockCycles() function yet so I commented it out, multiplied by 240 MHz, and left a hard-coded constant in my code. This value was just used for a timeout anyway, so I wasn’t too worried. There are also some timing-critical code sections during which the Adafruit code uses an InterruptLock() function to globally enable and disable interrupts, but these functions weren’t yet implemented, so I just commented it all out and crossed my fingers.
After reassigning the data pin to one of the ESP32’s free ones (GPIO 27, FWIW), it compiled, uploaded, and ran just fine. I now know exactly how hot and humid it is up here in my office, but moreover have had a quick success with an Arduino external library, and my faith is restored.
Lessons from the Libraries
I suspect that these two examples are going to be representative of the ESP32-Arduino experience for a little while. Oddball hardware is going to take some time to get supported. Highly optimized libraries with cycle-correct timings or other microcontroller-architecture specific code in them will need to be ported over as well, despite being “Arduino” code. If you’re a code consumer, you’ll just have to wait while the wizards work their behind-the-scenes magic.
But there will also be a broad group of libraries that are written in a more-or-less device-independent way, and these should be easy enough to get working within fifteen minutes or so, as with the DHT sensor library. If you’re willing to compile, read the errors, and comment out or fix whatever shows up, some codebases will work in short order.
What’s Next? Turning Servos
Given that the Arduino-ESP32 port is brand new, indeed it’s still in progress, there is a lot of work for the community to do in getting it up to speed. Suppose that you need to drive a lot of servos, but the “Servo” library isn’t implemented yet. You’re an impatient coder. What to do? Get hacking!
The good news is that the Arduino-ESP32 libraries themselves are full of hints and examples for getting started. Open up the ESP32-specific directory that you cloned from GitHub. The usual *.cpp files provide the standard Arduino core functionality. The esp32-hal-xxx.h and esp32-hal-xxx.c files are chip-specific, and a tremendous help in taking advantage of the chip’s stranger options. For instance, esp32-hal-matrix.* gives you nice and easy access to the pin-routing matrix, which is a daunting task if you’re starting just from the datasheet.
Spot-On and Jitter-Free
But let’s get back to servos. The ESP32 chip has an intriguing hardware LED PWM peripheral that lets you assign up to sixteen channels to individual LEDS, specify the PWM frequency and bit-depth, and then control them by appropriately setting bits in hardware registers. If you think this would be hard to do by hand, you’d be right. The esp32-hal-ledc.* files provide helper functions to set up the hardware PWM generator, and with these libraries, getting a 16-bit LED fade in straight C or “Arduino” is easy. But our sights are set on servos.
To drive a hobby servo, one needs pulses between 1,000 and 2,000 microseconds each, repeated every twenty milliseconds or so. Setting the repetition rate to 50 Hz takes care of the first part, and each count is 20 ms / 65,635 ticks long, or roughly 0.3 microseconds. Setting the PWM width value to something between 3,300 and 6,500 generates pulses in the right ballpark, and my servo ran jitter-free (and a clean signal was confirmed on the oscilloscope). Here’s all it took:
That wasn’t so hard, was it? It’s not “Arduino”-style — there’s no objects or classes or methods anywhere in sight — but thanks to a straightforward and well-written hardware abstraction layer, using the very complicated peripherals is made pretty simple. Kudos to [me-no-dev] for his work on the back-end here. The HAL inside the Arduino libraries is currently the best source of code examples on many of the chip’s more esoteric and interesting peripherals.
Conclusion?
The short version of my dive into Arduino-esp32 is that there’s a lot here, even though it’s not done yet. Blinking LEDs and other simple GPIO is a given, and the core communication libraries that are already implemented worked for me: GPIO, WiFi, SPI, and I2C are up and running.
Non-core libraries are hit and miss. I suspect that a lot of them will work with just a little bit of tweaking. Others, especially those that are architecture-dependent, may not be worth the effort to port and will need to be re-written. The ESP32 has a bunch of interesting and innovative hardware peripherals onboard and there’s certainly no Arduino libraries written for them yet, but there’s some great HAL code hidden away in the Arduino-ESP32 codebase that’ll give you a head start. We could get lost in there for hours. Time to get hacking!
The ESP32 is still a new chip, but orders should be coming in soon. Have one? Want to see us put other libraries or languages through their paces? Let us know in the comments.
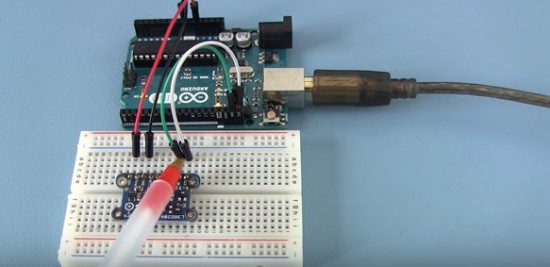
Starting a new project is always an effective way to hone your skills while exploring circuitry and programming. To help improve his engineering chops, Joop Brokking recently bought an inexpensive oscilloscope (a device for visualizing voltage over time in an x-y graph) and connected it to an Arduino Uno. He then shared his findings in a detailed tutorial on YouTube.
In the video below, Brokking is using a Hantek 6022BE 20MHz dual-channel oscilloscope and provides three examples to better understand what can go wrong when building a simple Arduino setup.
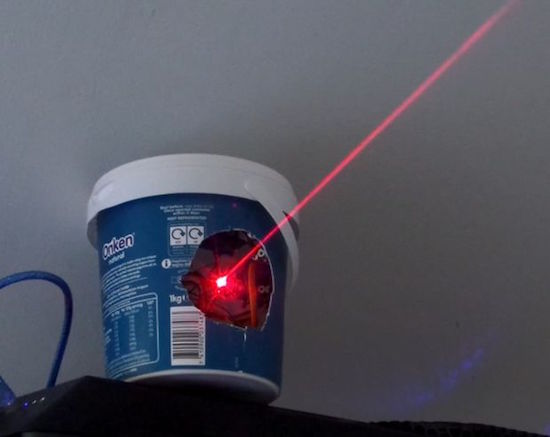
We’ve already seen an Altoids tin enhanced with a laser for your cat’s entertainment, so why not a yogurt tub?
If you’re looking for a way to keep your kitty busy, but would rather not actually have to get up and wave a laser around, this setup allows you to use the Blynk app to turn on and manipulate a laser right from your phone.
Keeping things simple, the enclosure for this project is a yogurt tub, and the laser manipulator is two Arduino-driven servos stuck together with tape. A computer provides power as well as Wi-Fi control, though with a Wi-Fi shield and battery it should be able to be used independently.
Now obviously the end result isn’t the most practical device you’ll ever build, but this was a great way for me to learn the fundamentals of programming Arduino and it can help you to learn too.
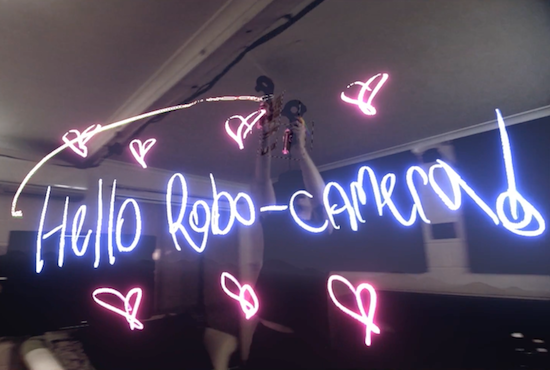
Light graffiti, virtual reality, and motion control combine to make one amazing robotic sidekick.
Film making has advanced in a staggering way over the last 50 or even 10 years, but what if you were to augment your filming rig with a VR headset and add a camera that automatically tracks where a VR controller is? Jaymis Loveday did just this, and in the video below, you’ll see a very interesting result–he’s painting with light in thin air.
If you’ve ever tried light graffiti, you’re familiar with what he’s doing. The problem is figuring out what and where exactly you’ve painted, and his system seems to solve this.
Later in the video, he interacts with a virtual world while the real world is still in the shot, for a kind of mixed reality filming experience. The possibilities for this kind of interface are staggering, so hopefully we’ll see even more strange art in the future!
… it’s a project I’ve had in my mind since I first used the Vive over a year ago, at PAX Prime in Seattle. As soon as I waved the controller in front of my face and noticed the tracking speed and accuracy I started mentally designing camera tracking systems. I wanted a VR system in my life because I love games, but I needed a Vive for filmmaking science experiments.
Using eight jack-o’-lanterns and an Arduino Mega, “CrankyCoder” built his own automated pumpkin patch.
CrankyCoder’s favorite holiday, as well as his family’s, is Halloween. After creating a skull that follows people around a few years ago, he decided to take things up a notch with his “Creepy Pumpkin Patch.” His patch includes eight pumpkins on the edges of a path with homemade pressure switches in between. As trick-or-treaters walk by, the patch is activated, making the pumpkins spin creepily.
Cleverly, CrankyCoder employs two pie pans with marbles in between for each rotating pumpkin, creating ball bearings to support the weight. Also, instead of a candle or other complicated electronics, he’s using flickering LEDs from the dollar store to produce a creepy lighting effect.
Les Boites Mécaniques are a set of four automated boxes that produce music out of wood and metal. These experimental instruments enable anyone to explore the magic of making sound by pressing buttons on a remote, which activate each respective device to vibrate, knock, and rub materials.
The boxes were developed by Kogumi‘s Anatole Buttin and Yan Godat for educational electronic music workshops, and can be played either solo or in unison. There’s even a mode that allows users to control it all via MIDI notes on a computer.
In terms of hardware, each box is equipped with an Arduino Uno, a TLC59711 LED driver, step motors with AccelStepper library and a 3D-printed microstep driver.
You can watch how it all comes together to create a unique sound below!
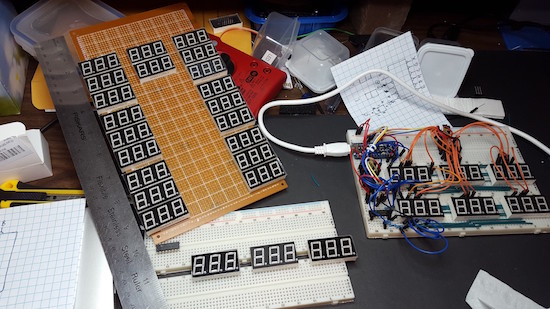
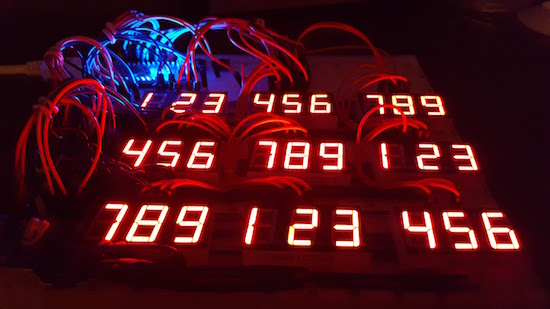
Using a rather large custom PCB, Hari Wiguna made a Sudoku board using discreet LED displays and a physical keypad.
Most people, buy a book and play Sudoku with a pencil or perhaps just get an app. Those that are really dedicated buy a standalone game, but this wasn’t good enough for Wiguna, who made his own electronic board not out of a normal LCD screen, but from 27 three-character LED modules to display the game on a glowing grid. Input is done via a keypad, which uses the grid layout to allow for two-button selection of any square.
Though extremely impressive, it doesn’t yet have a puzzle generator. Wiguna would welcome any contributions for this code-wise!
You can find out more about this project on his page, on GitHub, as well as in his detailed YouTube videos below.