Project – Arduino “Book Monster”
Introduction
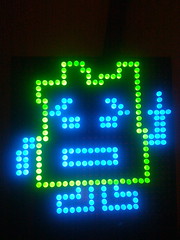
Recently we saw a neat project by the people from Evil Mad Scientist – their “Peek-O-Book“, a neat take on a book with a shy monster inside, based on hardware from their Snap-O-Lantern kit. Not wanting to fork out for the postage to Australia we decided to make our own version, of which you can follow along.
This is a fun project that doesn’t require too much effort and has a lot of scope for customisation. There’s no right or wrong when making your own (or this one!) so just have fun with it.
Construction
First, you’ll need a book of some sort, something large enough to hide the electronics yet not too large to look “suspicious” – then cut the guts out to make enough space for the electronics. Then again it’s subjective, so get whatever works for you. Coincidentally we found some “dummy books” (not books for dummies) that were perfect for the job:

After spraying the inside with matt black paint, the inside is better suited for the “eyes in the dark” effect required for the project:

The “book” had a magnet and matching metal disk on the flap to aid with keep the cover shut, however this was removed as it will not allow for smooth opening with the servo.
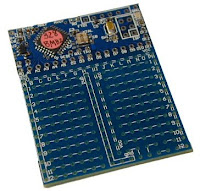
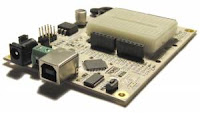
The electronics are quite simple if you have some Arduino or other development board experience. Not sure about Arduino? You can use any microcontroller that can control a servo and some LEDs. We’re using a Freetronics LeoStick as it’s really small yet offers a full Arduino Leonardo-compatible experience, and a matching Protostick to run the wires and power from:
By fitting all the external wiring to the Protostick you can still use the main LeoStick for other projects if required. The power is from 4 x AA cells, with the voltage reduced with a 1n4004 diode:
And for the “eyes” of our monster – you can always add more if it isn’t too crowded in the book:
We’ll need a resistor as well for the LEDs. As LEDs are current driven you can connect two in series with a suitable dropping resistor which allows you to control both if required with one digital output pin. You can use the calculator here to help determine the right value for the resistor.
Finally a servo is required to push the lid of the book up and down. We used an inexpensive micro servo that’s available from Tronixlabs:
The chopsticks are cut down and used as an extension to the servo horn to give it more length:
Don’t forget to paint the arm black so it doesn’t stand out when in use. We had a lazy attack and mounted the servo on some LEGO bricks held in with super glue, but it works. Finally, here is the circuit schematic for our final example – we also added a power switch after the battery pack:
To recap – this is a list of parts used:
- Dummy book
- Freetronics LeoStick and Protostick
- micro 9G servo
- two 5mm LEDs
- one 68Ω or thereabouts resistor
- assorted wire
- 9V battery snap (used as some 4 x AA cell holders need this)
- 4 x AA cell battery holder and 4 x AA cells
- SPDT switch
- 1N4004 or similar rectifier diode
- box, chopstick, odds and ends to mount the hardware
After some delicate soldering the whole lot fits neatly in the box:
Arduino Sketch
The behaviour of your “book monster” comes down to your imagination. Experiment with the servo angles and speed to simulate the lid opening as if the monster is creeping up, or quickly for a “pop-up” surprise. And again with the LED eyes you can blink them and alter the brightness with PWM. Here’s a quick sketch to give you an idea:
int angle;
int d; // for delays
int ledPin = 9; // LEDs on digital pin 9

#include <Servo.h>
Servo myservo;

void setup()
{
  myservo.attach(4); // servo control pin on digital 4
  pinMode(9, OUTPUT);
  randomSeed(analogRead(0));
  myservo.write(10);
  delay(5000);
}

void behaviour1()
{
  for (angle = 10; angle <=40; angle++)
  {
    myservo.write(angle);
    delay(50);
  }
  digitalWrite(ledPin, HIGH);
  delay(250);
  digitalWrite(ledPin, LOW);
  delay(250);
  digitalWrite(ledPin, HIGH);
  delay(250);
  digitalWrite(ledPin, LOW);
  delay(250);
  digitalWrite(ledPin, HIGH);
  delay(1000);
  digitalWrite(ledPin, LOW);
  delay(250);
  digitalWrite(ledPin, HIGH);
  delay(1000);
  digitalWrite(ledPin, LOW);
  delay(250);
  digitalWrite(ledPin, HIGH);
  delay(1000);
  digitalWrite(ledPin, LOW);
  delay(250);
  for (angle = 40; angle >=10; --angle)
  {
    myservo.write(angle);
    delay(5);
  }
}

void loop()
{
  behaviour1();
  delay(random(60000));
}
You can watch our example unit in this video.
Frankly the entire project is subjective, so just do what you want.
Conclusion
Well that was fun, and I am sure this will entertain many people. A relative is a librarian so this will adorn a shelf and hopefully give the children a laugh. Once again, thanks to the people from Evil Mad Science for the inspiration for this project – so go and buy something from their interesting range of kits and so on.
And if you enjoyed this article, or want to introduce someone else to the interesting world of Arduino – check out my book (now in a third printing!) “Arduino Workshop”.
The post Project – Arduino “Book Monster” appeared first on tronixstuff.


