Posts with «arduino yún» label

The internet of trees makes smart birdhouses using Arduino Yùn

The connected birdhouse is a project prototyped during a workshop ran by Massimo Banzi at Boisbuchet, last August in France. It was developed using Arduino Yùn, by Valentina Chinnici, who shared with us the project, and two other students taking part to  the week of learning-by-doing around the theme of  the Internet of Trees.

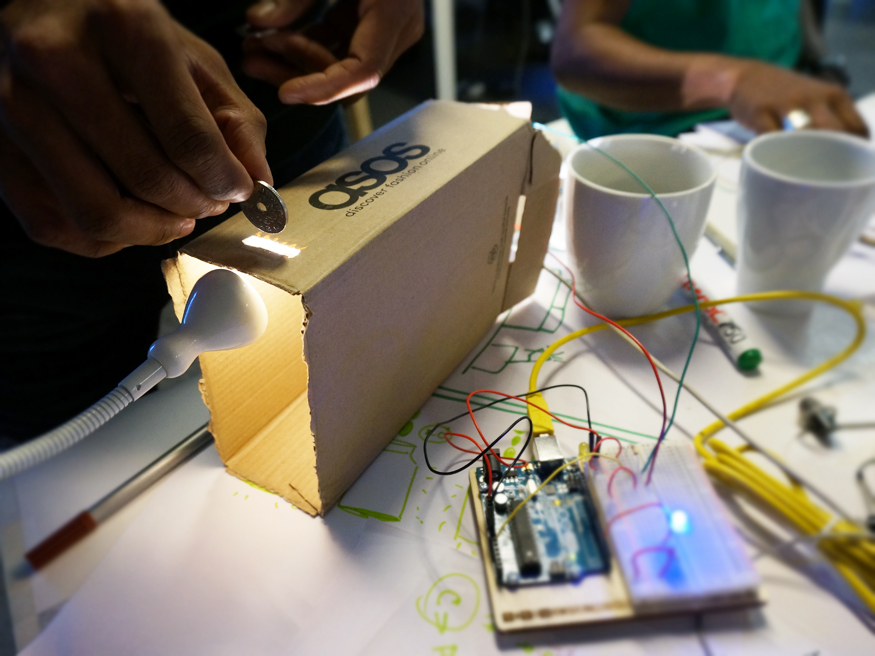
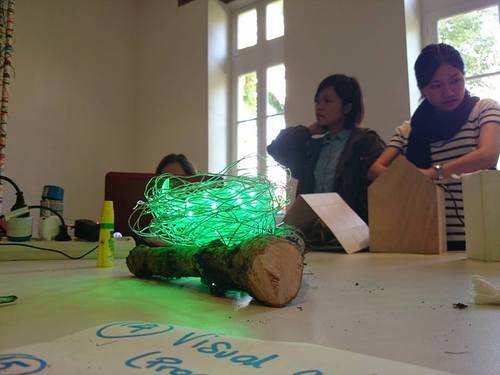
They redesigned a traditional object, a wooden birdhouse to be placed outdoor, and connected it to a lamp shaped like a nest, to be placed indoor:

The connected birdhouse was in fact an interactive object able to communicate to the nest/lamp the presence of a bird inside the house, and accordingly to a color coded signal was giving also some informations about the size of the bird itself. In the event of a bird entering into the house, the nest/lamp remotely controlled via WiFi by an Arduino Yùn, was turned on. The nest/lamp received the notification from the birdhouse translating it firstly with a rainbow effect. After few seconds the light changed according to the weight of the bird (green, yellow or red).

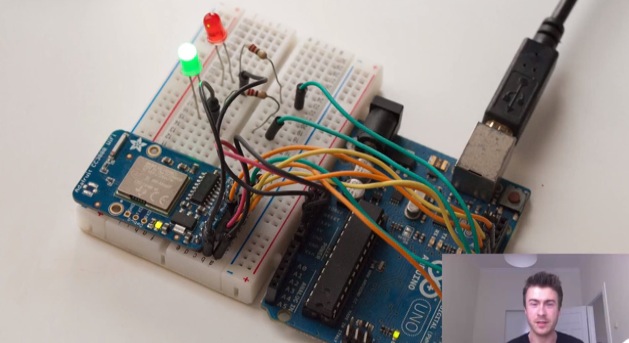
The LED strip used for the nest lamp was an Adafruit Neopixel strip controlled by an Arduino Yún.

On this blog you can find the sketch to make it work and create one yourself.

Arduino Blog 15 Sep 22:27

New Project: Smart Remote Control

Combine the Arduino Yún with a simple solderless breadboard circuit to create a homemade 'universal' remote control that you can navigate with your laptop or smartphone.

Read more on MAKE

Never Forget to Set an Alarm. Because This Alarm Clock Sets Itself!

Built with the Arduino Yún and using Temboo's online services, the SMART Alarm Clock automatically sets alarms based on Google Calendar events. And if you act quick and design an enclosure for this project you could win a Maker's Notebook!

Read more on MAKE

New Project: S.M.A.R.T. Alarm Clock

Combine the Arduino Yún with a TFT Touch Shield to assemble a homemade alarm clock that automatically sets alarms based on calendar events and even emails with the correct code word. And it looks cool too!

Read more on MAKE

Internet of things with Arduino Yún and Yaler

Explore this tutorial  demonstrating how the Arduino Yún can be controlled from anywhere with any internet connected web browser. The solution is provided by Bo Peterson using the Yaler service which means that the Yún can be reached from any network without knowing the IP-address, and without any port forwarding on the router where the Yún is connected.

A common problem in home automation and internet of things applications is that it is difficult to reach devices connected behind wifi routers from the outside. There are different approaches to overcome this problem:

  • Port forwarding and static ip addresses. This solution requires the user of the connected device to know how to configure a router and have access to router administration which is not always possible. A Yun tutorial with port forwarding is found here.
  • Polling is a technique where the connected device at regular intervals checks with an external server if the device should take action. This solution requires no configuration of the router but it creates extra network traffic and response delays.
  • A third way is to use WebSockets which is a way of providing real time full-duplex communication over TCP. Spacebrew is a good open source toolkit for connected devices using WebSockets. Autobahn is another infrastructure that can be used.
  • Reverse HTTP is the solution that will be used in this tutorial. We will use Yaler which is an open source relay infrastructure that gives access to connected devices with very little configuration.

Follow the tutorial and get the code at this link.

Arduino Blog 28 Jun 19:06
arduino  arduino yún  iot  yaler  yún  

An interactive coin jar saving for a good cause

At the end of May, Massimo Banzi and Giorgio Olivero (Todo) spent some days at the Copenhagen Institute of Interaction Design to teach a class called Connected Objects. The class goal was to envision, design and implement interactive objects that are open and connected, whose design and behaviour can be used to sense, read and affect the domestic landscape or other shared environments.

One of the team of students (Arun Mota, Hsiang-Lin Yang, Yashodeep Gholap) worked on Arduino Yún to create an energy redistribution service that allows people to save money and in parallel donate towards energy distribution projects in deprived areas of the world:

LightUp is an interactive fundraising coin jar that firstly encourages personal savings and then also allows people to contribute a part of their savings towards the cause. The system allows them to track in real-time exactly how many units of electricity they helped generate. Another visible reward is the jar lights up for 10 minutes each time they drop a coin.

To avail the service of LightUp, a user merely needs to register through an online platform. Every registered user is then provided with a physical jar to make savings on periodical basis. Users can save coins in these jars. Every time a coin is dropped in it, as a response the jar lights up for 10 minutes.

The drop of a coin each time also triggers a parallel transaction where a certain sum of money is transferred from the user’s account to LightUp’s Account. While registering, LightUp will also create a personal PayPal account for its users. This PayPal account is linked to the merchant PayPal account of LightUp. The user gets to decide the unit of money that can be debited each time while registering.

Every time users put coins in the LightUp jar, they will also receive immediate feedbacks such as SMS, email or facebook notification as per user’s preferences. These feedbacks will inform users on how their donation is being used for specific social projects and how they have helped make a real difference.


Arduino Blog 25 Jun 19:41

A REST API for Arduino and the CC3000 WiFi Chip

Marco Schwarz is an electrical engineer and passionate about home automation. He wrote us some weeks ago to present his work on the Arduino Yún:

I was recently playing with the Arduino Yún for a whole set of new projects, and I discovered a sketch that implements a REST API for the Arduino Yún. We’ll see in more details what a REST API is, but for now let’s say it allows to standardise the communication between your Arduino and the external world via WiFi or Ethernet, and develop complex applications without having to modify your Arduino sketch every time.

So I told myself: why not create one REST API for the CC3000 WiFi chip ? That’s exactly what I did as a weekend project, and I wanted to share it with you. If you want to directly jump to the project files, go over to the GitHub repository of the project.

Keep reading on his blog or watch the video below:

Controlling lights and sensors with Arduino Yún, Node js server and firmata

Arduino user Cinezaster sent us a project using Node js server on the Arduino Yún to control the lights, heating and some other sensors in the office of Appsaloon, the company where he’s doing an internship.

They already use Node.js for a lot of things and some of them are pretty cool with it.
That’s how they did it:


First of all you need to expand your flash, because there is not enough flash (16 MB) on the Arduino Yún. Sounds reasonable right? Not when you got the Yún for the first time in your hands. Luckily someone wrote this tutorial.

To start with you need to be on the same network to reach the Arduino .
Open your terminal

ssh root@arduino.local

It will ask for a password, which will by default be: ‘arduino’:

Now you can install Node.js on the Yún type :

opkg update
opkg install node

When the install is finished verify it by :

 node -v

It should give you something like this v0.10.28 (it may vary in the future)

Next you have to install the node-serialport package. This is necessary because the Atheros AR9331 needs to communicate with the ATmega32u4.

opkg update
opkg install node-serialport

After this you will need firmata for Node.js. This will control the inputs and outputs of the ATmega32u4.

Normally you would install firmata like this:

npm install firmata

But because the Arduino Yún does not have enough RAM this is ‘not possible’.

Keep reading it on their blog and fork it on Github!

Arduino Blog 03 Jun 19:33

Time to Expand your Yún disk space and install Node.js

Following the new Yún image, we are happy to announce two new features of the Arduino Yún.

  • The first feature is a tutorial we’ve written that allows you to use a micro SD card as a replacement for the Yún’s internal flash memory. Using this, you can expand your Yún’s free disk space from the original 7 Megabytes to the Gigabytes of your SD card.

Having more disk space allows you to make more complex projects, like activating webcams and saving pictures taken with it. In addition, by using an external SD card you avoid using the internal flash memory, thus extending the life of your Yún.

To upgrade your Yún to gain these features, follow the steps of the tutorial and report back to the Arduino Yún forum if you have any issues or questions.

  • The second new feature is the availability of Node.js as an installable package. In order to install Node.js on your Yún, use the Arduino IDE to upload the YúnSerialTerminal example or access your Yún via SSH.

Be sure your Yún has access to the internet, then type the following commands:

opkg update
opkg install node

And voilà! You’ve got Node.js on your Yún.

Try it out with the following command: 

node -e “console.log(‘Hello Yún’)”

If you are a Node.js fan, you probably want to use your favourite modules. Unfortunately, not every Node.js module is “pure javascript”, so some modules won’t work on the Yún. We are solving this by preparing packages for the most common native Node.js modules: we have already prepared node-serialport (opkg install node-serialport) and noble is on the way. If you miss your favourite one and want it added to the list, please consider joining us in developing the Yún.

Arduino Blog 06 May 11:46