Posts with «arduino pro micro» label

A VR “glove” inspired by Ender’s Game

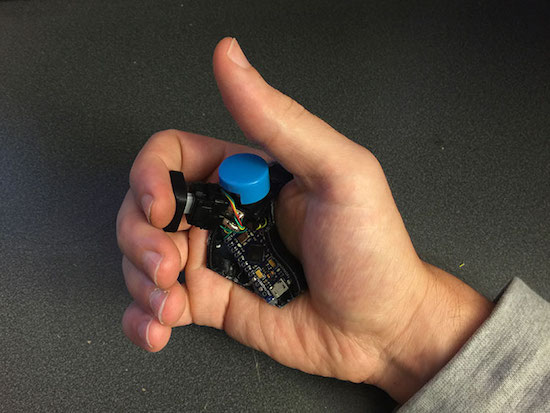
To complement his VR experience, Florian Mauer built a controller that could perhaps best be described as a “hand bracelet.”

As virtual reality applications begin to be implemented, one challenge will be finding an interface device, or combination of them that are unobtrusive, yet allow for versatile input. Mauer decided on a design inspired by the gravity control bracelet from the movie “Ender’s Game.” It can be worn similar to how a pistol is held (illustrated here with a virtual pistol), and reportedly doesn’t get in the way when using a keyboard or mouse–at least before the button was added.

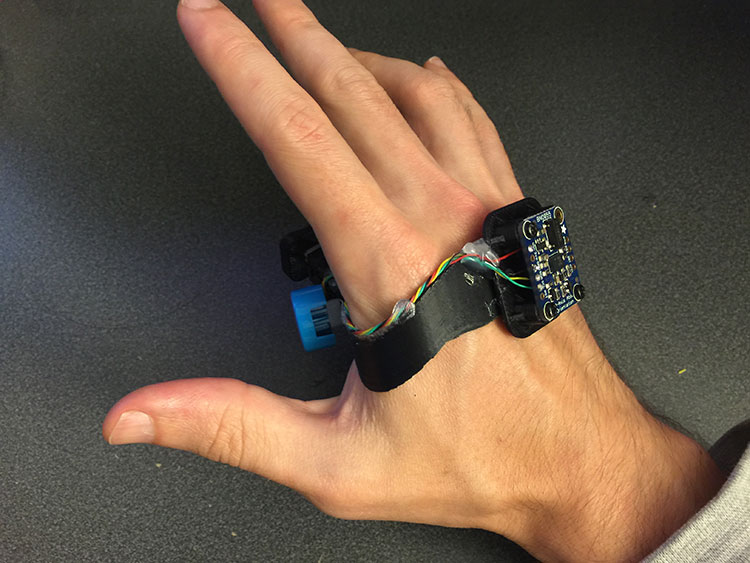
The 3D-printed gadget features an IMU, Arduino Pro Micro, as well as a couple buttons for in-game actions. This helps the Leap Motion controller used here to recognize gestures that would be difficult for its camera to pick up otherwise.

In the 2013 adaptation of Ender’s Game, Harrison Ford’s character slips a metallic device over his hand to control gravity in the training room. This scene inspired me as I’ve been trying to imagine VR controllers that can be used alongside mouse+keyboards. The controller used by Ford seemed convenient to put on, offer a lot of finger freedom, and probably allow for throwing VR objects without falling off.

You can see more information on this promising project on Mauer’s website here.

A multimeter heads-up display with Arduino glasses

With Alain Mauer’s Arduino glasses and a Bluetooth multimeter, electrical data is always in view!

If you’re in a job where you have to take readings inside a live electrical panel, one thing that’s inconvenient, and even dangerous at times, is having to look away from your hands to read your multimeter. With hopes of “making an engineer’s life easier and safer,” Mauer solved this problem using an Arduino Pro Micro and a BLE module to show data from a Bluetooth-enabled multimeter. Now he can see data on a display that looks similar to a Google Glass device. Perhaps this method could be expanded to other devices in the future!

If you’d like to build your own glasses, a description and 3D printing files can be found on Hackaday.io.

The most incessant (and annoying) Arduino project ever?

If you live with your family, a significant other or a few roommates, and you’re looking for a fun prank to drive them nuts, Connor Nishijima has the perfect trick for you: an Arduino cricket. Unlike actual crickets that are relatively consistent with the sounds they make, this one is a far cry from that. Instead, the Maker’s project will chirp for a brief second, and then go into a deep sleep for a random amount of time between three minutes and three hours. As you could imagine, this can make the source of the noise extremely difficult to pinpoint!

Nishijima combined the JeeLib library for reducing current consumption and his new library for 8-bit volume control to bring the insanely annoying “cricket” to life using nothing more than a speaker, a 7800mAh USB battery, and an Arduino. The best part? He estimates that the setup has enough juice to last for months, if not years. In his case, he enclosed the electronics within a box along with some magnets, then placed it in his vent to mess with his buddy.

For the lowest current comsumption with minimal effort, I’ll be using a 16MHz Arduino Pro Micro with a few power-hog components like the power LED desoldered. Unfortunately, the PWM speeds needed for my Volume lib only work well at 16MHz so far, so using 8MHz to conserve power is out.

However, the awesome battery calculator at Oregon Embeddedtells me that at 16mA “awake” current and 200uA “asleep” current (being asleep more than 95% of the time) this should last more than three years. Of course, the battery itself will have some drain involed with it’s circuitry, but even a FOURTH of the estimated battery life still puts us at almost a full year which is good enough for me, and bad enough for my friend.

Those wishing to give this prank a try can check out Nishijima’s videos below, as well as his code on GitHub.

Reflow Oven Controller with Graphic LCD

A reflow oven is one of the most useful tools you will ever have, and if you haven’t built one yet, now is as good a time as any. [0xPIT's] Arduino based reflow oven controller with a graphic LCD is one of the nicest reflow controllers we’ve seen.

Having a reflow oven opens up a world of possibilities. All of those impossible to solder surface mount devices are now easier than ever. Built around the Arduino Pro Micro and an Adafruit TFT color LCD, this project is very straight forward. You can either make your own controller PCB, or use [0xPIT's] design. His design is built around two solid state relays, one for the heating elements and one for the convection fan. “The software uses PID control of the heater and fan output for improved temperature stability.” The project write-up is also on github, so be sure to scroll down and take a look at the README.

All you need to do is build any of the laser cutters and pick and place machines that we have featured over the years, and you too can have a complete surface mount assembly line!


Filed under: Arduino Hacks, tool hacks

Building a Final Key


Remembering passwords is a pain, and there’s a number of devices out there to make it easier. If you’re looking to roll your own, this guide to building a Final Key will walk you through the process.

We talked about the Final Key before. It’s a one button password manager that encrypts and stores your password. It acts as a virtual serial port for configuration. When you hit the button, it becomes a keyboard and types in the correct password.

The creator has no intentions of making this a commercial project for a number of reasons. Instead, easy build instructions are provided based on the Arduino Pro Micro. The 24LC512 EEPROM can be soldered directly to the Arduino by bending out the DIP legs. A few resistors, a button, and an LED finish off the project. The last step is to fill it with hot glue to prevent tampering.

The Final Key firmware is available on Github, and the case can be ordered from Shapeways. If you’re interested in hardware password management, you can also check out the Mooltipass which is being developed on Hackaday.

[Thanks to Lars for the tip!]


Filed under: Arduino Hacks, security hacks