Posts with «arduino nano» label

Parking Assistant Helps Back Up the Car Without Going Too Far

Sure, [Ty Palowski] could have just hung a tennis ball from the ceiling, but that would mean getting on a ladder, testing the studfinder on himself before locating a ceiling joist, and so on. Bo-ring. Now that he finally has a garage, he’s not going to fill it with junk, no! He’s going to park a big ol’ Jeep in it. Backwards.

The previous owner was kind enough to leave a workbench in the rear of the garage, which [Ty] has already made his own. To make sure that he never hits the workbench while backing into the garage, [Ty] made an adorable stoplight to help gauge the distance to it. Green mean’s he’s good, yellow means he should be braking, and red of course means stop in the name of power tools.

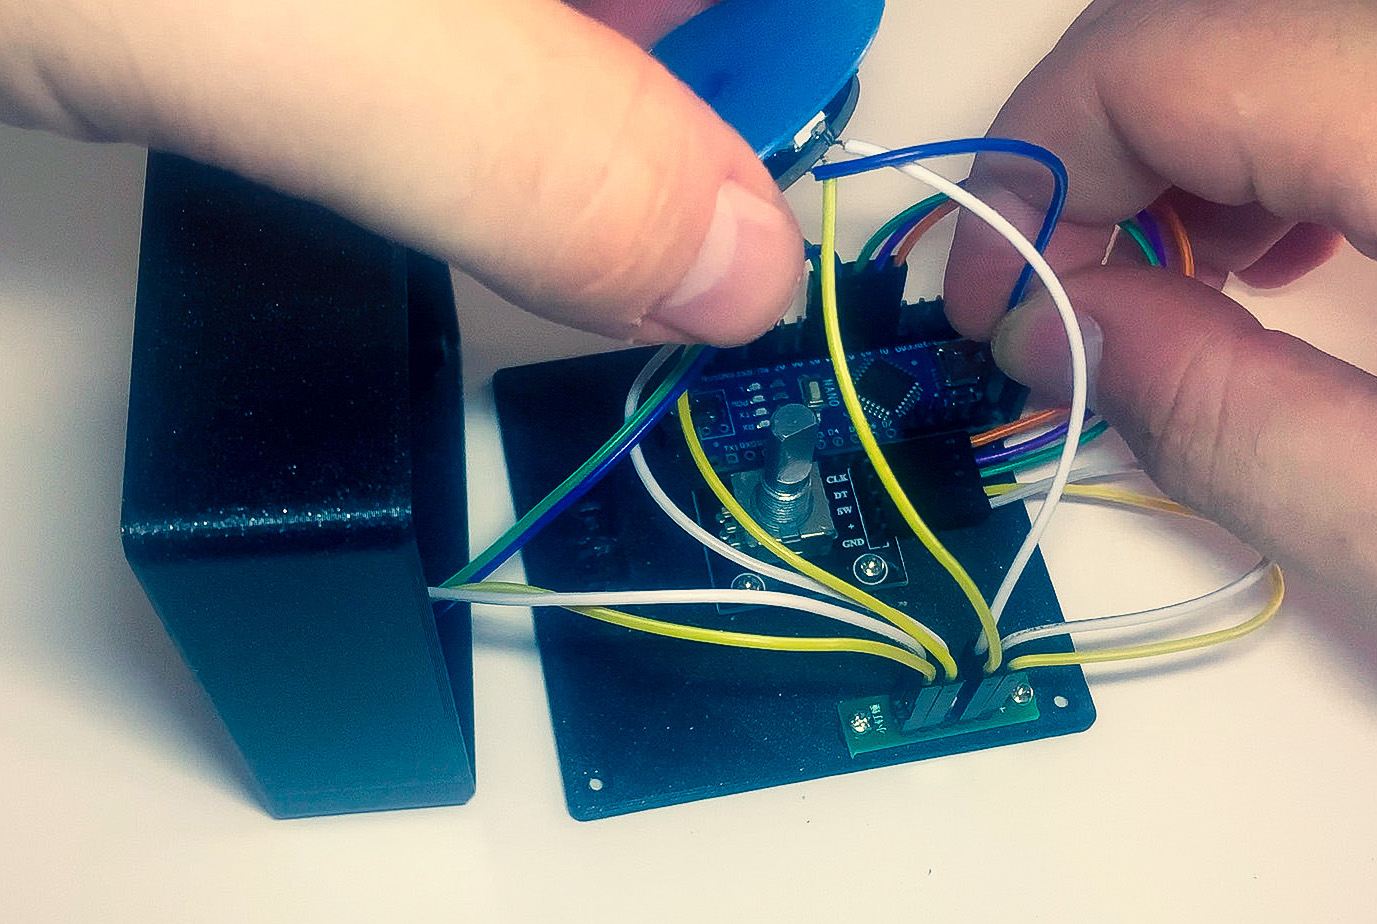
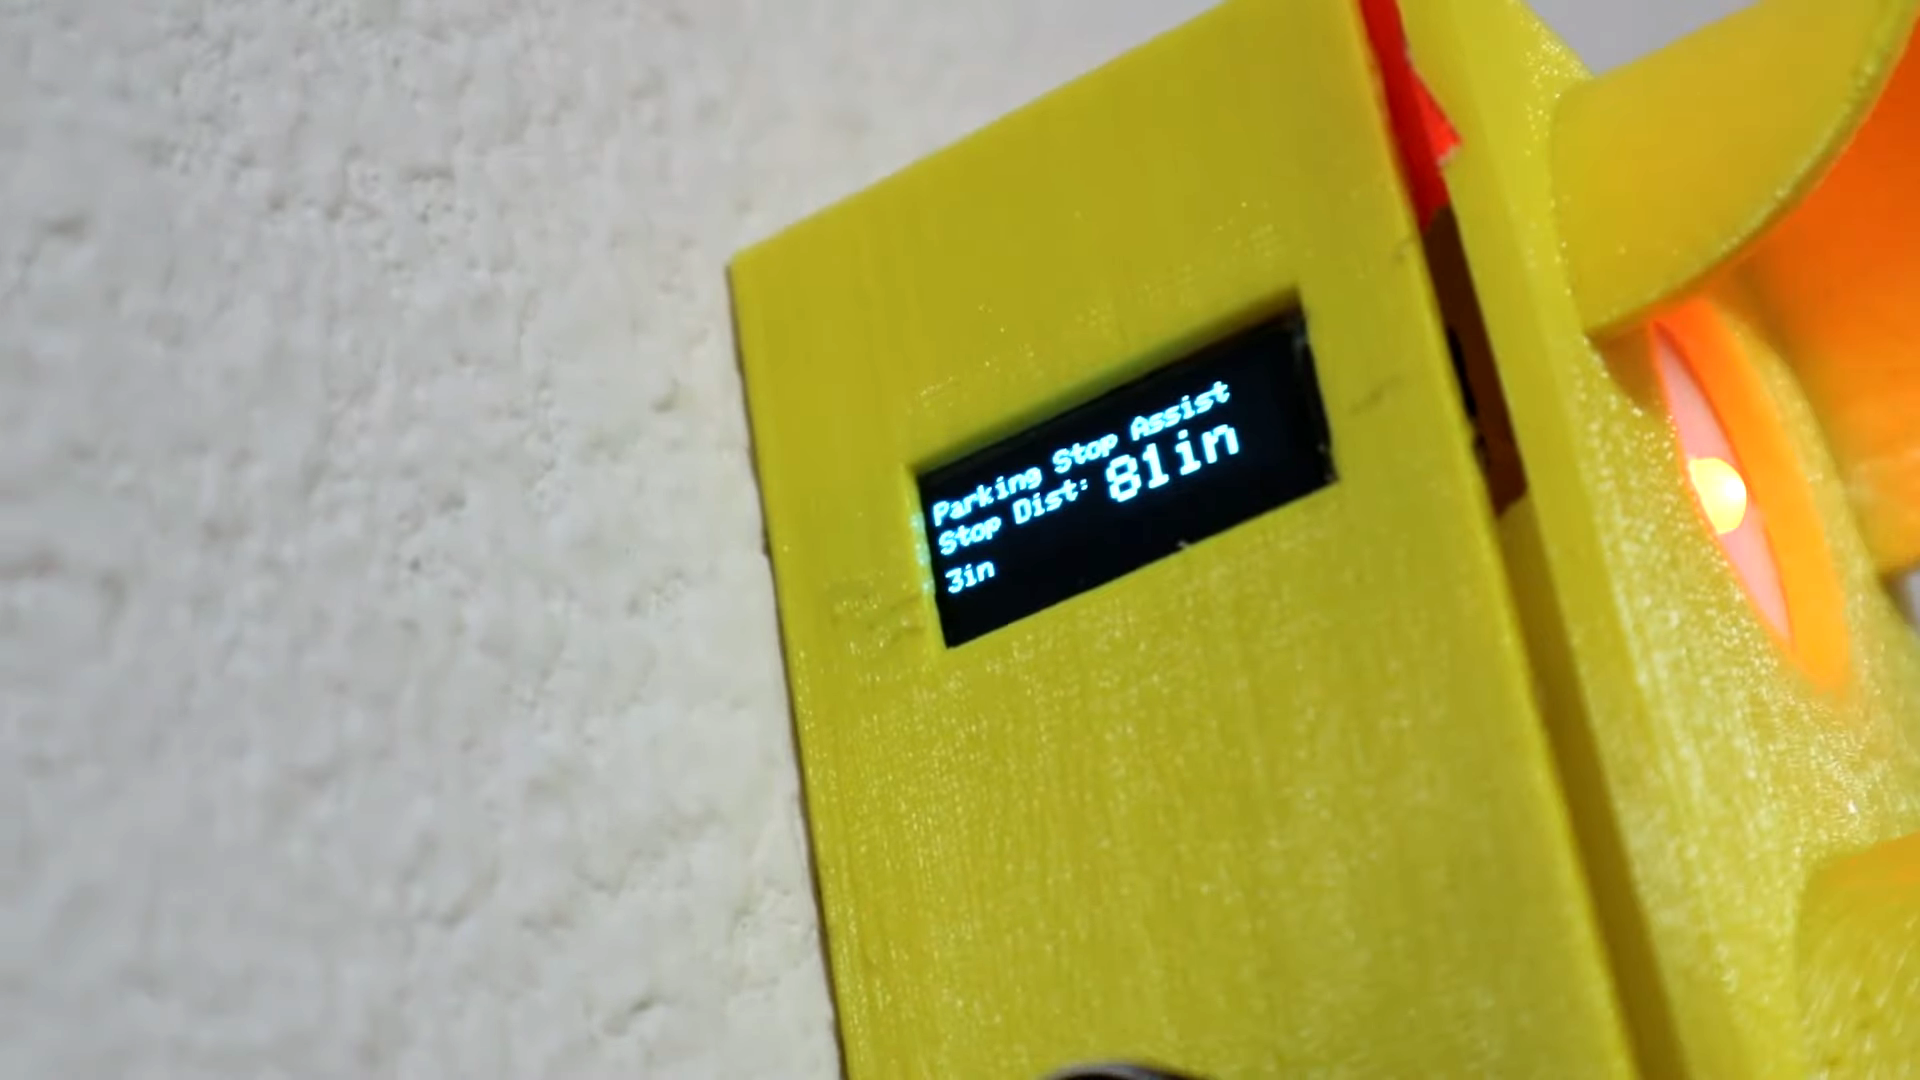
Inside the light is an Arduino Nano, which reads from the ultrasonic sensor mounted underneath the enclosure and lights up the appropriate LED depending on the car’s distance. All [Ty] has to do is set the distance that makes the red light come on, which he can do with the rotary encoder on the side and confirm on the OLED. The distance for yellow and green are automatically set from red — the yellow range begins 24″ past red, and green is another 48″ past yellow. Floor it past the break to watch the build video.

The humble North American traffic signal is widely recognized, so it’s a good approach for all kinds of applications. Teach your children well: start them young with a visual indicator of when it’s okay to get out of bed in the morning.

Multi-Volume Knob Gives All Your Programs a Turn

We’ve all been there. You’re manning the battle station, deep in the sim-racing or some other n00b-pwning zone and suddenly some loudmouth blows out your eardrums over Discord. It’s insulting to have to stop what you’re doing to find the right Windows volume slider. So why do that? Build [T3knomanzer]’s simple yet elegant multi-volume knob and stay zen in the zone.

It’s easy, just turn the knob to cycle through your programs until Discord comes up on the little screen, and then push down to change it into a volume knob. If you need to change another volume, just click it again. Since there’s no Alt+Tabbing out to the desktop, no checkered flags should ever slip through your fingers.

Inside the well-designed case you’ll find the usual suspects — Arduino Nano, rotary encoder, an OLED display, and an LED ring, each with their own place carved out.

This completely open-source knob looks great, and we love that it’s been made incredibly easy to replicate by standing up a site with foolproof, well-depicted, step-by-step instructions. Watch them take it for a spin after the break.

Want more than volume at your fingertips? Here’s a DIY USB knob that does shortcuts, too.

DIY TV-B-Gone is A-OK

Where won’t they put a TV these days? We’ve even seen one creeping behind semi-transparent mirror film in the ladies’ room of a sports bar, though that one didn’t last long. Up until that moment, we had never wished so hard for a TV-B-Gone, especially one as small and powerful as this DIY version by [Constructed].

The best thing about [Constructed]’s DIY TV-B-Gone is the strength of signal, though the size is nothing to sneeze at. That’s a 10-watt array or IR LEDs out of a security camera, and you can see how much brighter it is than a single IR LED in the video after the break.

Packed inside this minty enclosure is an Arduino Nano, which holds all the TV power-off codes known to hackers and fires them off in quick succession. [Constructed] salvaged a MOSFET from an electronic speed controller to drive that LED array, and there’s a voltage booster board to raise the 3.7V lithium battery to 5V. [Constructed] hasn’t really had the chance to test this out in public what with the global pandemic and all, but was able to verify a working distance of 40 feet inside the house.

Don’t care for such a raw look? Hide your zapper inside a toy, like this sonic screwdriver version.

Light Up the Night with a Tetrahedral LED Hat

People get into electronics for all kinds of reasons, but we would guess that the ability to blink the blinkenlights is probably pretty high on the survey results. [Kuchbert] has been going to Deichkind shows for the last decade and has wanted to build one of the German techno-rap band’s signature tetrahedral LED hats for about as long.

Up inside the hat is an Arduino Nano driving WS2812B LEDs and a portable battery to power everything. Thanks to an HC-05 Bluetooth module, the show can be controlled with an Android app. The many, many holes in the acrylic panels were milled out, but they could just as easily be laser-cut, or if you have infinite patience, drilled by hand. The code is coming once it has been cleaned up a bit. Everything else you’d need is already there waiting. This helmet even has its own lil’ music video, which we’ve carefully beat-matched in after the break.

Naturally, this makes us think of all the Daft Punk helms that have blinked by on this blog over the years. This hand-soldered one might be the most meticulously made.

Rotary Controller Dials in PC Volume

As wonderful as mechanical keyboards are, most of the pre-fab and group buy models out there have zero media controls. If you want rotary encoders and OLED screens to show what function layer you’re working in, you’ll probably have to build your own keyboard from the ground up.

Hackaday alum [Cameron Coward] got around this problem by building an electromechanical buddy for his keyboard that works as a volume control. Now that we don’t rely on them to make phone calls, rotary dials are a fun throwback to a time that seems simpler based on its robust and rudimentary technology. This one is from a lovely burnt orange Bell Trimline phone, which was peak rotary dial and one of the idea’s last gasps before tone dialing took over completely.

Operationally speaking, [Cameron] is reading in the dial’s pulses with an Arduino Nano and using a Python script to monitor the serial connection and translate the pulses to volume control. We like that this is isn’t a volume knob in the traditional sense — it’s a game of percentages. Dialing ‘2’ gives 20% volume across all programs, and ‘8’ raises it to 80% of maximum. Need to mute? Just dial ‘0’, and you’ll begin to understand why people wanted to move on from rotary dialing. It won’t take that long, but it’s not instant. Check out the demo after the break.

This isn’t the first time we’ve seen a rotary dial used to control volume, but that’s one of the minor selling points of this rotary cell phone.

Piston-Powered Pellet Pusher for Peckish Pets

We all have our new and interesting challenges in lockdown life. If you’ve had to relocate to ride it out, the chances are good that even your challenges have challenges. Lockdown left [Kanoah]’s sister in the lurch when it came to feeding her recently-adopted pet rat, so he came up with a temporary solution to ensure that the rat never misses a meal.

Most of the automated pet feeders we see around here use an auger to move the food. That’s all fine and good, but if you just need to move a singular mass, the screw seems like overkill. [Kanoah]’s feeder is more akin to a pellet-pushing piston. It runs on a Metro Mini, but an Arduino Nano or anything with enough I/O pins would work just fine. The microcontroller starts counting the hours as soon as it has power, and delivers pellets four times a day with a servo-driven piston arm. [Kanoah] has all the files up on Thingiverse if you need a similar solution.

There many ways of solving the problem of dry pet food delivery. Wet food is a completely different animal, but as it turns out, not impossible to automate.

Alexa, Shoot Me Some Chocolate

[Harrison] has been busy finding the sweeter side of quarantine by building a voice-controlled, face-tracking M&M launcher. Not only does this carefully-designed candy launcher have control over the angle, direction, and velocity of its ammunition, it also locates and locks on to targets by itself.

Here comes the science: [Harrison] tricked Alexa into thinking the Raspberry Pi inside the machine is a smart TV named [Chocolate]. He just tells an Echo to increase the volume by however many candy-colored projectiles he wants launched at his face. Simply knowing the secret language isn’t enough, though. Thanks to a little face-based security, you pretty much have to be [Harrison] or his doppelgänger to get any candy.

The Pi takes a picture, looks for faces, and rotates the turret base in that direction using three servos driven by Arduino Nanos. Then the Pi does facial landmark detection to find the target’s mouth hole before calculating the perfect parabola and firing. As [Harrison] notes in the excellent build video below, this machine uses a flywheel driven by a DC motor instead of being spring-loaded. M&Ms travel a short distance from the chute and hit a flexible, spinning disc that flings them like a pitching machine.

We would understand if you didn’t want your face involved in a build with Alexa. It’s okay — you can still have a voice-controlled candy cannon.

Open Laser Blaster Shells Out More Bang for the Buck

[a-RN-au-D] was looking for something fun to do with his son and dreamed up a laser blaster game that ought to put him in the running for father of the year. It was originally just going to be made of cardboard, but you know how these things go. We’re happy the design went this far, because that blaster looks fantastic.

Both the blaster and the target run on Arduino Nanos. There’s a 5mW laser module in the blaster, and a speaker for playing the pew pew-related sounds of your choice. Fire away on the blaster button, and the laser hits a light-dependent resistor mounted in the middle of the target. When the target registers a hit, it swings backward on a 9g servo and then returns quickly to vertical for the next shot.

There are some less obvious features that really make this game a hit. The blaster can run in 10-shooter mode (or 6, or whatever you change it to in the code) with a built-in reload delay, or it can be set to fully automatic. If you’re short on space or just get sick of moving the target to different flat surfaces, it can be mounted on the wall instead — the target moves forward when hit and then resets back to flat. Check out the demo video we loaded up after the break.

No printer? No problem — here’s a Node-RED shooting gallery that uses simple wooden targets.

Sun-Seeking Sundial Self-Calibrates in No Time

Sundials, one of humanity’s oldest ways of telling time, are typically permanent installations. The very good reason for this is that telling time by the sun with any degree of accuracy requires two-dimensional calibration — once for cardinal direction, and the other for local latitude.

[poblocki1982] is an amateur astronomer and semi-professional sundial enthusiast who took the time to make a self-calibrating equatorial ‘dial that can be used anywhere the sun shines. All this solar beauty needs is a level surface and a few seconds to find its bearings.

Switch it on, set it down, and the sundial spins around on a continuous-rotation servo until the HMC5883L compass module finds the north-south orientation. Then the GPS module determines the latitude, and a 180° servo pans the plate until it finds the ideal position. Everything is controlled with an Arduino Nano and runs on a 9V battery, although we’d love to see it run on solar power someday. Or would that be flying too close to the sun? Check out how fast this thing calibrates itself in the short demo after the break.

Not quite portable enough for you? Here’s a reverse sundial you wear on your wrist.

Celebrate Spring with a DIY Vibration Sensor

Is your heaving pile of electronic parts shrinking by the day as you finish old back-burnered projects and come up with new ones? Try an old pastime that never gets old: rolling your own sensors using household objects. [Nematic!] needs a way to sense vibration for an upcoming project. Instead of spending $1 plus shipping and waiting who knows how long for a spring vibration sensor to come in the mail, they made one in a matter of minutes.

A spring vibration sensor is a simple device that can be used as a poor man’s accelerometer, or simply to detect vibration. All you need is a length of conductive wire, a 10 kΩ resistor, and a way to pick up those good vibrations. For the purposes of demonstration, [Nematic!] is using an Arduino Nano in the short build video after the break.

The wire is wound around the threads of a bolt to form a coil that’s just large enough for a resistor to fit inside. One end of the coil is connected to 5 V, and one leg of the resistor connects to an input pin. Together, they form a normally-open switch. When vibrations force the free ends of both to touch, the circuit is complete and the pin is pulled high.

If you make one of these and find the sensitivity is off, just twist up a new coil with stiffer or softer wire depending on the problem. Iterating doesn’t get much cheaper than wrapping wire around a bolt. We can’t wait to see how [Nematic!] will use this sensor. In the meantime, we’re planning to use one to detect when the dryer stops running and send a text.

Speaking of bargain basement sensors, did you know you can detect water leaks with two pennies, an aspirin, and a clothespin? These projects demonstrate the kind of ingenuity that can win you a pile of toys in our new Making Tech At Home contest, running now through July 28th, 2020.