Posts with «arduino nano» label

Turn an old microscope into a live cell imaging device

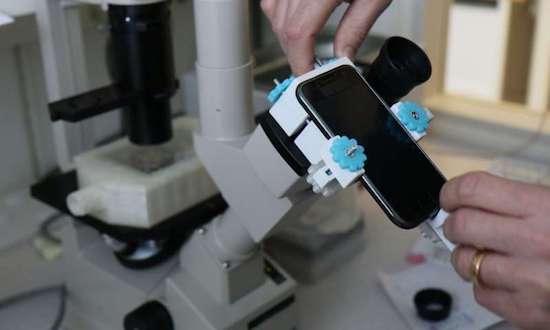
Microscopes are common pieces of equipment in laboratories (or even high school science classes for that matter), but making movies of living cells usually requires more expensive and specialized tools… until now. With a 3D-printed mount for a smartphone and an Arduino, researchers at Sweden’s Uppsala University have been able to retrofit ordinary microscopes to take time-lapse sequences.

To accomplish this, an Arduino was used to control a shutter for the smartphone to minimize light exposure when capturing intermittent images, while a heating unit was employed to maintain a constant temperature for the tiny organisms.

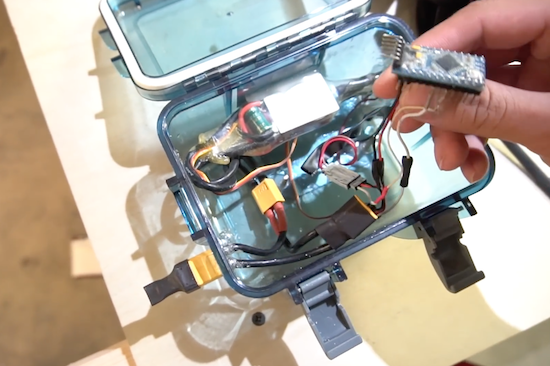
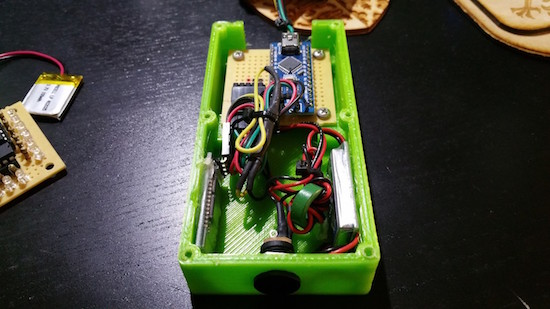
The control unit was built using an Arduino Nano, a Bluetooth communication module, a power transistor, and a voltage regulator. The control unit was connected to a standard computer power supply unit and then used to provide power at the appropriate voltages to the other components of system, i.e. the heating element (12V), the fan (12V), the temperature sensors (5V) and finally the shutter’s servo motor (5V). The control unit was used to operate the shutter’s servo motor via Bluetooth, and also to control the temperature inside the incubator by adjusting the power supplied to the heating element.

In the future, this modular and affordable system, called ATLIS, could increase the accessibility of time-lapse microscopy for the wider research community. The total cost for all of its components (excluding the phone and microscope) was only $277, a mere fraction of the price for commercially available equipment.

You can read more about the project on Phys.org and find the team’s full study here.

(Photo: Linda Koffmar / Phys.org)

This robot is a cool new way to use cassette tapes!

Though tape players persisted in vehicles for much longer than needed, cassettes are pretty much an obsolete format. That doesn’t mean they can’t be useful, as this project by Moscow-based media artist ::vtol:: shows.

His interactive robot, dubbed “pzr-10,” traverses a canvas littered with unwound tape, while two heads read the data off of it. Using an Arduino Uno, this data is then transmitted to the built-in loudspeaker and played aloud. Audio can be looped and processed in various ways, giving the user a unique audio experience!

A customized remote operates the robot. The controller is equipped with an Arduino Nano and a joystick that guides pzr-10, while buttons manipulate the sound.

You can read more about the robotic installation on ::vtol::’s page.


Arduino Blog 16 Dec 22:14

More Blinky = More Better – The WS2812FX Library

The WS2812 is an amazing piece of technology. 30 years ago, high brightness LEDs didn’t even exist yet. Now, you can score RGB LEDs that even take all the hard work out of controlling and addressing them! But as ever, we can do better.

Riffing on the ever popular Adafruit NeoPixel library, [Harm] created the WS2812FX library. The library has a whole laundry list of effects to run on your blinkenlights – from the exciting Hyper Sparkle to the calming Breathe inspired by Apple devices. The fantastic thing about this library is that it can greatly shorten development time of your garden-variety blinkables – hook up your WS2812s, pick your effect, and you’re done.

[Harm]’s gone and done the hard yards, porting this to a bevy of platforms – testing it on the Arduino Nano, Uno, Micro and ESP8266. As a proof of concept, they’ve also put together a great demonstration of the software – building some cute and stylish Christmas decorations from wood, aluminium, and hacked up Christmas light housings. Combining it with an ESP8266 & an app, the effects can be controlled from a smartphone over WiFi. The assembly video on YouTube shows the build process, using screws and nails to create an attractive frame using aluminium sheet.

This project is a great example of how libraries and modern hardware allow us to stand on the shoulders of giants. It’s quicker than ever to build amazingly capable projects with more LEDs than ever. Over the years we’ve seen plenty great WS2812 projects, like this sunrise alarm clock or this portable rave staff.
As always, blink hard, or go home. Video after the break.


Filed under: Arduino Hacks, Holiday Hacks, led hacks

Wrist thrusters let you fly through the water effortlessly

These small arm-mounted propeller units can carry a skin diver through the water with minimal effort.

YouTuber “PeterSripol” had only a week to prepare for his trip to Hawaii. Rather than purchase a set of fins or a snorkel, he instead hooked up two T100 thrusters that he had lying around to wrist straps. In his setup, these thrusters are controlled by a button interfaced with an Arduino that allows the user to select one of three power levels.

The required battery, as well as other control components are housed inside a waterproof box, and quite a bit of effort was put into making good (and hopefully waterproof) connections!

Unfortunately, the fun was cut short by a cut wire, but it looked awesome nevertheless! You can see the project in action below!

Making beats on a tiny Arduino DJ controller

Electronic music seems to be ripe for hacking, as a new device can be fun as well as quite useful. Imgur user “fatcookies” decided to create a small DJ controller using an Arduino Nano, six push buttons, three potentiometers, and four configurable LEDs.

In this setup, each input is fed into the Arduino, then sent to a computer over USB to be used as a MIDI interface (with the help of a couple pieces of intermediate software). A neat build for sure, but what really sets this tiny beast apart is that it’s about the size of a notebook’s trackpad.

The electronics are all stored inside a transparent nuts and bolts storage box, while fatcookies rounded out the design with some arcade buttons and brushed aluminium knobs on two of the pots.

You can check out how to make one of these mini devices for yourself on the project’s Imgur page.

The Synth Bike is a mobile music machine

With a speaker on the back and a drum machine on the front, what can possibly go wrong?

After riding his bike home after a synthesizer get together, Sam Battle decided to actually combine these two pursuits, transforming an iconic 1973 Raleigh Chopper into a mobile synthesizer. Though his first try was rather crude, using an Oyster card stuck between spokes to trigger a switch, his aptly named “Synth Bike 2.0” looks pretty awesome.

Featuring eight–yes eightArduino Nano boards, the music’s tempo can be controlled by how fast you pedal, or set up to use a built-in clock. Other electronics include a Sparkfun WAV Trigger, some analog synth circuitry, a sampler, a digital oscillator, and a Music From Outer Space Echo module.

Plenty of switches, dials, pads and knobs can be found on a control box mounted to the handlebars, while more pads are located on the bike’s top tube.

As awesome as it looks, all of this electronic gear seems to suck a lot of power, and it can only play for around 10 minutes at a stretch. A battery upgrade, however, is reportedly imminent!

Arduino Blog 09 Nov 15:24

Dtto is a 3D-printed, self-configurable modular robot

Congratulations to the winner of this year’s Hackaday Prize, Alberto Molina Perez! Inspired by Bruce Lee’s famous water quote, Dtto is a self-reconfigurable robot that can adopt any shape by simply changing the position and connection of its 3D-printed modules.

A coupling mechanism on both ends allows the sections to assemble themselves in various configurations and carry out complex tasks in unison. They can chain together to create a snake-like robot, turn into a wheel, or even form a bridge to get over a gap. Impressively, this is all accomplished autonomously. The goal is that, one day, Dtto’s versatility will enable it to perform rescue missions and explore unknown environments without any human intervention.

As Hackaday notes, each module consists of two boxes, rounded on one side, linked by a bar. One half houses all of the electronics, which includes an Arduino Nano, a Bluetooth chip, an NRF2401+ radio transceiver, two SG92R Tower Pro servos for hinging, and three Tower Pro SG90 micro servos for coupling, while the other leaves space for additional features, such as a camera, microphone and speakers, multiple sensors, actuators, or more batteries.

You can read more about the project on its Hackaday.io page, and be sure to check out its latest demo reel below!

Wear the Stranger Things wall on your shirt

The Netflix series Stranger Things has become a fan-favorite for Makers, especially for those looking to recreate a light-up alphabet wall of their own. While we’ve seen some awesome attempts over the last couple of weeks, Imgur user “MrWalkway” has decided to create a more portable version in the form of his Halloween costume.

The show-inspired costume uses an Adafruit LED strand, an Arduino Nano, a Bluetooth receiver, a battery, and some other components to allow his shirt to accept different messages and light patterns. The instructions are sent from a Bluetooth terminal on his phone over a serial connection to the Arduino.

As you can see on the project’s Imgur page, the electronics are all housed within a 3D-printed control box that gets tucked away in his pocket while the 25 LEDs are stitched to the inside of the shirt.

A touchless MIDI controller for your electric guitar

If guitar effects pedals aren’t really your thing, perhaps Evan Kale’s touchless MIDI controller will fit the bill.

Using an Arduino, along with a Colpitts oscillator and some other electronics, Kale has come up with a rather unique interface for his guitar. Instead of using a foot pedal, he put a strip of aluminum foil inside of a fingerless glove, then attached a homemade metal detector coil and circuit to the back.

This allows him to strum the guitar, then change the sound by moving his hand away and toward the strings as a MIDI input. Very clever, and as always, Kale outlines everything in his own zany video style!

You can find the code for this project here and check out the schematic on Imgur. On the other hand, if this looks slightly familiar, he uses the same type of circuit for this MIDI controller as the metal detector previously covered on our blog.