The Nokia 3100 is a classic in the circles we frequent. The LCD in this phone is a very cheap and very common display, and it was one of the most popular phones since the phone from Bell, making it a very popular source of cool components.
Now everything is an Internet of Thing, and cellular data for microcontroller projects is all the rage. [Charles] thought it would be interesting to use the famous Nokia 3100 to transmit and receive data. After battling with some weird connectors, he succeeded.
The Nokia 3100 doesn’t have a USB connector, as this phone was made before the EU saved us from a menagerie of cell phone chargers. Instead, this phone has a Nokia Pop-Port, a complex connector that still has TX and RX pins running at 115,200 bit/s 8N1. By fitting a USB socket onto a prototyping board, adding a few level shifters, and connecting the pins in the right order, [Charles] was able to get his Arduino talking to an old Nokia Brick.
[Charles] isn’t quite at the level of sending SMS from his confabulation, and even following a tutorial from [Ilias Giechaskiel] didn’t work. [Charles] is looking for help here, and if you have any suggestions, your input would be appreciated.
There is a problem with using a Nokia 3100 as a cheap Arduino cellular shield: it’s only 2G, and sometime soon those cell towers will be shut down. For now, though, it works, and once those 2G towers are shut down, there are plenty of options with cheap, early Android and iOS phones.
The apparent lull on the Arduino front the last few weeks was just the calm before the storm that is the Bay Area Maker Faire (BAMF). Both companies claiming the Arduino name were there over the weekend, with news and new products in tow. Ironically, you could see from one booth straight over to the other. Small world.
Perhaps the biggest news from Arduino LLC is that hacker-friendly Adafruit is now going to be making officially-licensed boards in the US. Competing with this news, Arduino SRL brought its new boards, including the Yun Mini and ARM-powered Arduino M0. And [Massimo Banzi] and Arduino LLC seem to be taking an end-run around the Arduino SRL trademark by announcing the “Genuino” brand for European production. For all the details, read on!
The Adafruit Connection
As announced by [Massimo] in his “State of the Arduino” keynote speech at the BAMF, Arduino is licensing Adafruit to produce a range of the “most-requested” Arduino boards at their factory in New York. So those of you looking to support Arduino LLC with your purchases also get to help line [Ladyada]’s pockets at the same time. That’s a big win in our book.
Photo: Atmel
It’s not a complete surprise that Adafruit should get tapped as a US fab for Arduino.cc. They’ve been selling the boards and producing copious Arduino-related tutorials since their beginnings in 2005. More recently, Adafruit partnered with Arduino LLC to create the Gemma board, which is basically an ATTiny85-based Arduino-a-like in a tiny round, wearable-friendly board. (If you’re familiar with the Adafruit lineup, it’s essentially a Trinket in the round format of a LilyPad Arduino.)
Indeed, after the deal is done and the dust has settled, it’s a bit surprising to us that this hasn’t happened earlier, what with both Adafruit and Sparkfun producing licensed boards and Arduino LLC looking for new manufacturers. Anyway, good job Adafruit and Arduino (LLC)!
(New) Hardware from Arduino SRL
Arduino SRL had its Yun Mini, which is essentially a smaller version of the Yun — a mashup of an Arduino Leonardo with an OpenWRT-capable router chipset. We’ve reported on these previously but it’s fun to see them in the flesh.
The M0 is interesting. Before the troubles began, Arduino designed an ARM-M0+ based board with Atmel. Now Arduino LLC has it listed on their website as the Arduino Zero, but still hasn’t got any for sale yet. Arduino SRL has the boards on their website as the Arduino Zero Pro, with a different name, but is now touting this version as the “M0 Pro”. What’s in a name? Not much. The circuit layouts and parts appear identical.
The Portal Battle
Both of the Arduino companies are working on getting your Arduino development into “the cloud”. (Conscience compels us to note that “the cloud” is actually just other people’s computers.) Anyway, this essentially means new web-based and browser-based versions of the IDE that tie into web services. Interestingly enough, the two companies have different takes on what that entails.
According to their Maker Faire press release, Arduino SRL will be launching a web portal for makers to “promote and distribute their products” and share code and ideas. Located at my.arduino.org (which currently seems to be password-access only), the idea seems to be to create a mini-Tindie for Arduino-based products. This couples with their “Arduino IDE-alpha”, a JavaScript-based IDE that will run in the browser.
Meanwhile, Arduino LLC displayed previously announced their alternative development platform, Arduino Create. Arduino Create lets you write, compile and upload sketches “directly from the browser with the Arduino Web Editor”, and store your code in the “Arduino Cloud”. Arduino Create looks slick: certainly a lot better than the homely Java IDE that we’re all used to. It’s too early to tell what this “cloud” is all about, but it looks like it will include code sharing, schematic and wiring hookup storage, and easy sharing among users.
We already use blogs, Hackaday.io (shameless plug!), Github, and other “cloud” services to store our projects and code, so we’re not entirely sure what either of these portal offerings will bring to the table. It’s 2015, is anyone still hurting for project hosting space on the web?
Cynically, we note that both of these companies are in a battle to “own” the Arduino community and that getting people to host code and projects on their servers is an obvious strategy, and providing a web-based IDE to facilitate this capture is the tactic.
And before we leave “the cloud”, we should note that both Arduinos are late to the game. codebender has been around and programming Arduinos on the web since 2012.
New Names
Photo: Making Society
Finally, as if it weren’t bad enough with Arduino LLC and Arduino SRL, [Massimo Banzi] also announced that licensed boards for the European market will be sold under the new “Genuino”.
Actually, this is a pretty cagey maneuver, because it side-steps the European trademark issues (which [Massimo] referred to as “the bullsh*t” in his talk) and is a cute name to boot. “Genuine”, get it?
Our take? As [Massimo] almost said in this video interview with Make, “a rose by any name would smell as sweet.” If Arduino LLC loses the trademark lawsuit in Italy, they’ll not be allowed to sell boards using the “Arduino” name. The best way to limit the damage in the future is to make the switch now, while everyone is watching, and give the market time to adapt.
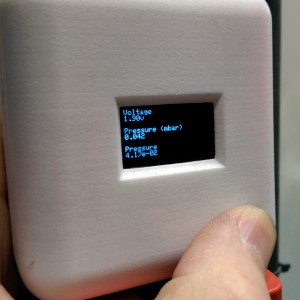
Arduinos! They’re a great tool that make the world of microcontrollers pretty easy, and in [cptlolalot]’s case, they also give us an alternative to buying expensive, proprietary parts. [cptlolalot] needed a gauge for an expensive vacuum pump, and rather than buying an expensive part, built a circuit around an Arduino to monitor the vacuum.
This project goes a little beyond simple Arduino programming though. A 12V to 5V power supply drives the device, which is laid out on a blank PCB. The display fits snugly over the circuit which reduces the footprint of the project, and the entire thing is housed in a custom-printed case with a custom-printed pushbutton. The device gets power and data over the RJ45 connection so no external power is needed. If you want to take a look at the code, it’s linked on [cptlolalot]’s reddit thread.
This project shows how much easier it can be to grab an Arduino off the shelf to solve a problem that would otherwise be very expensive. We’ve been seeing Arduinos in industrial applications at an increasing rate as well, which is promising not just because it’s cheap but because it’s a familiar platform that will make repairs and hacks in the future much easier for everyone.
Version 1.6.4 of the Arduino IDE has been out for a little while now, and it has a couple of notable changes. To our eyes, the most interesting change makes adding support for non-standard boards and their configurations within the Arduino IDE a lot simpler. We’ll get into details below.
But before that, it’s time to bid farewell to the cheeky little popup window that would deliver a warning message when using a board bearing the USB IDs of their former-partner-turned-competitor. We absolutely agree with [Massimo] that the issues between Arduino SRL / Smart Projects and Arduino LLC are well-enough known in the community, and that it’s time for the popup to fade away.
Now on to the meat of this post. The new “Board Manager” functionality makes it significantly easier for other non-Arduino products to be programmed within the Arduino IDE. Adafruit has a tutorial on using the Board Manager functionality with their products, and it basically boils down to “enter the right URL, click on the boards you want, download, restart Arduino, bam!”
The list of unofficially supported third-party boards is still a bit short, but it includes some stellar entries. For instance, Adafruit has provided the files needed for the ESP8266, which recently received the Arduino treatment. This means that you can simply point your IDE at Adafruit’s URL, and it’ll set you up with everything needed to develop for the ESP8266 from within the comfy Arduino IDE.
Another standout, from our perspective, is this link that simplifies programming bare AVR chips from the Arduino IDE. While programming your Arduino code into a simple AVR ATmega168 has always been possible, it’s never been as easy as it is now.
How it Works
Under the hood, the new board manager system is pretty straightforward. Clicking on one of the links leads to a JSON file with any number of board architecture definitions. Each entry provides text descriptions of the target board that are used for generating menu entries in the Arduino IDE’s pulldown menus, and a link to a zip file. This zip file contains everything necessary to adapt the Arduino libraries to the target board or chip.
For instance, with something simple like the bare-AVR modifications, the zip file simply includes the boards.txt and platform.txt files that the Arduino IDE uses to fill in a lot of board-specific parameters like the CPU clock speed, fuse bit settings, and AVRDUDE command options for flashing new code. For something more involved, like porting Arduino to the ESP8266, the zip file additionally includes the ported Arduino core and library functions, as well as the uploader tools that make Arduino work on that target.
It’s a very interesting experiment to open up the Arduino IDE so transparently to third-party devices. It’ll surely win points with both hackers and retailers of *duinos, and we’re guessing it’ll only encourage porting the Arduino libraries to more platforms. Let’s see where the community takes this one. What do you want to see Arduino ported to next?
Have you ever come across an Internet meme and just thought to yourself, “I have to bring this into the physical world!” Well [0xb3nn] and [Knit Knit] did. They decided to take the classic nyan cat meme and bring it to life.
The frame is 24″ x 36″. Many hours went into the knitting process, but the result obviously turned out very well. The stars include 24 LED sequins to add a sparkling animation effect. These were sewn onto the back of the work using conductive thread. They are bright enough to shine through to the front where needed. These connect back to an Arduino Pro Mini 5V board.
The Arduino is also connected to a capacitive touch sensor. This allows the user to simply place their hand over the nyan cat image to start the animation. No need for physical buttons or switches to take away from the visual design. An Adafruit AudioFX sound board was used to play back a saved nyan cat theme song over a couple of speakers. The source code for this project is available on github. Be sure to watch the demo video below.
[Piotr] was working on a recent Arduino project when he ran into a problem. He was having trouble getting his Arduino Pro Mini to communicate with an ESP8266 module. He needed a way to snoop on the back and forth serial communications. Since he didn’t have a specialized tool for this task, [Piotr] ended up building his own.
The setup is pretty simple. You start with a standard serial cable containing the TX, RX, DTR, and GND wires. This cable connects the Arduino to the ESP8266 WiFi module. The TX and RX lines are then tapped into. Each wire is routed to the RX pin of two different serial to USB adapters. This way, the data being sent from the Arduino shows up on one COM port and the data being transmitted from the module shows up on the other.
The next piece of the puzzle was coming up with a way to see the data more clearly. [Piotr] could have opened two serial terminals simultaneously, but this wasn’t ideal because it would be difficult to compare the timing of the data. Instead, [Piotr] spent less than an hour writing his own simple serial terminal. This one connects to two COM ports at the same time and prints the data on the same screen. The data from each COM port is displayed in a separate color to make it easy to differentiate. The schematic and source code to this project can be found on [Piotr’s] website.
[Brian B] found a handful of servos at his local hackerspace, and like any good hacker worth his weight in 1N4001’s, he decided to improve upon their design. Most servos are configured to spin only so far – usually 180 degrees in either direction. [Brian B’s] hack makes them spin 360 degrees in continuous rotation.
He starts off by removing the top most gear and making a small modification with a razor. Then he adds a little super glue to the potentiometer, and puts the thing back together again. A few lines of code and an arduino confirms that the hack performs flawlessly.
We’ve seen ways to modify other types of servos for 360 rotation. There’s a lot of servos out there, and every little bit of information helps. Be sure to check your parts bin for any Tower Pro SG90 9g servos and bookmark this article. It might come in handy on a rainy day.
A little board that adds WiFi to any project for a few hundreds of pennies has been all the rage for at least half a year. I am referring to the ESP8266 and this product is a marrige of one of those WiFi modules with the support hardware required to get it running. This week I’m reviewing the HUZZAH ESP8266 Breakout by Adafruit Industries.
If you saw the article [cnlohr] woite for us about direct programming this board you will know that a good chunk of that post covered what you need to do just to get the module into programming mode. This required adding a regulated 3.3V source, and a way to pull one of the pins to ground when resetting the power rail. Not only does the HUZZAH take care of that for you, it turns the non-breadboard friendly module into a DIP form factor while breaking out way more pins than the most common module offers. All of this and the price tag is just $9.95. Join me after the break for the complete run-down.
The Hardware
This board is about 1.5 inches by 1 inch… like two postage stamps side-by-side. It hosts the FCC and CE approved module which we first heard about in December. These modules need a 3.3v supply and there is a regultor on board which can supply up to 500mA (the module can consume as much as 250mA) and can be fed by a battery, USB power, or any other 5V supply. As I mentioned earlier you need to pull a pin low during reset to put the module in programming mode. There are two switches on the board that facilitate this, hold the user button down and press reset and you’re ready to flash.
On a breadboard you’ll have two rows not covered by the board on one side, and one row on the other. The board doesn’t have a USB-to-UART bridge but we’re fine with that. On one end of the board you’ll find the common pinout for a USB-to-serial programming cable. Above you can see the programming cable Adafruit sent me with these samples. To the right I tried out my 5V Sparkfun FTDI board and as advertised, the HUZZAH can be programmed with either 3.3v or 5V logic levels.
The one thing I noticed is that the two buttons are a bit tricky to get at with the programmers connected, especially the FTDI board. For the second module I may supply my own right-angle header to get around that. Of course doing so would cover part of the breadboard so this is probably six of one, half dozen of the other.
I love it that they supply the pin headers but don’t solder them. Sometimes I prefer pin sockets or unpopulated pads, and this makes it easy for me to make that choice like the right-angle one I mentioned above. It’s something small but I also appreciate that the pinheaders in the package were not the minimum number necessary for this board — there were a few extra pins. You need to break them off and sometimes they can break one pin over from where you expected. If it were the minimum number you would either start over or solder a single pin at the end of the row (not ideal). If you screw up snapping these you could conceivably use a set of three pins and the rest as one unit to fix your mistake. Maybe I’m weird but it’s the small things in life!
Programming Options: NodeMCU and Lua
The board ships with this firmware on it. I was up and running with the Lua interpreter within three minutes of the package arriving at my door. Seriously, it took me longer to figure out if the USB-to-serial was green or white for TX/RX than it did to connect to my local WiFi Access point. Adafuit’s ‘Hello World’ walkthrough gets you going if you haven’t given this a try before.
Programming Options: Arduino IDE
Adafruit has a Board Manager for Arduino IDE. Perhaps this is common knowledge but I don’t often work with this IDE and it’s the first time I’ve run into it. What can I say, it kicks ass!
I hate setting up tool chains for new chips. With this you add a web address and port number, restart the IDE, and use the board manager to add support for this board. Sweet!
That turns this into an Arduino compatible board which solves something that has long bothered me. I’ve seen a ton of really simple Arduino projects that use the ESP8266 externally. Last month’s porting of the Arduino framework for these chips, coupled with this ready-to-go hardware does away with that nonsense. Seriously, the vast majority of those projects need little to no computing power and will work like a dream when directly programmed onto this chip.
To prove my point, I knocked out this quick binary counter that uses five LEDs as outputs. I’m not leveraging any of the WiFi features on this, but the compiled binary is 174,358 bytes and the Arduino IDE reports this board has a max capacity of 524,288 bytes. It five I/O used for LEDs there are still four more digital pins, the two UART pins, and an ADC input.
Programming Options: esptool
Arduino will overwrite NodeMCU but that’s easy to reflash. I followed [cnlohr’s] direct programming guide to write the binary using esptool. Both this method and the Arduino method are directly programming the EEPROM on the module. This is exactly the same method you’d use if you wanted to develop natively using the Espressif or the Open Source SDKs. Here’s the commands I used to reflash the NodeMCU firmware:
“Buy as many of these as [Phil] will make for us.” That’s what I’ve asked [Julian], the Hackaday Store manager to do. You should be able to get the Hackaday black version of this in a few weeks. Adafruit is currently sold out but I’m sure they’re racing to remedy this.
These are amazing little boards. The price of $9.95 is crazy considering what you get for it. I’m talking about the entire ecosystem which gives you multiple flavors of programming environments. Adafruit has done a lot to contribute to the code and knowledge base here, but a mammoth portion of this is community developed and I think coming in low on the price is one more way Adafruit has chosen to be a good guy in this ecosystem. The board has a ton of I/O for what it is, and if that’s not enough just, implement I2C, SPI, or UART to couple a beefy uC to the connectivity this one brings to the party. I see zero downside on this board. It’s as close to perfect as you can get.
If you’re not stuck in the tech news filter bubble, you may not have heard the Microsoft Build Developers Conference is going on right now. Among the topics covered in the keynotes are a new Office API and a goal to have Windows 10 running on a Billion devices in a few years.
There are, however, some interesting things coming out of the Build conference. Windows 10 is designed for hackers, with everything from virtual Arduino shields running on phones, Windows 10 running on Raspberry Pis, and Visual Code Studio running on OS X and Linux.
This is not the first time in recent memory Microsoft has courted the maker market. Microsoft begrudgingly supported the hardware dev scene with the PC version of the Microsoft Kinect, and a year or two ago, Microsoft rolled out drivers for 3D printers that were much more capable than the usual serial interface (read: the ability for printer manufacturers to add DRM). To the true, tie-die wearing, rollerblade-skating, acoustic coupler-sporting, Superman III-watching hackers out there, these efforts appear laughable – the product of managers completely out of touch with their audience.
Depending on your perspective, the new releases for the Arduino, Raspberry Pi, and other ‘maker-themed’ hardware could go one way or the other.
As far as educational efforts go, the Windows Remote Arduino and Windows Virtual Shields for Arduino are especially interesting. Instead of filling a computer lab up with dozens of Arduinos and the related shields, the WVSA uses the sensors on a Windows 10 smartphone with an Arduino. Windows Remote Arduino allows makers to control an Arduino not through the standard USB port, but a Bluetooth module.
If Arduinos aren’t your thing, the Windows 10 IoT preview for the Raspberry Pi 2 and Minnowboard Max is out now. The Win10 IoT distribution does not yet have working WiFi or Bluetooth, making it the single most useless operating system for Internet of Things devices. It was, however, released at the Build conference.
Also announced was a partnership with a fabulous hardware project hosting site, Hackster.io. Microsoft and Hackster.io will be collaborating with hackathons and other events focused on Windows technology. I get why they wouldn’t want another, vastly more popular project hosting site doing this, but I’m a little confused at why Instructables wasn’t the top Microsoft pick.
As always, you may express your infinite derision in the comments below. Spelling Microsoft with a dollar sign will result in a ban.
There are plenty of GPS navigation units on the market today, but it’s always fun to build something yourself. That’s what [middelbeek] did with his $25 GPS device. He managed to find a few good deals on electronics components online, including and Arduino Uno, a GPS module, and a TFT display.
In order to get the map images on the device, [middelbeek] has to go through a manual process. First he has to download a GEOTIFF of the area he wants mapped. A GEOTIFF is a metadata standard that allows georeferencing information to be embedded into a TIFF image file. [middelbeek] then has to convert the GEOTIFF into an 8-bit BMP image file. The BMP images get stored on an SD card along with a .dat file that describes the boundaries of each BMP. The .dat file was also manually created.
The Arduino loads this data and displays the correct map onto the 320×240 TFT display. [middelbeek] explains on his github page that he is currently unable to display data from two map files at once, which can lead to problems when the position moves to the edge of the map. We suspect that with some more work and tuning this system could be improved and made easier to use, of course for under $25 you can’t expect too much.


 This project goes a little beyond simple Arduino programming though. A 12V to 5V power supply drives the device, which is laid out on a blank PCB. The display fits snugly over the circuit which reduces the footprint of the project, and the entire thing is housed in a custom-printed case with a custom-printed pushbutton. The device gets power and data over the RJ45 connection so no external power is needed. If you want to take a look at the code,

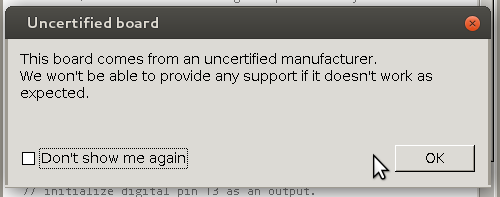 But before that, it’s time to bid farewell to the cheeky little popup window that would deliver a warning message when using a board bearing the USB IDs of their former-partner-turned-competitor. We absolutely


 This board is about 1.5 inches by 1 inch… like two postage stamps side-by-side. It hosts the FCC and CE approved module which
 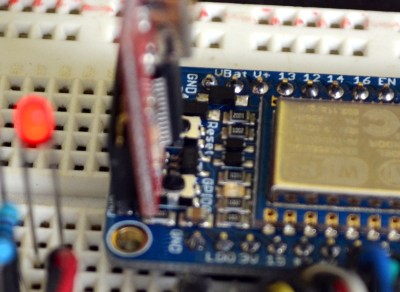 To the right I tried out my 5V Sparkfun FTDI board and as advertised, the HUZZAH can be programmed with either 3.3v or 5V logic levels.
 Adafruit has a Board Manager for Arduino IDE. Perhaps this is common knowledge but I don’t often work with this IDE and it’s the first time I’ve run into it. What can I say, it kicks ass!
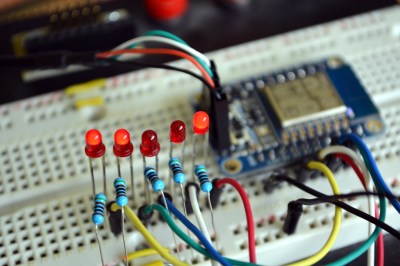 To prove my point, I knocked out this quick binary counter that uses five LEDs as outputs. I’m not leveraging any of the WiFi features on this, but the compiled binary is 174,358 bytes and the Arduino IDE reports this board has a max capacity of 524,288 bytes. It five I/O used for LEDs there are still four more digital pins, the two UART pins, and an ADC input.


