

Arduino Altair 8800 Simulator
Browse around eBay for an original Altair 8800 and you quickly find that the price range is in the thousands of dollars. If you are a collector and have some money in your pocket maybe that’s okay. But if you want the Altair 8800 experience on a budget, you can build yourself a clone with an Arduino. [David] kindly shared the build details on his Arduino Project Hub post. Using an Arduino Due (or a Mega for 25% of original speed), the clone can accurately reproduce the behavior of the Altair’s front panel elements. We covered a similar project in the past, using the Arduino Uno.
While not overly complicated to build one, you will need a 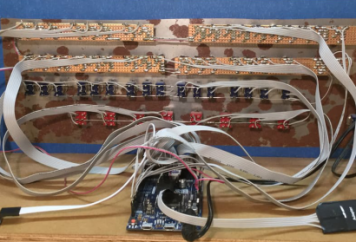 fair amount of patience so you can solder all the 36 LEDs, switches, transistors, and resistors but in the end, you’ll end up with a brand new computer to play with. In 1975, an assembled Altair 8800 Computer was selling for $621 and $439 for an unassembled version. Sourced right, your clone would be under 50 bucks. Not bad.
The simulator comes with a bunch of software for you to try out and even games like Kill-the-Bit and Pong. BASIC and Assembler example programs are included in the emulator software and can easily be loaded.
In addition, the simulator includes some extra functions and built-in software for the Altair which are accessible via the AUX1/AUX2 switches on the front panel (those were included but not used on the original Altair). From starting different games to mount disks in an emulated disk drive, there are just too many functions to describe here. You can take a look at the simulator documentation for more information.
In case you don’t know already, here’s how to play Kill-the-Bit:
Filed under: Arduino Hacks


