Posts with «apa102» label

Tidy POV Display Using The ESP32
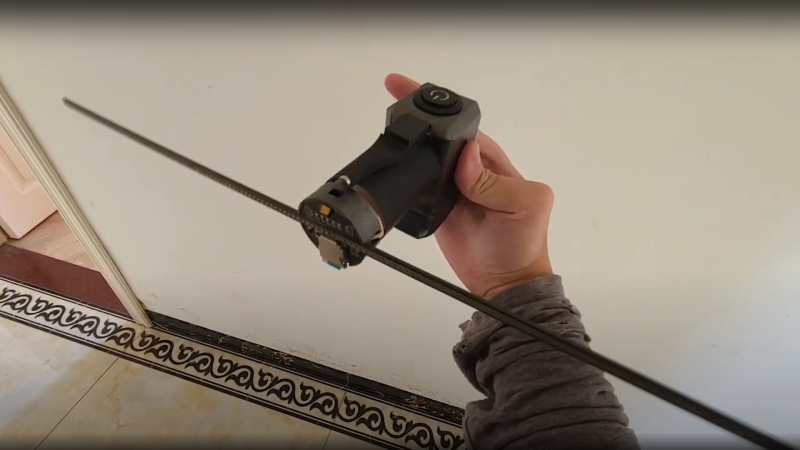
Chinese Youtuber [corebb] presents the second version of his POV display. The earlier version used 5050-sized SMT addressable LEDs, which didn’t give great resolution, so he rev’d the design to use a much higher number (160 to be exact) of APA102 LEDs. These are 2mm on the side, making them a little more difficult to handle, so after some initial solder paste wobbles, he decided to use a contract assembly house to do the tricky bit for him. This failed as they didn’t ‘understand’ the part and placed them the wrong way around! Not to be deterred, he had another go with a modified solder stencil, and eventually got the full strip to light up correctly.

Based on an ESP32 (using the Arduino stack) and SDCard for control, and a LiPo cell charged wirelessly, the build is rather tidy. A couple of hall effect switches are mounted at the start of each of the two arms, presumably lining
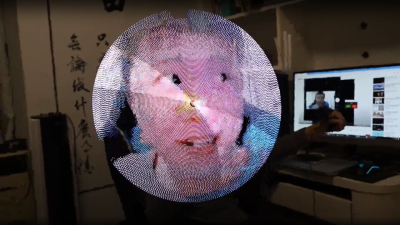
Real-time video streaming? Check!

up with a magnet on the case somewhere, although this isn’t clear. The schematic and PCB appear to have been designed with JLCEDA, which is a repackaging of EasyEDA. We can see the attraction with the heavy integration of this with the JLC and LCSC services. It appears that he even managed to get streamed video working — showing a live video from a webcam — which is quite an undertaking to pull off when you think how much processing needs to happen in real-time. As he alludes to in the video, trying to increase the resolution beyond this point is not viable with the processing capability of the ESP32.

A resin-printed case finishes off the build, with a screw-thread mount added to the rear, to allow typical camera mounts to be used to hold the thing down. A smart move we think.

We love POV displays around here, this spherical POV display is especially fabulous, but you don’t need fancy hardware if you have a handy ceiling fan and a bit of protoboard spare.

Thanks to [mrx23dot] for the tip!

Hack a Day 24 Nov 00:00

A Multi-Layered Spin On Persistence Of Vision

By taking advantage of persistence in human vision, we can use modest bits of hardware to create an illusion of a far larger display. We’ve featured many POV projects here, but they are almost always an exploration in two dimensions. [Jamal-Ra-Davis] extends that into the third dimension with his Volumetric POV Display.

Having already built a 6x6x6 LED cube, [Jamal] wanted to make it bigger, but was not a fan of the amount of work it would take to grow the size of a three-dimensional array. To sidestep the exponential increase in effort required, he switched to using persistence of vision by spinning the slight source and thereby multiplying its effect.

The current version has six arms stacked vertically, each of which presents eight individually addressable APA102 LEDs. When spinning, those 48 LEDs create a 3D display with an effective resolution of 60x8x6.

We saw an earlier iteration of this project a little over a year ago at Bay Area Maker Faire 2018. (A demo video from that evening can be found below.) It was set aside for a while but has now returned to active development as an entry to Hackaday Prize 2019. [Jamal-Ra-Davis] would like to evolve his prototype into something that can be sold as a kit, and all information has been made public so others can build upon this work.

We’ve seen two-dimensional spinning POV LED display in a toy top, and we’ve also seen some POV projects taking steps into the third dimension. We like where this trend is going.

The HackadayPrize2019 is Sponsored by:

Gyro Controlled RGB Blinky Ball Will Light up Your Life

[James Bruton], from the XRobots YouTube channel is known for his multipart robot and cosplay builds. Occasionally, though, he creates a one-off build. Recently, he created a video showing how to build a LED ball that changes color depending on its movement.

The project is built around a series of 3D printed “arms” around a hollow core, each loaded with a strip of APA102 RGB LEDs. An Arduino Mega reads orientation data from an MPU6050 and changes the color of the LEDs based on that input. Two buttons attached to the Mega modify the way that the LEDs change color. The Mega, MPU6050, battery and power circuitry are mounted in the middle of the ball. The DotStar strips are stuck to the outside of the curved arms and the wiring goes from one end of the DotStar strip, up through the middle column of the ball to the top of the next arm. This means more complicated wiring but allows for easier programming of the LEDs.

Unlike [James’] other projects, this one is a quickie, but it works as a great introduction to programming DotStar LEDs with an Arduino, as well as using an accelerometer and gyro chip. The code and the CAD is up on Github if you want to create your own. [James] has had a few of his projects on the site before; check out his Open Dog project, but there’s also another blinky ball project as well.

Hack a Day 03 Nov 03:00