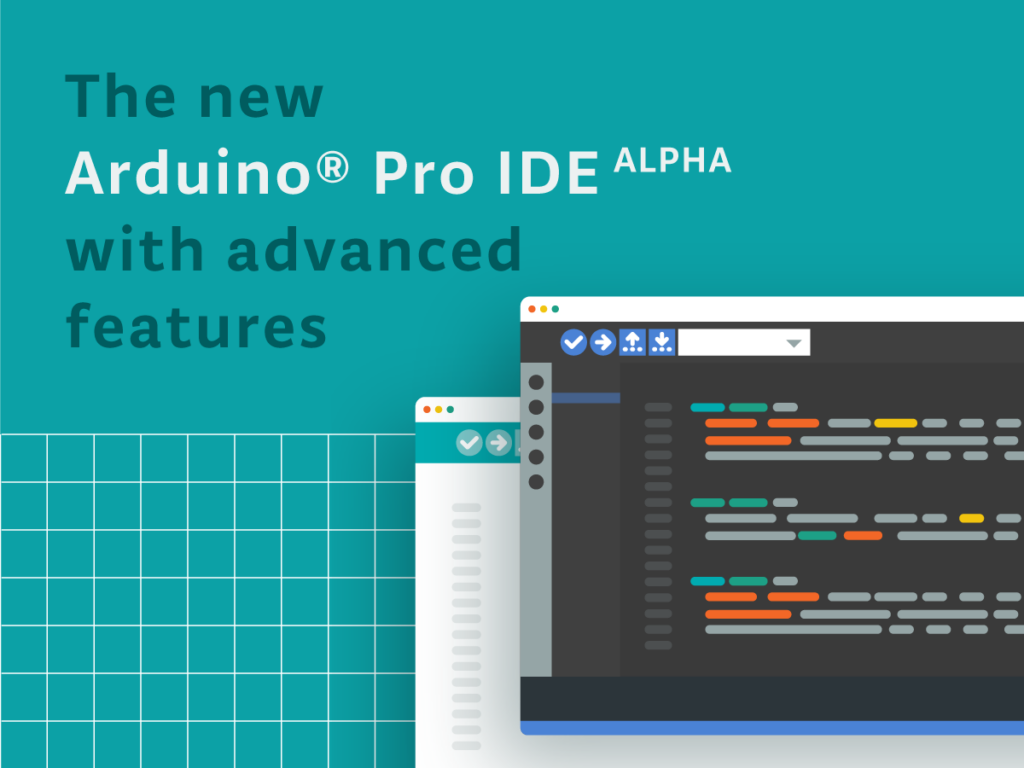
Live from Maker Faire Rome on Saturday, October 19th at 16.00 CET, Massimo Banzi and Luca Cipriani will push the button to release the new Arduino Pro IDE (alpha) — watch this space.
The hugely popular Arduino IDE software is easy-to-use for beginners, yet flexible enough for advanced users. Millions of you have used it as your everyday tool to program projects and applications. We’ve listened to your feedback though, and it’s time for a new enhanced version with features to appeal to the more advanced developers amongst you.
We are very excited to be releasing an “alpha” version of a completely new Development Environment for Arduino, the Arduino Pro IDE.
The main features in this initial alpha release of the new Pro IDE are:
Modern, fully featured development environment
Dual mode, classic mode (identical to the classic Arduino IDE) and pro mode (file system view)
New Board Manager
New Library Manager
Board List
Basic auto completion (Arm targets only)
Git integration
Serial Monitor
Black theme
But the new architecture opens the door to features that the Arduino community have been requesting like these that will be following on soon:
Sketch synchronisation with Arduino Create Editor
Debugger
Fully open to third party plug-ins
Support for additional languages than C++
The new Arduino Pro IDE is based on the latest technologies as follows:
Arduino CLI used in daemon mode is providing all the main Arduino features.
Electron the framework behind Eclipse Theia, allows the use of web technologies on desktop environments.
Available in Windows, Mac OSX and Linux64 versions; we need your help in improving the product. Before releasing the source code to move out of the alpha, we would greatly appreciate your feedback. Like all things in the Arduino community, we grow and develop together through your valued contributions. Please test the Arduino Pro IDE to it’s breaking point, we want to hear all the good and bad things you find. We’re open to recommendations for additional features, as well as hearing about any bugs you may find – there’s bound to be a few as it is an alpha version afterall!
Versions(released from 16.00 CET on Saturday, October 19th)
This post was originally published by Sandeep Mistry and Dominic Pajakon the TensorFlow blog.
Arduino is on a mission to make machine learning simple enough for anyone to use. We’ve been working with the TensorFlow Lite team over the past few months and are excited to show you what we’ve been up to together: bringing TensorFlow Lite Micro to the Arduino Nano 33 BLE Sense. In this article, we’ll show you how to install and run several new TensorFlow Lite Micro examples that are now available in the Arduino Library Manager.
The first tutorial below shows you how to install a neural network on your Arduino board to recognize simple voice commands.
Example 1: Running the pre-trained micro_speech inference example.
Next, we’ll introduce a more in-depth tutorial you can use to train your own custom gesture recognition model for Arduino using TensorFlow in Colab. This material is based on a practical workshop held by Sandeep Mistry and Dan Coleman, an updated version of which is now online.
If you have previous experience with Arduino, you may be able to get these tutorials working within a couple of hours. If you’re entirely new to microcontrollers, it may take a bit longer.
Example 2: Training your own gesture classification model.
We’re excited to share some of the first examples and tutorials, and to see what you will build from here. Let’s get started!
Note: The following projects are based on TensorFlow Lite for Microcontrollers which is currently experimental within the TensorFlow repo. This is still a new and emerging field!
Microcontrollers and TinyML
Microcontrollers, such as those used on Arduino boards, are low-cost, single chip, self-contained computer systems. They’re the invisible computers embedded inside billions of everyday gadgets like wearables, drones, 3D printers, toys, rice cookers, smart plugs, e-scooters, washing machines. The trend to connect these devices is part of what is referred to as the Internet of Things.
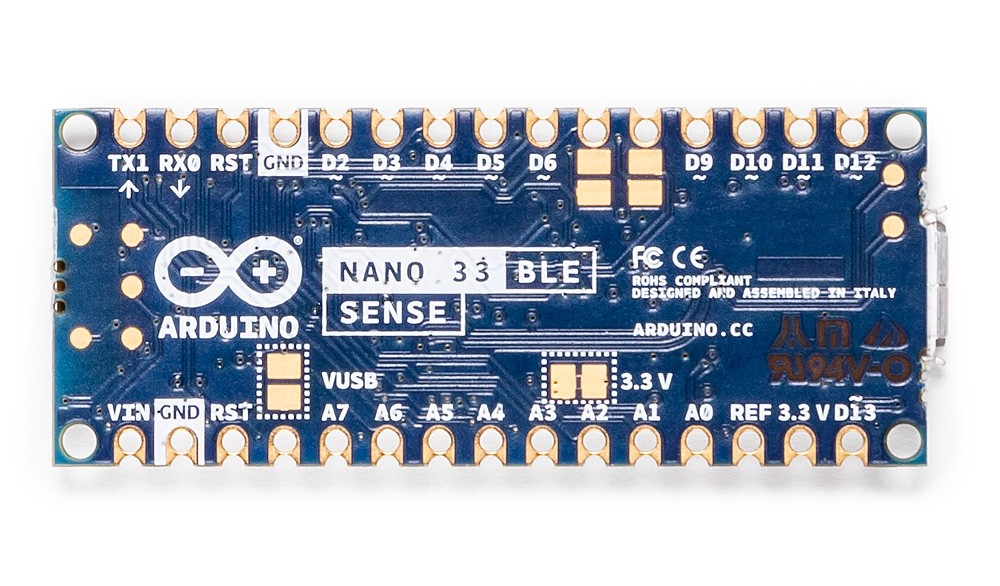
Arduino is an open-source platform and community focused on making microcontroller application development accessible to everyone. The board we’re using here has an Arm Cortex-M4 microcontroller running at 64 MHz with 1MB Flash memory and 256 KB of RAM. This is tiny in comparison to Cloud, PC, or mobile but reasonable by microcontroller standards.
Arduino Nano 33 BLE Sense board is smaller than a stick of gum.
There are practical reasons you might want to squeeze ML on microcontrollers, including:
Function – wanting a smart device to act quickly and locally (independent of the Internet).
Cost – accomplishing this with simple, lower cost hardware.
Privacy – not wanting to share all sensor data externally.
Efficiency – smaller device form-factor, energy-harvesting or longer battery life.
There’s a final goal which we’re building towards that is very important:
Machine learning can make microcontrollers accessible to developers who don’t have a background in embedded development
On the machine learning side, there are techniques you can use to fit neural network models into memory constrained devices like microcontrollers. One of the key steps is the quantization of the weights from floating point to 8-bit integers. This also has the effect of making inference quicker to calculate and more applicable to lower clock-rate devices.
TinyML is an emerging field and there is still work to do – but what’s exciting is there’s a vast unexplored application space out there. Billions of microcontrollers combined with all sorts of sensors in all sorts of places which can lead to some seriously creative and valuable TinyML applications in the future.
A Micro USB cable to connect the Arduino board to your desktop machine
To program your board, you can use the Arduino Web Editor or install the Arduino IDE. We’ll give you more details on how to set these up in the following sections
The Arduino Nano 33 BLE Sense has a variety of onboard sensors meaning potential for some cool TinyML applications:
Environmental – temperature, humidity and pressure
Light – brightness, color and object proximity
Unlike classic Arduino Uno, the board combines a microcontroller with onboard sensors which means you can address many use cases without additional hardware or wiring. The board is also small enough to be used in end applications like wearables. As the name suggests it has Bluetooth LE connectivity so you can send data (or inference results) to a laptop, mobile app or other BLE boards and peripherals.
Tip: Sensors on a USB stick – Connecting the BLE Sense board over USB is an easy way to capture data and add multiple sensors to single board computers without the need for additional wiring or hardware – a nice addition to a Raspberry Pi, for example.
TensorFlow Lite for Microcontrollers examples
The inference examples for TensorFlow Lite for Microcontrollers are now packaged and available through the Arduino Library manager making it possible to include and run them on Arduino in a few clicks. In this section we’ll show you how to run them. The examples are:
micro_speech – speech recognition using the onboard microphone
magic_wand – gesture recognition using the onboard IMU
person_detection – person detection using an external ArduCam camera
For more background on the examples you can take a look at the source in the TensorFlow repository. The models in these examples were previously trained. The tutorials below show you how to deploy and run them on an Arduino. In the next section, we’ll discuss training.
How to run the examples using Arduino Create web editor
Once you connect your Arduino Nano 33 BLE Sense to your desktop machine with a USB cable you will be able to compile and run the following TensorFlow examples on the board by using the Arduino Create web editor:
Compiling an example from the Arduino_TensorFlowLite library.
Focus on the speech recognition example: micro_speech
One of the first steps with an Arduino board is getting the LED to flash. Here, we’ll do it with a twist by using TensorFlow Lite Micro to recognise voice keywords. It has a simple vocabulary of “yes” and “no”. Remember this model is running locally on a microcontroller with only 256KB of RAM, so don’t expect commercial ‘voice assistant’ level accuracy – it has no Internet connection and on the order of 2000x less local RAM available.
Note the board can be battery powered as well. As the Arduino can be connected to motors, actuators and more this offers the potential for voice-controlled projects.
Running the micro_speech example.
How to run the examples using the Arduino IDE
Alternatively you can use try the same inference examples using Arduino IDE application.
First, follow the instructions in the next section Setting up the Arduino IDE.
In the Arduino IDE, you will see the examples available via the File > Examples > Arduino_TensorFlowLite menu in the ArduinoIDE.
Select an example and the sketch will open. To compile, upload and run the examples on the board, and click the arrow icon:
For advanced users who prefer a command line, there is also the arduino-cli.
Training a TensorFlow Lite Micro model for Arduino
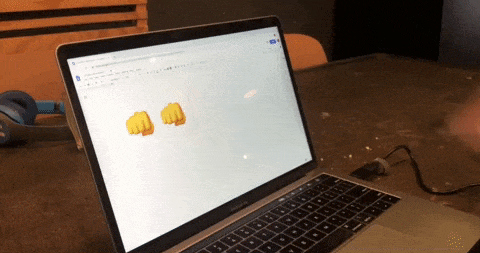
Gesture classification on Arduino BLE 33 Nano Sense, output as emojis.
Next we will use ML to enable the Arduino board to recognise gestures. We’ll capture motion data from the Arduino Nano 33 BLE Sense board, import it into TensorFlow to train a model, and deploy the resulting classifier onto the board.
The idea for this tutorial was based on Charlie Gerard’s awesome Play Street Fighter with body movements using Arduino and Tensorflow.js. In Charlie’s example, the board is streaming all sensor data from the Arduino to another machine which performs the gesture classification in Tensorflow.js. We take this further and “TinyML-ifiy” it by performing gesture classification on the Arduino board itself. This is made easier in our case as the Arduino Nano 33 BLE Sense board we’re using has a more powerful Arm Cortex-M4 processor, and an on-board IMU.
We’ve adapted the tutorial below, so no additional hardware is needed – the sampling starts on detecting movement of the board. The original version of the tutorial adds a breadboard and a hardware button to press to trigger sampling. If you want to get into a little hardware, you can follow that version instead.
Setting up the Arduino IDE
Following the steps below sets up the Arduino IDE application used to both upload inference models to your board and download training data from it in the next section. There are a few more steps involved than using Arduino Create web editor because we will need to download and install the specific board and libraries in the Arduino IDE.
First, we need to capture some training data. You can capture sensor data logs from the Arduino board over the same USB cable you use to program the board with your laptop or PC.
Arduino boards run small applications (also called sketches) which are compiled from .ino format Arduino source code, and programmed onto the board using the Arduino IDE or Arduino Create.
We’ll be using a pre-made sketch IMU_Capture.ino which does the following:
Monitor the board’s accelerometer and gyroscope
Trigger a sample window on detecting significant linear acceleration of the board
Sample for one second at 119Hz, outputting CSV format data over USB
Loop back and monitor for the next gesture
The sensors we choose to read from the board, the sample rate, the trigger threshold, and whether we stream data output as CSV, JSON, binary or some other format are all customizable in the sketch running on the Arduino. There is also scope to perform signal preprocessing and filtering on the device before the data is output to the log – this we can cover in another blog. For now, you can just upload the sketch and get sampling.
To program the board with this sketch in the Arduino IDE:
Compile and upload it to the board with Sketch > Upload
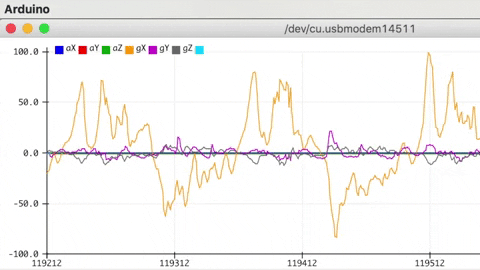
Visualizing live sensor data log from the Arduino board
With that done we can now visualize the data coming off the board. We’re not capturing data yet this is just to give you a feel for how the sensor data capture is triggered and how long a sample window is. This will help when it comes to collecting training samples.
In the Arduino IDE, open the Serial Plotter Tools > Serial Plotter
If you get an error that the board is not available, reselect the port:
Tools > Port > portname (Arduino Nano 33 BLE)
Pick up the board and practice your punch and flex gestures
You’ll see it only sample for a one second window, then wait for the next gesture
You should see a live graph of the sensor data capture (see GIF below)
Arduino IDE Serial Plotter will show a live graph of CSV data output from your board.
When you’re done be sure to close the Serial Plotter window – this is important as the next step won’t work otherwise.
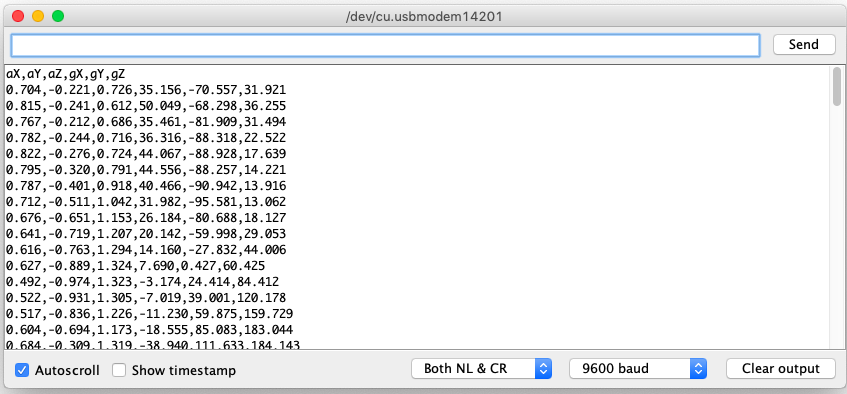
Capturing gesture training data
To capture data as a CSV log to upload to TensorFlow, you can use Arduino IDE > Tools > Serial Monitor to view the data and export it to your desktop machine:
Reset the board by pressing the small white button on the top
Pick up the board in one hand (picking it up later will trigger sampling)
In the Arduino IDE, open the Serial Monitor Tools > Serial Monitor
If you get an error that the board is not available, reselect the port:
Tools > Port > portname (Arduino Nano 33 BLE)
Make a punch gesture with the board in your hand (Be careful whilst doing this!)
Make the outward punch quickly enough to trigger the capture
Return to a neutral position slowly so as not to trigger the capture again
Repeat the gesture capture step 10 or more times to gather more data
Copy and paste the data from the Serial Console to new text file called punch.csv
Clear the console window output and repeat all the steps above, this time with a flex gesture in a file called flex.csv
Make the inward flex fast enough to trigger capture returning slowly each time
Note the first line of your two csv files should contain the fields aX,aY,aZ,gX,gY,gZ.
Linux tip: If you prefer you can redirect the sensor log output from the Arduino straight to a .csv file on the command line. With the Serial Plotter / Serial Monitor windows closed use:
$ cat /dev/cu.usbmodem[nnnnn] > sensorlog.csv
Training in TensorFlow
We’re going to use Google Colab to train our machine learning model using the data we collected from the Arduino board in the previous section. Colab provides a Jupyter notebook that allows us to run our TensorFlow training in a web browser.
Arduino gesture recognition training colab.
The colab will step you through the following:
Set up Python environment
Upload the punch.csv and flex.csv data
Parse and prepare the data
Build and train the model
Convert the trained model to TensorFlow Lite
Encode the model in an Arduino header file
The final step of the colab is generates the model.h file to download and include in our Arduino IDE gesture classifier project in the next section:
Create a new tab in the IDE. When asked name it model.h
Open the model.h tab and paste in the version you downloaded from Colab
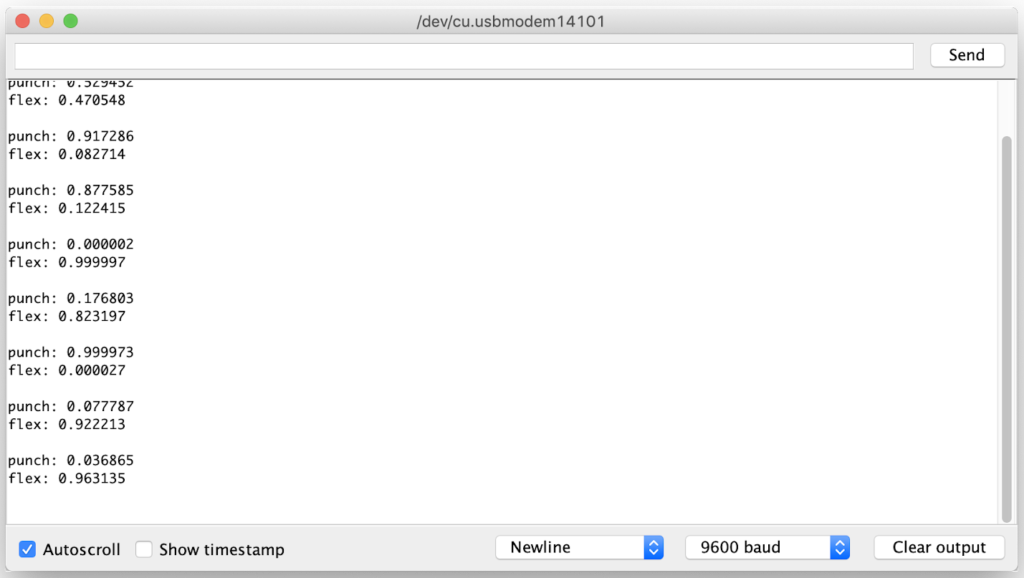
Upload the sketch: Sketch > Upload
Open the Serial Monitor: Tools > Serial Monitor
Perform some gestures
The confidence of each gesture will be printed to the Serial Monitor (0 = low confidence, 1 = high confidence)
Congratulations you’ve just trained your first ML application for Arduino!
For added fun the Emoji_Button.ino example shows how to create a USB keyboard that prints an emoji character in Linux and macOS. Try combining the Emoji_Button.ino example with the IMU_Classifier.ino sketch to create a gesture controlled emoji keyboard ?.
Conclusion
It’s an exciting time with a lot to learn and explore in TinyML. We hope this blog has given you some idea of the potential and a starting point to start applying it in your own projects. Be sure to let us know what you build and share it with the Arduino community.
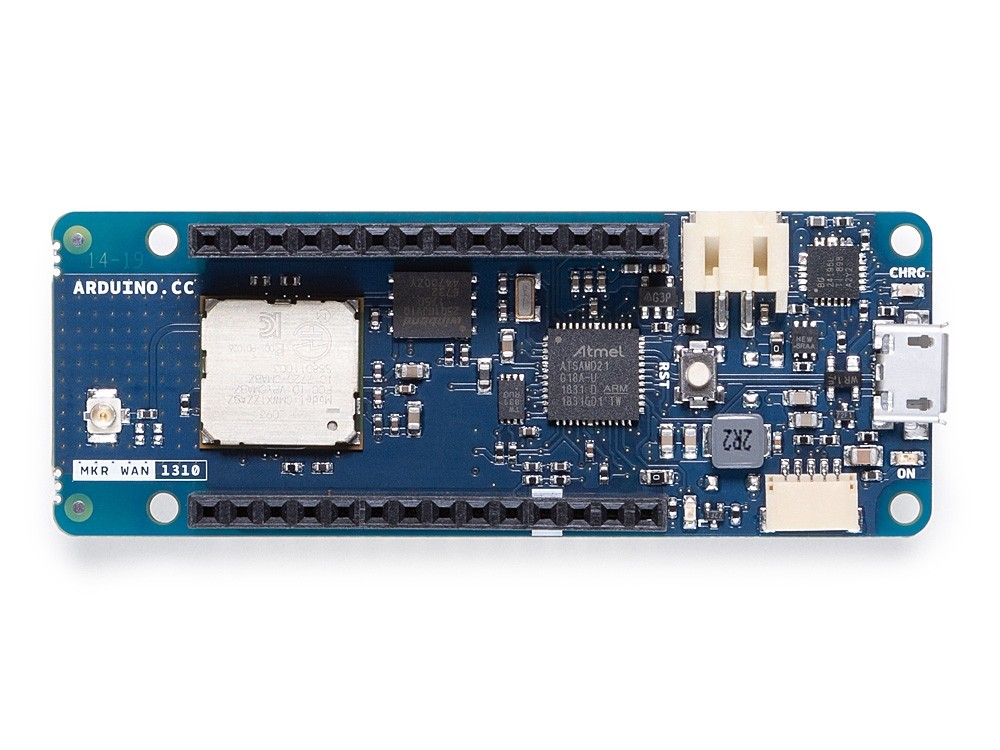
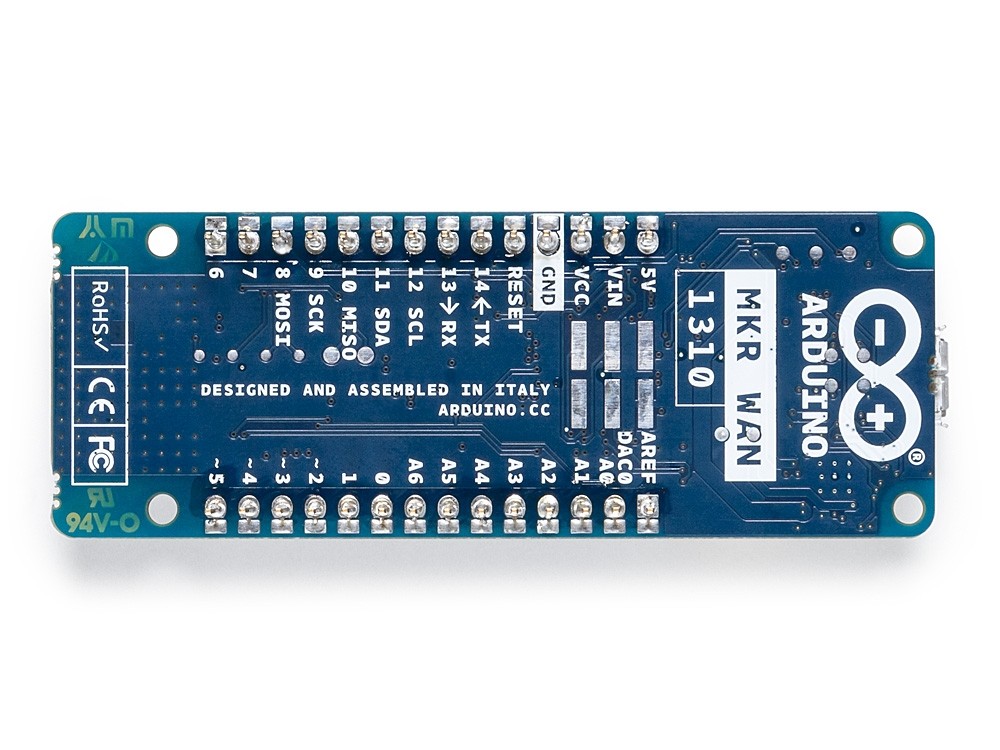
We’re excited to announce the launch of the Arduino MKR WAN 1310, which offers a practical and cost-effective solution for those looking to add LoRa connectivity to their projects.
The new MKR WAN 1310 enables you to connect your sensors and actuators over long distances harnessing the power of the LoRa wireless protocol or throughout LoRaWAN networks.
To your own LoRa network using the Arduino Pro Gateway for LoRa
To existing LoRaWAN infrastructure like The Things Network
Or even to other boards using the direct connectivity mode
The latest low-power architecture has considerably improved the battery life on the MKR WAN 1310. When properly configured, the power consumption is now as low as 104uA! It is also possible to use the USB port to supply power (5V) to the board; run the board with or without batteries – the choice is yours.
Based on the Microchip SAM D21 low-power processor and a Murata CMWX1ZZABZ LoRa module, the MKR WAN 1310 comes complete with an ECC508 crypto chip, a battery charger and 2MByte SPI Flash, as well as improved control of the board’s power consumption.
Data logging and other OTA (Over-the-Air) functions are now possible since the inclusion of the on board 2MByte Flash. This new exciting feature will let you transfer configuration files from the infrastructure onto the board, create your own scripting commands, or simply store data locally to send it whenever the connectivity is best. While the MKR WAN 1310’s crypto chip adds further security by storing credentials and certificates in the embedded secure element.
These features make it the perfect IoT node and building block for low-power wide area IoT devices.
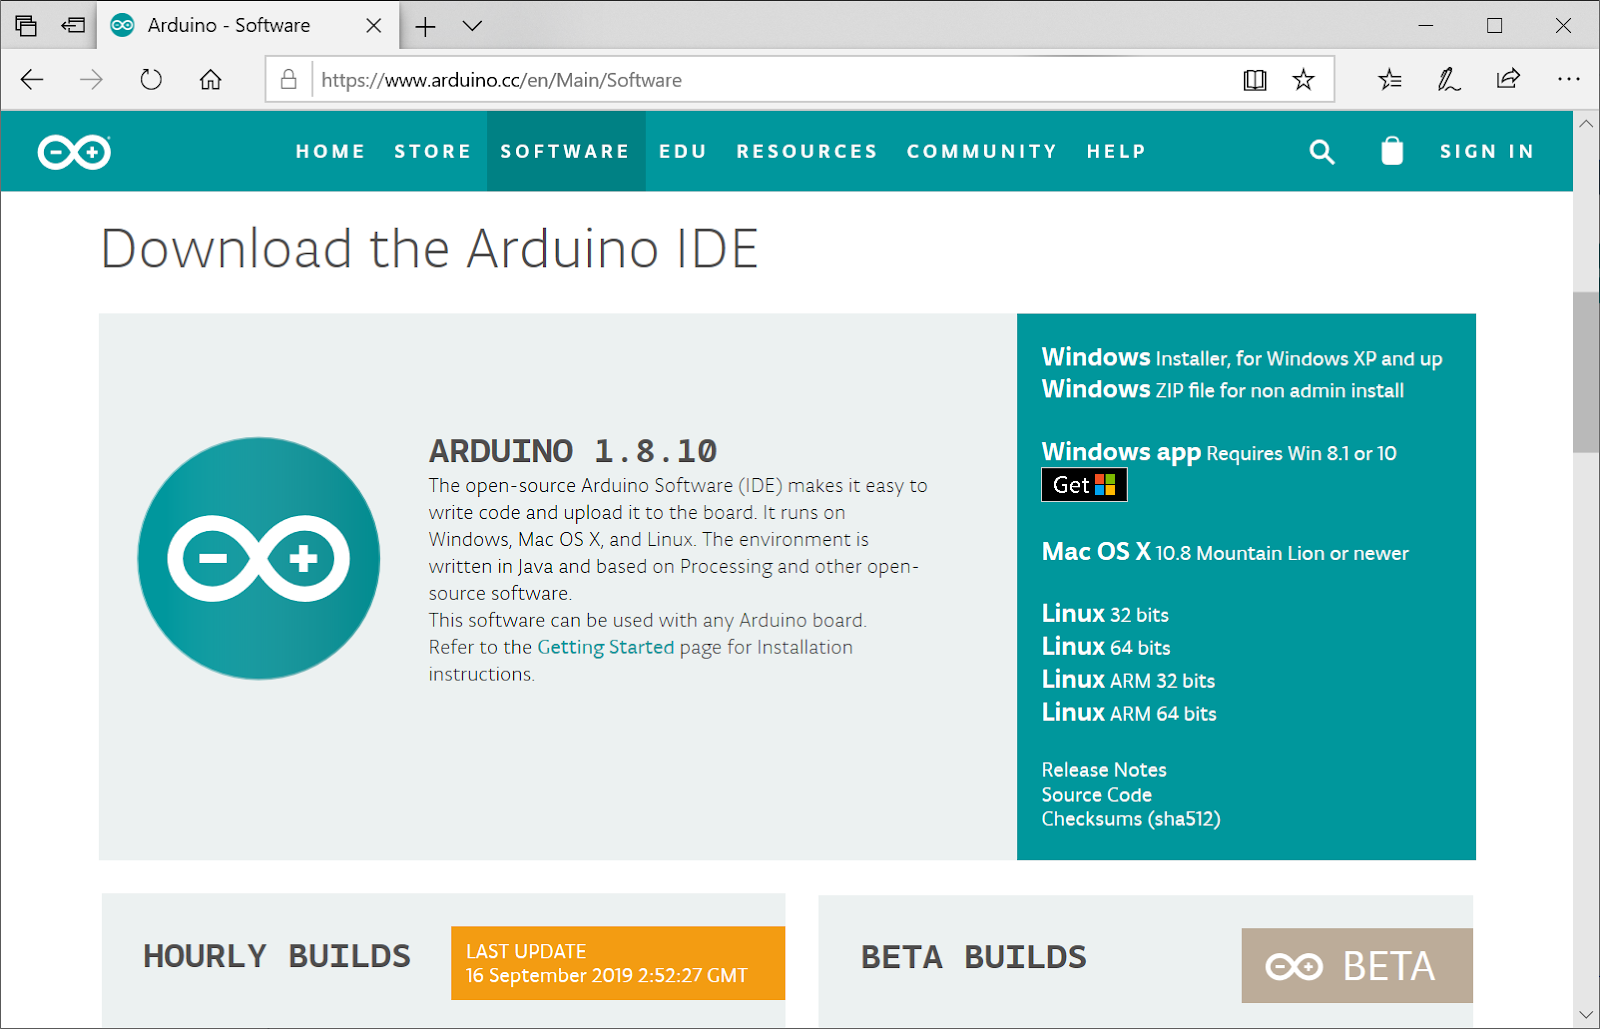
Today we are releasing IDE 1.8.10 and you should try it because it’s awesome! With the support of our incredible community, we’ve been improving a lot of (small and not so small) things.
Besides taking a look at the complete changelog, we’d like to point out one outstanding contribution that we received during this dev cycle.
Our friend Joe Wegner from APH reached out to us with a very clear plan on how to improve the IDE’s accessibility with some very convenient patches. With the help of co-founder Tom Igoe and ITP alumnus and research resident Jim Schmitz, we’ve started targeting some of the most problematic components that used to interact badly with screen readers (popups, links, lists not entirely navigable by keyboard) while also adding a plethora of accessibility descriptions to components that were basically hidden for blind and visually impaired users.
To keep things clean, Wegner added a checkbox under Preference panel to enable some particular optimizations for screen readers (like transforming links into buttons so they can be reached using the TAB key).
We hope it is the start of a lasting collaboration to make Arduino truly available for everyone willing to learn and hack with us.
The holidays are over and we’re back at work, so it’s time to clean up the house. To get ready for autumn, our amazing dev team has decided to devote an entire week to resolve as many of the open issues on the Arduino IDE repository and related projects (cores, libraries, etc.) as possible.
Starting this Monday, the dev team will be going through the open issue log — analyzing requests, fixing them where immediately possible, and in some cases, reaching out to the original submitter to establish if they are still seeing an issue or if it can be closed out. If you do receive such a notification in your GitHub account (with a subject starting with [arduino/Arduino] …), please help us help you by responding accordingly.
Big thanks to all of you who’ve contributed in the past and continue to submit the issues you find within the Arduino IDE for resolution. We appreciate your support and acknowledge your patience while waiting for them to be fixed.
Let’s watch that open issue counter fall by the day!
Arduino Create Agent is a plug-in that was designed to help Arduino users connect their devices to the Arduino Create platform. The plug-in lets your browser communicate with your device’s serial port from a web application.
We chose Bitrock’s InstallBuilder, a powerful and easy to use cross-platform installer creation tool, for generating the Arduino Create Agent installers (Windows, macOS, Linux). Those binaries are then served through our global CDN.
Yesterday, Bitrock has published an important security advisory in which they stated that Windows binaries generated with InstallBuilder versions earlier than 19.7.0 are vulnerable to tampering even if they contain a valid Authenticode signature. A specially crafted payload can be appended to an existing installer and trick the installer initialization code to execute code included in it, while the existing signature remains valid.
The issue, originally reported to them by Youfu Zhang of Chaitin Security Research Lab (@ChaitinTech), got addressed by releasing an updated version of InstallBuilder so all their customers could re-build and re-release their installers. CVE-2019-5530 has been assigned to this issue (CVSSv3 score of 6.7).
Once we’ve been notified, and given the potential impact of this security issue, we worked around the clock to re-build and re-release our Agent’s Windows installer. Version 1.1.89 has now been released through our official channels.
Please note that all versions of the Windows installer before version 1.1.89 are vulnerable to CVE-2019-5530.
Because this issue can be exploited with existing binaries already released, we also want to remind all of you to only download installers from official sources.
If you have any questions regarding this security issue, or if you need any help with upgrading your installer, please do not hesitate to contact Arduino Support through e-mail at support@arduino.cc.
We are excited to announce a new partnership with Chirp, a London-based company on a mission to simplify connectivity using sound. Chirp’s machine-to-machine communications software enables any device with a loudspeaker or microphone to exchange data via inaudible sound waves.
Starting today, our Chirp integration will allow Arduino-powered projects to send and receive data wirelessly over sound waves, using just microphones and loudspeakers. Thanks to some compatible libraries included in the official Arduino Library Manager and in the Arduino Create — as well as further comprehensive documentation, tutorials and technical support — it will be easy for anyone to add data-over-sound capabilities to their Arduino projects.
Creative applications of Arduino and Chirp include, but certainly are not limited to:
Triggering events from YouTube audio
Securely unlocking a smart lock with sound
Sending Wi-Fi credentials to bring offline devices onto a Wi-Fi network
Having a remote control that only interacts with the gadgets in the same room as you
“Connectivity is a fundamental asset for our users, as the demands of IoT uptake require devices to communicate information seamlessly and with minimal impact for the end user. Chirp’s data-over-sound solution equips our boards with robust data transmission, helping us to deliver enhanced user experiences whilst increasing the capabilities of our hardware at scale,” said Massimo Banzi, Arduino co-founder.
“Sound is prevailing as a highly effective and versatile means of seamless data transmission, presenting developers with a simple to use, software-defined solution which can connect devices. Working with Arduino to extend the integration of data-over-sound across its impressive range of boards will not only increase the reach of Chirp’s technology, but provide many more developers with an accessible and easily integrated connectivity solution to help them drive their projects forward in all purposes and environments. We can’t wait to see what the Arduino community builds,” commented James Nesfield, Chirp CEO.
To learn how to send data with sound with an Arduino Nano 33 BLE Sense and Chirp, check out this tutorial and visit Chirp website here.
This post is from Martino Facchin, who is in charge of the firmware development team at Arduino. Hopefully this is the first of a series of posts describing the inner workings of what we do.
The new, shiny and tiny Nano 33 BLE and Nano 33 BLE Sense are on their way to becoming a serious threat to any hacker’s summer vacation. (I’d recommend spending a couple of days at the lake or beach anyway despite the board’s awesomeness!)
Quoting Sir Isaac Newton (who walked the same streets of Cambridge, UK that the Arm engineers use to get to work everyday), starting from scratch is not always a clever idea. Tens of thousands of man-hours have been spent since the beginning of computer science to reinvent the wheel, sometimes with great results, other times just bringing more fragmentation and confusion.
Since we didn’t have an official Arduino core for the Nordic nRF52840 Cortex-M4 microcontroller, which the Nano 33 BLE and Nano BLE Sense are based upon, we took a look at the various alternatives:
Using Nordic softdevice infrastructure
Writing a core from scratch
Using Mbed OS as a foundation
Option one looks juicy but clashes with a cornerstone of Arduino: open-source software. In fact, softdevice’s closed source approach limits the user’s freedom.
Option two would take a lot of burden on our shoulders for a single board, making the core not very reusable.
So, we went to option three: basing the core on Mbed OS foundation, sharing its drivers and libraries.
As many of you may know, Mbed is a fully preemptive RTOS (real-time operating system), meaning you can run multiple “programs” (more specifically, threads) at the same time, much like what happens in your notebook or smartphone. At Arduino, we have been looking for an RTOS to use on our more advanced boards for a long time but we never found something we liked until we started working with the Mbed OS. Programming an RTOS is usually quite complicated (every university grade course on operating systems will be full of frightening terms like ‘mutex’ and ‘starvation’), but you don’t have to worry if you just want to use it as an Arduino; setup() and loop() are in their usual place, and nobody will mess with your program while it’s running.
But if you want to do MORE, all Mbed infrastructure is there, hidden under the mbed:: namespace. As a side effect of reusing its drivers, we can now support every Mbed board in Arduino with minimal to no effort. Plus, the structure of the core allows any Mbed developer to use Arduino functions and libraries, simply by prepending arduino:: before the actual function call.
Mbed also supports tickless mode; in this way, every time you write delay() in your code, the board will try to go in low power modes, knowing exactly when to wake up for the next scheduled event (or any external interrupt). We are able to achieve an impressive 4.5uA of lower consumption while running a plain old Blink on the Nano 33 BLE (a minimal hardware modification is needed to obtain this value but another blog post is coming). As for Bluetooth support, you can start creating your BLE devices today using the wonderful https://github.com/arduino-libraries/ArduinoBLE but we support plain Cordio APIs as well, in case you need features not yet available in Arduino BLE.
And of course, it’s all open-source!
If you just want to make awesome projects with its plethora of onboard sensors, fire up your Arduino IDE, open the board manager and search for Nano 33 BLE; one click and you are ready to go!
If you want to hack the core, add another Mbed board or merely take a look, your next entry point is the GitHub repo. Don’t be shy if you find a bug or have a suggestion; we love our community, and will try to be as responsive as possible.
We are excited to announce that we’ve selected Auth0 as the identity management platform of choice for Arduino. We will replace our own Single Sign On solution with Auth0 for all public facing web properties, including Arduino Create and other apps.
We discovered that our own homegrown authentication solution would not scale to meet the rapidly developing needs of the growing global community and decided to reach out to Auth0. In addition to Single Sign On, Arduino will take advantage of Auth0’s new Universal Login, which enables developers to completely customise their branded authentication experiences quickly, and Device Flow for browserless or input-constrained devices.
“We wanted a robust platform to replace our SSO solution but also give us the flexibility to do cool, new things in the device authentication space. Auth0 is a brand we admire, and their API-based approach makes it easy to migrate our login data in a way that’s completely transparent for the customer. We are excited to welcome them to our global community.” – Gianluca Varisco, Arduino CISO
We plan to leverage the power of both communities and events, and explore a technical partnership in the IoT domain. Auth0 currently secures more than 2.5 billion logins per month for 21 million users.
“I have been using Arduino for years as the brain for my personal projects, so working with them in a business capacity is really rewarding. When you empower the developer with simple, powerful tools, the whole business benefits. We are excited by the reach of the Arduino community and aligned in our mission to help the developer in their journey to innovate.” – Eugenio Pace, Auth0 CEO and co-founder
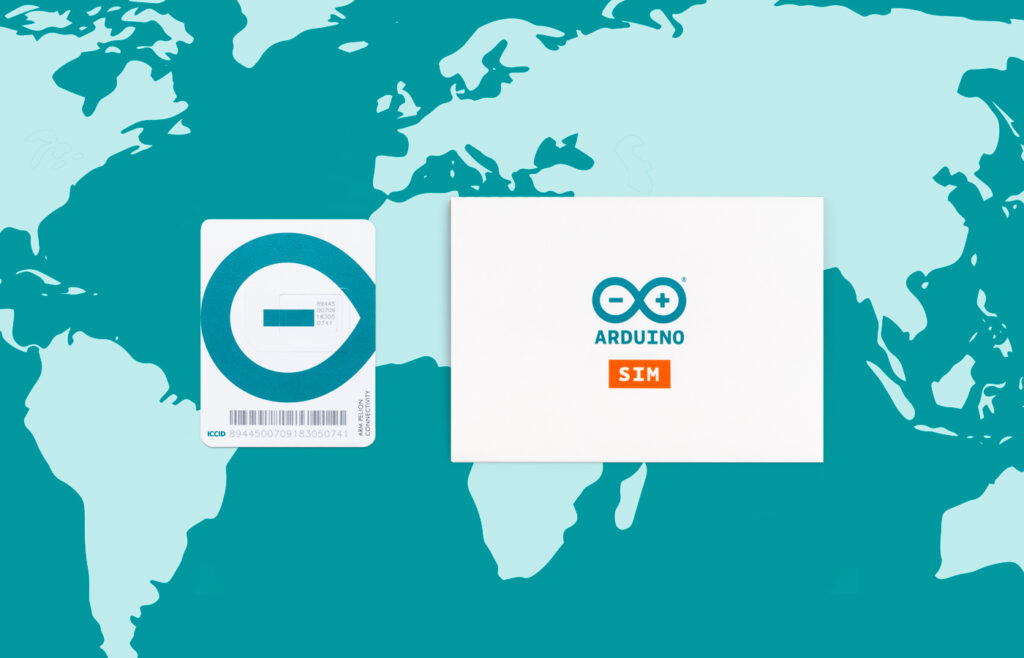
Hot on the heels of announcing the launch of the Arduino SIMin the US, we’re very pleased to further roll out availability of the data plan to Asia, Australia/NZ, Middle East and Africa, and the Americas (excluding Brazil).
With 10MB free data for up to 90 days and a global roaming profile, the new Arduino SIM offers the simplest path to cellular IoT device development.
The Plan:
Arduino SIMcomes with 10 MB of data free for the first days 90 days.
One simple subscription at 5 MB for $1.50 USD per month*.
Global roaming profile – enjoy the same amount of data traffic for the same price wherever you are operating the device around the world.
Cellular connectivity to the Arduino IoT Cloud – monitor and control your devices anytime, anywhere.
Ideal for connected devices on the go or in areas without reliable WiFi.
Scalable to large numbers of devices in the future with Arm Pelion Connectivity Management.
*Available worldwide except for the European Union and Brazil
Currently, the Arduino SIM will allow users to send data into the Arduino IoT Cloud, while later in the year they will also be able to use the Arduino SIM to connect to the Internet via a combination of webhooks and APIs.
Arduino SIM will initially be compatible with the MKR GSM 1400 (3G with 2G fallback) — an Arm Cortex-M0+ board supporting TLS and X.509 certificate-based authentication through an on-board secure element and crypto accelerator. The Arduino IoT Cloud makes it possible for anyone to connect to these boards securely without any coding required, but they are still programmable using open-source libraries and the traditional Arduino IDE.