Posts with «robotics» label

Robot Bartenders Compete In Mixology and Microcontrollers

The Fifth Annual DNA Lounge Cocktail Robotics Grand Challenge is this Sunday, bringing out the best competitors in the art of robotics and bartending.

Read more on MAKE

The post Robot Bartenders Compete In Mixology and Microcontrollers appeared first on Make: DIY Projects and Ideas for Makers.

3D Printed Arduino Bot is Limbo Master

As if we didn’t have enough to worry about in regards to the coming robot uprising, [Ali Aslam] of Potent Printables has recently wrapped up work on a 3D printed robot that can flatten itself down to the point it can fit under doors and other tight spaces. Based on research done at UC Berkeley, this robot is built entirely from printed parts and off the shelf hardware, so anyone can have their own little slice of Skynet.

On display at East Coast RepRap Festival

The key to the design are the folding “wings” which allow the robot to raise and lower itself on command. This not only helps it navigate tight spaces, but also gives it considerable all-terrain capability when it’s riding high. Rather than wheels or tracks, the design uses six rotors which look more like propellers than something you’d expect to find on a ground vehicle. These rotors work at the extreme angles necessary when the robot has lowered itself, and allow it to “step” over obstructions when they’re vertical.

For the electronics, things are about what you’d expect. An Arduino Pro Mini combined with tiny Pololu motor controllers is enough to get the bot rolling, and a Flysky FS-X6B receiver is onboard so the whole thing can be operated with a standard RC transmitter. The design could easily be adapted for WiFi or Bluetooth control if you’d rather not use RC gear for whatever reason.

Want to build your own? All of the STL files, as well as a complete Bill of Materials, are available on the Thingiverse page. [Ali] even has a series of videos on YouTube videos walking through the design and construction of the bot to help you along. Outside of the electronics, you’ll need a handful of screws and rods to complement the 50+ printed parts. Better start warming up the printer now.

As an interesting aside, we got a chance to see this little critter first hand at the recent East Coast RepRap Festival in Maryland, along with a number of other engineering marvels.

Live Updates From Maker Faire Bay Area 2018

Maker Faire Bay Area is here! Get a sneak peek at all the must-see exhibits and creators. We'll be updating this post regularly throughout the weekend, so check back regularly.

Read more on MAKE

The post Live Updates From Maker Faire Bay Area 2018 appeared first on Make: DIY Projects and Ideas for Makers.

Adafruit Previews CRICKIT, Hopes To Make Robotics More Acessible

There have been a rash of short videos popping onto the Adafruit youtube channel recently that depict Limor Fried showing off a new board driving some fun cardboard based projects. This new board, which we can hear Limor explain is the CRICKIT, appears to be in prototype stages. It got […]

Read more on MAKE

The post Adafruit Previews CRICKIT, Hopes To Make Robotics More Acessible appeared first on Make: DIY Projects and Ideas for Makers.

Robot Van Gogh will paint your portrait

Maker Faire Rome, where everything started

I participated in Maker Faire Rome back in December 2017. I came with the rest of the Arduino crew to spend two days talking to other makers in the show, check out the projects made in the field of education and to…  get a portrait painted. Now seriously, I hadn’t planned to get a painting of my beard made at Maker Faire, it just happened. I was walking around together with Marcus, one of the guys running the Arduino Education web infrastructure, when I saw my own picture on a computer screen at a not-so-distant booth. We came closer just to satisfy my curiosity, and then the surprise… there was a robot making my portrait!

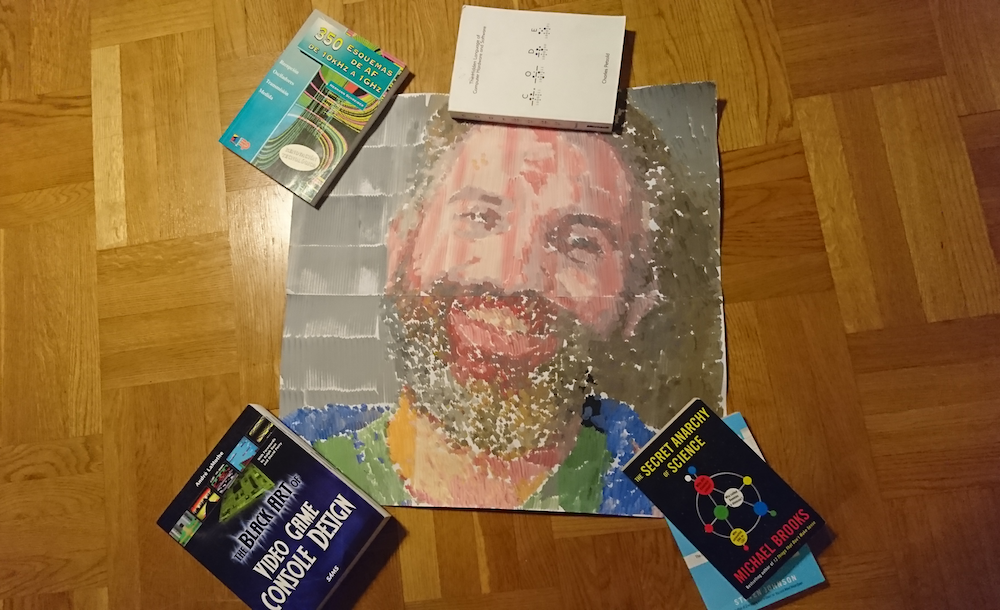
The process of making this portrait was not exactly short, the robot moves back and forth every couple of brush strokes to get some more paint. The colors are created by dipping into small containers. Imagine a CNC of sorts moving on the X-Y plane and making a small movement with the brush in order to make a mark on the canvas. My portrait is made of several A4 pages glued together, as you can see in the picture. In total it takes several hours to produce a portrait like this one.

You can see the first traces made by the machine while painting my portrait in the following video.

The painting robot was built by Jose Salatino, a painter gone roboticist that used to go around making portraits to famous musicians and giving the paintings away to them. He told me that this is how he started in the art world. At some point he wanted to bring together his life passion with his hobby (electronics) and got interested into painting robots (seems like there is a whole niche there I haven’t explored yet) and realized that very few people were really using a painter’s technique to mix the colors. That triggered him into learning more about machines in general, and machines that could paint in particular.

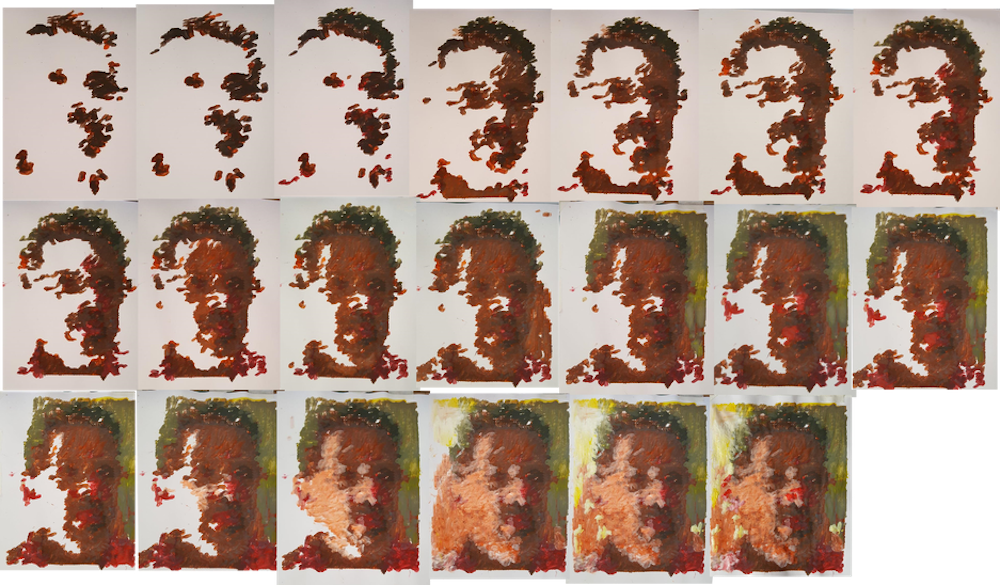
[Jose’s self portrait process, image courtesy of Jose Salatino]

The machine itself

The painter robot, which I came to call Van Gogh because of its painting style, is a two-axis machine that can be programmed to move all over the canvas. The machine uses the technique of creating a color by mixing first basic pigments (blue, yellow, red) and then dipping the brush again into one of a series of containers grading from white to black. This is, Jose told me, how he would mix the paint: first dip into the different containers of basic color (e.g. to make a bright green, need to dip once in blue and maybe three times in yellow), second assign the luminosity by dipping into a certain gray color. When asked about whether the paint containers would not get dirty by doing so, Jose replied that so it goes when painting for him. The colors get dirty on the palette and you need to keep on adding new color. And this is when I realized that I was totally over engineering the project in my head when I tried to imagine how I would do it. Check the robot in action in the following video.

Note the sponge used to clean the brush before reloading it with paint, yet another master move, in my opinion. You can read more about the machine by visiting the project’s write-up here

The contest Jose is participating in

Jose has entered a robotics painting contest with the works made by his robot. One of the proposed pieces is actually my portrait.  

The 2018 “3rd Annual” International Robotic Art Competition’s goal is to challenge teams to produce something visually beautiful with robotics – that is, to have a robot use physical brushes and paint to create an artwork.

Jose’s robot is all about brushes, as I already told you. And he is all for the competition, for which he teamed up with his kids who learned everything that was needed to make the robot paint as it does. The idea is that, in case he won this contest, 90% off the $100.000 USD prize would be donated to an NGO in the US. Are you interested in art? More specifically, are you into robotic art? Then visit the contest’s site, register, and vote for your favorite pieces. If you voted for Jose’s work, you could also help him choose an NGO where to give the money away: Red Cross, Black Girls Code, Learn2Teach-Teach2Learn… as he lives in Barcelona, he doesn’t really know who he would give the price to in the US. Jose is open to suggestions, but remember he needs your vote first!

Check the whole contest here and Jose’s entry here.

Read more about Jose

If you are interested in reading more about Jose’s project, his daughter, Flor, made a very nice interview and reflection about the role of the artist when there is a machine making the work. This is something I bet many readers were wondering by now: “if the machine paints it, who is the one to be credited, the machine or the person making the machine?” In my opinion, and since I am one of the models, I think we–the models giving away our image–should be also getting some credit, or? (Note: this last sentence was a joke!)

This 3D-Printed Robotic Vacuum Sucks

After you’ve taken a moment to ponder the turn of phrase used in the title, take a look at this scratch-built robotic vacuum created by [theking3737]. The entire body of the vacuum was 3D printed, and all of the internal electronics are off-the-shelf modular components. We can’t say how well it stacks up against the commercial equivalents from iRobot and the like, but it doesn’t look like it would be too hard to build one yourself to find out.

The body of this rather concerned-looking robot was printed on a DMS DP5 printer, which is a neat trick as it only has a build platform of 200 mm x 200 mm. Once all the pieces were printed, a 3D pen was used to “weld” the sections together. The final result looks a bit rough, but should give a bond that’s just as strong as the printed parts themselves.

The robot has four sets of ultrasonic range finders to detect walls and obstacles, though probably not in the positions you would expect. The right side of the robot has two sets of sensors, while the left side only gets one. We aren’t sure the reasoning behind the asymmetrical layout, but presumably the machine prefers making right turns.

Control is provided by an Arduino Mega and the ever-reliable HC-05 Bluetooth module. A companion Android application was written which allows configuring the robot without having to plug into the Arduino every time you want to tweak a setting.

We can’t say we’ve seen that many DIY robotic vacuums here at Hackaday, but we’ve certainly featured our fair share of hacks for the commercially available models.

Learning Microcontrollers and Robotics in the DroneBot Workshop

Discover an excellent YouTube channel for learning hobby electronics, microcontrollers, robotics, and drones.

Read more on MAKE

The post Learning Microcontrollers and Robotics in the DroneBot Workshop appeared first on Make: DIY Projects and Ideas for Makers.

10 Arduino-Based Robo-Critters

Hot on the heels of yesterday’s delightful discovery of Vorpal, a lovable scamp of a hexapod, I decided to poke around to see what other Arduino-based robot projects there are out there these days. I found this YouTube video rounding up ten robo-critters. These include a robo-dog, a robotic cat, […]

Read more on MAKE

The post 10 Arduino-Based Robo-Critters appeared first on Make: DIY Projects and Ideas for Makers.

This 3D Printed Arduino-Based Hexapod Robot Can Bust a Move!

Check out the sick moves on this open-source, 3D-printable hexapod robot.

Read more on MAKE

The post This 3D Printed Arduino-Based Hexapod Robot Can Bust a Move! appeared first on Make: DIY Projects and Ideas for Makers.