Posts with «mega» label

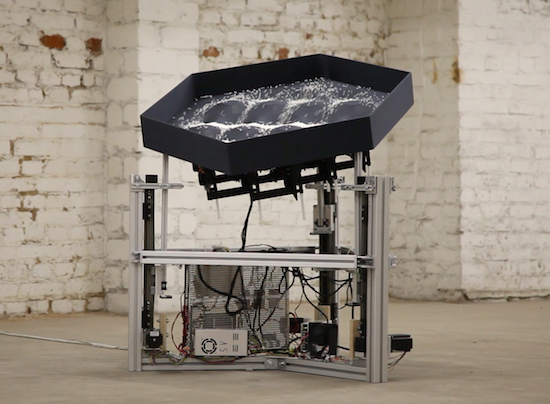
Try to grab some candy with this Arduino claw machine

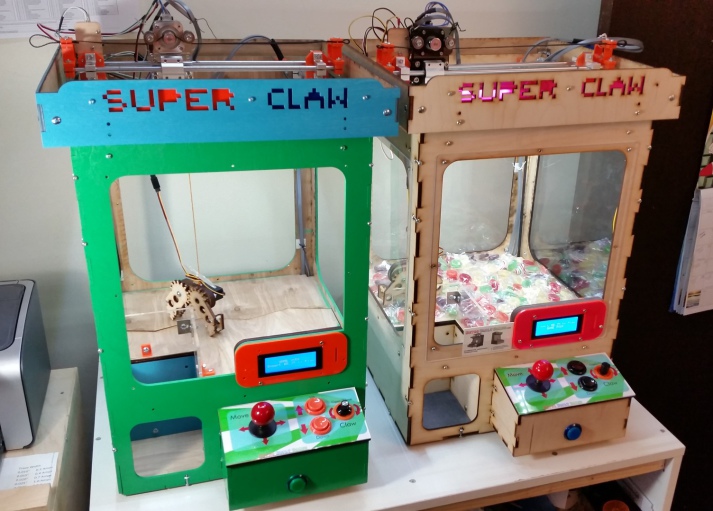
Depending on your point-of-view, you may see claw machines as an interesting device that can normally be ignored, or perhaps magnet for quarters that you must satisfy until you capture the stuffed animal that’s “so easy to get.” Maybe these gantry-crane gadgets would be a bit more fun if you could play them at home to your heart’s content. If that sounds appealing, then Ryan Bates of Retro Built Games has the perfect solution with his “Super Claw” machine.

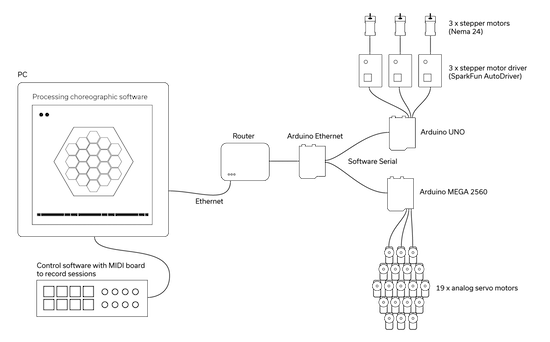
This project, though on version four, is not currently for sale as a kit, but he is now selling his stepper driver board for the device, which links up to an Arduino Mega via an IDC cable. This takes advantage of the brick of I/O opposite the USB and power connector on the Mega to clean up wiring significantly.

You can buy the board here and check out his build page for lots more info on the (still ongoing) development process!

Arduino device helps keep dogs safe from overheating

Pets bring an untold amount of joy into our lives, but unfortunately they aren’t allowed to go everywhere that humans are. Of course this makes sense in many situations, but if you’d like to take your dog with you wherever you go, this means occasionally leaving poochie in the car. Along with leaving the sunroof and windows open, this project’s author also came up with a transmitter and receiver to monitor the temperature inside of the car with a series of LED pulses.

The car unit consists of an Arduino Mega, along with a temperature sensor and LoRa transciever. The receiver takes this wireless information, which can be reliably read at a range of 250 meters (820 feet) in an urban environment, and gives the user a series of blinks to assure Max’s (the dog) human that he’s not overheating!

You can find the entire build’s write-up here, or check out its code on GitHub.

A LoRa home environment monitoring gateway

When you’re away from your home, perhaps you’d like to know what is going on there. A camera system is one solution, but is fairly data-intensive and might not be the right method if you’d like to monitor information like temperature and humidity in several zones. For this, Rod Gatehouse decided to build his own LoRa environment monitoring system using an Arduino Mega.

To keep an eye on things, Gatehouse (aka “RodNewHampshire” on Instructables) came up with an excellent LoRa IoT gateway that can be controlled via four push buttons and an LCD screen. This device can take input from remote stations wirelessly, and can put this data online or push it to a user as a text message.

The system enables a homeowner to monitor the home environment via an Internet accessible dashboard, receive periodic SMS environmental notifications, receive real-time SMS alerts when monitored environmental parameters exceed preset thresholds, and log environmental data to the cloud.

For more details on how Gatehouse set up this project and on his design choices, check out his Instructables page here.

The Lake Erie Mamba is a 12-servo snake robot

If you want to build a robot that moves across the ground, the normal options are wheels or legs of some kind. Maker “joesinstructables,” however, decided to do something a bit different. He created a versatile, slithering system, which he calls the “Lake Erie Mamba.”

He put a dozen Arduino Mega-controlled servos together in a reptile configuration to allow the robot to move via serpentine motion (like a normal snake), rectilinear motion (like a worm), or sidewinding (which snakes use in shifting terrain). It can also twist itself into a wheel and roll in this rather unnatural, though quite interesting way.

The Lake Erie Mamba contains 12 segments, each consisting of a servo motor, a C-bracket, a side bracket, a wire clip, and a set of LEGO wheels. The reconfigurable robot is not only controlled using a four-button key fob remote, but can move about autonomously via an IR sensor as well.

You can see more of this build on its Instructables page here and in action below!

Pablo Odysseus is an autonomus bot that rakes art in the sand

For this year’s Hackaday Prize, hacker “Ulysse” has designed an autonomous beach art rover using an Arduino Mega and a pair of Micros.

While walking along the shore, the footprints you leave behind are mildly interesting, and perhaps you might go to the effort of scraping a pattern in the sand if you were feeling rather creative. If, however, you wanted to make drawings on a massive scale, Ulysse’s robot “Pablo Odysseus” looks like an elegant solution.

The Arduino-powered rover uses two wheelchair motors to propel it along the beach, as well as a rake to leave a mark as to where it’s been. Navigation is provided by a GNSS receiver (a more general term for “GPS”), a digital compass, and an odometer set up on each of the motors. Meanwhile, USB dongles enable it to communicate wirelessly with a smartphone and laptop.

Now, Ulysse can simply program in an artistic pattern, and Pablo will take care of the rest! You can see more about this project on Hackaday.io and GitHub.


This Maker built a game board that lights up correct moves

Want to help familiarize someone with the rules of checkers? Tired of cheating opponents? Well, Bogdan Berg has just the thing for you!

After discussing the idea for an electronic board that teaches kids how to play chess, Berg decided to make this a reality. Hall effect sensors on each square tell the Smart Game Board—rather the Arduino Mega controlling the board—where pieces are, and when one is picked up, LEDs highlight what moves are possible. These lights can also show the pieces’ starting positions, assisting novice players in this important part of the game.

Currently, the device is programmed to play the international version of checkers, but there’s no reason other games like chess and tic-tac-toe couldn’t be added as well. You can see more about this project, which took about six months to complete, in Berg’s write-up here.

Add smartphone control to your rolling backpack

Have you ever hopped off the plane at LAX with a… rolling backpack, and wished it would just push itself? Using an Arduino and motor controllers, “TannerTech” made his own robo-backpack.

Carrying backpacks around is so 20th century. Modern travelers, of course, get their robotic minions to drive the bags around for them. Or at least that’s what this Maker’s vision seems to be. The backpack in question is wheeled around by two motors on mounts made out of paint sticks. Control is provided by an Arduino Mega using an H-bridge motor controller to handle the relatively high current required.

In order for a human to call the backpack to him or herself, an “Arduino bluetooth controller” Android app is used to send characters to the Mega and Bluetooth module in the bag. Electronics are housed inside of a pencil case, making this a surprisingly accessible project.

You can find out more on TannerTech’s Instructables page, and see a demo of it below!

Particle Flow makes granules tumble in interesting patterns

This Arduino-based project creates interesting tumbling patterns using a system that tilts a plane in a controlled manner while deforming its surface.

NEOANALOG, a “studio for hybrid things and spaces,” was commissioned to build the Particle Flow installation, which explores how granules tumble under the control of gravity. This mechanism takes the form of a large hexagon held in three corners by linkages pushed up and down by NEMA 24 stepper motors. As these rods are lifted, the granules inside the “arena” are steered over to the opposite side producing a zen-like experience.

Inside the main hexagon are 19 smaller hexagons, each controlled by servos to lift an individual section of the rolling surface up and down. Control of the entire system is accomplished via a PC running Processing, which sends commands via Ethernet to an Arduino Mega and the steppers to an Arduino Uno with three motor drivers. 

A moving slanted plane and a grid of motorized stamps control the elements to form infinite variations of behaviors and patterns. The result is a zen-like experience that is both: fascinating and contemplative. Software controlled motion follows a complex choreography and enables precise steering of physical particles in a variety of ways: from subtle to obvious, from slow to high paced, from random-like to symmetric.

Intrigued? Be sure to check out Creative Applications Network’s write-up on this piece as well as NEOANALOG’s page for more details.

An interactive LED floor to get the dance party started

If you want a light-up dance floor for your next wedding or other special event, you can rent one; however, that can be quite expensive. On the other hand, you and your hacker friends can always build one. How hard can that be?

Turns out, very hard. While it may be simple to get one translucent panel to illuminate with LEDs, this 17-square-foot interactive dance floor used 64 panels with four lighting cells in each, for a total of 256 lighting arrays and 7,680 RGBs arranged as 2,560 addressable pixels.

Even with some advanced tools like a pick-and-place machine for PCB manufacturing, as well as a laser cutter, it still took volunteers many hours over the course of 11 months to get it working. LED control is accomplished via a Teensy 3.1, while 256 pressure switches under the surface are read by an Arduino Mega.

You can see more details of the impressive project in the video below (including a round of multi-player Dance Dance Revolution) and a few more technical details in AvBrand’s write-up here.

Build a motorized gimbal on a budget with Arduino

Tadej Strah, a freshman at Gimnazija Vic in Slovenia, made a motorized gimbal using only $60 worth of parts.

After joining a photo and film club at his university, Strah was inspired by a member with cerebral palsy to build an inexpensive gimbal to keep a small camera level. His project uses an MPU-6050 sensor to detect motion, and an Arduino Mega to process this data and control the device’s two servos. The setup includes a handle from an angle grinder, while the servos are mounted on bent pieces of metal, helping keep the cost down.

Strah believes that with a few upgrades, such as a smaller battery, Bluetooth connectivity, and a 3D-printed frame, it should be able to provide many of the features of those available for $500 or more. Hopefully we’ll see this design become even better in the future!

Until then, you can follow along with Strah’s progress, and perhaps another iteration of his gimbal, on his YouTube channel.