Posts with «iot» label

Enter the World’s Largest Arduino Maker Challenge

Massimo Banzi, CEO of Arduino.cc created a video to to invite you to the World’s Largest Arduino Maker Challenge in collaboration with  Microsoft and Hackster.io. Participate with your IoT idea and take the chance to win twice! We are giving away 1000 new Arduino MKR1000 (US only) and Genuino MKR1000 (Outside US) boards , for the first time ever, and other amazing prizes like Maker Faire trips, Adafruit gift certificates and a video production about you and your work.

Watch the video and register as a participant!

Arduino Blog 14 Dec 14:57
arduino  featured  genuino  iot  mkr1000  

Meet the new MKR1000 and win it in an amazing contest!

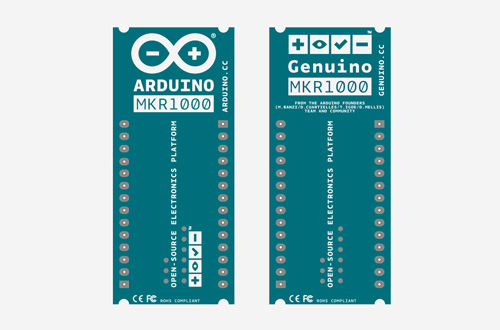
It’s a great pleasure to introduce the new member of the Arduino and Genuino family: MKR1000 is a powerful board that combines the functionality of the Zero and the connectivity of the Wi-Fi Shield.

It’s based on the Atmel ATSAMW25 that is part of the SmartConnect family of Atmel Wireless devices, specifically designed for IoT. It offers the ideal solution for makers seeking to add Wi-Fi connectivity with minimal previous experience in networking.

The new board will be available for purchase from February 2016 but starting today #1000 MKR1000 can be won in the World’s Largest Arduino Maker Challenge in collaboration with Hackster.IO and Microsoft.

We want to celebrate the maker community so we thought there’s no better way to do that than encourage inventors, artists, makers, hobbyists or professionals and developers to create on Arduino. The contest is very flexible – choose anything you want to build from environmental sensors to gaming, augmented reality, robotics or UAVs using the power of Arduino.cc boards and Windows 10.

The 1,000 makers who submit the best project ideas will receive the newly released Arduino MKR1000 (US only) and Genuino MKR1000 (Outside US) boards. Then three finalists submitting the best completed projects will be awarded with a fully-funded trip to Maker Faire Shenzhen, New York or Rome; a chance to present their creation at the Microsoft and the Arduino and Genuino booths; a professional video production of the project; and a whopping $500 gift certificate to Adafruit.

Contest starts today,  December 9th 2015, when participants can sign up or log into Hackster and enter to win the new MKR1000 board by pitching the idea. Idea submissions close on January 15, 2016 at 11:59 PM (PT).

Save the date and participate now!


DIY Connected objects for happy connected people

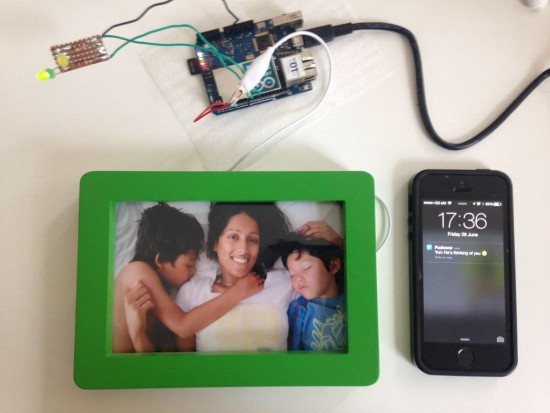
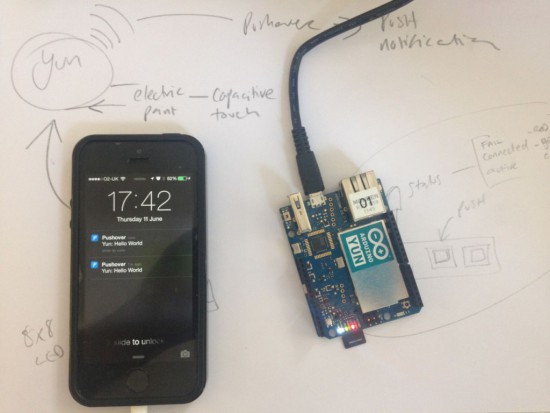
What happens when a creative technologist wants his family to know he’s thinking about them? He creates a project with Arduino Yún! IMissYou is a simple project transforming a picture in a connected object thanks to a capacitive layer made with Bareconductive Paint and inserted behind the photo. The ‘touch’ is detected by the Arduino through the glass of the frame by a spike in the values (with a basic Capsense library), sent to the internet via wi-fi and delivered to a phone with Pushover.

Martin Hollywood, the Arduino user who made  the project, wrote us:

Looking at the photograph of my family that I have on my desk one day, I missed them and wanted to be home. I touched the photo and realised that somewhere between those was the germ of the idea…

I wanted my family to know I was thinking of them, but I didn’t want to create two products; think GoodNight Lamp – I do love that project. In any case, there was no guarantee they would even notice a ‘blinking’ photo frame responding to my signal. Making the Receive a PUSH notification seemed like a no brainer, but the last time I developed for mobile was iOS 1! There are a number of service apps out there: Pusher, Pushingbox but I decided on Pushover. It had a 7 day trial period and good API support (I’ve since bought a license).

Take a look at his blog for more details and if you want to give him some tips to make it a real product.

New Project: The Internet of Bees: Adding Sensors to Monitor Hive Health

Learn how to pull realtime sensor data from a beehive to monitor its weight, temperature, and humidity over the internet.

Read more on MAKE

The post The Internet of Bees: Adding Sensors to Monitor Hive Health appeared first on Make: DIY Projects, How-Tos, Electronics, Crafts and Ideas for Makers.

Control your Arduino over the Internet using Blynk

Introduction

There are many ways of remotely-controlling your Arduino or compatible hardware over the Internet. Some are more complex than others, which can be a good thing or a bad thing depending on your level of expertise. Lately we’ve become more interested in this topic and have come across Blynk, which appeared to be a simple solution – and thus the topic of our review.

What is Blynk?

From their website: “Blynk is a Platform with iOS and Android apps to control Arduino, Raspberry Pi and the likes over the Internet. It’s a digital dashboard where you can build a graphic interface for your project by simply dragging and dropping widgets. 

It’s really simple to set everything up and you’ll start tinkering in less than 5 mins. Blynk is not tied to some specific board or shield. Instead, it’s supporting hardware of your choice. Whether your Arduino or Raspberry Pi is linked to the Internet over Wi-Fi, Ethernet or this new ESP8266 chip, Blynk will get you online and ready for the Internet Of Your Things.” Here is the original launch video:

Blynk started off as an idea, and raised initial funding through Kickstarter – which was successful and the system has now launched. Blynk comprises of an app on your smartphone (Android or iOS) inside which you can add widgets (controls) to send commands back to your development board (Arduino etc.).

For example, you can add a switch to turn a digital output on or off. Furthermore, data from sensors connected to the development board can be send back to the smartphone. The data passes through the Blynk Cloud server, or you can download and run your own server on your own hardware and infrastructure.

How much does it cost?

Right now (September 2015) the Blynk system is free. We downloaded the app and experimented without charge. We believe that over time there will be payment required for various functions, however you can try it out now to see if Blynk suits your needs then run with it later or experiment with other platforms.

Getting Started

Well enough talk, let’s try Blynk out. Our hardware is an Android smartphone (the awesome new Oppo R7+) for control, and a Freetronics EtherTen connected to our office modem/router:

You can also use other Arduino+Ethernet combinations, such as an Arduino Uno with an Ethernet shield. First you need to download the app for your phone – click here for the links. Then from the same page, download the Arduino library – and install it like you would any other Arduino library.

For our first example, we’ll use an LED connected to digital pin 7 (via a 560 ohm resistor) shown above. Now it’s time to set up the Blynk app. When you run the app for the first time, you need to sign in – so enter an email address and password:

Then click the “+” at the top-right of the display to create a new project, and you should see the following screen:

You can name your project, select the target hardware (Arduino Uno) – then click “E-mail” to send that auth token to yourself – you will need it in a moment. Then click “Create” to enter the main app design screen. Next, press “+” again to get the “Widget Box” menu as shown below, then press “Button”:

This will place a simple button on your screen:

Press the button to open its’ settings menu:

From this screen you can name your button, and also determine whether it will be “momentary” (i.e., only on when you press the button) – or operate as a switch (push on… push off…). Furthermore you need to select which physical Arduino pin the button will control – so press “PIN”, which brings up the scrolling menu as shown below:

We set ours to D7 then pressed “Continue”. Now the app is complete. Now head back to your computer, open the Arduino IDE, and load the “Arduino_Ethernet” sketch included with the library:

Then scroll down to line 30 and enter the auth key that was sent to you via email:

Save then upload the sketch to your Arduino. Now head back to your smartphone, and click the “Play” (looks like a triangle pointing right) button. After a moment the app will connect to the Blynk server… the Arduino will also be connected to the server – and you can press the button on the screen to control the LED.

And that’s it – remote control really is that easy. We’ve run through the process in the following short video:

Now what else can we control? How about some IKEA LED strips from our last article. Easy… that consisted of three digital outputs, with PWM. The app resembles the following:

… and watch the video below to see it in action:

Monitoring data from an Arduino via Blynk

Data can also travel in the other direction – from your Arduino over the Internet to your smartphone. At the time of writing this (September 2015) you can monitor the status of analogue and digital pins, and widgets can be added in the app to do just that. They can display the value returned from each ADC, which falls between zero and 1023 – and display the values in various forms – for example:

The bandwidth required for this is just under 2 K/s, as you can see from the top of the image above. You can see this in action through the video below:

Conclusion

We have only scratched the surface of what is possible with Blynk – which is an impressive, approachable and usable “Internet of Things” platform. Considering that you can get an inexpensive Android smartphone or tablet for under AU$50, the overall cost of using Blynk is excellent and well worth consideration, even just to test out the “Internet of Things” buzz yourself. So to get started head over to the Blynk site.

Tronixstuff 20 Sep 09:30

Control your Arduino over the Internet using Blynk

Introduction

There are many ways of remotely-controlling your Arduino or compatible hardware over the Internet. Some are more complex than others, which can be a good thing or a bad thing depending on your level of expertise. Lately we’ve become more interested in this topic and have come across Blynk, which appeared to be a simple solution – and thus the topic of our review.

What is Blynk?

From their website: “Blynk is a Platform with iOS and Android apps to control Arduino, Raspberry Pi and the likes over the Internet. It’s a digital dashboard where you can build a graphic interface for your project by simply dragging and dropping widgets. 

It’s really simple to set everything up and you’ll start tinkering in less than 5 mins. Blynk is not tied to some specific board or shield. Instead, it’s supporting hardware of your choice. Whether your Arduino or Raspberry Pi is linked to the Internet over Wi-Fi, Ethernet or this new ESP8266 chip, Blynk will get you online and ready for the Internet Of Your Things.” Here is the original launch video:


Blynk started off as an idea, and raised initial funding through Kickstarter – which was successful and the system has now launched. Blynk comprises of an app on your smartphone (Android or iOS) inside which you can add widgets (controls) to send commands back to your development board (Arduino etc.).

For example, you can add a switch to turn a digital output on or off. Furthermore, data from sensors connected to the development board can be send back to the smartphone. The data passes through the Blynk Cloud server, or you can download and run your own server on your own hardware and infrastructure.

How much does it cost?

Right now (September 2015) the Blynk system is free. We downloaded the app and experimented without charge. We believe that over time there will be payment required for various functions, however you can try it out now to see if Blynk suits your needs then run with it later or experiment with other platforms.

Getting Started

Well enough talk, let’s try Blynk out. Our hardware is an Android smartphone (the awesome new Oppo R7+) for control, and a Freetronics EtherTen connected to our office modem/router:

You can also use other Arduino+Ethernet combinations, such as an Arduino Uno with an Ethernet shield. First you need to download the app for your phone – click here for the links. Then from the same page, download the Arduino library – and install it like you would any other Arduino library.

For our first example, we’ll use an LED connected to digital pin 7 (via a 560 ohm resistor) shown above. Now it’s time to set up the Blynk app. When you run the app for the first time, you need to sign in – so enter an email address and password:

Then click the “+” at the top-right of the display to create a new project, and you should see the following screen:

You can name your project, select the target hardware (Arduino Uno) – then click “E-mail” to send that auth token to yourself – you will need it in a moment. Then click “Create” to enter the main app design screen. Next, press “+” again to get the “Widget Box” menu as shown below, then press “Button”:

This will place a simple button on your screen:

Press the button to open its’ settings menu:

From this screen you can name your button, and also determine whether it will be “momentary” (i.e., only on when you press the button) – or operate as a switch (push on… push off…). Furthermore you need to select which physical Arduino pin the button will control – so press “PIN”, which brings up the scrolling menu as shown below:

We set ours to D7 then pressed “Continue”. Now the app is complete. Now head back to your computer, open the Arduino IDE, and load the “Arduino_Ethernet” sketch included with the library:

Then scroll down to line 30 and enter the auth key that was sent to you via email:

Save then upload the sketch to your Arduino. Now head back to your smartphone, and click the “Play” (looks like a triangle pointing right) button. After a moment the app will connect to the Blynk server… the Arduino will also be connected to the server – and you can press the button on the screen to control the LED.

And that’s it – remote control really is that easy. We’ve run through the process in the following short video:

Now what else can we control? How about some IKEA LED strips from our last article. Easy… that consisted of three digital outputs, with PWM. The app resembles the following:

… and watch the video below to see it in action:

Monitoring data from an Arduino via Blynk

Data can also travel in the other direction – from your Arduino over the Internet to your smartphone. At the time of writing this (September 2015) you can monitor the status of analogue and digital pins, and widgets can be added in the app to do just that. They can display the value returned from each ADC, which falls between zero and 1023 – and display the values in various forms – for example:

The bandwidth required for this is just under 2 K/s, as you can see from the top of the image above. You can see this in action through the video below:

Conclusion

We have only scratched the surface of what is possible with Blynk – which is an impressive, approachable and usable “Internet of Things” platform. Considering that you can get an inexpensive Android smartphone or tablet for under AU$50, the overall cost of using Blynk is excellent and well worth consideration, even just to test out the “Internet of Things” buzz yourself. So to get started head over to the Blynk site.

And finally a plug for our own store – tronixlabs.com – which along with being Australia’s #1 Adafruit distributor, also offers a growing range and Australia’s best value for supported hobbyist electronics from DFRobot, Freetronics, Seeedstudio and much much more.

As always, have fun and keep checking into tronixstuff.com. Why not follow things on twitterGoogle+, subscribe  for email updates or RSS using the links on the right-hand column, or join our forum – dedicated to the projects and related items on this website.

The post Control your Arduino over the Internet using Blynk appeared first on tronixstuff.

Tronixstuff 20 Sep 09:30

Developers: builders or explorers?

Last spring we collaborated with VisionMobile to run a survey on IoT developers and also the value that Open source has in the field.

We discovered that Between IoT developers there is a big chunk of open source enthusiast. 1/5 value the importance of using open source tools and platforms.

Developer that define themselves explorers cover a crucial role in the field. It is from them that all the truly new, out-of-the-box ideas come from.

Only by exploring seemingly crazy ideas can the Internet of Things reach its full potential. The open source ecosystem is often the area where these ideas bloom.

While open source is so valued between developers, there is still a lot of work to be done. 60% of the opensource enthusiast in fact, think that open standards are missing in IoT.

We are really happy that the connected Home is the most interesting vertical market for developers, and we can’t wait to see what this big group of explorers will develop in the next future. Hopefully the next big invention will be open source.

Find a full article on Developer Economics website.

On Casa Jasmina website you can explore the infographic in high-res with some  interesting data:

The most important role of Internet of Things developers is to explore new possibilities. The technology is widely available; in no small part because of open source software and hardware projects. Now we need to learn where we can take it. We can build it, but should we?

Build an IoT Gauge with Arduino Yún and IFTTT

Tomas Amberg shared with us the link to an Instructable he published on how to build a Web-enabled, Arduino-based IoT Gauge with a REST API, and connect it to the IFTTT mash-up platform, via the Yaler.net relay service he founded.

The cool thing about this project is the connection with the Maker Channel  of IFTTT which supports custom Webhooks, to integrate DIY IoT projects: 

Inspired by WhereDial, a DIY Internet of Things classic, the IoT Gauge shows the current location of its owner. A bit like the Weasley Clock in Harry Potter. The design and code of the IoT Gauge is generic and could be used as well to display e.g. weather conditions. The logic resides in the Cloud, the gauge is just a servo with an API.

Check out the five-step tutorial and the ingredients you need at this link.

Arduino Blog 05 Aug 18:00
arduino  featured  fritzing  gauge  ifttt  iot  lasercut  tutorial  uno  yún  

Bread Online is a Bread Maker for the Internet of Things

An engineering student at the University of Western Macedonia has just added another appliance to the ever-growing list of Internet enabled things. [Panagiotis] decided to modify an off-the-shelf bread maker to enable remote control via the Internet.

[Panagiotis] had to remove pretty much all of the original control circuitry for this device. The original controller was replaced with an Arduino Uno R3 and an Ethernet shield. The temperature sensor also needed to be replaced, since [Panagiotis] could not find any official documentation describing the specifications of the original. Luckily, the heating element and mixer motor were able to be re-used.

A few holes were drilled into the case to make room for the Ethernet connector as well as a USB connector. Two relays were used to allow the Arduino to switch the heating element and mixer motor on and off. The front panel of the bread maker came with a simple LCD screen and a few control buttons. Rather than let those go to waste, they were also wired into the Arduino.

The Arduino bread maker can be controlled via a web site that runs on a separate server. The website is coded with PHP and runs on Apache. It has a simple interface that allows the user to specify several settings including how much bread is being cooked as well as the desired darkness of the bread. The user can then schedule the bread maker to start. Bread Online also comes with an “offline” mode so that it can be used locally without the need for a computer or web browser. Be sure to check out the video demonstration below.

[Thanks Minas]


Filed under: Arduino Hacks, cooking hacks