Posts with «digital cameras hacks» label

Versatile motion dolly for time lapse photography

This beautiful build is a motion dolly for making time-lapse videos. It is at a point where you could consider it complete. After all, the segments featured in the video after the break look marvelous. But [Scottpotamas] has a few additions planned and it sounds like it won’t belong before he accomplishes his goals.

The build is a linear rail on which the camera rides. In the image above you can see the stepper motor which moves the camera mounted at the far end of the rig. This is controlled by an Arduino. Currently the camera is responsible for timing the capture of the images, but [Scottpotamas] says the firmware is nearly ready to hand this responsiblity over to the Arduino. The system is modular, with a simple setting for the length of the track. This way he can swap out for a longer or shorter rail which only takes about five minutes. He also included support for a panning mount for the camera. It allows the control box can be programmed to keep the subject centered in the frame as the camera slides along the track.

[via Reddit]


Filed under: digital cameras hacks
Reading punch cards with an Arduino and digital camera

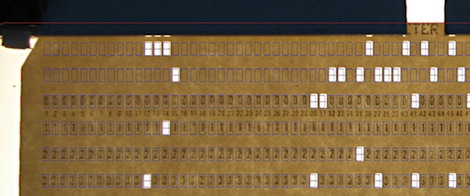
[digitaltrails] wanted the data on a few old IBM 80-column punch cards he had lying around, but didn’t have decades old computer hardware in his garage. He decided to build his own out of LEGO, an Arduino, a digital camera, and a bit of Python.

The hardware portion of [digitaltrails] build includes a crank-operated feed mechanism made entirely out of LEGO. For each turn of the crank, the feed mechanism sends one card down a chute where a photodetector wired into an Arduino tells a camera to take a picture. After that, a servo is activated, sending the card into the ‘already scanned’ bin.

On the software side of the build, [digitatrails] used the Python Imaging Library to scan one row of pixels where each column is expected to be. The software outputs the code and data contained on the 80-column card as well as a very cool ASCII art version of each card.

Considering you just can’t go down to Fry’s and buy an IBM 80-column punch card reader, we’re loving [digitatrails]‘ clever way of getting data off an otherwise unreadable storage medium. Check out the video of the card reader in action after the break.


Filed under: arduino hacks, classic hacks, digital cameras hacks

Laser light painting includes camera control

This laser light painting setup can even control the camera. But it probably will not work with your average point-and-shoot. The exposure time used is somewhere around 2 seconds long, a feature which is hard to find on anything but DSLR cameras.

The setup relies on a red laser diode to do the painting. When viewed in real time you only see a dot tracing out a cryptic pattern and occasionally switching on and off. But with a long exposure the intense light persists to achieve an image like the one seen above. Note the ghosting around the rig as it has moved while the shutter was open.

The Arduino controlled device consists of a base which pivots the diode horizontally, with a servo for aiming on the vertical axis. Since the sketch is divided up by letter, we wonder how hard it would be to adapt this for use with a point-and-shoot? Perhaps you could capture one letter at a time and layer the frames in post production?

It seems this is a lot easier to build than some of the LED plotters we’ve looked at. If you do make your own don’t forget to send a link our way.


Filed under: digital cameras hacks, laser hacks

Remote shutter module uses LCD screen for setup

Here’s a full-featured remote shutter project which [Pixel-K] just finished. It seems that he’s interested in taking time-lapse images of the cosmos. Since astrophotography happens outside at night, this presented some special design considerations. He wanted something that he could configure in the dark without zapping his night-vision too much. He also wanted it to be easily configured with a pair of gloves on.

The project enclosure is a 4x AA battery box. He removed the partitions between each cell, leaving plenty of room for the guts. Inside you’ll find a lithium battery and a micro-USB recharger board. It powers the Arduino mini pro which drives the 1.8″ LCD screen and actuates the optoisolator which is responsible for triggering the camera. On the right you can see the clear knob of the clickable rotary encoder. All of the user settings are chosen and selected using just this one knob.

He’s already tried it out on a 6-hour shoot and had no battery life problems or other issues.


Filed under: digital cameras hacks