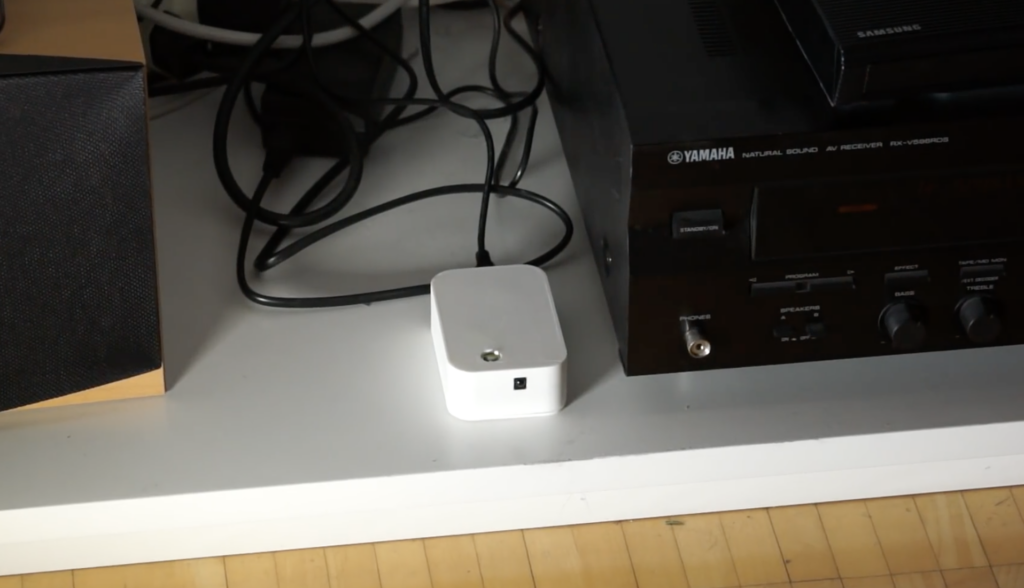
After purchasing a new television, maker Andreas Spiess’ remote no longer worked seamlessly with the controller his family had been using. While a universal remote could have solved the problem, in order to keep things simple to use, he instead came up with an infrared “babel fish” signal translator—named after the language translation animal Hitchhiker’s Guide to the Galaxy’s.
The device receives infrared signals from the original remote, then uses an Arduino Nano to pass the properly translated pulses on to his TV and receiver. A 3W IR diode transmits these new signals with the help of an N-channel MOSFET, giving it enough power to control each component, even without the proper line-of-sight orientation.
It’s a hack that could be useful in many situations, and Speiss goes over how it was made, along with design requirements in the video below.
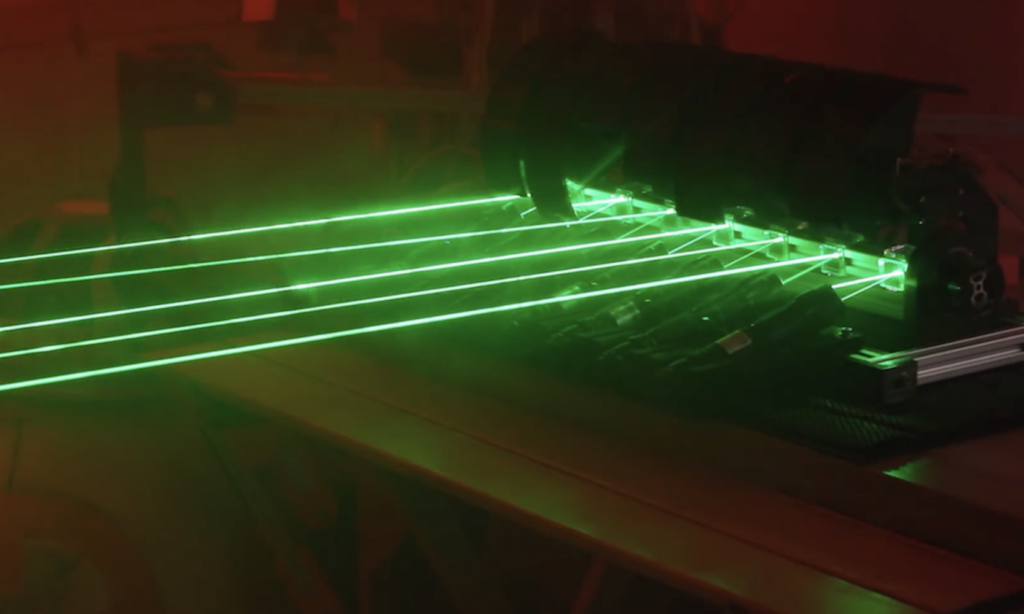
If you’d like to visualize your music, VU meters make an excellent tool. While they are generally built into audio equipment, maker James Bruton had the idea to construct his own using lasers. His setup features an MSGEQ7 module to separate sound frequencies, sending data on seven different ranges to an ArduinoMega board.
The Arduino then uses this information to selectively lower seven shutters via servos. When lowered, these shutters hide part of the lines formed by lasers and a spinning mirror assembly to indicate each sound frequency’s intensity.
The resulting machine not only effectively projects a visual of the music playing on a nearby wall, but also looks like some sort of mythical beast or contraption, progressively waving its appendages while emitting eerie green light!
Although this kind of project can be fun, be sure to wear the proper safety equipment when dealing with powerful lasers!
In our pursuit to democratize Internet of Things development, today we are excited to announce the Arduino IoT Cloud!
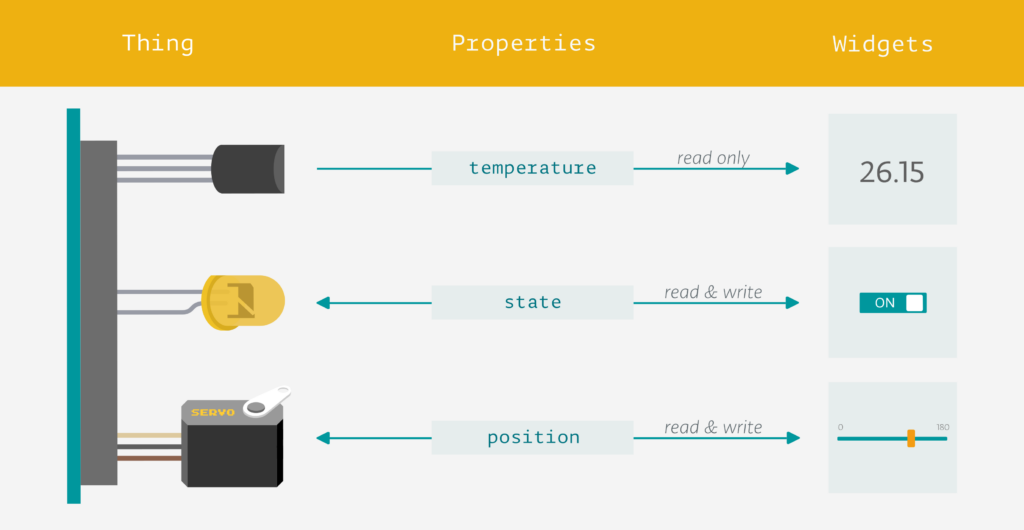
The Arduino IoT Cloud is an easy-to-use platform that makes it very simple for anyone to develop and manage their IoT applications, then deploy them to a large number of users. It allows users to create applications that solve real-life problems, and hopefully, improve their lives.
With the launch of the Arduino IoT Cloud, Arduino now provides its one million users a complete end-to-end approach to IoT that includes hardware, firmware, cloud services, and knowledge. After six months of private beta testing, I am very pleased to release the public beta of the Arduino IoT Cloud with automatic dashboard generation, Webhooks support, and full TLS secure transport.
— Luca Cipriani, Arduino CIO
Convenience and flexibility are key considerations for the Arduino IoT Cloud. Arduino boards usually require you to program them by entering code by way of a sketch — now the Arduino IoT Cloud can do this for you. It will quickly and automatically generate a sketch when setting up a new thing, thus enabling a developer to go from unboxing their board to a working device within five minutes. The Arduino IoT Cloud also provides other methods of interaction, including HTTP REST API, MQTT, Command-Line Tools, Javascript, and Websockets.
Going from an idea to a fully-functional IoT device has been a tedious process even for the most advanced engineers and developers… until now. Arduino now offers a complete platform with the MKR family providing a streamlined way to create local IoT nodes and edge devices using a range of connectivity options and compatibility with third-party hardware, gateway, and cloud systems. Whilst the Arduino IoT Cloud lets users manage, configure and connect not only Arduino hardware but the vast majority of Linux-based devices — truly democratizing IoT development. — Massimo Banzi, Arduino CTO and Co-Founder
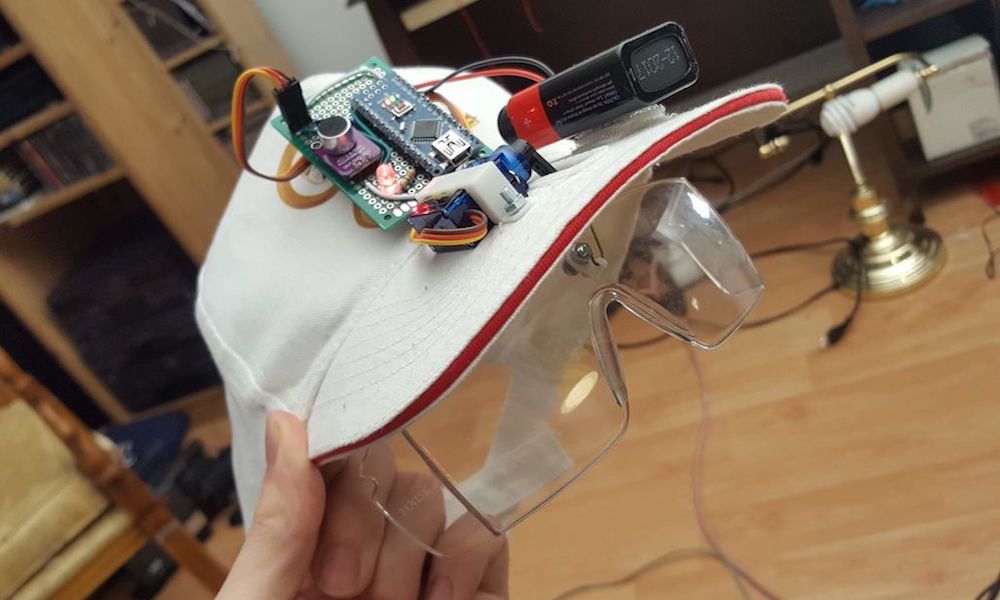
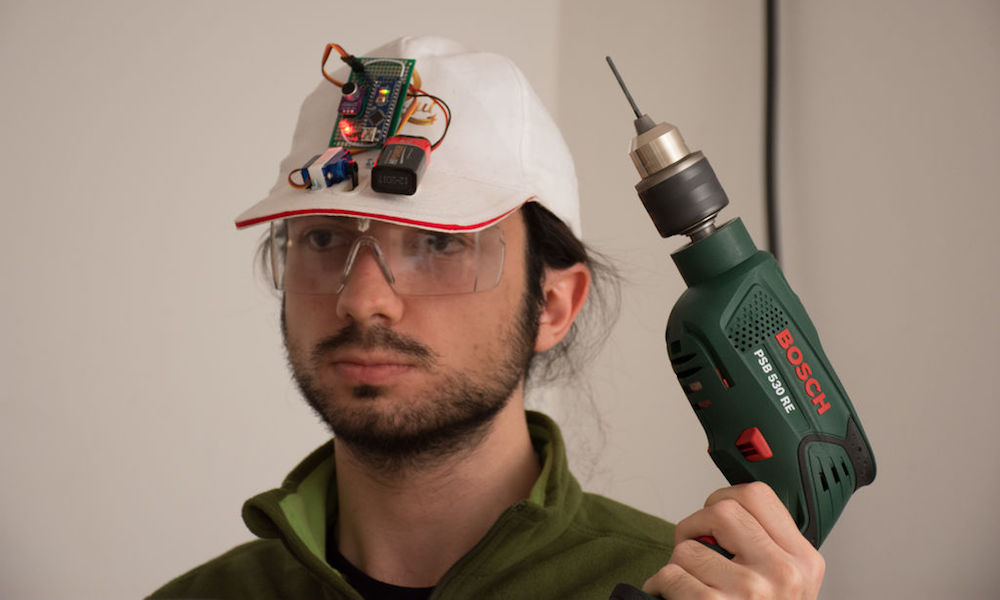
Görkem Bozkurt has a bit of a problem. When he gets going with a build, sometimes safety glasses are forgotten in the excitement of making something new. While understandable, this doesn’t make things any less dangerous, so he came up with a novel idea to put on his safety specs on automatically.
His wearable creation attaches an Arduino Nano and a MAX4466 electret mic amplifier to the top of a previously normal hat, along with a small servo connected to a pair of lens below the bill. If a loud sound is heard, the goggles are lowered by the servo in response. They’re then retracted when the noise, and hopefully the danger, is gone.
While the system is still very much a work-in-progress, it’s an entertaining concept that Bozkurt hopes to develop further.
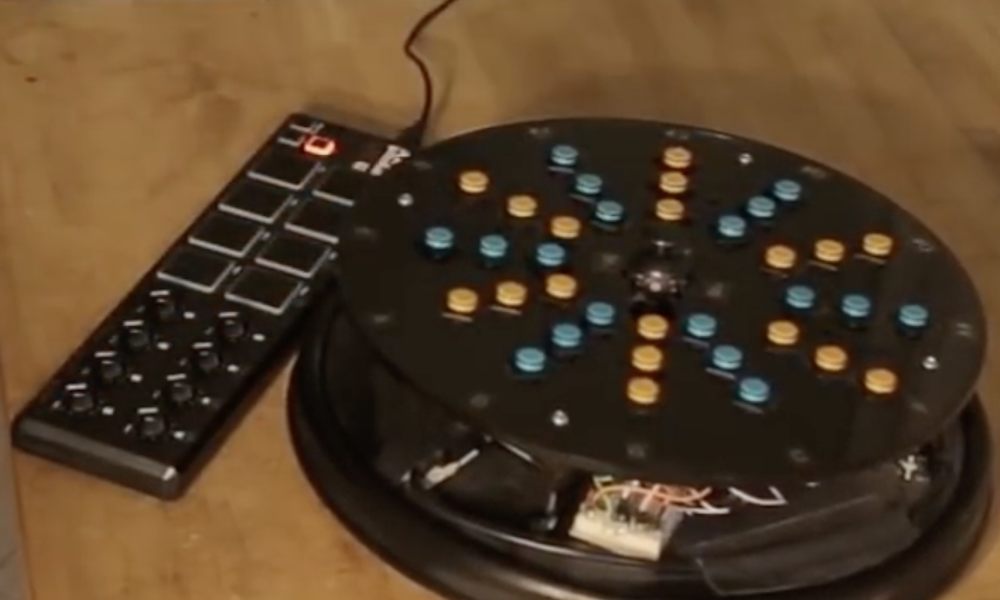
According to musician/maker Ruben Dax, “Few things make him happier than being able to create things that create things.” As seen in the video below, what he’s created is a very strange cylindrical instrument with an array of buttons and what appears to be an auxiliary loop controller.
What he creates with it is music that starts off as simple “plink-plonk” sounds, but builds up into something of an orchestral arrangement.
The DIY device utilizes an Arduino Mega for control, with a bunch of pushbuttons and a dual-axis joystick for inputs. Button info is then sent to his computer over Bluetooth, which takes care of actual MIDI generation.
As cool as this is, a new gadget is in the works, which uses a Leonardo and other hardware for plug-and-play functionality. Whether this will interfere with the instrument’s unique rotating action remains to be seen!
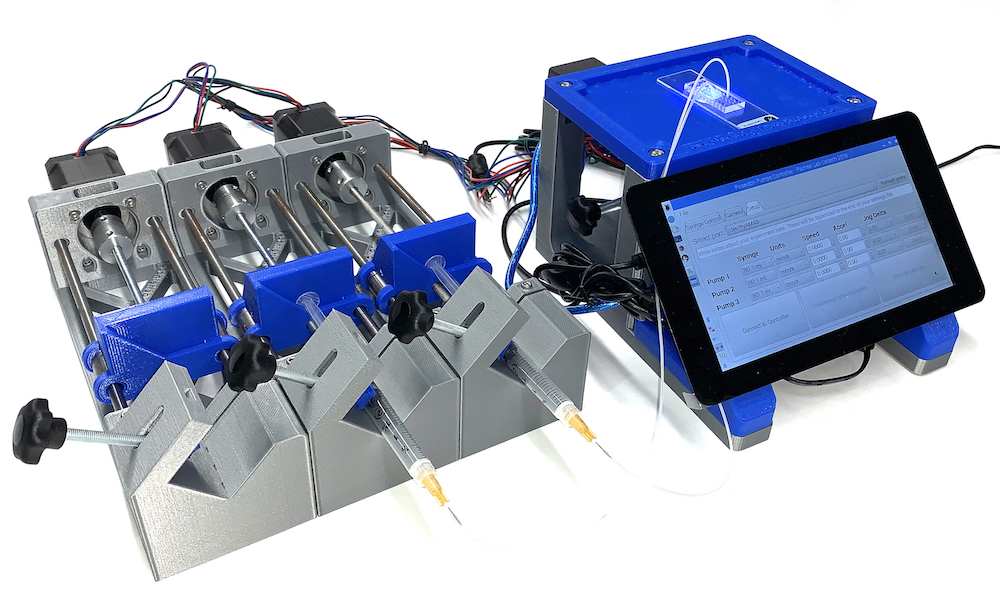
Microfluidics deals with the manipulation of tiny amounts of liquid, and as such, specialized equipment must be used for any sort of measurable experimentation. While you could purchase an expensive commercial solution, the Poseidon system—developed by students at the California Institute of Technology—presents an excellent open source option which can be built for a fraction of the cost.
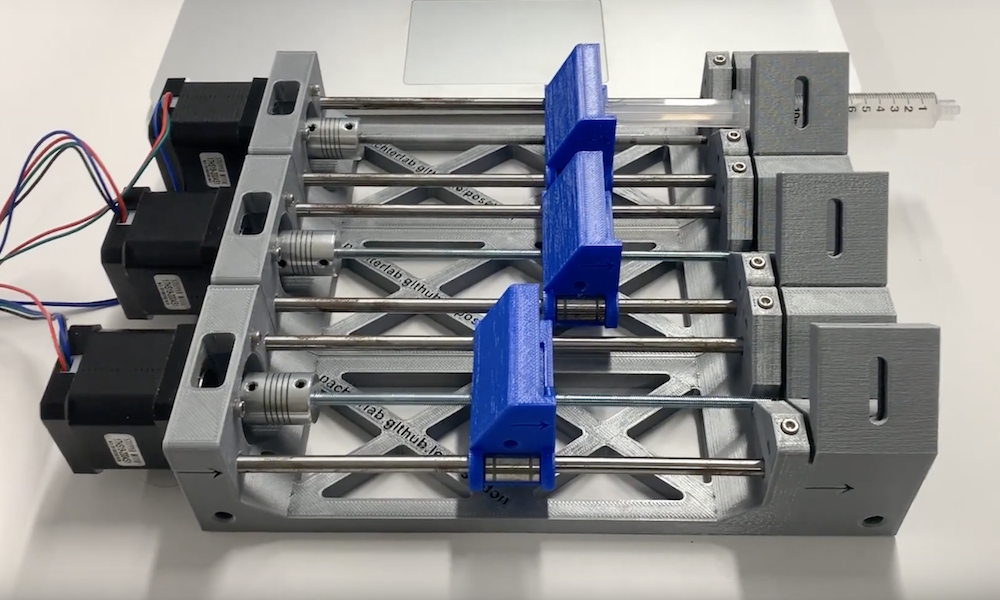
Fluid distribution is managed by a computer GUI or via a terminal window. Steppers handle each of the system’s three “axes,” and push fluid out of syringes under control of an ArduinoUno and CNC shield. A microscope is also available for a full experimental setup.
The Poseidon syringe pump and microscope system is an open source alternative to commercial systems. It costs less than $400 and can be assembled in an hour. It uses 3D-printed parts and common components that can be easily purchased either from Amazon or other retailers. The microscope and pumps can be used together in microfluidics experiments, or independently for other applications. The pumps and microscope can be run from a Windows, Mac, Linux, or Raspberry Pi computer with an easy to use GUI.
The Poseidon system was designed to be customizable. It uses the Raspberry Pi and Arduino electronics boards, which are supported by a strong ecosystem of open source hardware and software, facilitating the implementation of new functionalities.
The pump driver uses an Arduino with a CNC shield to run up to three pumps. Each pump has a stepper motor that drives lead screw which in turn moves a sled that is mounted on linear bearings. The displacement of the sled moves the syringe forward or backward allowing the user to dispel or intake liquid.
The controller station uses a Raspberry Pi with a touchscreen to connect to the Arduino and microscope via USB. Because the microscope and Arduino use USB connections, they can alternatively be connected to a computer instead of a Raspberry Pi.
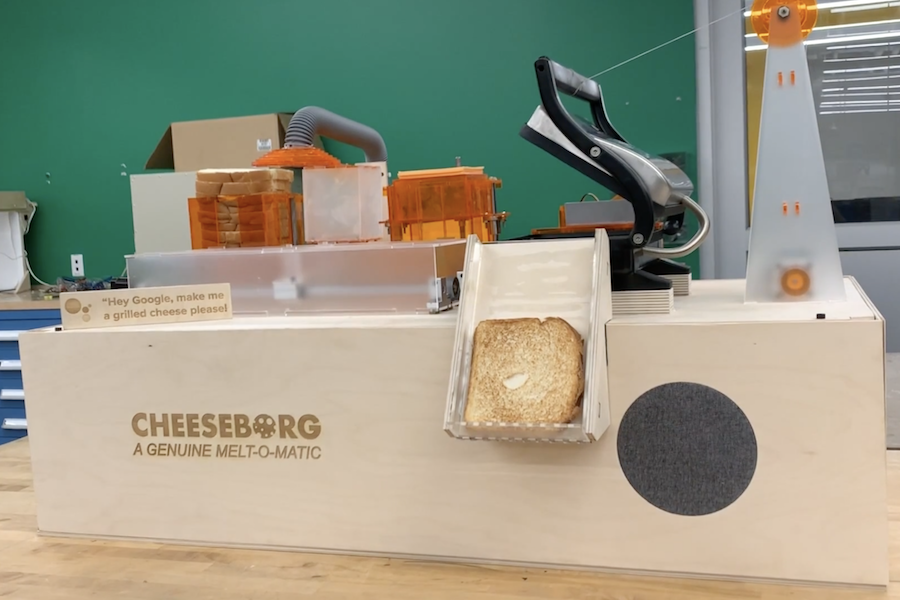
Do you like grilled cheese? Would you rather not make it yourself? If so, then the Cheeseborg by Taylor Tabb, Mitchell Riek, and Evan Hill could be the perfect device for you!
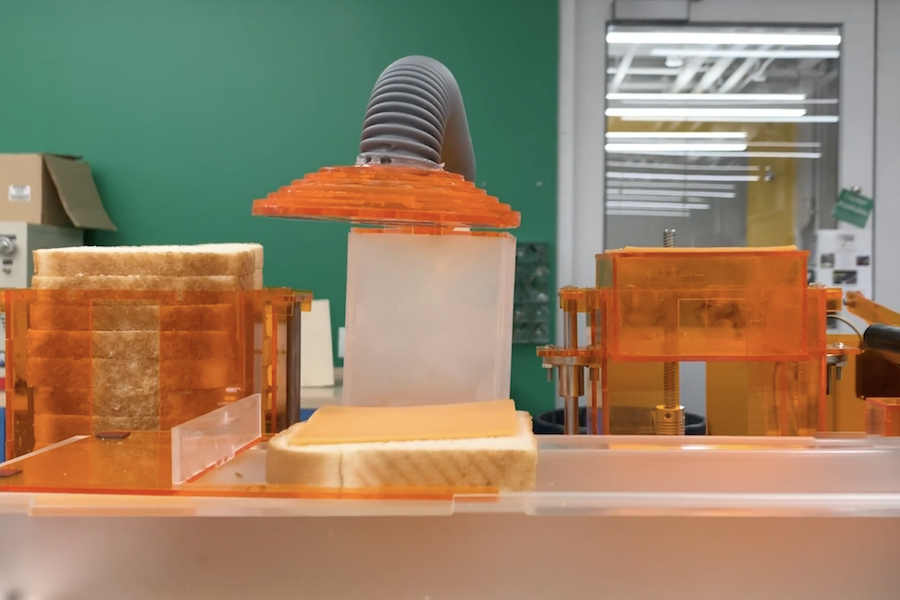
This assembly line-like robot first stacks bread-cheese-bread using a vacuum gripper, and passes the unheated sandwich onto the grill via a pusher mechanism. Butter spray is first added to the bottom of the grill, then the top of the sandwich when present in order to coat both sides. Upon heating, the finished sandwich is pushed into a “food slot” for consumption.
Electronics are controlled using an Arduino Mega, while Google assistant running on a Raspberry Pi allows for voice activation. So the next time you’re hungry, all you have to do is ask, “Hey Google, make me a grilled cheese please!”
Our goal was to make an easy snack even easier. The design combines 7 individual subsystems enabling the assembly, cooking, and serving of a perfect, repeatable, tasty grilled cheese.
A big learning was how challenging it is to manipulate bread and cheese repeatedly. After several iterations, we converged on a vacuum lift mechanism, inspired by industrial robotic manipulation of small electronics. Due to the porosity of bread and the gloss of cheese, it was very challenging to find a mechanism working for both, but vacuum certainly seemed to do the trick!
For the actuation of of the electromechanical subsystems, we use stepper motors and servos combined with linkages, lead screws, linear bearings, a winch, and other mechanical components. For buttering (not pictures) we have a delightful spray butter can attached to an acrylic stand beside the grill.
Beyond the mechanisms, which are controlled by an Arduino Mega, the system is enabled with Google Assistant SDK running on an Raspberry Pi 3B, so the whole thing can be activated just by saying “Hey Google, make me a grilled cheese please!” From there, the machine stacks the bread, cheese, bread, then slides over the platform toward the grill as the buttering station sprays the bottom of the grill. Once the sandwich is placed on the grill, the butter sprays again (to coat the top of the sandwich). Then the grill closes, and cooks for the precise amount of the time for the perfect gooey grilled cheese! Then the grill opens and the sandwich is kicked to the serving slot for a hungry friend to enjoy.
Whether one of your senses is weak or non-existent, or you would simply like a way to augment your perception and control options, the Cthulhu Shield can be applied in either situation.
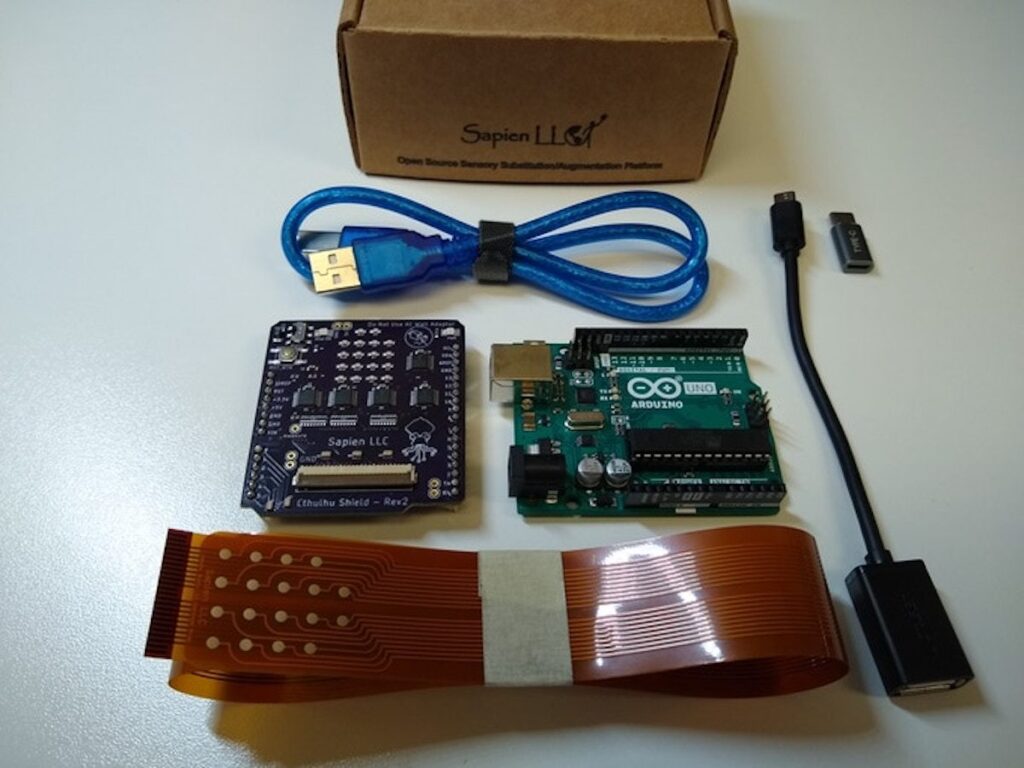
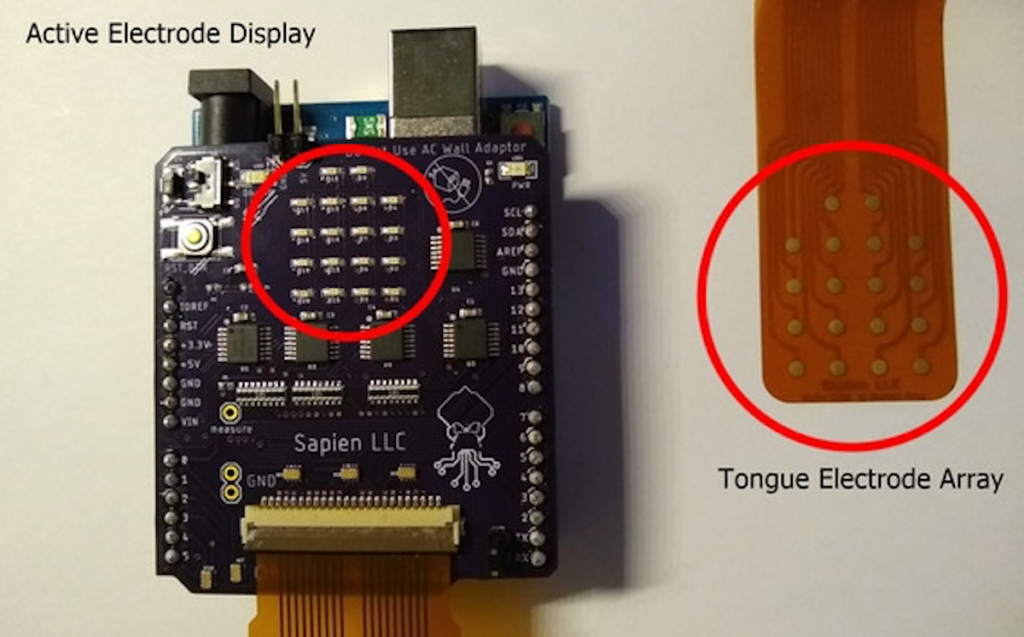
The device takes the form of an Arduino Uno or Mega shield, with a strange flexible electrode setup that is placed directly on the user’s tongue.
When these electrodes are fired, they activate nerve fibers on the tongue, producing a feeling like that of carbonated bubbles popping. This can then be used to convey information to the user, whether this is visual, sound, or even Internet updates or other non-traditional stimuli. Importantly, it can also be utilized as an interface for tongue computer control.
The Cthulhu Shield lets anyone experiment and make devices that can expand your sensory experience!
We’ve made android apps and example programs that will let you use the Cthulhu Shield and your smartphone to ‘see’ and ‘hear’ with your tongue without needing to write a single line of code!
For those of you interested in making your own projects, we’ve written an easy to use Arduino library and provided example code to get you started on projects including tongue-heat-vision, tongue-based GPS directions, and soon, tongue-ultrasonic hearing. But don’t limit yourselves to the examples we’ve provided, the only limit to what you can make is your imagination!
Finally, we designed the Cthulhu to be used as a tongue based computer interface (because if you already have something in your mouth, why not use it to control your computer)? Write your own code to hotkey video game actions, send text messages, or control a wheelchair or mobility device with your tongue.
If you’d like to get your hands on one, the Cthulhu Shield is now being funded on Kickstarter, while code and board schematic are available on GitHub.
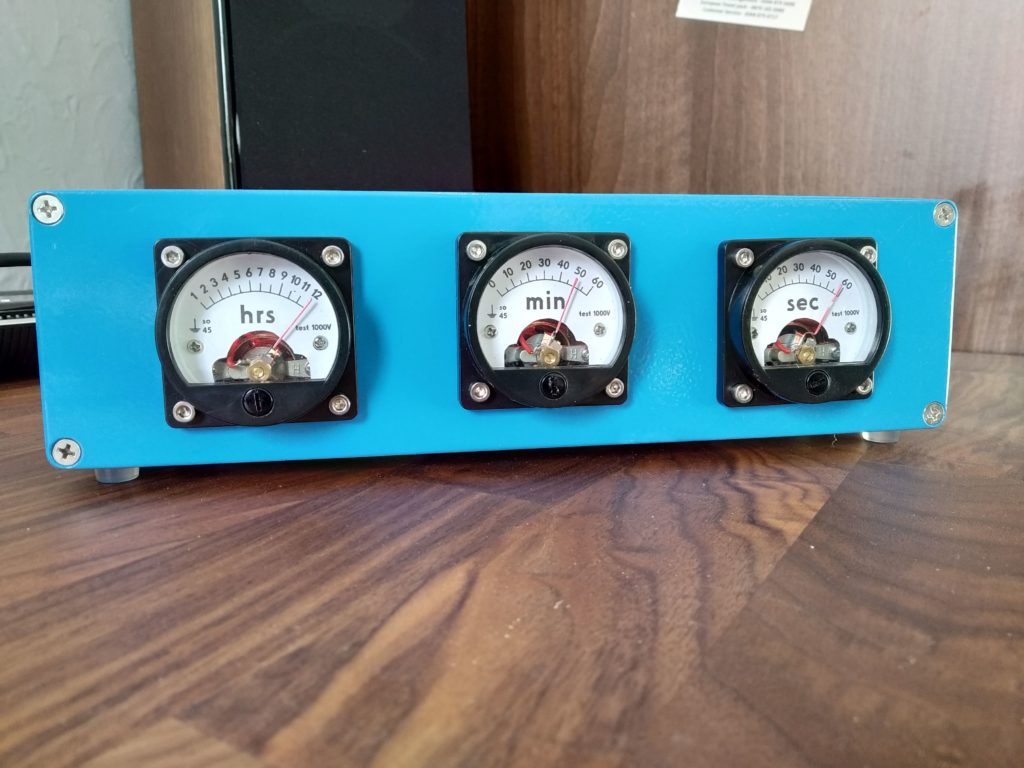
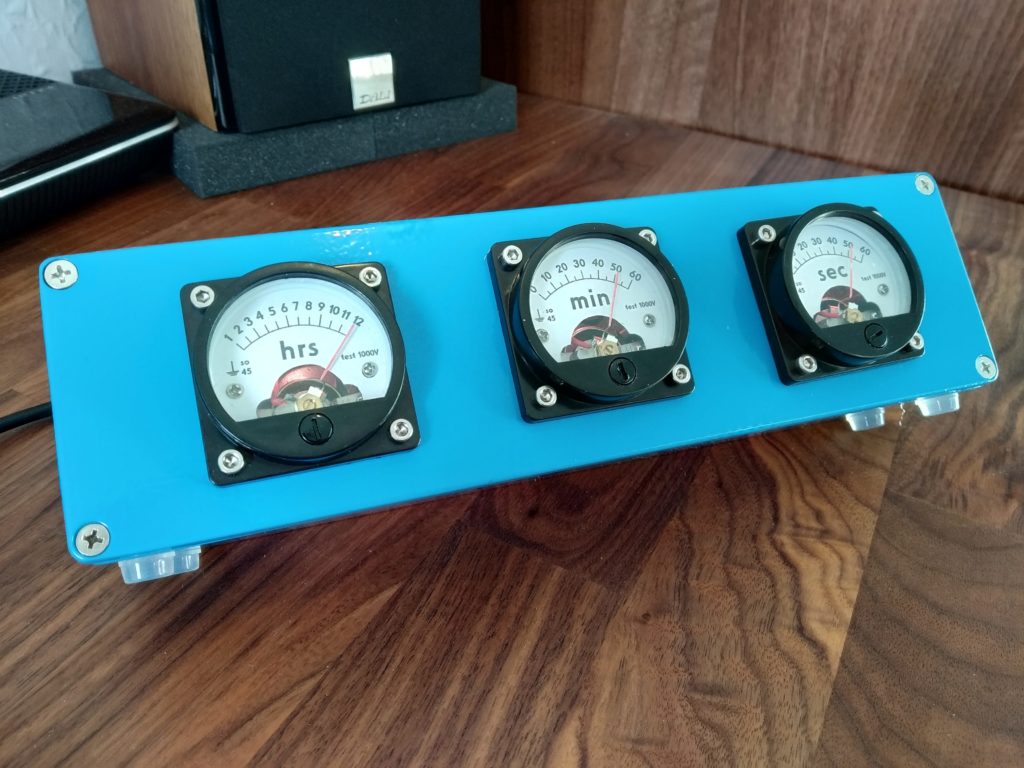
Apparently not satisfied with available timekeeping devices, ElegantAlchemist crafted a unique clock using an Arduino Nano, an RTC module, and three formerly 1000VAC analog meters.
The first order of business for the build was converting the meters into something that could traverse its range with only 5V, accomplished by replacing the stock resistor, diode, and capacitor with a 2.2kohm resistor.
Now controllable via Arduino, new faceplate labels were designed in CorelDraw for a very professional look. Everything was encased in an aluminum stomp box enclosure—actually several as multiple clocks were constructed—and RGB LEDs were also added behind each display.
Waking up before 9am can be a challenge for Nikodem Bartnik, but he also hates to waste time sleeping when he could instead make something.
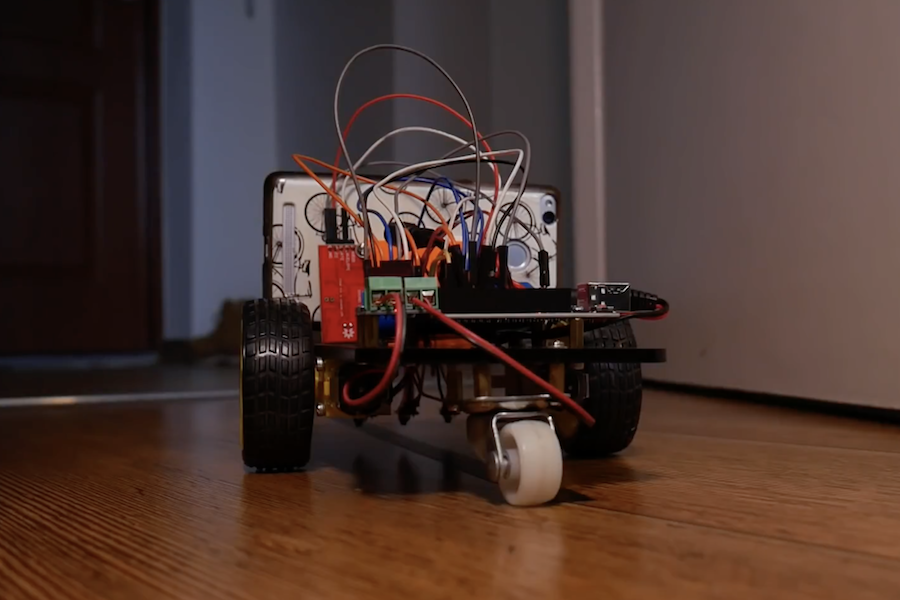
In order to help him with this “joyous” task, he assembled a line-following robot that scoots his phone out of the room in the morning, forcing him to get out of bed and chase it down.
The device utilizes a pair of gearmotors in a standard tank-like configuration for movement, and sensors to follow a black line on the floor. A sound sensor allows its Arduino Uno controller to pick up on alarm sounds coming from his phone, which is mounted on the robot with a 3D-printed holder. When activated, it follows the path out of his room, waiting for Bartnik’s bleary eyed—but awake—arrival.