Posts with «projects» label

Mean Machines

I am proud to announce the final show for the Physical Prototyping course at the BA in Interaction Design at the School of Arts and Communication at Malmo University, Sweden. This year our students got to work under the brief “Mean Machines” and a whole series of seriously nasty objects were produced as a result. There is a one-in-a-lifetime opportunity to see these objects in action by coming to K3 on Friday March 23rd between 11.00 and 18.00. There will be a guided tour at 17.00, don’t miss it!

As an example, here a picture of the All-In-A-Row keyboard, trying to slow down the typing experience to the maximum:
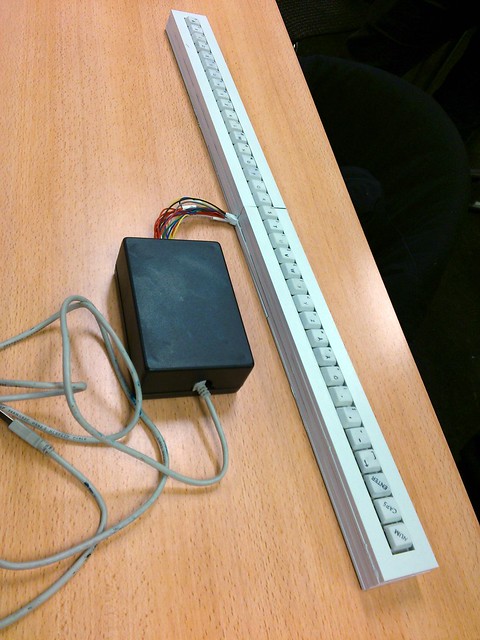
 

(c) 2012 by its authors, All In A Row Keyboard

I love the way Tony Olsson, the course’s instructor, introduces the final show:

As always its not officially spring until the bachelor students at the Interaction Design program in Malmö present their final exhibition for the Physical Prototyping 1 class. At this one day only event the student will introduce you to some rude, anti social, annoying and politically incorrect technology made with a whole lot of love.
So head over to Malmö University’s School of Arts and Communication (K3) on the 23rd of March.

The exhibition will open at 11.00 and at 17.00 there will be a guided tour where you will have the chance to meet up with the students behind these mean creations. The exhibition closes officially at 18.00 and then the unofficial party will start and move from K3 to continue elsewhere through the night.

You can find K3 on this map.

As a side note, Tony is also known for being behind the Open Softwear book.


Arduino Blog 16 Mar 14:41

Comunikino, an Arduino based communication system


“Social things” have replaced traditional ways of communication like sms and mails. One day i needed a new, fast, mobile and snappy way of communication. So i made Comunikino.

It consists of two main parts, a script in python that runs on the PC and a box that goes on desktop connected through an USB cable used for data and power (no external power needed if you use a 500mA capable usb port!). You need to create a mailbox  for Comunikino with pop access, i raccomend to use gmail as many providers don’t offer pop access for free mailboxes.

Using Comunikino is simple, just send a mail to its mailbox and the subject will be printed to its LCD (max 16 chars). Who reads the message can use one of three Comunikino’s buttons to send a mail back to the address setted in python script to say yes, no or readed (this button can also to be used to say: “hey! I’m thinking of you”). Simple, isn’t it?

Schematics

Built instructions

You will need:

Amount Part Type Properties
1 Arduino I’ve used a 2009
1 Basic Servo
1 LCD screen I’ve used a 16×2 LCD based on SPLC780D chip which is totally compatible with Arduino LCD library that is made for HD44780 chip. Its voltage must be 5V!
3 Push-button Momentary normally open push button
1 Rotary Potentiometer Rotary Shaft Potentiometer; see datasheet for maximum resistance
1 Metal or plastic box I used a 13,5×7,5×5,5 cm metal box but you can use anything similar.

First of all the box. You should cut it as images below.

LCD mounting:

Now fix arduino and buttons like this:

Mounting servo:

Putting things together (you can note a recycled hard disk flat cable used to connect LCD, ricycling is good!):

The flag can be made by wood, mdf, or cardboard:

Setting up software

Now download Comunikino's software (122) (Linux and windows version inside) and configure python script with the data of the mailbox you have created for Comunikino (gmail is highly recommended). You can do this just editing the script with a text editor. At the beginning you will find variables that you have to change, read comments for explanation! You need also to download and burn into Arduino the sketch into the zip (no modification needed here).  Remember, before launching python script you have to connect Comunikino to PC or it will quit with an error. I advice you to leave Comunikino linked to the computer and make the script run on start up. Comunikino will inform you that it is ready to communicate with a mail every time computer is turned on.

Comunikino is ready!

Perhaps you may find interesting:

Eraclitux 24 Nov 23:43
arduino  idea  project  projects  python  sketch  

Comunikino, an Arduino based communication system


“Social things” have replaced traditional ways of communication like sms and mails. One day i needed a new, fast, mobile and snappy way of communication. So i made Comunikino.

http://www.youtube.com/watch?v=Y9fqseT9PI0

It consists of two main parts, a script in python that runs on the PC and a box that goes on desktop connected through an USB cable used for data and power (no external power needed if you use a 500mA capable usb port!). You need to create a mailbox  for Comunikino with pop access, i raccomend to use gmail as many providers don’t offer pop access for free mailboxes.

Using Comunikino is simple, just send a mail to its mailbox and the subject will be printed to its LCD (max 16 chars). Who reads the message can use one of three Comunikino’s buttons to send a mail back to the address setted in python script to say yes, no or readed (this button can also to be used to say: “hey! I’m thinking of you”). Simple, isn’t it?

Schematics

Built instructions

You will need:

Amount Part Type Properties
1 Arduino I’ve used a 2009
1 Basic Servo
1 LCD screen I’ve used a 16×2 LCD based on SPLC780D chip which is totally compatible with Arduino LCD library that is made for HD44780 chip. Its voltage must be 5V!
3 Push-button Momentary normally open push button
1 Rotary Potentiometer Rotary Shaft Potentiometer; see datasheet for maximum resistance
1 Metal or plastic box I used a 13,5×7,5×5,5 cm metal box but you can use anything similar.

First of all the box. You should cut it as images below.

LCD mounting:

Now fix arduino and buttons like this:

Mounting servo:

Putting things together (you can note a recycled hard disk flat cable used to connect LCD, ricycling is good!):

The flag can be made by wood, mdf, or cardboard:

Setting up software

Now download Comunikino's software (430) (Linux and windows version inside) and configure python script with the data of the mailbox you have created for Comunikino (gmail is highly recommended). You can do this just editing the script with a text editor. At the beginning you will find variables that you have to change, read comments for explanation! You need also to download and burn into Arduino the sketch into the zip (no modification needed here).  Remember, before launching python script you have to connect Comunikino to PC or it will quit with an error. I advice you to leave Comunikino linked to the computer and make the script run on start up. Comunikino will inform you that it is ready to communicate with a mail every time computer is turned on.

Comunikino is ready!

I want to upgrade this device with advanced features. I want to create a better software with GUI and a nice looking box. Help me!

Eraclitux 24 Nov 23:43
arduino  idea  project  projects  python  sketch