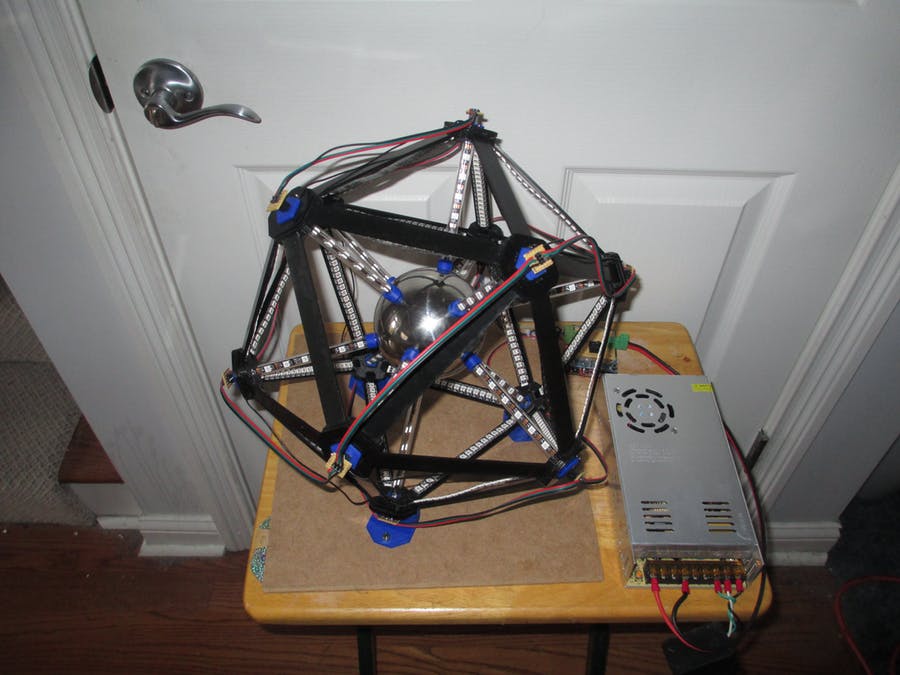
Convex regular icosahedrons contain 30 edges and 12 vertices. This makes for an interesting math problem, but as demonstrated by this project out of the LVL1 hackerspace in Louisville, Kentucky, its geometry also presents an excellent target for a massive number of LEDs.
Their build, in fact, consists of 708 programmable LEDs arranged facing inward on the edges and doubled over on each vertex support. These supports lead to a central stainless steel ball, reflecting a massive amount of light to the surrounding area.
Everything is controlled by an Arduino Mega, along with an Uno-style prototyping shield, and power is provided by a massive 5V 60A supply unit.
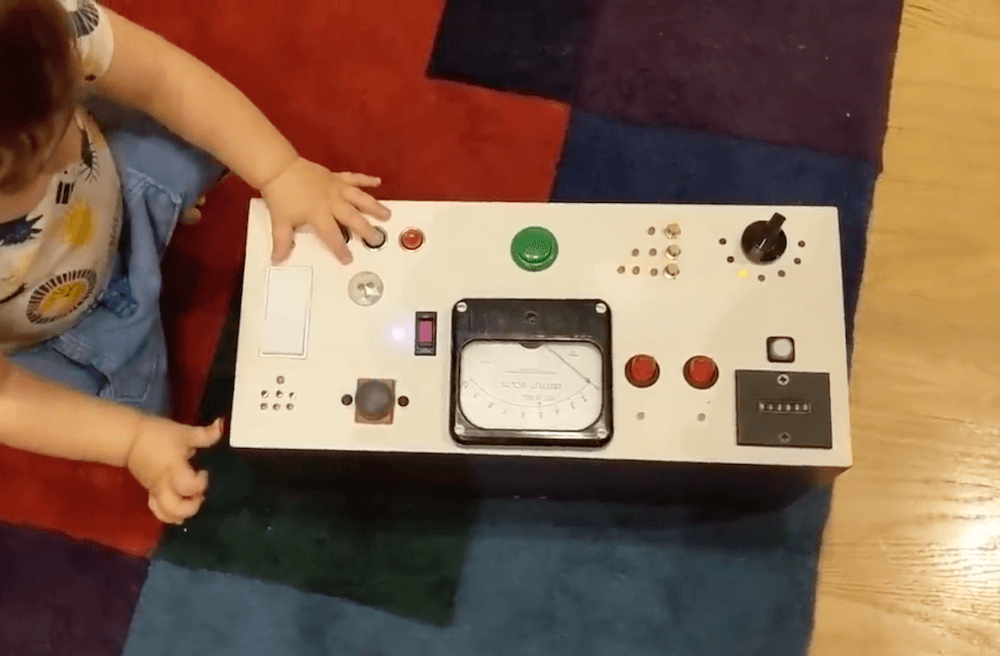
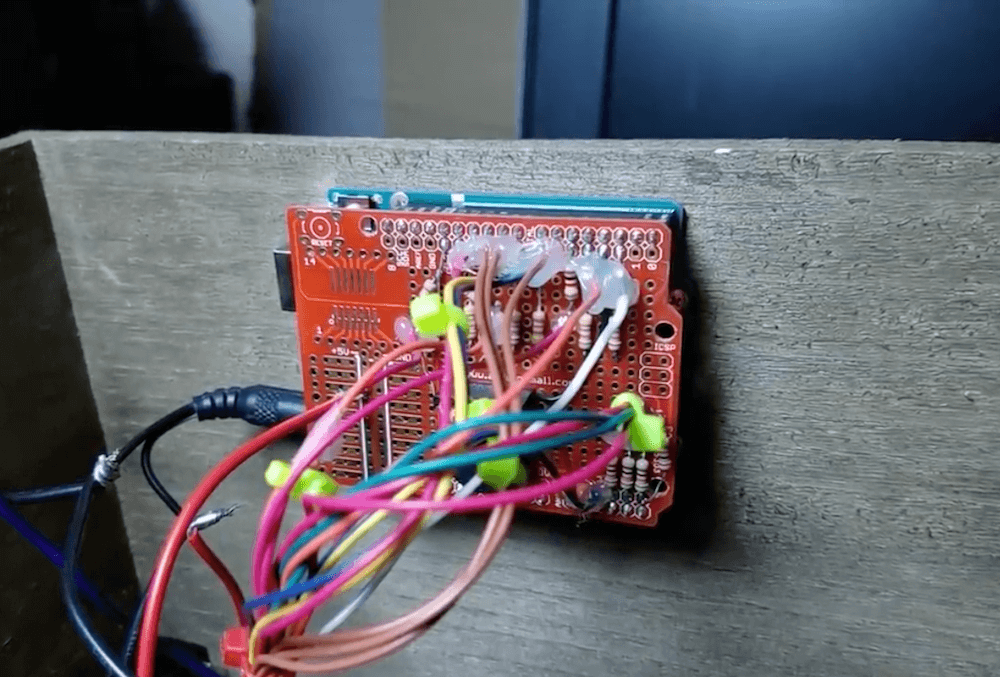
Like most one-year-olds, CodePanda’s son really likes pushing buttons. Rather than purchasing a so-called busy board that might teach him skills like unlocking doors or plugging in electrical outlets, he decided to build his own custom device controlled by an Arduino Uno.
The resulting toy features a wide variety of lights, buttons and switches, and makes sounds to keep the little guy entertained. In the center, a big green button activates an analog voltmeter, which not only looks cool, but actually indicates the battery level of the unit.
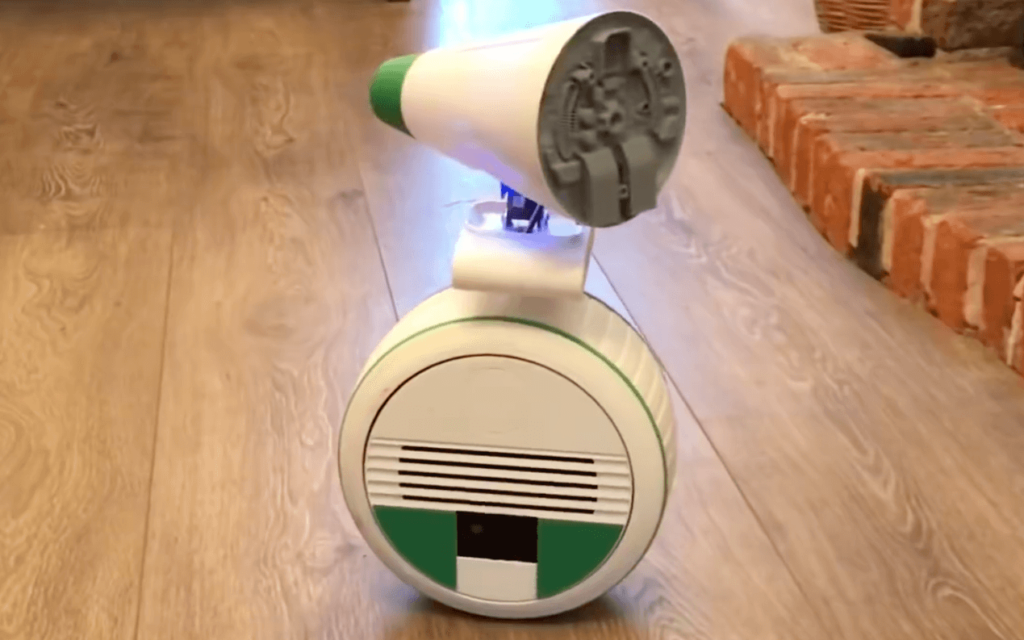
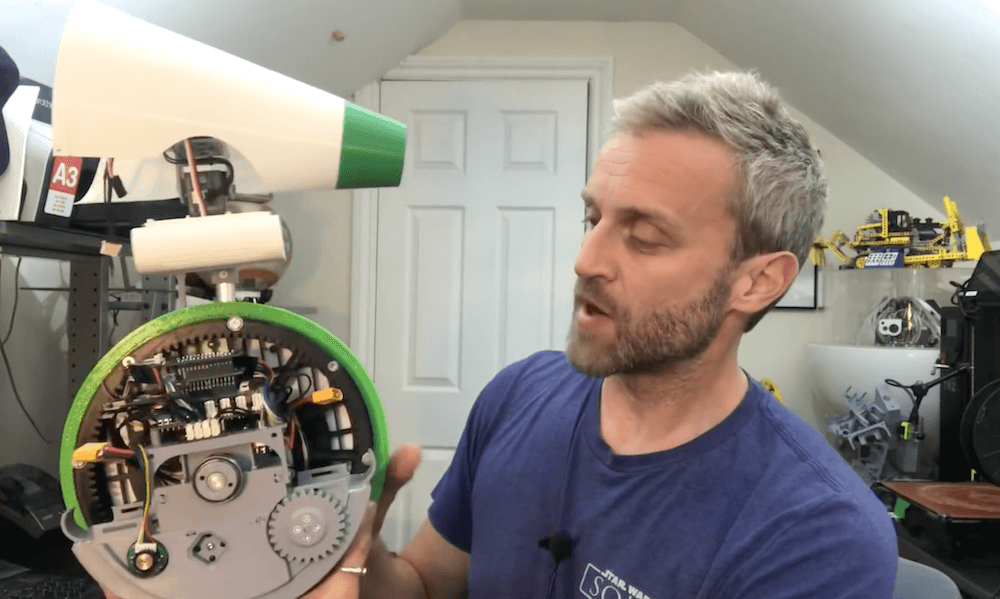
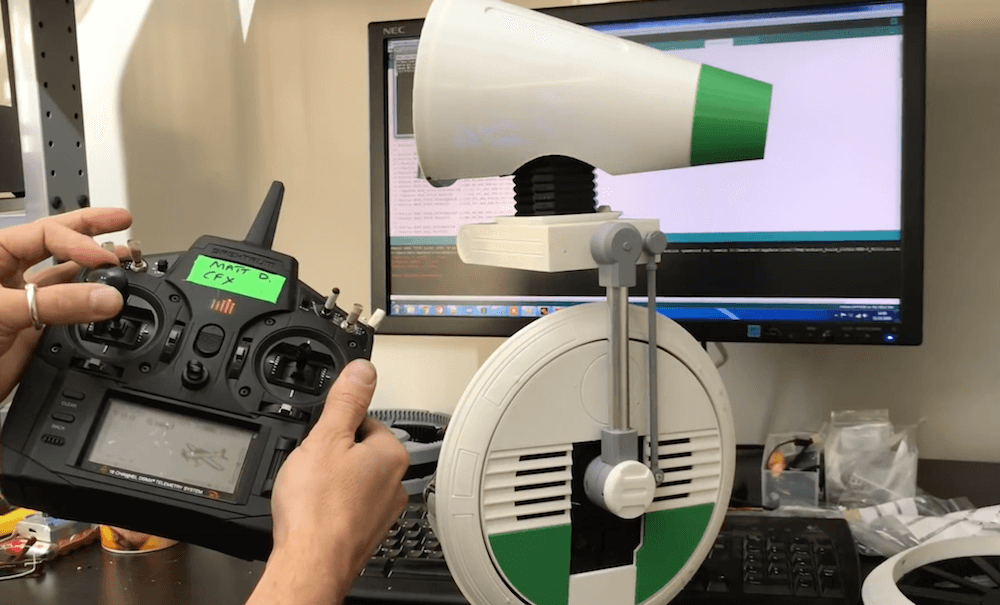
While it’s yet to make its premiere, Matt Denton has already built the D-O droid from Star Wars: The Rise of Skywalker using a MKR WiFi 1010 for control, along with a MKR IMU Shield and a MKR Motor Carrier.
The droid scoots around on what appears to be one large wheel, which conceals the Arduino boards as well as other electronics, batteries, and mechanical components. Denton’s wheel design is a bit more complicated mechanically than it first appears, as its split into a center section, with thin drive wheels on the side that enable differential steering.
On top, a cone-shaped head provides sounds and movement, giving the little RC D-O a ton of personality. The droid isn’t quite finished as of the video below, but given how well it works there, the end product should be amazing!
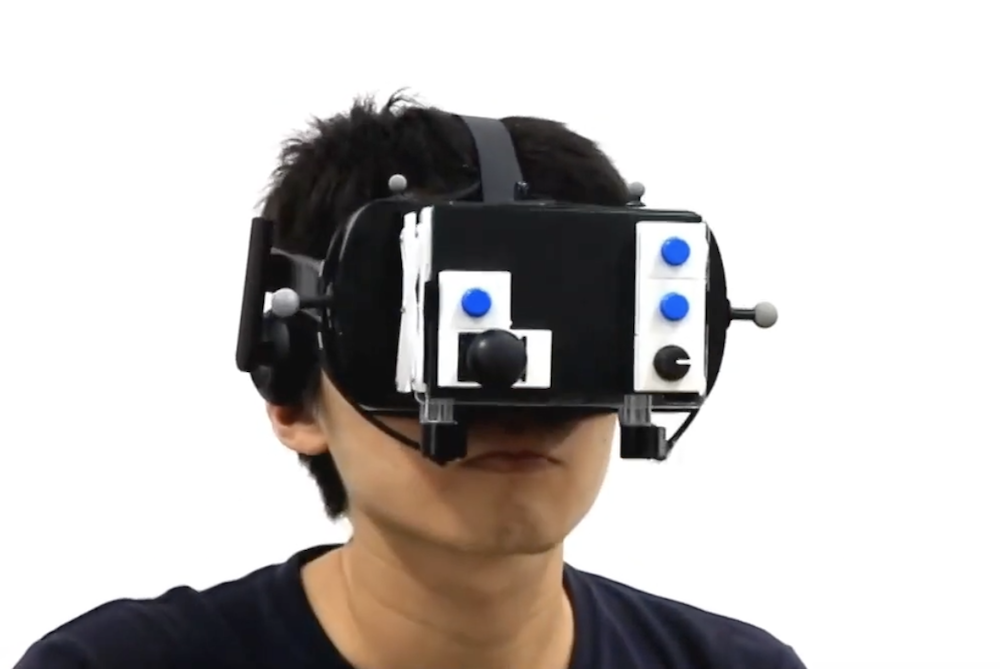
When using a virtual reality (VR) system, you may need to flip a switch, touch a button, etc., which can be represented by a carefully coordinated series of pixels in front of your eyes. As a physical alternative — or augmentation — researchers at the National Chiao Tung University in Hsinchu, Taiwan have developed a system of interchangeable physical control panels, called FaceWidgets, that reside on the backside of head-mounted unit itself.
When a wearer places their palm near their face (and headset), this is sensed and an on-screen canvas appears depending on the application. They can then manipulate these widgets both physically and in the virtual world to control the experience.
Physical interactions are detected with the help of an Arduino Mega and the facial control pad even extends and retracts for optimal usage via a motor shield and stepper motors.
We present FaceWidgets, a device integrated with the backside of a head-mounted display (HMD) that enables tangible interactions using physical controls. To allow for near range-to-eye interactions, our first study suggested displaying the virtual widgets at 20 cm from the eye positions, which is 9 cm from the HMD backside. We propose two novel interactions, widget canvas and palm-facing gesture, that can help users avoid double vision and allow them to access the interface as needed. Our second study showed that displaying a hand reference improved performance of face widgets interactions. We developed two applications of FaceWidgets, a fixed-layout 360 video player and a contextual input for smart home control. Finally, we compared four hand visualizations against the two applications in an exploratory study. Participants considered the transparent hand as the most suitable and responded positively to our system.
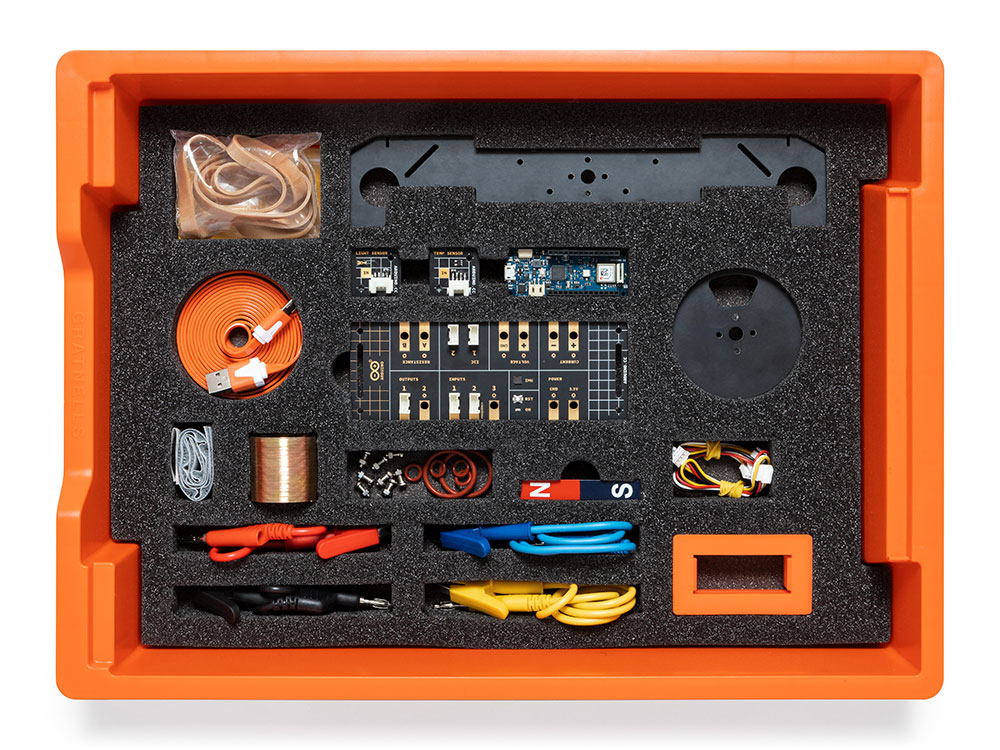
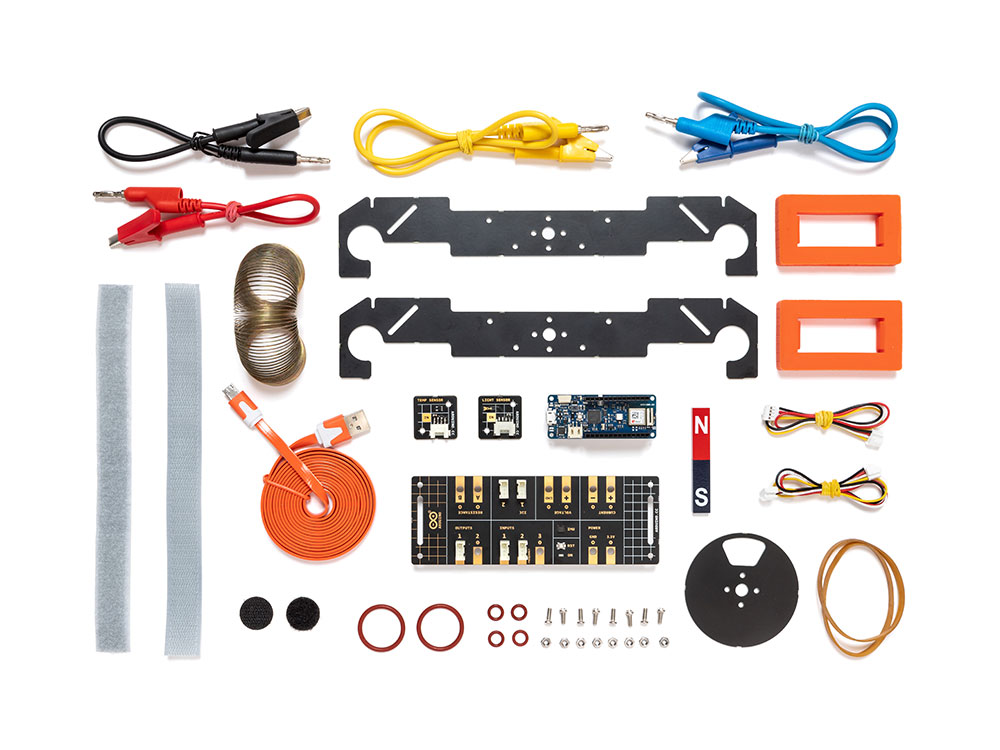
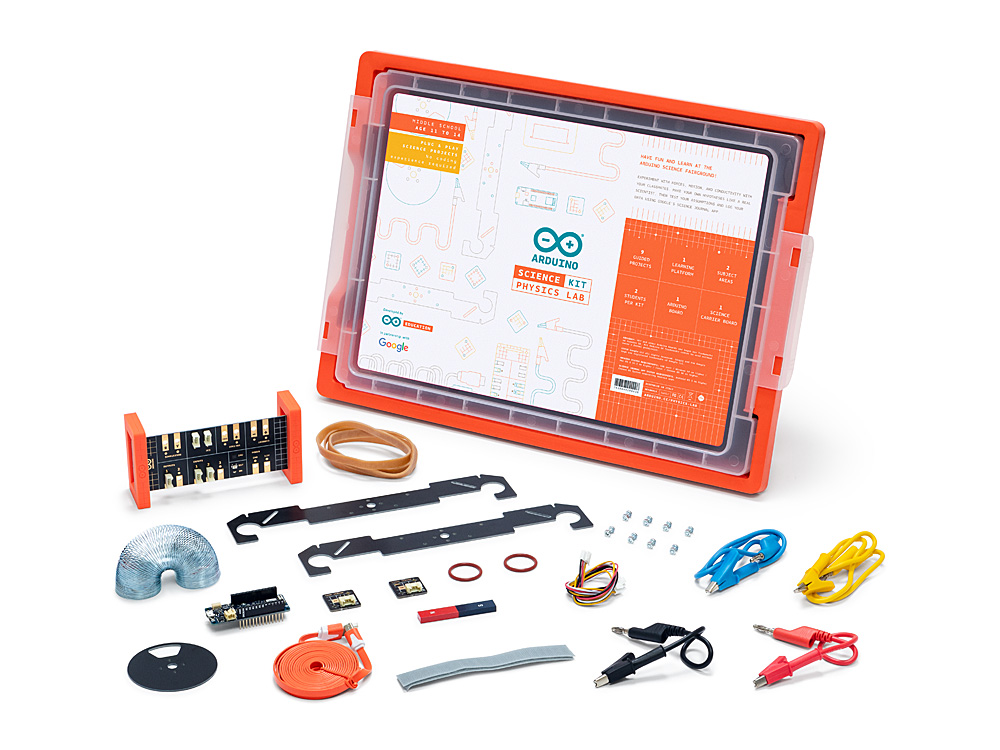
Launched back in January 2019 in partnership with Google, the Arduino Science Kit Physics Lab is designed for middle school students (aged 11 to 14) to explore science. It is now available with Italian and Spanish course content, making it more accessible than ever.
“You discovered it yourself, so it was really fun doing that” UK Student from ARK Burlington Danes Academy.
The Arduino Science Kit Physics Lab, requires no prior electronics knowledge. It features online course content and equipment to conduct and test the fundamental laws of traditional physics through nine exciting science projects inspired by popular fairground rides like the Gravitron and Pirate Ship. It is perfect for developing transferable skills such as critical thinking and problem solving through an inquiry-based learning approach. Students will experiment with forces, motion, magnetism, and conductivity – making their own hypothesis like real scientists, checking their assumptions, and logging data in real-time using Google’s Science Journal for Android.
“Makes it more accessible for students to do practical physics” – Graeme Wood, UK – Physics teacher, ARK Burlington Danes Academy.
Incredibly easy to get started, students simply connect their Android mobile device to the board, build their project, and then use the onboard sensor and plug-and-play modules to simulate the rides’ dynamics. Data is transmitted from the experiment to the student’s mobile device via Bluetooth, where they can analyse and record their results in Google’s Science Journal App or worksheets.
The Arduino Education Science Kit Physics Lab isn’t confined to the classroom. In fact, students can use the kit outdoors to turn the playground into their very own fairground by applying the concepts they’ve learned to design and test their own rides. Based upon the Arduino MKR WiFi 1010, it is a fully portable lab including a range of sensors to measure light, temperature, motion, and magnetic fields, and much more… that come in a protective Gratnells classroom tray.
Arduino Education aims to assist educators by providing our programs, online course content and worksheets in as many languages as possible: not only relevant European languages, but for example, Arabic and Japanese are also planned for future release. Next in line for the Science Kit Physics Lab will be German, Hungarian and Portuguese so watch this space.
Ya están disponibles las ediciones de Science kit en Italiano y en Español
Lanzado en Enero de 2019 en colaboración con Google, Arduino Science Kit Physics Lab está diseñado para estudiantes de primaria ( de 11 a 14 años ) para aprender sobre ciencia. Ahora el contenido está disponible en Italiano y Español, haciéndolo aún más accesible que nunca.
“Lo vas descubriendo todo tú mismo, fue muy divertido” Estudiante de Reino Unido de ARK Burlington Danes Academy
Arduino Science Kit Physics Lab, no necesita conocimientos previos sobre electrónica. Incluye un curso online y equipamiento para llevar a cabo y probar las leyes fundamentales de la física tradicional a través de 9 proyectos científicos excitantes inspirados en atracciones populares de las ferias como el Gravitron y el Barco Pirata. Es perfecta para desarrollar habilidades como el pensamiento crítico y la resolución de problemas, a través de un aprendizaje mediante enseñanza reflexiva. Los alumnos experimentaran con fuerzas, movimientos, magnetismo y conductividad – haciendo sus propias hipótesis como científicos de verdad, probando sus suposiciones y recogiendo información en tiempo real usando la app de Google “Science Journal” para Android.
“Hace que la física práctica sea más accesible para los estudiantes” –Graeme Wood, UK – Profesor de física, ARK Burlington Danes Academy.
Increiblemente facil de empezar a usar, los alumnos simplemente tienen que conectar el dispositivo Android a la placa, montar el proyecto, y después usa los sensores que contiene la shield y los módulos plug-and-play para simular las atracciones. Los datos son transmitidos del experimento a el dispositivo móvil del alumno via Bluetooth, donde se puede ver y analizar el resultado obtenido en la app Science Journal de Google o en las fichas de los alumnos.
Arduino Education Science Kit Physics Lab no está pensado para usarse únicamente en clase. De hecho, los alumnos pueden usar el kit en exteriores para convertir su recreo en su propia feria de ciencia aplicando los conceptos que han aprendido, y así, diseñar y probar sus propias atracciones. Basado en el uso de Arduino MKR WiFi 1010 , que es un laboratorio portátil incluyendo un grupo de sensores para medir luminosidad, temperatura, movimiento, campos magnéticos y mucho más… todo esto en una caja Gratnells protectora.
Arduino Education apunta a apoyar a los profesores proporcionando nuestros programas, contenido online y las hojas del alumno en el mayor número de idiomas posible: no solo en los idiomas Europeos relevantes, por ejemplo, Árabe y Japonés están planeados para futuras actualizaciones. Lo siguientes idiomas para Science Kit Physics Lab serán Alemán, Húngaro y Portugués.
Da oggi Science Kit è disponibile anche in italiano e spagnolo.
Nel Gennaio 2019, in collaborazione con Google, Arduino Science Kit Physics Lab è stato lanciato sul mercato, per studenti di scuola media (tra 11 e 14 anni) e non solo, con l’obiettivo di esplorare la scienza, divertendosi.
Da oggi, i contenuti del corso sono disponibili in italiano e spagnolo, rendendolo ancora più accessibile.
“Sei tu che esperimenti in prima persona, ed è stato davvero divertente poterlo fare” ha commentato uno studente inglese dell’accademia di ARK Burlington Danes.
Arduino Science Kit Physics Lab non richiede nessuna conoscenza pregressa in elettronica. Possiede un corso online con tutti i contenuti e gli strumenti per poterli condurre e testare le leggi fondamentali della fisica classica attraverso nove esperimenti di scienza, ispirati dalle attrazioni più popolari nei parchi divertimento, come la nave pirata o il Gravitron. E’ un prodotto ideale per poter sviluppare competenze come l’abilità di saper risolvere problemi e il pensiero critico, attraverso un metodo di apprendimento basato sull’indagine pratica. Gli studenti sperimentano con le forze, il moto, il magnetismo e la conduttività; creando le loro ipotesi come veri scienziati, verificando le loro supposizioni, e prendendo nota dei dati in tempo reale usando il Google Science Journal per Android.
“Rende molto più accessibile agli studenti praticare la fisica” Graeme Wood, docente di fisica, presso ARK Burlington Danes Academy.
E’ incredibilmente facile da avviare, gli studenti connettono semplicemente il loro dispositivo mobile Android alla scheda, costruiscono il progetto, e dopo, usano i sensori installati e i moduli plug-and-play per simulare le dinamiche dei dati. I dati sono trasmessi dall’esperimento al dispositivo mobile via Bluetooth, dove possono analizzare, registrare i risultati nel loro Google Science Journal oppure nelle loro schede di lavoro.
Arduino Education Science Kit Physics Lab non si limita soltanto alla classe. Infatti, gli studenti possono usare il kit anche fuori all’aperto, trasformando il cortile della scuola in un luna-park, applicando i concetti che hanno imparato e progettando e testando le loro attrazioni. Basato su Arduino MKR WiFi 1010, è un laboratorio portatile completo, che include vari sensori per misurare la luce, la temperatura, il moto, i campi magnetici e molto altro…tutto incluso in una comoda e sicura scatola.
Arduino Education mira ad assistere gli insegnanti sostenendo i corsi, i contenuti online e le schede per gli studenti, in più’ lingue possibili: non soltanto lingue europee, ma anche per esempio arabo e giapponese sono in programma per il futuro. Prossimamente, Science Kit Physics Lab verrà rilasciato in tedesco, ungherese e portoghese, perciò continuate a seguirci per restare informati.
This post is from Massimiliano Pippi, Senior Software Engineer at Arduino.
GitHub Actions is the name of the SDLC (Software Development Life Cycle) system introduced by GitHub about a year ago, currently in public beta and now approaching the general availability status. When you read SDLC, think about some sort of CI/CD system that’s generic enough to let you define a sequence of operations not necessarily limited to build, test, and deploy code: GitHub Actions can help you automate processes in code reviews, issue triaging, and repository management.
GitHub Actions have been part of the tools we use at Arduino for a while now; helping us solve a wide range of problems from automating workflows within our backend infrastructure, to managing the release process of our open source software. In the spirit of giving back to the community, we started publishing some of the Actions we developed internally so that they can be used right ahead from any GitHub account that’s been granted access to the public beta of GitHub Actions, and eventually in any GitHub repository.
Our Actions are available from this repository and there’s one in particular we think the Arduino community will be happy to have – it’s called setup-arduino-cli and under the hood it takes all the steps necessary to have the `arduino-cli` binary available in a Workflow. This means that in any step of your Workflow you can leverage the long list of features of the Arduino CLI.
# This is the name of the workflow, visible on GitHub UI.
name: test

# Here we tell GitHub to run the workflow when a commit
# is pushed or a Pull Request is opened.
on: [push, pull_request]

# This is the list of jobs that will be run concurrently.
# Since we use a build matrix, the actual number of jobs
# started depends on how many configurations the matrix
# will produce.
jobs:
  # This is the name of the job - can be whatever.
  test-matrix:

    # Here we tell GitHub that the jobs must be determined
    # dynamically depending on a matrix configuration.
    strategy:
      matrix:
        # The matrix will produce one job for each configuration
        # parameter of type arduino-platform, in this case a
        # total of 2.
        arduino-platform: ["arduino:samd", "arduino:avr"]
        # This is usually optional but we need to statically define the
        # FQBN of the boards we want to test for each platform. In the
        # future the CLI might automatically detect and download the core
        # needed to compile against a certain FQBN, at that point the
        # following include section will be useless.
        include:
          # This works like this: when the platform is "arduino:samd", the
          # variable fqbn is set to "arduino:samd:nano_33_iot".
          - arduino-platform: "arduino:samd"
            fqbn: "arduino:samd:nano_33_iot"
          - arduino-platform: "arduino:avr"
            fqbn: "arduino:avr:uno"

    # This is the platform GitHub will use to run our workflow, we
    # pick Windows for no particular reason.
    runs-on: windows-latest

    # This is the list of steps this job will run.
    steps:
      # First of all, we clone the repo using the checkout action.
      - name: Checkout
        uses: actions/checkout@master

      # We use the arduino/setup-arduino-cli action to install and
      # configure the Arduino CLI on the system.
      - name: Setup Arduino CLI
        uses: arduino/setup-arduino-cli@v1.0.0

      # We then install the platform, which one will be determined
      # dynamically by the build matrix.
      - name: Install platform
        run: |
          arduino-cli core update-index
          arduino-cli core install ${{ matrix.arduino-platform }}

      # Finally, we compile the sketch, using the FQBN that was set
      # in the build matrix.
      - name: Compile Sketch
        run: arduino-cli compile --fqbn ${{ matrix.fqbn }} ./blink
Example
Let’s say you keep your sketches in a GitHub repository, and you want to be sure that every time you push a git commit or you merge a pull request, the sketches compile correctly on certain boards you own, for example a Nano 33 IoT and a Uno. To keep the configuration at minimum, we can use a “build matrix”, so that GitHub will start a different job for each one of the platforms we list in the matrix, without the need to configure them explicitly.
You can find more info and docs for the Action on the GitHub Marketplace: if you like it, please leave us a star! We’re eager to hear your feedback, feel free to hit the Action repository and open an issue should you find any problem, or a feature request in case you want more from the action.
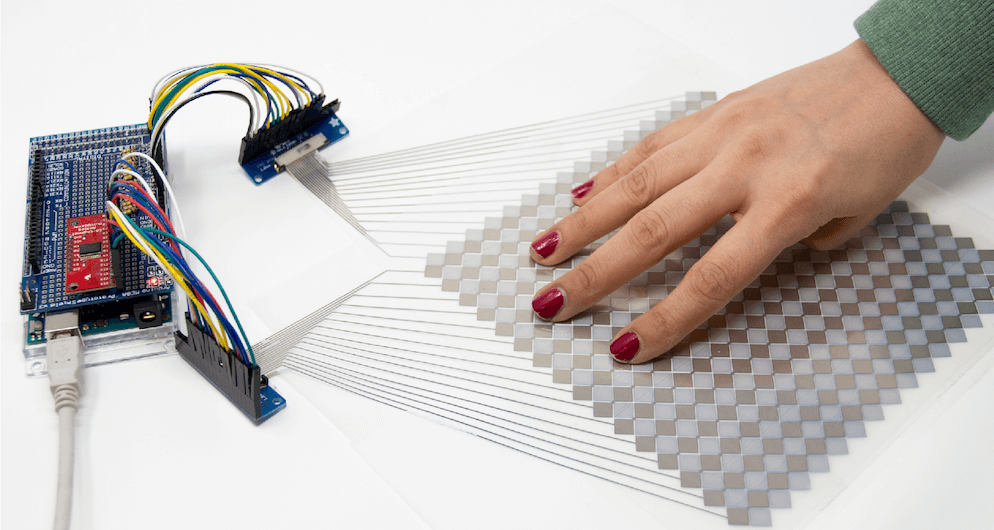
You likely use touchscreens every day when interacting with your phone — perhaps even to read this article — but prototyping your own capacitive matrix is unfortunately out of reach for most makers and electronics novices. As seen here, researchers have devised a new technique that will allow for easier prototyping of this type of interface, which can function on both flat and curved surfaces, over a variety of materials.
To accomplish this, the team developed an Arduino library, as well as one for Processing, and used OpenCV to track multiple finger positions. Interactions have been tested with an Uno, Mega and LilyPad, and would presumably work with almost any other Arduino board as needed!
We introduce Multi-Touch Kit, a low-cost do it-yourself technique to enable interaction designers, makers, and electronics novices alike to rapidly create and experiment with high-resolution multi-touch sensors of custom sizes, geometries, and materials.
In contrast to existing solutions, the Multi-Touch Kit is the first technique that works with a commodity microcontroller (our implementation uses a standard Arduino) and does not require any specialized hardware. As a technical enabler, we contribute a modified multi-touch sensing scheme that lever ages the human body as a transmission channel of MHz range signals through a capacitive near-field coupling mechanism. This leads to a clean signal that can be readily processed with the Arduino’s built-in analog-to-digital converter, resulting in a sensing accuracy comparable to industrial multi-touch con trollers. Only a standard multiplexer and resistors are required alongside the Arduino to drive and read out a touch sensor matrix.
The technique is versatile and compatible with many types of multi-touch sensor matrices, including flexible sensor films on paper or PET, sensors on textiles, and sensors on 3D printed objects. Furthermore, the technique is compatible with sensors of various scale, curvature, and electrode materials (silver, copper, conductive yarn) fabricated using conductive printing, hand-drawing with a conductive pen, cutting, or stitching.
You can now securely connect Alexa to your Arduino IoT Cloud projects with no additional coding required. You could use Alexa to turn on the lights in the living room, check the temperature in the bedroom, start the coffee machine, check on your plants, find out if your dog is sleeping in the doghouse… the only limit is your imagination!
Below are some of the features that will be available:
Changing the color and the luminosity of lights
Retrieving temperature and detect motion activity from sensors
Using voice commands to trigger switches and smart plugs
Being compatible with one of the most recognized cloud-based services on the market, bridges the communication gap between different applications and processes, and removes many tricky aspects that usually follows wireless connectivity and communication.
Using Alexa is as simple as asking a question — just ask, and Alexa will respond instantly.
Integrating Arduino with Alexa is as quick and easy as these four simple steps:
1. Add the Arduino IoT Cloud Smart Home skill.
2. Link your Arduino Create account with Alexa.
3. Once linked, go to the device tab in the Alexa app and start searching for devices.
4. The properties you created in the Arduino IoT Cloud now appear as devices!
Boom — you can now start voice controlling your Arduino project with Alexa!
IoT – secure connections
The launch of the Arduino IoT Cloud & Alexa integration brings easy cross platform communication, customisable user interfaces and reduced complexity when it comes to programming. These features will allow many different types of users to benefit from this service, where they can create anything from voice controlled light dimmers to plant waterers.
While creating IoT applications is a lot of fun, one of the main concerns regarding IoT is data security. Arduino IoT Cloud was designed to have security as a priority, so our compatible boards come with an ECC508 crypto chip, ensuring that your data and connections remain secure and private to the highest standard.
The latest update to the Arduino IoT Cloud enables users with a Create Maker Plan subscription to use devices based on the popular ESP8266, such as NodeMCU and ESPduino. While these devices do not implement a crypto chip, the data transferred over SSL is still encrypted.
Getting started with this integration
In order to get started with Alexa, you need to go through a few simple steps to make things work smoothly:
Setting up your Arduino IoT Cloud workspace with your Arduino Create account
Getting an IoT Cloud compatible board
Installing the Arduino Alexa Skill
Setting up the Arduino IoT Cloud workspace
Getting started with the Arduino IoT Cloud is fast and easy, and by following this tutorial you will get a detailed run through of the different functionalities and try out some of the examples! Please note, you will need an Arduino Create account in order to use the Arduino IoT Cloud and a compatible board.
Getting an IoT Cloud compatible board
The Arduino IoT Cloud currently supports the following Arduino boards: MKR 1000, MKR WiFi 1010, MKR GSM 1400 and Nano 33 IoT. You can find and purchase these boards fromour store.
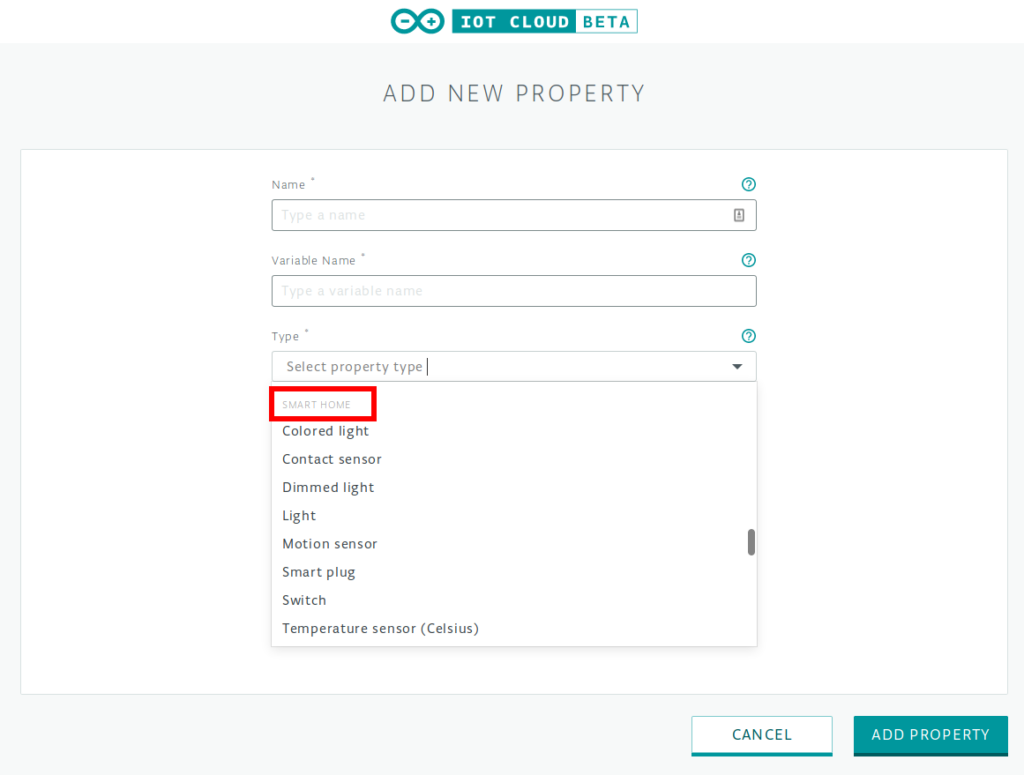
The following properties in the Arduino IoT Cloud can currently be used with Alexa:
Light
Dimmable light
Colored light
Smart plug
Smart switch
Contact sensor
Temperature sensor
Motion sensor
Any of these properties can be created in the Arduino IoT Cloud platform. A sketch will be generated automatically to read and set these properties.
Installing the Arduino Alexa Skill
To install the Arduino Alexa Skill, you will need to have an Amazon account and download the latest version of the Alexa app on a smartphone or tablet, or use the Amazon Web application. You can find the link to the Amazon Alexa app here. Once we are successfully logged into the app, it is time to make the magic happen.
To integrate Alexa and Arduino IoT Cloud, you need to add the Arduino skill. Then link your Arduino Create account with Alexa. Once linked, select the device tab in the Alexa app and start discovering devices.
The smart home properties already in existence in the Arduino IoT Cloud now appear as devices, and you can start controlling them with the Alexa app or your voice!
Step-by-step guide to connecting Arduino IoT Cloud with Alexa
A simple and complete step-by-step guide showing you how to connect the Arduino IoT Cloud with Alexa, is available via this tutorial.
Share your creativity with us!
Community is everything for Arduino, so we would love to see what you create! Make sure you document and share your amazing projects for example on Arduino Project Hub and use the #ArduinoAlexa hashtag to make it discoverable by everyone!
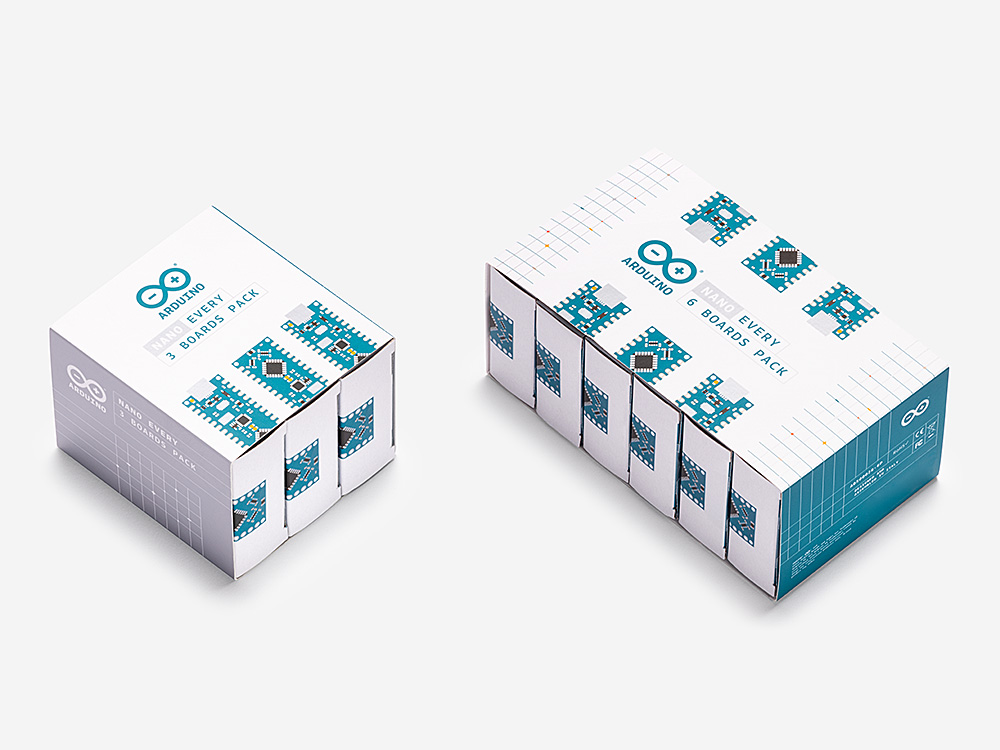
The Arduino Nano Every is now available in a 3 and 6 pack – perfect for running a course or powering all your projects with Arduino.
For those countless creations requiring a small and easy to use microcontroller board, the Nano Every has the tiniest Arduino form factor out there measuring just 45x18mm. Whether you’re working on a low-cost robotics project for the entire classroom or presenting a complex prototype with many functional blocks, this pack offers exactly what you need – a batch of Nano Every boards at a great price!
This robust little board costs as little as €7.50 each ($9.30 each) in the 6 pack, saving €0.50 ($0.60) per board versus the single. It’s now more affordable than ever to forecast the local across town by building your own little band of Gnome Weather Forecasters in your class.
If you are interested in the ARDUINO NANO EVERY – PACK, visit the Arduino online store at this link.
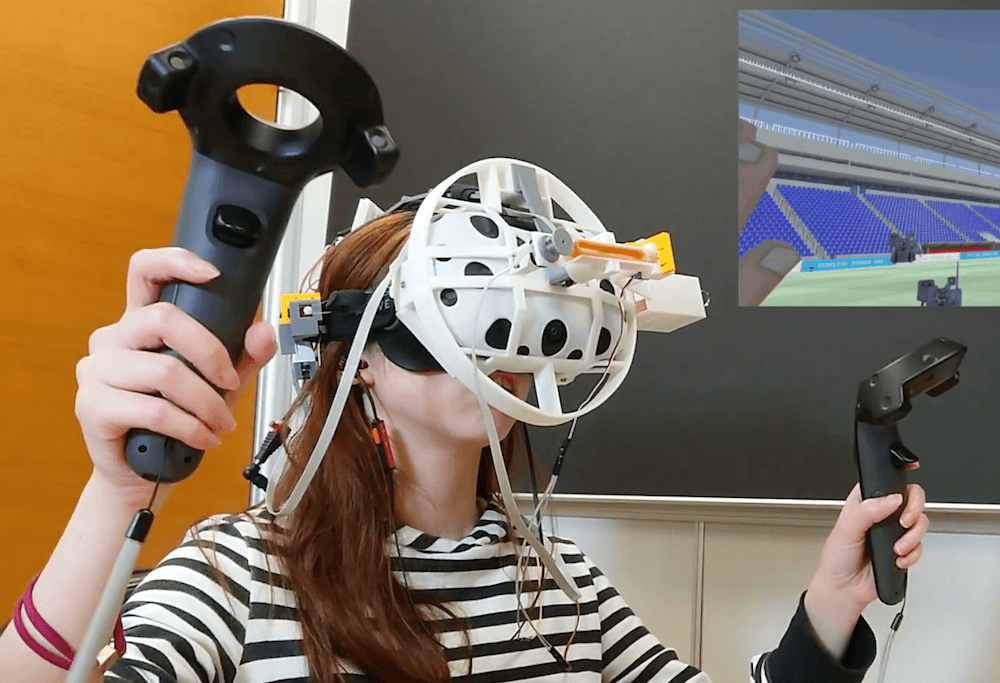
If you’ve ever used a VR system and thought what was really missing is the feeling of being hit in the face, then a team researchers at the National Taiwan University may hold just the solution.
ElastImpact takes the form of a head-mounted display with two impact drivers situated roughly parallel to one’s eyes for normal — straight-on — impacts, and another that rotates about the front of your face for side blows.
Each impact driver first stretches an elastic band using a gearmotor, then releases it with a micro servo when an impact is required. The system is controlled by an Arduino Mega, along with a pair of TB6612FNG motor drivers.
Impact is a common effect in both daily life and virtual reality (VR) experiences, e.g., being punched, hit or bumped. Impact force is instantly produced, which is distinct from other force feedback, e.g., push and pull. We propose ElastImpact to provide 2.5D instant impact on a head-mounted display (HMD) for realistic and versatile VR experiences. ElastImpact consists of three impact devices, also called impactors. Each impactor blocks an elastic band with a mechanical brake using a servo motor and extending it using a DC motor to store the impact power. When releasing the brake, it provides impact instantly. Two impactors are affixed on both sides of the head and connected with the HMD to provide the normal direction impact toward the face (i.e., 0.5D in z-axis). The other impactor is connected with a proxy collider in a barrel in front of the HMD and rotated by a DC motor in the tangential plane of the face to provide 2D impact (i.e., xy-plane). By performing a just-noticeable difference (JND) study, we realize users’ impact force perception distinguishability on the heads in the normal direction and tangential plane, separately. Based on the results, we combine normal and tangential impact as 2.5D impact, and performed a VR experience study to verify that the proposed 2.5D impact significantly enhances realism.