Posts with «arduino uno» label

A Flag-Waving Hat for All Occasions

When [Taste the Code] saw that his YouTube channel was approaching 1,000 subscribers, it was time to do something special. But celebration is no reason to be wasteful. This flag-waving celebratory hat has endless possibilities for the future.

The build is simple, which is just right for these strange times of scarcity. An Arduino Uno hot-glued to the back of the hat is directly driving a pair of 9g servos on the front. [Taste the Code] made the flags by sticking two stickers back to back with a bamboo skewer in between. The code is flavored such that the flags will wave in one of three randomly-chosen patterns — swing around, swing in reverse, and wild gesticulations.

After the novelty of the whole 1k subs thing wears off, [Taste the Code] can change the flags over to Jolly Rogers to help with social distancing. And someday in the future when things are really looking up, they can be changed over to SARS-CoV-2 victory flags, or fly the colors of a local sports team. We think it would be way cool to program some kind of real semaphore message into the flags, though the mobility might be too limited for that. Check out the build video after the break, which happens picture-in-picture as [Taste the Code] dishes out a channel retrospective and lays out a course for the future.

Even though YouTube messed with subscriber counts, we think it’s still worth making a cool counter. Here’s one with a Tetris twist.

Simon Says, But With Servos

How much easier would life be if you could just grab hold of whatever mechanism you wanted to manipulate, move it like you want, and then have it imitate your movements exactly? What if you could give a servo MIDI-like commands that tell it to move to a certain location for a specific duration? Wonder no more, because [peterbiglab] has big-brained the idea into fruition.

With just one wire, an Arduino, and some really neat code, [peter] can get this servo to do whatever he wants. First he tells the Arduino the desired duration in frames per second. Then he grabs the horn and moves it around however he wants — it can even handle different speeds. The servo records and then mimics the movements just as they were made.

The whole operation is way simpler than you might think. As [peterbiglab] demonstrates in the video after the break, the servo knows its position thanks to an internal potentiometer on the motor’s rotor. If you locate the pot output pin on the control board and run a wire from there into an Arduino, you can use that information to calibrate and control the servo’s position pretty easily. There are a ton of possibilities for this kind of control. What would you do with it? Let us know in the comments.

If you want to try this with a bunch of servos at once, might as well build yourself a little testing console.

Via r/duino

Offline Dinosaur-Jumping Becomes a Real Workout

It’s great to see people are out there trying to find fun ways to exercise amid the current crisis. Although jumping up and down isn’t great for the knees, it does give decent cardio. But if you don’t have a rope or a puddle, we admit that jumping can lose its bounce pretty fast.

Quarantine has been a game-filled time for [fridaay]. Somewhere between a handful of FPS games, he decided to try to play Google’s offline dinosaur-based side scroller game by making the dinosaur spring over the saguaros whenever he physically jumps in the air. (Video, embedded below.)

Here’s how it works: [fridaay] holds a transmit circuit that consists of an Arduino UNO, an accelerometer module, and an nRF24L01 transceiver, all running on a 9 V battery. Whenever [fridaay] jumps, the accelerometer reads the change in Z and sends it to the receiving circuit, which is just another UNO and nRF. The receiving UNO is connected to a laptop and configured to press the space bar so the dinosaur canters over the cacti.

We’ve never been able to stay alive long enough in the game to see this happen, but apparently you need to crouch at some point in the game. [fridaay] has yet to implement a control for that, but we’re sure he’ll think of something. Jump past the break to see the video, and hit him up if you need the code.

If you have a lot of parts at your disposal, why not make a physical version?

Via r/duino

Self-Playing Whistle While You Work From Home

In ridiculous times, it can help to play ridiculous instruments such as the slide whistle to keep your bristles in check. But since spittle is more than a little bit dangerous these days, it pays to come up with alternative ways to play away the days during lockdown life.

Thanks to some clever Arduino-driven automation, [Gurpreet] can maintain a safe distance from his slide whistle while interacting with it. Slide whistles need two things — air coming in from the top, and actuation at the business end. The blowing force now comes from a focused fan like the ones that cool your printed plastic as soon as the hot end extrudes it. A stepper motor moves the slide up and down using a printed rack and pinion.

Here’s a smooth touch — [Gurpreet] added a micro servo to block and unblock the sound hole with a cardboard flap to make the notes more distinct. Check out the build video after the break, which includes a music video for “My Heart Will Go On”, aka the theme from Titanic. It’s almost like the ship herself is playing it on the steam whistles from the great beyond.

Speaking of, did you hear about the effort to raise and restore the remains of her radio room?

Slippy Slapper Uselessly Uses All the Arduinos

Want to take that annoyingly productive coworker down a notch? Yeah, us too. How dare they get so much done and be so happy about it? How is it possible that they can bang on that keyboard all day when you struggle to string together an email?

The Slippy Slapper is a useless machine that turns people into useless machines using tactics like endless distraction and mild physical violence. It presses your buttons by asking them to press buttons for no reason other than killing their productivity. When they try to walk away, guess what? That’s another slappin’. Slippy Slapper would enrage us by proxy if he weren’t so dang cute.

You’re right, you don’t need an Arduino for this. For peak inefficiency and power consumption, you actually need four of them. One acts as the master, and bases its commands to the other three on the feedback it gets from Slippy’s ultrasonic nostrils. The other three control the slappin’ servos, the speakers, and reading WAV files off of the SD card. Slap your way past the break to see Slippy Slapper’s slapstick demo.

Need to annoy a group of coworkers all at once? Slip a big bank of useless machines into the conference room while it’s being set up.

Vocal Effects On The Arduino Uno

When one thinks of audio processing, the mind doesn’t usually leap to an 8-bit micro. Despite this, if you’re looking for some glitchy fun, it’s more than possible, as [Amanda Ghassaei] demonstrates with the Arduino Uno in this 2012 throwback project.

The build is designed for vocal effects, based on the idea of granular synthesis. This is where audio samples are chopped up into small chunks, called “grains”, and manipulated in various ways to make fun sounds. Controls on the box allow the nature of the sound created to be modified by the user.

[Amanda]’s project serves as a great example of what it takes to run audio processing on the Arduino Uno. There’s a guide to using the on-board ADC as a microphone input, as well as the construction of a resistor ladder DAC for output. As a neccessity, this also requires discussion of how to write directly to the ATMEGA’s IO ports, rather than using the slower digitalWrite() function typically used in Arduino projects. There’s plenty of value here for anyone learning to do audio on a microcontroller platform.

Overall, it’s a fun project that serves as a good primer for those keen to dive into digital sound processing. Of course, those looking to kick things up a gear would do well to check out the Teensy Audio Library, too. Video after the break.

IoT Safe Keeps Latchkey Kids’ Phones on Lockdown

Phones are pretty great. Used as telephones, they can save us from bad situations and let us communicate while roaming freely, for the most part. Used as computers, they often become time-sucking black holes that can twist our sense of self and reality. Assuming they pick up when you call, phones are arguably a good thing for kids to have, especially since you can hardly find a payphone these days. But how do you teach kids to use them responsibly, so they can still become functioning adults and move out someday? [Jaychouu] believes the answer is inside of a specialized lockbox.

This slick-looking box has a solenoid lock inside that can be unlocked via a keypad, or remotely via the OBLOQ IoT module. [Jaychouu] added a few features that drive it out of Arduino lockbox territory. To prevent latchkey children from cheating the system and putting rocks (or nothing at all) in the box, there’s a digital weight sensor and an ultrasonic sensor that validate the credentials of the contents and compare them with known values.

Want a basic lockbox to keep your phone out of reach while you work? Here’s one with a countdown timer.

Superbly Synchronized Servos Swaying Softly

LEDs and blinky projects are great, and will likely never fade from our favor. But would you look at this sweeping beauty? This mesmerizing display is made from 36 micro servos with partial Popsicle sticks pasted on the arms. After seeing a huge display with 450 servos at an art museum, [Doug Domke] was inspired to make a scaled-down version.

What [Doug] didn’t scale down is the delightful visuals that simple servo motion can produce. The code produces a three-minute looping show that gets progressively more awesome, and you can stare at that after the break. Behind the pegboard, a single, hardworking Arduino Uno controls three 16-channel PWM controllers that sweep the servos. We like to imagine things other than Popsicle sticks swirling around, like little paper pinwheels, or maybe optical illusion wheels for people with strong stomachs.

You won’t see these in the video, but there are five ultrasonic sensors mounted face-up on the back of the pegboard. [Doug] has optional code built in to allow the servo sticks to follow hand movement. We hope he’ll upload a demo of that feature soon.

Servos can be hypnotic as well as helpful, as we saw in this 114-servo word clock.

Via Arduino blog

Air Hockey Table is a Breeze to Build

Many of us have considered buying an air hockey table, but are put off by the price. And even if the money is there, those things take up a lot of space. How often are you really going to use it?

This DIY air hockey table is the answer. It’s big enough to be fun, but small and light enough to easily stow away in the off-season. At ~$50, it’s a cheap build, provided you have a vacuum cleaner that can switch to blower mode. The strikers, goals, corner guards, and scoreboard enclosure are all 3D-printed, while the pucks and playfield are laser-cut acrylic. [Technovation] glued acrylic feet to the strikers to help them last longer.

The scoreboard is an Arduino Uno plus an LCD that changes color to match the current winner. Scoring must be entered manually with button presses, but we think it would be fairly easy to detect a puck in the goal with a force or weight sensor or something. For now, the RGB LEDs around the edge are controlled separately with a remote. The ultimate goal is to make the Arduino do it. Shoot past the break and cross-check it out.

Already have a table? Had it so long, no one will play you anymore? Build yourself a robotic opponent.

sprintf function

Description

This tutorial will help you to understand the sprintf function, and how to use it. Essentially, the sprintf function allows you to construct a string using a pre-formatted string template to which you can insert variables at pre-defined locations. The sprintf function will "compile" the string and assign it to a char array. All you have to do is make sure that the char array is large enough to hold all of the characters in the string. The best way to understand the sprintf function is with examples. And luckily, I have examples. What are we waiting for ? Let's dive in.

Parts Required: an Arduino and a USB cable.


sprintf ( char* array,   const char* strTemplate,   var1...);


Arduino IDE

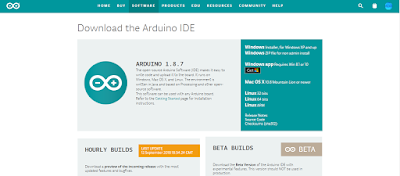
While there are many Arduino IDE alternatives out there, I would recommend that you use the official Arduino IDE for this project. I used the official Arduino IDE app (v1.8.5) for Windows 10.
Make sure to get the most up-to-date version for your operating system here.


Arduino Code

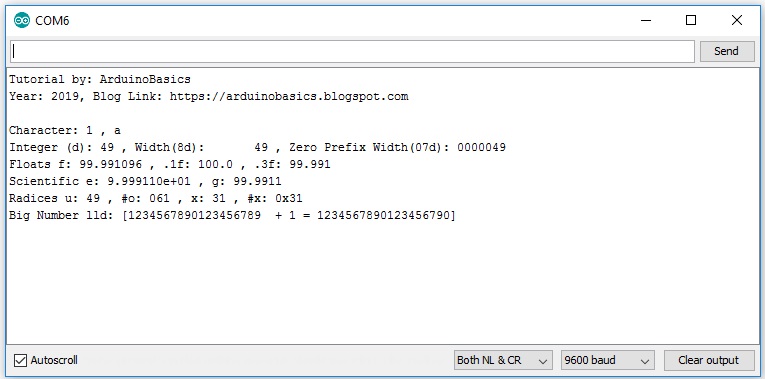
The code below will show you how to use the sprintf function and includes a number of different format specifiers to play with. In each case the sprintf function writes to the "data" character array, and subsequently sends it through to the Serial monitor. The string template helps to construct the data output, allowing you to insert variables at specific locations within the text. The format of the variable is defined by the "format specifier" used in the sprintf function. The format specifier is always prefixed with a percentage sign (%).


Serial Monitor Output

  1. Upload the code to the Arduino.
  2. Open the Serial monitor in the Arduino IDE (Ctrl+Shift+M).
  3. Ensure that you have set the baud rate in the Serial monitor to 9600.
  4. You should see the following output:


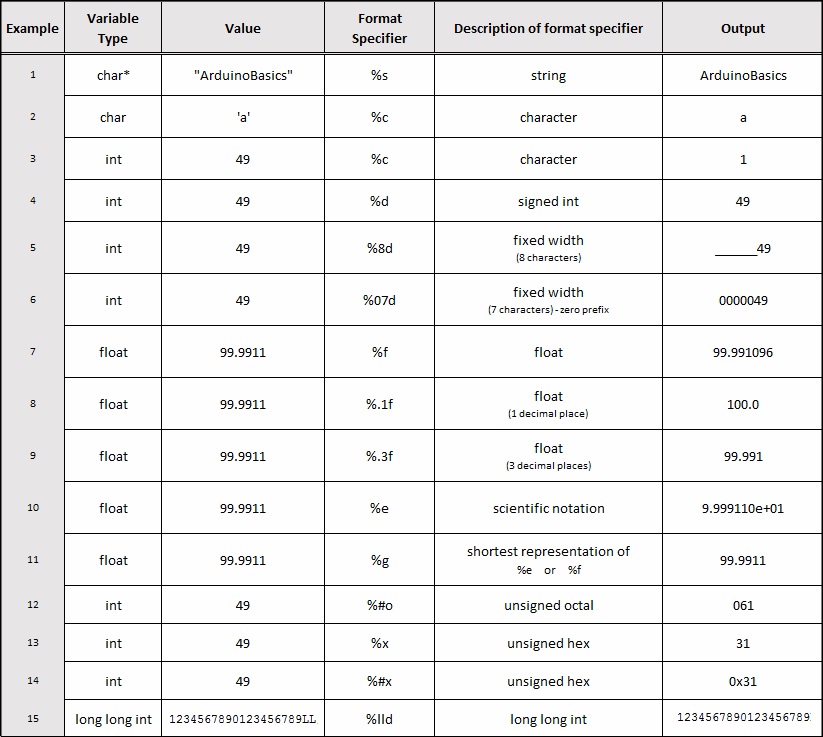
The sprintf function requires that you have a character array to store the output. In the example code above, the output is stored in the "data" character array. It also requires a template that tells the function where to insert the variables. As you can see from the table below, the variables will be formatted based on the format specifier used. The format specifier can be quite useful for numeric conversions. Eg. decimal to hex conversions.


Format Specifiers

Some of the different format specifiers that can be used with the sprinf function are listed below.

Conclusion

Now that you know all about the sprintf function, I hope it will inspire you to use it in your own projects. Please let me know in the comments below how you use the sprintf function, and whether there was anything that you feel I failed to mention in this tutorial.
Happy Coding !!


If you found this tutorial helpful, please consider supporting me by buying me a virtual coffee/beer.

$3.00 AUD only
 

Social Media

You can find me on various social networks:

Follow me on Twitter: ScottC @ArduinoBasics.
I can also be found on Instagram, Pinterest, and YouTube.
And if all else fails, I have a server on Discord.