Posts with «arduino uno» label

Bluetooth-Enabled Danger Sign for Lab
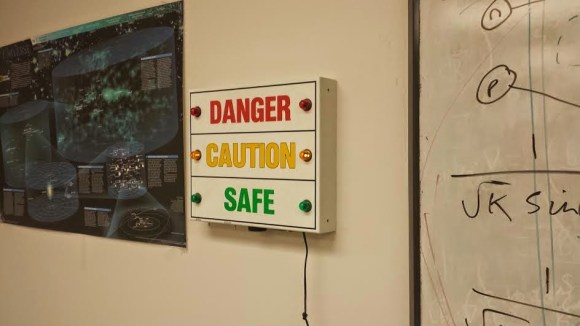
[A Raymond] had some free time at work, and decided to spend it on creating a wireless warning sign. According to his blog profile, he is a PhD student in Applied Physics. His lab utilizes a high-powered laser system. His job is to use said system, but only after it’s brought online by faculty scientists. The status of the laser system is changed by a manual switchbox that controls the warning signs wired around the lab entrances. Unfortunately, if you were in the upstairs office, you only knew this after running downstairs to check. [A Raymond's] admitted laziness finally got the better of him – he wanted a sign that displayed the laser’s status from the comfort of the office. He had an old sign he could use, but he wanted a way for it to communicate with the switchbox downstairs. After some thought, he decided Bluetooth was the way to go, using a pair of BlueSMiRF Bluetooth modules from Sparkfun and Arduino Uno R3’s.

He constructed a metal box that intercepted the cable from the main switchbox, mounting one BlueSMiRF and Uno into it. Upon learning that the switchbox sends 12V AC signals over three individual status wires, he half-wave rectified the wires and divided their voltages so that the Uno wouldn’t fry. Instead, it determined which status wire that had active voltage. and sent a “g(reen)”, “y(ellow)”, or “r(ed)” signal continuously via Bluetooth. On the receiving end, [A Raymond] gutted the sign and mounted the other BlueSMiRF and Uno into it along with some green, yellow, and red LEDs. The LEDs light up in response to the corresponding Bluetooth signal.

The result is a warning sign that is always up-to-date with the switchbox’s status. We’ve covered projects using Bluetooth before, from plush birds to cameras- [A Raymond's] wireless sign is in good company. He notes that it’s “missing” a high pitched whining noise when the “Danger” lights are on. If he decides to add an accompanying (annoying) sound, he couldn’t go wrong with something like this. Regardless, we’re sure [A Raymond] is happy that he no longer has to go back and forth between floors before he can use the laser.


Filed under: Arduino Hacks, wireless hacks

The making-of an animatronic baby alien

Eva Taylor works at EKT Workshop and built an animatronic rod puppet Alien as a masterwork research project for the National Institute of Dramatic Art (NIDA) in Sydney Australia. It was inspired by the “bambi burster” built for the film Alien 3, although her creature is somewhat different.

The animatronics are controlled via a Playstation 3 controller, using a servoshock module between the controller and an Arduino Uno board:

It contains and 8 way 2 stage tail mechanism and animatronic lips, jaw and tongue. The remaining parts are rod controlled. A myriad of techniques were deployed in its construction – the torso and limbs were hand-carved from Queensland Maple while the joints were custom made from recycled parts of RC cars and planes. The skeleton of the tail was custom made from acrylic and cut on a laser cutter. The head contains an underskull of fibreglass, dental acrylic teeth and silicone skin. The muscle groups are also made of deadened, encapsulated silicone.

She shared with us the video above showing the main phases of the making-of process, while the one below gives you an idea of how  the puppet looks like in a more dramatic piece:

Arduino Blog 29 Oct 23:47

Control your Halloween Props with Arduino

Jason from Make Magazine published a video tutorial on how to create an amazing choreography hacking your Halloween props using Arduino Uno:


Arduino Blog 23 Oct 14:07

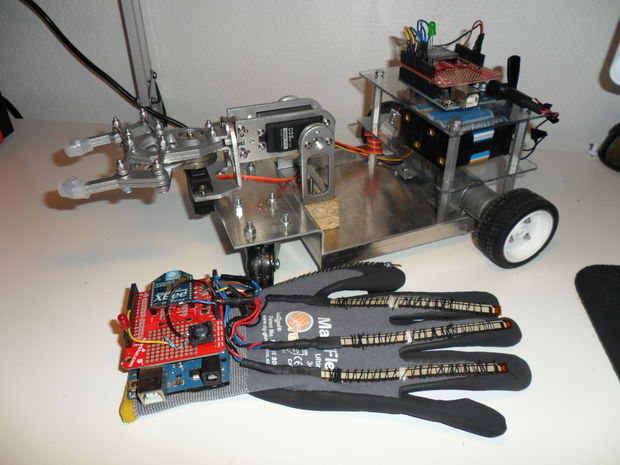
Control a robot through hand gestures with Arduino Uno and Xbee

Robin Andersson shared with us the link to his Instructable to create a robot controlled by (gloved) hand gestures and running on a couple of Arduino Unos and Xbee.

You can make it yourself following the 8 steps of the tutorial and then customize the gestures as you like.

Enjoy the video below:

Arduino Blog 15 Oct 22:04

GPS lamps and the (in)visible landscape of the networked city

Satellite Lamps is a project investigating one of the most important contemporary infrastructures, the Global Positioning System or GPS. It’s a project curated by Einar Sneve Martinussen, Jørn Knutsen and Timo Arnall as part of the Yourban research project at the Oslo School of Architecture and Design and continues their previous work on revealing the materials of technologies that started in 2009 with RFID and Immaterials: Light Painting Wifi. The project uses Arduino extensively, and is also thoroughly documented:

GPS is widely used yet it’s invisible and few of us really have any idea of how it works or how it inhabits our everyday environments. We created a series of Lamps that change brightness according to the accuracy of received GPS signals, and when we photograph them as timelapse films, we start to get a picture of how these signals behave in actual urban spaces.


They published a film that you can watch above, and published an article that details very thoroughly how it was made and why. If you are interested in the project, you can read more on how they explored GPS , how the visualisations were made, and about the cultural history of GPS.

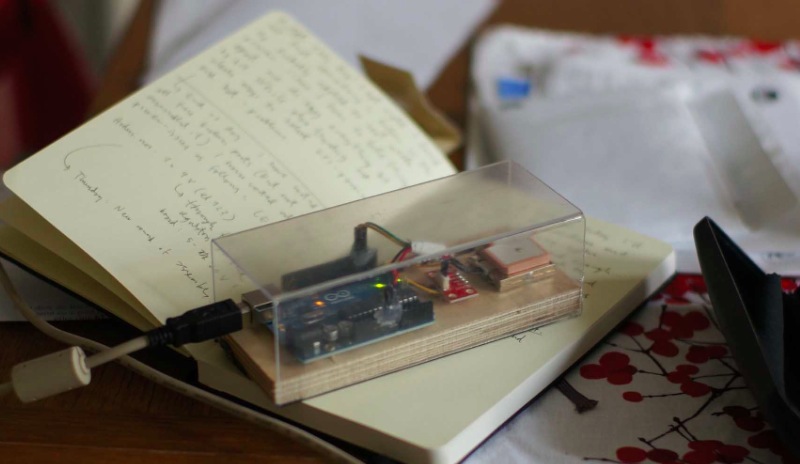
This is a GPS receiver connected to Arduino that sends data to a piece of software running on a laptop. It is a quickly designed tool, a transparent plastic box that that allows us to observe the performance of the electronics, and still mobile enough to carry in hand or a backpack.

Arduino Blog 09 Oct 17:42
arduino  arduino uno  featured  gps  lamp  lamp(s)  oslo  

The Effects are IN the Guitar? It’s so Simple…

We’ve all had that problem. Up on stage, rocking out Jimi Hendrix-style on guitar with your band, but frustrated at having to mess around with foot pedals to control all of the effects. [Richard] solved this problem in a unique way: he put a preamp and a microcontroller in a guitar that can create some very interesting effects.

For the musically challenged, electric guitars often have several sets of electromagnetic pickups that detect vibrations in the strings at different points along the strings. Selecting different pickup combinations with a built-in switch changes the sound that the guitar makes. [Richard] wired the pickups in his Fender Stratocaster to the microcontroller and programmed it to switch the pickups according to various patterns. The effect is somewhat like a chorus pedal at times and it sounds very unique.

The volume and tone knobs on the guitar are used to select the programmed patterns to switch various pickups at varying speeds. This has the added bonus of keeping the stock look of the guitar in tact, unlike some other guitars we’ve seen before. The Anubis preamp, as it is called, is a very well polished project and the code and wiring schematic are available on the project site along with some audio samples.


Filed under: musical hacks

Web Browser Pushes Arduino’s Limits

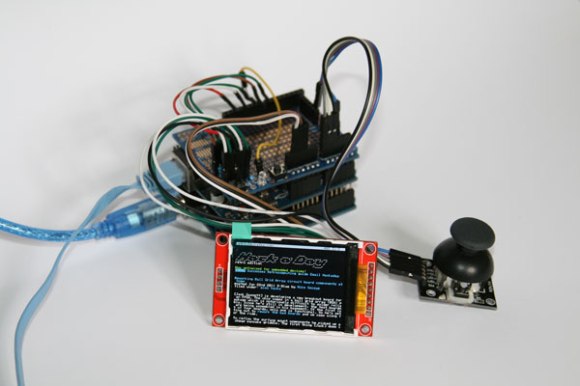
Some projects that we build fulfill a genuine need for a new piece of hardware or software that will make life easier or fix a common problem. Other projects, on the other hand, we do just because it’s possible to do. [Gilchrist] has finished work on a project that fits squarely in the second category: a web browser that runs exclusively on an Arduino Uno with an ethernet shield.

The Arduino can serve plain-text web pages to an attached LCD and can follow hyperlinks. User input is handled by a small joystick, but the impressive part of the build is on the software side. The Arduino only has 2KB of RAM to handle web pages, and the required libraries take up 20KB of memory, leaving only about 12 KB for the HTML parser/renderer and the LCD renderer.

The Arduino browser is a work in progress, and [Gilchrist] mentions that goals for the project include more robustness to handle poor HTML (the Hackaday retro edition loads flawlessly though), a terminal, and WiFi capabilities. To that end, maybe a good solution would be using the new ESP8266 chip to keep things small and inexpensive?


Filed under: Arduino Hacks

Visualizing the unique processes of human brain with magnets and liquids

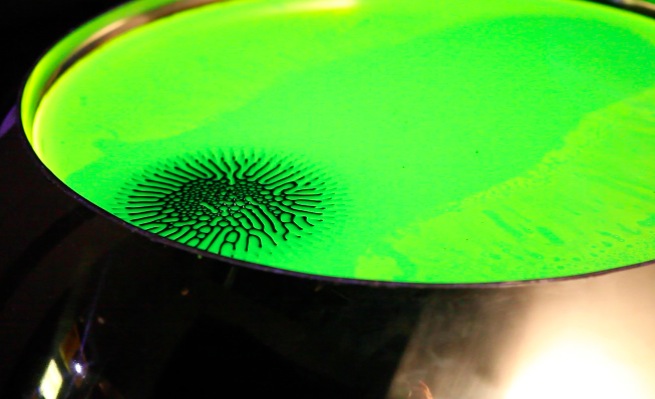
Solaris is an interactive installation created by Julia Borovaya (idea curation), Edward Rakhmanov (robotic system, chemistry), Vtol (programming, electronics) with the help of Alexander Kaplan, professor of neurophysiology:

it demonstrates the field influence of the permanent magnet on the magnetic and spirit (fluorescent) liquids. Two liquids constitute the diphasic system. Due to liquids movements and their surfaces’ modifications we visualize the unique processes of human brain. The spectator wears on neuro interface Emotive Epoc, the device computes a brain activity and sends information to the installation machinery.

To test the project people of different ages, social groups and professional areas were invited. Test results confirmed that brain activity and mood of the man reflect on the dynamic and character of liquids movements in the sphere. Object reacts on the changes of mind and emotion states. People who spent a plenty of time with the object managed to influence the dynamic and direction of the liquids on the unconsciousness level. We also reveal that the installation visualizes the temperament of the person. The object copies your mental organization and echoes it on the liquid’s surface. The object becomes a part of the participant.

It runs on Arduino Uno controlling dc motors, 2 actuators and a custom digital motor control system interface.

Arduino Blog 24 Sep 23:11

A keyboard for Minecraft addicted to customize the gaming experience

The award-winning Minecraft is a very popular PC game and also pretty addictive. It was originally created  by Swedish programmer Markus “Notch” Persson, later developed and supported on different platforms and recently acquired by Microsoft for 2.5$ billions.

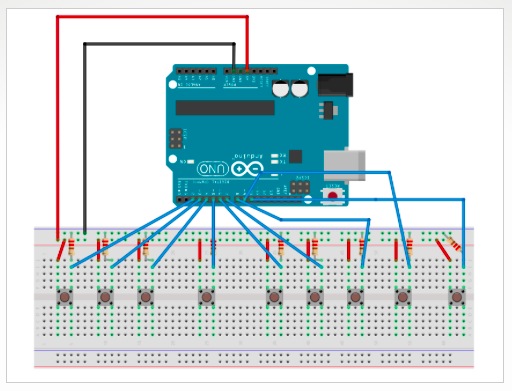
Arduino user lakhanm shared  a DIY keyboard prototyped with Arduino Uno and substituting the basic keyboard controls such as move forwards or backwards. The project is also compatible with most of the Arduino boards. 

Take a look at the circuit below and grab the sketch and bill of materials at this link.


Arduino Blog 22 Sep 16:57

Real life Lego Rock Band powered by Arduino

We’d like to share the performance, by Opificio Sonico,  recorded live in July 2014 of  Toa Mata Band, best known as the “World’s first LEGO robotic band” and controlled by Arduino Uno which is hooked up to a MIDI sequencer:

In this video, the third episode, the robots are playing some unconventional drum-percussions made by some food packaging are captured by a contact microphone (piezo) and processed in real time in the D.A.W. Ableton Live. A brand new device appears for the first time, it’s a moving platform on x-axis, made of Lego bricks, gears and servo motors that permits to move with semitones-steps the tiny synth. The song is a cover of the famous synth-pop band Depeche Mode, it’s a personal tribute to the band who made my days in the 80′s.


Arduino Blog 09 Sep 13:58
arduino  arduino uno  band  featured  lego  midi  music