Posts with «hackaday.io» label

Lixie is a Nixie tube alternative

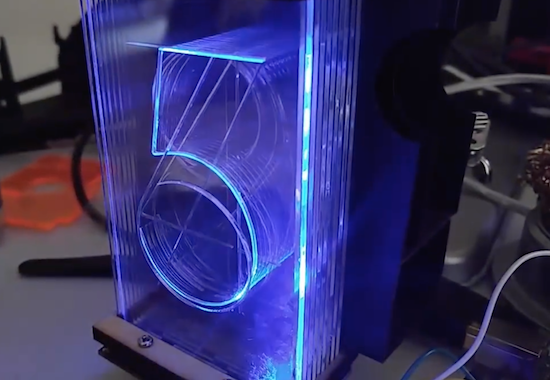
Using a series of etched acrylic panes, the “Lixie” display can show numbers in the style of a Nixie tube.

Nixie tubes are beautiful pieces of display hardware that are no longer in production, and are becoming harder and harder to find. They also generally require relatively high DC voltages to operate, making them difficult and potentially dangerous. Connor Nishijima, however, has come up with an alternative called the Lixie.

This laser-cut item employs etched panes of acrylic to reflect the light from WS2812B LEDs as required, revealing digits 0-9. Since the LEDs are RGB, different colors can be selected as desired.

Edge-lighting panes of acrylic etched with a design has been done for decades, but they’ve always been static information like an “EXIT” sign. If you stack multiple panes of acrylic (each with a unique design) and light them individually, you can change what design the user sees! This makes edge-lighting perfect for a numeric display! And since I love the look of Nixies, we’ll emulate the typography as well. At the end of the day, what I’ve made is a beautiful over-sized numeric display using WS2812Bs and a laser cut digit assembly!

You can find more about this “modernized Nixie tube” on Hackaday.io.

Arduino Blog 13 Dec 19:19

FlipFrame is a rotating digital picture frame

With Timothy Giles’ rotating digital picture frame, you’ll never have to endure black bars around your vertical images again!

Rather than accept the poor presentation of vertical images that normal displays offer, Giles instead made his own out of a discarded 27-inch LCD TV. A Raspberry Pi displays the images sideways, then uses an Arduino with a stepper shield to rotate the TV to compensate.

Mechanically, he uses a herringbone gear set to turn the TV, while the Arduino accelerates and decelerates the TV’s rotation to give a smooth transition. It’s a very cool project, and one that makes you wonder “why didn’t I think of that?”

You can find more about Giles’ FlipFrame project at his Hackaday.io page, including code and mechanical design files if you want to build your own!

A multimeter heads-up display with Arduino glasses

With Alain Mauer’s Arduino glasses and a Bluetooth multimeter, electrical data is always in view!

If you’re in a job where you have to take readings inside a live electrical panel, one thing that’s inconvenient, and even dangerous at times, is having to look away from your hands to read your multimeter. With hopes of “making an engineer’s life easier and safer,” Mauer solved this problem using an Arduino Pro Micro and a BLE module to show data from a Bluetooth-enabled multimeter. Now he can see data on a display that looks similar to a Google Glass device. Perhaps this method could be expanded to other devices in the future!

If you’d like to build your own glasses, a description and 3D printing files can be found on Hackaday.io.

Analyze your world with the WiSci portable spectrometer

Spectroscopy is an incredible tool for chemical analysis–and now you can make your own Bluetooth-enabled device with an Arduino Pro Mini.

If you took advanced chemistry classes, you may have had the opportunity to work with a spectrometer. It probably seemed like a magical gadget, identifying the chemicals in a substance through its light characteristics unlike the experimental methods you previously had to use.

Using off-the-shelf components–including an Arduino, a Bluetooth module, an LED, optical filters, and a LiPo battery–housed inside a 3D-printed case, the WiSci aims to take this tool out of the lab, and into the “real world.” By following the instructions on its project page, you can build one for just under $250.

What’s really neat is that the portable spectrometer can even scan a fruit and then wirelessly send the data over to an accompanying Android app to tell you whether or not the fruit is ripe. (You can view its IEEE Spectrum article for a little more background on that!)

A spectrometer is a very powerful tool. By analysing intensity/wavelength pairs of the interacted EM radiation with the material under study, detailed information like its chemical composition, crystal structure and other elemental information can be extracted. It can also be used for food analysis. For example, it can reveal adulteration in milk or oil and analyse toxins to understand causes of food poisoning to name a few uses.

To create your own, check out its Hackaday.io page here.

What’s Tiny, Has Eight Legs, and Acts Like an Arduino?

Back in the late 1970s, comedian Steve Martin had a bit about “Let’s get small!” Over on Hackaday.io, [Daniel Grießhaber], has taken that call to heart. He’s been working on DIL-Duino, a minuscule form factor Arduino in an 8-pin DIP format.

Built with an ATtiny85, the board has an area of just under 75 square millimeters (less than 8 mm x 10 mm). If you add the USB port, it still comes in at just over 144 square millimeters. [Daniel] found other small Arduino boards like the Olimexino-85s and the Nanite are not as small as his design.

The module has a QFN CPU and castellated holes around the perimeter for mounting. With pin headers, this would easily fit into a breadboard (as [Daniel] shows) or you could mount it directly to another board like a surface mount device. In fact, that’s the reason for using castellated holes: you can inspect that the solder joint at the mating SMD pad is good. You sometimes hear the technique called half-vias or leadless chip carrier.

If you note, [Daniel] used an oversized board with full holes around the perimeter and then had the board maker score the board, so the holes are cut in half. This is a better technique than trying to drill half holes on the board edge, which is difficult to do.

Naturally, this isn’t the first tiny Arduino we’ve seen. If you are an ARM fan, there’s some little bitty cards for it, too, although not quite as small as DIL-Duino.


Filed under: Arduino Hacks

Link Trucker is a Tiny Networking Giant

If you’re a networking professional, there are professional tools for verifying that everything’s as it should be on the business end of an Ethernet cable. These professional tools often come along with a professional pricetag. If you’re just trying to wire up a single office, the pro gear can be overkill. Unless you make it yourself on the cheap! And now you can.

[Kristopher Marciniak] designed and built an inexpensive device that verifies the basics:

  • Is the link up? Is this cable connected?
  • Can it get a DHCP address?
  • Can it perform a DNS lookup?
  • Can it open a webpage?

What’s going on under the hood? A Raspberry Pi, you’d think. A BeagleBoard? Our hearts were warmed to see a throwback to a more civilized age: an ENC28J60 breakout board and an Arduino Uno. That’s right, [Kristopher] replicated a couple-hundred dollar network tester for the price of a few lattes. And by using a pre-made housing, [Kristopher]’s version looks great too. Watch it work in the video just below the break.

Building an embedded network device used to be a lot more work, but it could be done. One of our favorites is still [Ian Lesnet’s] webserver on a business card from way back in 2008 which also used the ENC28J60 Ethernet chip.


Filed under: Network Hacks, tool hacks

You’re Never Too Young to Be a Rocket Scientist

We’ve been keeping tabs on the progress SpaceX has made toward landing a rocket so that it can be reused for future orbital launches. As you would imagine, this is incredibly difficult despite having some of the world’s greatest minds working on the task. To become one of those minds you have to start somewhere. It turns out, high school students can also build guided rockets, as [ArsenioDev] demonstrates in his project on hackaday.io.

[Arsenio]’s design targets amateur rockets with a fuselage diameter of four inches or so. The main control module is just a cylinder with four servos mounted along the perimeter and some fancy 3D printed fins bolted onto the servo. These are controlled by an Arduino and a 6DOF IMU that’s able to keep the rocket pointing straight up. Staaaay on target.

We saw this project back at the Hackaday DC meetup a month ago, and [Arsenio] was kind enough to give a short lightning talk to the hundred or so people who turned up. You can catch a video of that below, along with one of the videos of his build.


Filed under: Microcontrollers, transportation hacks

Laser Rangefinder Brought to Life With Arduino

Range finders are amazing tools for doing pretty much anything involving distance calculations. Want to blink some lights when people are nearby? There’s a rangefinder for that. Need to tell how far away the next peak of a mountain range is? There’s a rangefinder for that. But if you’re new to range finders and want one that’s hackable and configurable, look no further than the SF02/F rangefinder with the Arduino shield, and [Laser Developer]’s dive into what this pair can do.

Once the rangefinder and shield have been paired is when the magic really starts to happen. Using USB, the Arduino can instantly report a huge amount of raw data coming from the rangefinder. From there, [Laser Developer] shows us how to put the device into a “settings” mode which expands the capabilities of the rangefinder even more. The data can be dumped into a graph, for example, which can show trends between distance, laser strength, and many other data sets. [Laser Developer] goes one step further and demonstrates how to use this to calculate the speed of light, but from there pretty much anything else is possible as well.

And while you can just buy a rangefinder off the shelf, they are fairly limiting in their features and can cost exponentially more. This is a great start into using a tool like this, especially if you need specific data or have a unique application. But, if laser range finding isn’t for you or if this project is too expensive, maybe this $5 ultrasonic rangefinder will work better for your application.


Filed under: Arduino Hacks
Hack a Day 22 Oct 03:00

Pinball Simulator Makes The Neighbors Happy

There are a lot of simulators out there if you want to try something out that would be otherwise impossible. Great examples are flight simulators for simulating the piloting of a fighter jet, or goat simulators for simulating the life of a goat who destroys a town. [Erland] wanted a pinball machine, but like planes and goats, found it was impractical to get a real one because it would probably upset his neighbors in his apartment. Instead, he set out to build a pinball simulator.

The cabinet is miniature-sized compared to a regular pinball machine so it can more easily fit in the apartment. It utilizes three monitors, a 24″ one in portrait mode for the main playing area, a 20″ one for the back screen, and a smaller one for the “dot matrix” style scoreboard. Once the woodwork was completed, a PC was put together to control everything and an Arduino was installed to handle the buttons and output USB commands to the PC.

Of course, we’ve featured many other pinball simulators before, but this one is no slouch when it comes to features either. It is very well crafted and the project is very well documented, and the miniature size sets it apart as well. However, if you want to go a step further with your pinball simulator, you might want to check out this augmented reality pinball system.


Filed under: toy hacks