Posts with «arduino» label

Step aside Arduino, TinkerForge is the new sheriff in mod-town (video)

Does Arduino coding bring you out in a cold sweat? Perhaps what you need is the new open-source gear from TinkerForge. The modular system is designed for even novice users to whip up fully functioning robots in a matter of minutes hours. You start with a 4 x 4cm Brick, which you program over USB, but it won't do anything until you add accessories in the form of Bricklets: switches, joysticks, motors, accelerometers and LCDs. You can stack up to eight Bricks to expand the potential of your projects, including a step-down transformer and a (forthcoming) WiFi unit. If the rules-based programming software is too easy for you, the hardcore can bust out their mad C, C++, C#, Java and Python skills. The first models are available today, Bricks cost between €30 ($40) - €50 ($70) and Bricklets cost €3 ($4) - €20 ($25). Head on past the break to catch the press release and a video of some of the brilliant ways you can use this technology, including an infra-red theremin, self-positioning telescope and robots -- so many robots.

Continue reading Step aside Arduino, TinkerForge is the new sheriff in mod-town (video)

Step aside Arduino, TinkerForge is the new sheriff in mod-town (video) originally appeared on Engadget on Fri, 09 Dec 2011 19:35:00 EST. Please see our terms for use of feeds.

Permalink | Email this | Comments
Engadget 10 Dec 00:35
arduino  bricklets  bricks  diy  hack  hackers  hacking  kit  make  mod  modding  mods  tinkerforge  video  

ARDUINO Laser 3D Tracking / Range Finder

 The idea of using triangulation for distance measurements is well known since Pythagorean time, when his brilliant formula become available for mathematicians.
What is new in this design, is lasers power control via “blooming” effect of CMOS camera. Here this “negative” effect was put to work instead of ADC. No need high price “no-blooming” camera! (More information on this link: http://dpanswers.com/content/tech_defects.php ) There are few others design approach, that I was trying to make in hardware/software, and some of them not fully implemented yet ( project just started ).
Power Control Loop (PCL) allows to get stable  readings of the reflected back light beams, doesn’t matter what is reflectivity of the object’s surface, how well illuminated background and what distance range !!! edited: / (Regarding stability measurements in varying illumination conditions, right now there is a resistor for manual adjustment comparator trigger level, depends on average  “black-fixed” video. Gonna get rid off it shortly)./
Probably, someone could “hack” a camera, and redesign build-in AGC to provide stable, “fixed-white” level of video signal. But it would be extremely difficult to do with this SMD components, lack of documentation and too complicated for average hobbyist. Plus after that camera is not “in use” anymore for it’s main purpose.

Arduino has low size of RAM memory and 8-bit low power microprocessor, so full image processing could not be done. Instead, “build-in” 1-bit comparator forms visual map, where each cell stores time stamp, when events was captured. As video frame created from top to bottom line by line, line number corresponds to Y coordinate, and time of events on this line – X consequently. At this stage project is more like test bench, than final solution -);.
Right now I’m looking for optical zooming devices, to cover long / short distances automatically. Green lasers, I’m sure ‘d bring better resolution, just have to find couple of them for affordable price.
Approximate range with low cost CMOS camera and w/o optical zoom: 0.2 – 10 meters. Accuracy would greatly depends on lasers base/spacing. Lasers base also defines minimum size of the tracking object in Z coordinate.  NTSC camera:
Velleman CAMCOLMBLAHU MINI COLOR CMOS CAMERA WITH AUDIO + POWER ADAPTER
has viewing angle 52 degrees. Forget about pixels resolution for a moment, we are in analog television world -);   Math to calculate the distance (I call it Z coordinate) is pretty simple:   D =  B / tan ( phi ),  where D is distance, B is lasers base, and phi is an angle what camera reports.  Phi = 52 degree / 832 = 0.0625 degree per coordinate difference.(See below where 832 comes from).  D = B / tan (( X1 – X2 ) * 0.0625).  For example, B = 6 cm, X1 = 500, X2 = 512, than: D = 0.06 / tan ( ( 512 – 500) * 0.0625) = 4.58 meters.
( http://en.wikipedia.org/wiki/Tangent_(trigonometric_function)

Basically, one laser would be sufficient to measure distance. I installed two of them, because it looks cool! If seriously, there are a few advantages:
- redundancy;
- better accuracy;
- no interruption in distance measurements, even when object is in “vision field” area. I defined this area, for PCL operation. Width of vision field area is adaptive, it’s  narrowing to a few lines! after start-up system.

This version of software capable to follow 1 object in X axes. edited: see below Version 2 release notes. Object has to be visible by itself (rocket, vehicle, any source of light in general) OR highlighted by external light source – not focused to cover bigger space area. Reflectivity of object would define necessary power of the light source in this case, for specific distance range. Optical zoom would significantly improve systems performance.
Tracking in Vertical (Y axes) is not implemented yet, but coordinate reported on serial monitor. Math calculus of Z dimension is not included, simple trigonometry formula could be used. Calibration of mechanical setup would be necessary in order to get meaningful measurements results.

Some technical specification: edge detection resolution -  52 microsecond / per line x 16 MHz  = 832 pixel; 235 lines / per frame;    235 x 832 overall. Speed 60 frame / second. There is no issue to get 486 vertical lines with lower speed 30 fps.

52 microsecond is essential characteristic of the NTSC standard, which represents active line duration.  I used NTSC cam, and for PAL/SECAM it’s the same. 16 MHz oscillators frequency Arduino Uno board. I’m saying edge detection instead of spacial resolution as in current setup left edge is only detected with highest possible time accuracy 16 MHz. Technically it easy to modify settings to detect right side edge as well, and measure size of object, shape, and track few of them the same time. It wouldn’t be 832 pixels, as interrupt routine timing overhead will slow down time response, and there is not much memory in Arduino to do  a complex analysis of the picture anyway. This is why decision was made not to bother with right side. In current design, capture timing of event completely done by hardware. There is a link with details on video format: http://en.wikipedia.org/wiki/Analog_television#Synchronization

If you can imagine a balloon brightly highlighted from left side, with right edge invisible in shadow, it’d be close approximation.  For time sync extraction: LM1881. Two sync signal vertical/horizontal are attached on pins 2 and 3. Hardware interrupt feature of AtMega 328 continuously updates synchronization information – current line number. Time capture done by analog comparator and timer 1. DC voltage has to be adjusted in order to trigger comparator reliable at specific level of the video signal.
And one more things to mention, servo motor driving. In order to avoid interrupt routines racing , between lines/frame syncs and servo motor software library, which generate a jitter in position of the servo, plus timing noise on video raster, I didn’t use a standard Arduino Servo library, and generate servo-sync synchronously with frame sync. Frequency is up to 60 Hz instead of regular 50 Hz, but there is no complain from my Parallax servo, and I think it would the same with any other motors as well.

Link to download sketch:  Arduino_Laser_TRF

12 December 2011   *****  VERSION 2  *****


*     There are 4 main features in the project:
*
* 1. LOCALIZATION XY. CMOS Camera, LM1881.
* 2. RANGE FINDER Z.  Two Lasers plus Camera.
* 3. TRACKING 3D.        2 Servo Motors, plus all of the above.
* 4. TRACE TOOL.      Doesn’t require hardware, software only.
*
Feature considered to be independent, so you can star to build from first one, than move on next stage, and so on depends on a budget, parts availability or your interest! This version of software capable to track object in 3D space, X, Y and Z coordinates. Tracking feature requires
object to be visible in normal “visible” spectrum or near IR. Spectral range could be extended to thermal vision with different Image sensors. Emitting light by itself Object (rocket, star, any source of light in general) OR highlighted by external light source – not focused to cover bigger space area. For distance measurements Reflectivity of object and distance would define necessary power of the external light source in this case.
Z coordinate / distance is calculated in real time, based on simple trigonometry formula D = B * tan (phi).
Calibration of mechanical setup would be necessary in order to get accurate measurements results, especially
on long distances, when angle phi becomes really small. 

Link to download sketch:  Arduino_Laser_TRF_V2
* I’m not removing first version from download section, as it’s smaller and easier to understand logic
behind some software sub-module. Please, be advised that  V1 has bugs in servo motor position calculation. V1 is preferable to hobbyist, who want only localization and distance measurements features.

NEXT LEVEL DEGREES OF FREEDOM :   6 D++ 
http://optical-magnet-laser-6d-tracking.blogspot.com/


Triggertrap automatic shutter release hits production, links your camera to most things

Want your camera to take a shot whenever the phone rings or someone loads your blog page? Triggertrap can arrange that for you. This Arduino-powered box has managed to cross the funding finish-line and will be bringing its multi-source automatic release to camera creatives early next year. The former Insert Coin project can communicate with cameras through either a wired connection or its own IR transmitter. It can initiate shutter release from a multitude of sensors, with the built-in light, laser and sound sensors backed up by an auxiliary port, meaning it can be hooked up to anything capable of generating an electronic signal. With prototype testing complete, the Triggertrap looks set to ship in early February next year, with a special build-your-own version appearing soon after that. The ready-made options will set you back $125, while the customizable 'shield' version is pegged at $75. Interested? Well, hold on after the break for a full video tour of the cherry red hardware.

Continue reading Triggertrap automatic shutter release hits production, links your camera to most things

Triggertrap automatic shutter release hits production, links your camera to most things originally appeared on Engadget on Tue, 06 Dec 2011 11:10:00 EST. Please see our terms for use of feeds.

Permalink | Email this | Comments

eSleeper combines cats, Arduino and Twitter in an eMac shell (video)

If we had to imagine our dream DIY project chances are it would involve Arduino, Twitter and, of course, cats. How we'd combine those things we're not sure, but we'll admit to being big fans of Samuel Cox's eSleeper, which turns a hollowed-out eMac into a bed for his feline. Inside the shell is an Arduino Ethernet connected to an IR sensor, some LEDs and a sound shield. When the cat breaks the infrared beam it triggers the iconic Mac chime and turns on a series color-shifting LEDs for a little mood lighting. From there the clock starts ticking. When little Fluffy (Captain Whiskers? Matlock? Penny? Greg?) decides she's had enough napping and leaves the white plastic cocoon, tripping the IR sensor again, a random phrase is tweeted, along with the length of the cat's siesta. Check out the video after the break to see the eSleeper in all its adorable DIY glory.

Continue reading eSleeper combines cats, Arduino and Twitter in an eMac shell (video)

eSleeper combines cats, Arduino and Twitter in an eMac shell (video) originally appeared on Engadget on Thu, 01 Dec 2011 06:34:00 EST. Please see our terms for use of feeds.

Permalink | Email this | Comments

How to connect a weather station WS2355 (or WS2300) to Weather Underground with Arduino

Our weather station LIVE


There are several softwares that enable the publication of the weather data of a professional weather station, but they all work on PC, so we should connect the weather station to a computer and leave it on, the idea is not good because the computer takes up space and consumes a lot. At a time when we should spare the energy, its not a good thing.
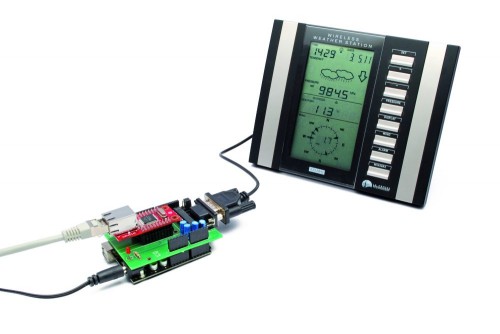
The project we’re talking about instead operates as a stand-alone application and allows you to publish the weather station data independently on http://www.wunderground.com, “forgetting” the PC consumption and even the desk space.

Arduino controls the dialogue with the weather station to acquire the data and also the Ethernet interface to transfer them, by making the necessary connection to the Internet via ADSL, passing by a router pointing to the IP address of the Weather Underground site and transferring information using the TCP / IP.


Our project

This circuit reads data from a weather station with serial interface and upload the data collected on http://www.wunderground.com.
Not all stations are equal, therefore, our circuit can not be universal but it is indicated specifically for stations La Crosse WS2355, WS2300 or WS2350.

The choice of weather station WS23xx was dictated primarily by a consideration: it has a convenient serial interface to connect and dialogue with a microcontroller such as Arduino.
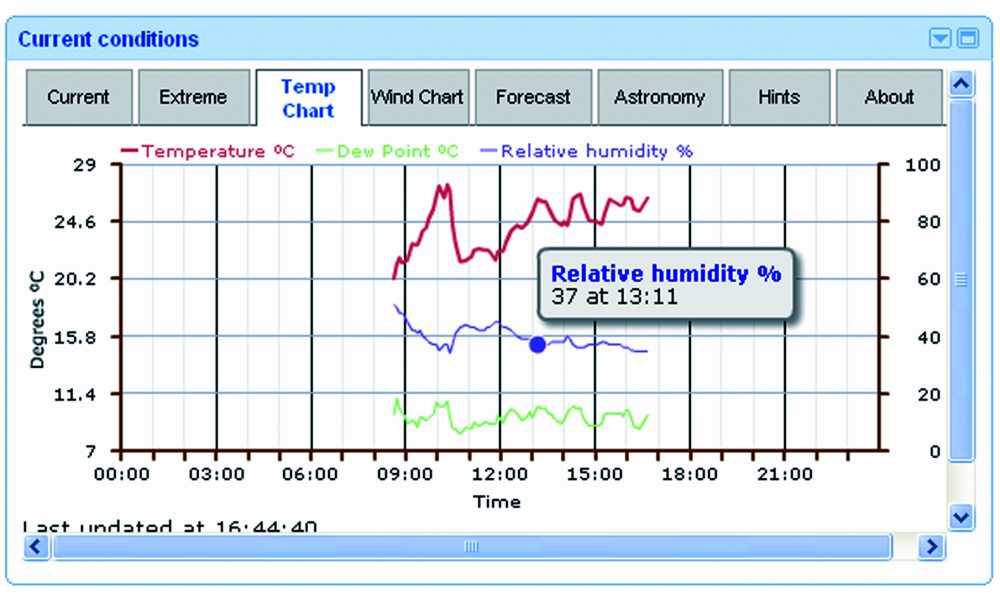
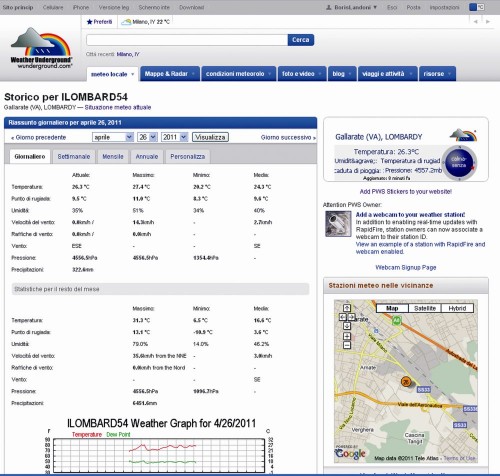
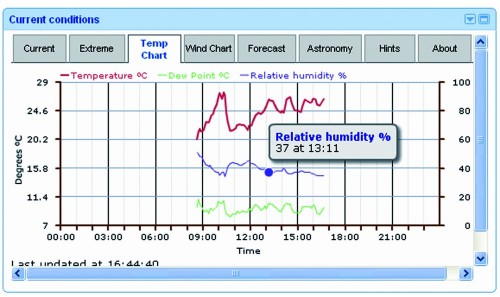
We chose www.wunderground.com site because it allows anyone to upload their weather data, but also to monitor the temperature, humidity, pressure, wind etc. on line. Also on this site there are many widgets that allow you to integrate data in website or blog.
An example is the Widget for the home page of Google.
The data sent by users are publicly available, then from the home page we can specify the geographic area that interests us and we will see a screen that lists all of the corresponding stations.

How does it work?

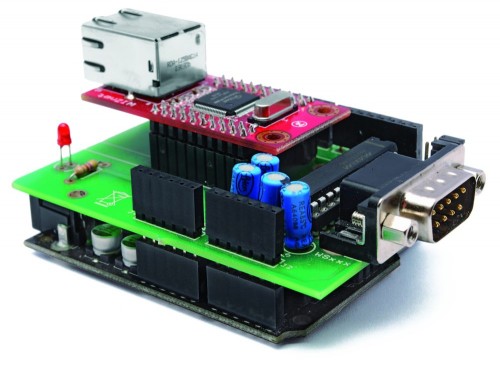
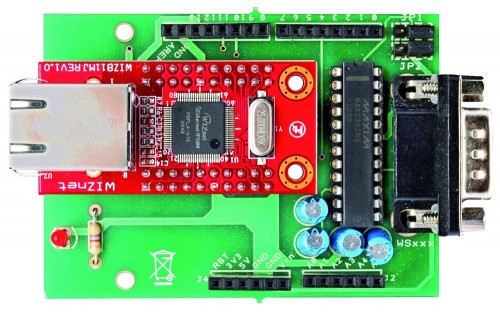
The system has two circuit: one is the famous Arduino UNO and the other is a shield that integrates the Ethernet module WIZnet (you may, of course, use the the original Ethernet Shield), as well as a TTL/RS232 logic level converter MAX238 type. The converter allows you to adapt the serial levels of weather station to the TTL levels of Arduino.
Please be aware that the communication port of the weather station is not a simple RS232, because it has no ground reference. The DTR line must have a negative voltage while the RTS must be positive. The lack of common ground leads to the hypothesis (remember that there is no official document) that these two lines are taken as a reference of logic levels used in communication. It is a system that not only allows the use of serial connections relatively long, but also gives the opportunity to agree devices with different voltage levels on the serial port.
To communicate with La Crosse, the speed of the serial device (in our case, the Arduino module) must be set to 2,400 bps, with blocks of 8 bits, no parity and one stop bit (2400-8-N-1).
The memory map of the weather station, like many other unofficial information on the WS2355 is on the site http://www.lavrsen.dk/foswiki/bin/view/Open2300/WebHome.
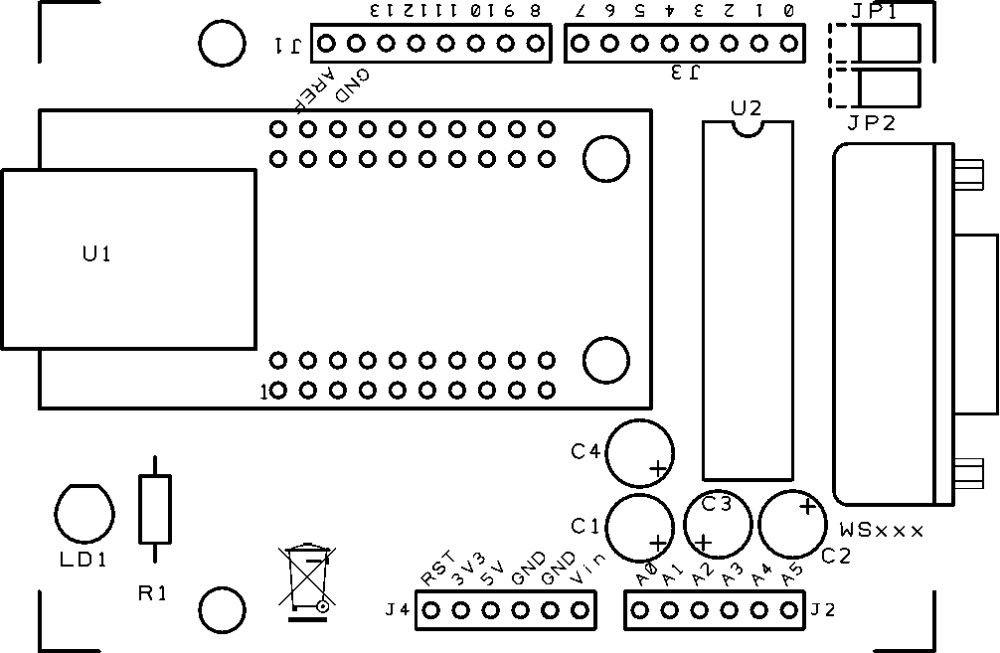
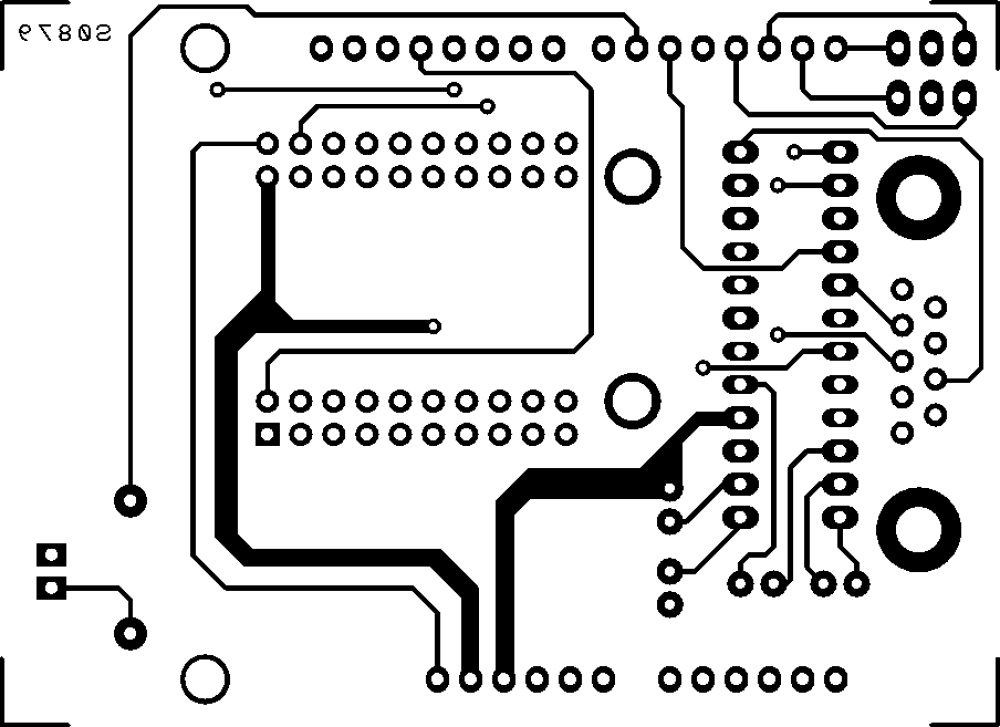
 

The hardware

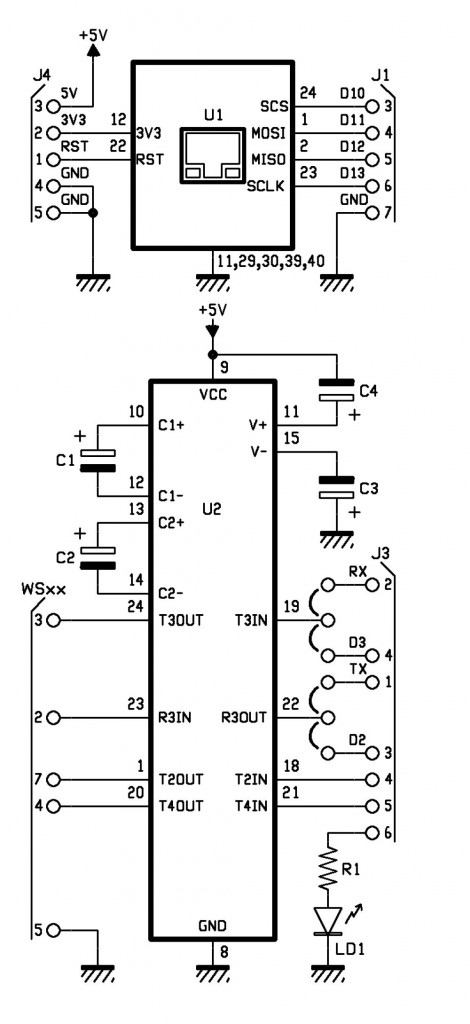
The jumpers on the lines T3IN and R3OUT (respectively RS232/TTL converter output and RS232/TTL converter input) let you choose which lines use for Arduino communication: we give you the opportunity to choose if use the serial hardware TXD and RXD or the two I/O digital D2 and D3 emulating a serial port with the appropriate library that can be downloaded from the website http://arduiniana.org/libraries/newsoftserial.


R1: 470 ohm
C1: 1 µF 100 VL
C2: 1 µF 100 VL
C3: 1 µF 100 VL
C4: 1 µF 100 VL
U1: WIZNET
U2: MAX238CNG
LD1: led 3 mm red

- socket 12+12
- Strip male 3 via (2 pz.)
- Jumper (2 pz.)
- Strip female/male 6 via (2 pz.)
- Strip female/male 8 via(2 pz.)
- Strip female 10 via (4 pz.)
- DB9 male
- PCB


The sketch

/*

****************************************************************
*  Name    : Personal Weather Station to wunderground.com      *
*  Author  : Landoni Boris                                     *
*  www.open-electronics.org                                    *
*  blog.elettronicain.it                                       *
*  www.futurashop.it                                           *
****************************************************************

http://wiki.wunderground.com/index.php/PWS_-_Upload_Protocol#Example_URL

action [action=updateraw] -- always supply this parameter to indicate you are making a weather observation upload
ID [ID as registered by wunderground.com]
PASSWORD [PASSWORD registered with this ID, case sensative]
dateutc - [YYYY-MM-DD HH:MM:SS (mysql format)] In Universal Coordinated Time (UTC) Not local time
winddir - [0-360 instantaneous wind direction]
windspeedmph - [mph instantaneous wind speed]
humidity - [% outdoor humidity 0-100%]
tempf - [F outdoor temperature]
rainin - [rain inches over the past hour)] -- the accumulated rainfall in the past 60 min
indoortempf - [F indoor temperature F]
indoorhumidity - [% indoor humidity 0-100]
softwaretype - [text] ie: WeatherLink, VWS, WeatherDisplay

windgustmph - [mph current wind gust, using software specific time period]
windgustdir - [0-360 using software specific time period]
windspdmph_avg2m  - [mph 2 minute average wind speed mph]
winddir_avg2m - [0-360 2 minute average wind direction]
windgustmph_10m - [mph past 10 minutes wind gust mph ]
dewptf- [F outdoor dewpoint F]
dailyrainin - [rain inches so far today in local time]
baromin - [barometric pressure inches]
weather - [text] -- metar style (+RA)
clouds - [text] -- SKC, FEW, SCT, BKN, OVC
soiltempf - [F soil temperature]
 * for sensors 2,3,4 use soiltemp2f, soiltemp3f, and soiltemp4f
soilmoisture - [%]
* for sensors 2,3,4 use soilmoisture2, soilmoisture3, and soilmoisture4
leafwetness  - [%]
+ for sensor 2 use leafwetness2
solarradiation - [W/m^2]
UV - [index]
visibility - [nm visibility]

http://weatherstation.wunderground.com/weatherstation/updateweatherstation.php?ID=KCASANFR5&PASSWORD=XXXXXX&dateutc=2000-01-01+10%3A32%3A35&winddir=230&windspeedmph=12&windgustmph=12&tempf=70&rainin=0&baromin=29.1&dewptf=68.2&humidity=90&weather=&clouds=&softwaretype=vws%20versionxx&action=updateraw

mappa ws2300

Command	Hex Digit	  	Command	Hex Digit
82	 0	  	 A2	 8
86	 1	  	 A6	 9
8A	 2	  	 AA	 A
8E	 3	  	 AE	 B
92	 4	  	 B2	 C
96	 5	  	 B6	 D
9A	 6	  	 BA	 E
9E	 7	  	 BE	 F

*/

#include <SPI.h>
#include <Ethernet.h>
#include <EEPROM.h>
#include <NewSoftSerial.h>

byte mac[] = {  0xDE, 0xAD, 0xBE, 0xEF, 0xFE, 0xED };
byte ip[] = { 192,168,0,145 };
byte server[] = { 38,102,136,125 }; // http://weatherstation.wunderground.com/

#define UPDATE_INTERVAL            300000    // if the connection is good wait 60 seconds before updating again - should not be less than 5
unsigned long update=0;

NewSoftSerial mySerial(2, 3);   //NewSoftSerial mySerial(rx,tx);

const int ledPin = 6; // the pin that the LED is attached to
const int rts = 4;
const int dtr = 5;
String id = "xxxxxxx";
String PASSWORD = "xxxxxxx";
boolean upload=1;
boolean leggicontinuo=0;

Client client(server, 80);

void setup() {
  Ethernet.begin(mac, ip);

  digitalWrite(ledPin, LOW);
  // initialize serial communication:
  Serial.begin(2400);
  Serial.println("Goodmorning WS2300!");
  // set the data rate for the NewSoftSerial port
  mySerial.begin(2400);

  // initialize the LED pin as an output:
  pinMode(ledPin, OUTPUT);
  pinMode(rts, OUTPUT);
  pinMode(dtr, OUTPUT);

  digitalWrite(rts, HIGH);
  digitalWrite(dtr, LOW);
  delay(2000);
  digitalWrite(rts, LOW);
  digitalWrite(dtr, HIGH);

  for (int i=0;i<10;i++){
    digitalWrite(ledPin, HIGH);
    delay(200);
    digitalWrite(ledPin, LOW);
    delay(200);
  }

}

void loop() {

  int incomingByteSer;      // a variable to read incoming serial data into
  // see if there's incoming serial data:
  if (Serial.available() > 0) {
    // read the oldest byte in the serial buffer:
    incomingByteSer = Serial.read();
    // if it's a capital H (ASCII 72), turn on the LED:
    Serial.flush();
    if (incomingByteSer == 'o') {
      String data=getTime();
      Serial.print("ora ");
      Serial.println(data);
    }  

    if (incomingByteSer == 'd') {
      String data=getDay();
      Serial.print("giorno ");
      Serial.println(data);
    }
    if (incomingByteSer == 't') {
      String data=getTemp(1);
      Serial.print("temperatura interna F ");
      Serial.println(data);
    } 

    if (incomingByteSer == 'T') {
      String data=getTemp(0);
      Serial.print("temperatura esterna F ");
      Serial.println(data);
    } 

    if (incomingByteSer == 'h') {
      String data=getHum(1);
      Serial.print("umidità interna ");
      Serial.println(data);
    } 

    if (incomingByteSer == 'H') {
      String data=getHum(0);
      Serial.print("umidità esterna ");
      Serial.println(data);
    } 

    if (incomingByteSer == 'p') {
      String data=getPress(1);
      Serial.print("pressione hPa ");
      Serial.println(data);
    } 

    if (incomingByteSer == 'P') {
      String data=getPress(0);
      Serial.print("pressione Hg ");
      Serial.println(data);
    } 

    if (incomingByteSer == 'w') {
      String data=getWind(0);
      Serial.print("wind speed mph ");
      Serial.println(data);     

    } 

    if (incomingByteSer == 'W') {
      String data=getWind(1);
      Serial.print("wind dir ");
      Serial.println(data);
    } 

    if (incomingByteSer == 'r') {
      String data=getRain(1);
      Serial.print("rain 1 ");
      Serial.println(data);
    } 

    if (incomingByteSer == 'R') {
      String data=getRain(0);
      Serial.print("rain 24 ");
      Serial.println(data);
    }  

    if (incomingByteSer == 'e') {
      String data=getDew();
      Serial.print("dew point ");
      Serial.println(data);
    } 

    if (incomingByteSer == 'U') {
      readws();
    } 

    if (incomingByteSer == 'u') {
      pubblica();
    }

    if (incomingByteSer == 'a') {
      if (upload==1){
        upload=0;
        Serial.println("Disattivo l'upload automatico ");
      }
      else
      {
        upload=1;
        Serial.println("Attivo l'upload automatico ");
      }
    }

    if (incomingByteSer == 'A') {
      if (leggicontinuo==1){
        leggicontinuo=0;
        Serial.println("Disattivo lettura continua ");
      }
      else
      {
        leggicontinuo=1;
        Serial.println("Attivo lettura continua ");
      }
    }

    // if it's an L (ASCII 76) turn off the LED:
    if (incomingByteSer == 'L') {
      digitalWrite(ledPin, LOW);
    }
  }

  if (upload==1){
    if (millis() < update) update = millis();
      if ((millis()% 1000) < 2){
        delay (100);
        Serial.print(".");
      }
        if ((millis() - update) > UPDATE_INTERVAL){
            update = millis();
            readws();
            pubblica();
            Serial.println("tempo impiegato per fare la pubblicazione: ");
            Serial.println(millis()-update);
        }
  }

  if (leggicontinuo==1){
    if (millis() < update) update = millis();
      if ((millis()% 1000) < 2){
        delay (100);
        Serial.print(".");
      }
        if ((millis() - update) > UPDATE_INTERVAL){
            update = millis();
            readws();
        }
  }

}

void pubblica()
{

  int timeout=0;
  int skip=0;
  String inString="";
  digitalWrite(ledPin, HIGH);
  Serial.print("connecting  ");

  if (client.connect()) {

    Serial.println("connected");
    //client.println("GET / HTTP/1.0");
    Serial.print("GET /weatherstation/updateweatherstation.php?");//modificare qua.
    client.print("GET /weatherstation/updateweatherstation.php?");//modificare qua.
    pubbws();
    client.println(" HTTP/1.0");
    Serial.println(" HTTP/1.0");

    Serial.print("HOST: ");
    client.print("HOST: ");
    client.println("http://www.wunderground.com");
    Serial.println("http://www.wunderground.com");
    client.println();
  } else {
    Serial.println("connection failed");
  }
  while (!client.available() && timeout<50)
  {
    timeout++;
    Serial.print("Time out ");
    Serial.println(timeout);
    delay(100);
  }

  while (client.available())
  {
        char c = client.read();
          if ((inString.length())<150){ inString.concat(c);}
  }         

  client.flush();

      if ((inString.length())>5)
      {
              Serial.print("Risposta ");
              Serial.print(inString);
      }              

   if (!client.connected())
   {
        Serial.println("disconnecting.");
        client.stop();
        delay (1000);
   }
   digitalWrite(ledPin, LOW);

}

void readws(){

      Serial.println("URL ");
      Serial.print("http://weatherstation.wunderground.com/weatherstation/updateweatherstation.php?");
      String temp =getDay();
      String temp1=getTime();
      if ((temp.length()>6) && (temp1.length()>4)){
        Serial.print("ID=");
        Serial.print(id);
        Serial.print("&PASSWORD=");
        Serial.print(PASSWORD);
        Serial.print("&dateutc=");
        Serial.print(temp);
        Serial.print("+");
        Serial.print(temp1);
        scrivimem(temp,0);
        scrivimem(temp1,20);
      }
      else
      {
        Serial.println("Lettura data/ora non riuscita torno");
        return;
      }
      temp=getWind(1);
      if (temp.length()>1){
        Serial.print("&winddir=");
        Serial.print(temp);
        scrivimem(temp,40);
      }
      temp=getWind(0);
      if (temp.length()>2){
        Serial.print("&windspeedmph=");
        Serial.print(temp);
       scrivimem(temp,60);
      }
      temp=getTemp(0);
      if (temp.length()>3){
        Serial.print("&tempf=");
        Serial.print(temp);
        scrivimem(temp,80);
      }
      temp=getRain(1);
      if (temp.length()>2){
        Serial.print("&rainin=");
        Serial.print(temp);
        scrivimem(temp,100);
      }
      temp=getRain(0);
      if (temp.length()>2){
        Serial.print("&dailyrainin=");
        Serial.print(temp);
        scrivimem(temp,120);
      }
      temp=getHum(0);
      if (temp.length()>1){
        Serial.print("&humidity=");
        Serial.print(temp);
        scrivimem(temp,140);
      }
      temp=getDew();
      if (temp.length()>1){
        Serial.print("&dewptf=");
        Serial.print(temp);
        scrivimem(temp,160);
      }
      temp=getPress(0);
      if (temp.length()>1){
        Serial.print("&baromin=");
        Serial.print(temp);
        scrivimem(temp,180);
      }
}

void pubbws(){
      String temp =leggimem(0);
      String temp1=leggimem(20);
      if ((temp.length()>6) && (temp1.length()>4)){
        Serial.print("ID=");
        Serial.print(id);
        Serial.print("&PASSWORD=");
        Serial.print(PASSWORD);
        Serial.print("&dateutc=");
        Serial.print(temp);
        Serial.print("+");
        Serial.print(temp1);
        client.print("ID=");
        client.print(id);
        client.print("&PASSWORD=");
        client.print(PASSWORD);
        client.print("&dateutc=");
        client.print(temp);
        client.print("+");
        client.print(temp1);
      }
      else
      {
        Serial.println("Lettura data/ora non riuscita torno");
        return;
      }
      temp=leggimem(40);
      if (temp.length()>1){
        Serial.print("&winddir=");
        Serial.print(temp);    

        client.print("&winddir=");
        client.print(temp);
      }    

      temp=leggimem(60);
      if (temp.length()>2){
        Serial.print("&windspeedmph=");
        Serial.print(temp);        

        client.print("&windspeedmph=");
        client.print(temp);
      }   

      temp=leggimem(80);
      if (temp.length()>3){
        Serial.print("&tempf=");
        Serial.print(temp);

        client.print("&tempf=");
        client.print(temp);
      }   

      temp=leggimem(100);
      if (temp.length()>2){
        Serial.print("&rainin=");
        Serial.print(temp);       

        client.print("&rainin=");
        client.print(temp);
      }   

      temp=leggimem(120);
      if (temp.length()>2){
        Serial.print("&dailyrainin=");
        Serial.print(temp);       

        client.print("&dailyrainin=");
        client.print(temp);
      }   

      temp=leggimem(140);
      if (temp.length()>1){
        Serial.print("&humidity=");
        Serial.print(temp);        

        client.print("&humidity=");
        client.print(temp);
      }   

      temp=leggimem(160);
      if (temp.length()>1){
        Serial.print("&dewptf=");
        Serial.print(temp);        

        client.print("&dewptf=");
        client.print(temp);        

      }   

      temp=leggimem(180);
      if (temp.length()>1){
        Serial.print("&baromin=");
        Serial.print(temp);        

        client.print("&baromin=");
        client.print(temp);        

      } 

        Serial.print("&windgustmph=0.00");
        client.print("&windgustmph=0.00");
        Serial.print("&action=updateraw");
        client.print("&action=updateraw");

}

void scrivimem(String dataStr, int pos){

  for (int i=0; i<dataStr.length();i++)
  {
    EEPROM.write((pos+i),dataStr[i]);
  }
  EEPROM.write((pos+dataStr.length()),'#');
  for (int i=pos;i<(pos+50);i++)
  {
    if (EEPROM.read(i)=='#')
    {
      break;
    }
  }

}

String leggimem(int pos){
  int lung=0;
  char dataStr[15];

  for (int i=0;i<15;i++)
  {
    dataStr[i]=0;
  }
  for (int i=pos;i<(pos+20);i++)
  {
    lung++;
    if (EEPROM.read(i)=='#')
    {
      break;
    }
    char c=EEPROM.read(i);
    dataStr[i-pos]=(c); 

  }
  dataStr[lung]='\0';
  return(dataStr);
}

String Leggi (int mem[]) {
    String inString;
    char inChar [3];
    int incomingByte=0;      // a variable to read incoming serial data into
    int time=0;
    String chk;
     while ((incomingByte!=2) && (time<20)){
          time++;
          mySerial.print(byte(06));
          delay(20); 

            if ((mySerial.available() > 0) && (time<20)) {
              delay(30);
              time++;
              incomingByte = mySerial.read();
              inString.concat(incomingByte);
            }
      }

     inString="";
     time=0;
     inString.concat("00"); //aggiungo due cifre
     mySerial.flush();
     if (time>18){
          return("0\0");
     }  

      for (int i=0; i<2; i++){

          if (inString.length()>8){
            chk=(inString.substring(4,8));
          }
          inString="";
          inString.concat("00"); //aggiungo due cifre
          for (int tmp=0; tmp<5; tmp++){
            mySerial.print(byte(mem[tmp]));
            while ((mySerial.available() == 0) && (time<100)){
             delay(30);
             time++;
            }
            if (time>98){
              return("0\0");
              break;  

            }        

            if (mySerial.available() > 0) {
              incomingByte = mySerial.read();
            }

            time=0;
           //delay(200);
               while ((mySerial.available() > 0) && time<200 ) {
                    time++;
                    delay(20);
                    incomingByte = mySerial.read();
                    if (tmp<4){
                      if (tmp!=((incomingByte & B11110000)/B10000)){
                          return("0\0");
                          break;
                      }
                    }
                    if (tmp==4){
                      sprintf(inChar, "%02X", incomingByte);
                      inString.concat(inChar);
                    }
               }
           }

      }
        if (chk!=(inString.substring(4,8)))
        {
          return("0\0");

        }
        inString=inString.trim();
        if (inString.length()>16){
          inString=(inString.substring(0,15));
        }
        return(inString);
}

String getTime(){

      String dataStr="";
      int my_array[] = {0x82,0x8A,0x82,0x82,0xDA};  //0200
      String inString;

        for (int ritenta=0; ritenta<10; ritenta++){
           dataStr="";
            inString=Leggi(my_array);
            if (inString.length()>5){
                //data= inString.substring(4,6);  //estraggo i decimali della temperatura
                dataStr.concat(inString.substring(6,8));  //estraggo l'ora
                dataStr.concat(":");
                dataStr.concat(inString.substring(4,6));  //estraggo i minuti
                dataStr.concat(":");
                dataStr.concat(inString.substring(2,4));  //estraggo i secondi
                if (((inString.substring(6,8))<23 && (inString.substring(6,8))>=0)&&((inString.substring(4,6))<60 && (inString.substring(4,6))>=0) && ((inString.substring(2,4))<60 && (inString.substring(2,4))>=0)) {
                    break;
                }
                else {
                  dataStr="";
                }

             }
             else
             {
                 delay(500);
             }
        }
      return(dataStr);
}

String getDay(){
      String inString;
      String dataStr="";
      int my_array[] = {0x82,0x8A,0x8E,0xAE,0xEE};
        for (int ritenta=0; ritenta<10; ritenta++){
            dataStr="";
            inString=Leggi(my_array);
            if (inString.length()>5){
                dataStr.concat("20");
                dataStr.concat(inString.charAt(13));
                dataStr.concat(inString.charAt(10));
                dataStr.concat("-");
                dataStr.concat(inString.charAt(11));
                dataStr.concat(inString.charAt(8));
                dataStr.concat("-");
                dataStr.concat(inString.charAt(9));
                dataStr.concat(inString.charAt(6));
                if (((inString[13]<='9' && inString[13]>='0')&&(inString[10]<='9' && inString[10]>='0')) && ((inString[11]<='1' && inString[11]>='0')&&(inString[8]<='9' && inString[8]>='0')) && ((inString[9]<='3' && inString[9]>='0')&&(inString[6]<='9' && inString[6]>='0'))) {
                    break;
                }
                else {
                  dataStr="";
                }
           }
           else
           {
               delay(500);
           }
        }
      return(dataStr);
}

String getTemp(int dato){
      String inString;
      String dataStr="";
      //String dataStr;
      char cdata [10];
      int lung=0;
      char buff[10];
      int my_array[6];

      if (dato==1){
        my_array[0] = (0x82);
        my_array[1] = (0x8E);
        my_array[2] = (0x92);
        my_array[3] = (0x9A);
        my_array[4] = (0xFA);
      }
       else
      {
        my_array[0] = (0x82);
        my_array[1] = (0x8E);
        my_array[2] = (0x9E);
        my_array[3] = (0x8E);
        my_array[4] = (0xFA);
      }
        for (int ritenta=0; ritenta<10; ritenta++){
            dataStr="";
            inString=Leggi(my_array);
            if (inString.length()>5){
                (inString.substring(4,6)).toCharArray(buff,3);
                dataStr.concat((atoi(buff))-30);
                dataStr.concat(".");
                dataStr.concat(inString.substring(2,4));  //estraggo le decine e unità della temperatura
               if (((inString[4]<='9' && inString[4]>='0')&&(inString[5]<='9' && inString[5]>='0')) && ((inString[2]<='9' && inString[2]>='0')&&(inString[3]<='9' && inString[3]>='0'))) {
                   break;
                }
                else {
                  dataStr="";
                }
           }
           else
           {
              delay(500);
           }
        }
      if (dataStr.length()>2)
      {

        dataStr.toCharArray(cdata, dataStr.length()+1);
          float fdata=(atof(cdata)*1.800+32.000);
          if (fdata<1000){lung=7;}
          if (fdata<100){lung=6;}
          if (fdata<10){lung=5;}
          dtostrf(fdata,lung,3,cdata);
          dataStr=cdata;
      }
      else
      {
        dataStr="";
      }

      return(dataStr);
}

String getHum(int dato){
      String dataStr="";
      String inString;
      int my_array[6];
      if (dato==1){
        my_array[0] = (0x82);
        my_array[1] = (0x8E);
        my_array[2] = (0xBE);
        my_array[3] = (0xAE);
        my_array[4] = (0xDA);
      }
       else
      {
        my_array[0] = (0x82);
        my_array[1] = (0x92);
        my_array[2] = (0x86);
        my_array[3] = (0xA6);
        my_array[4] = (0xDA);
      }
        for (int ritenta=0; ritenta<10; ritenta++){
            dataStr="";
            inString=Leggi(my_array);
            if (inString.length()>5){
                dataStr.concat(inString.substring(2,4));  //estraggo le decine e unità della temperatura
               if ((inString[2]<='9' && inString[2]>='0')&&(inString[3]<='9' && inString[3]>='0')) {
                   break;
                }
                else {
                  dataStr="";
                }
           }
           else
           {
               delay(500);
           }
        }
      return(dataStr);
}

String getPress(int dato){
      String dataStr="";
      String inString;
      int my_array[6];
      if (dato==1){
        my_array[0] = (0x82);
        my_array[1] = (0x96);
        my_array[2] = (0xBA);
        my_array[3] = (0x8A);
        my_array[4] = (0xD6);
      }
       else
      {
        my_array[0] = (0x82);      //press hg
        my_array[1] = (0x96);
        my_array[2] = (0xB6);
        my_array[3] = (0xB6);
        my_array[4] = (0xD6);
      } 

        for (int ritenta=0; ritenta<10; ritenta++){
            dataStr="";
            inString=Leggi(my_array);
            if (inString.length()>5){
                dataStr.concat(inString.charAt(7));
                dataStr.concat(inString.charAt(4));
                dataStr.concat(inString.charAt(5));
                if (dato==1){
                  dataStr.concat(inString.charAt(2));
                  dataStr.concat(".");
                  dataStr.concat(inString.charAt(3));
                }
                else
                {
                  dataStr.concat(".");
                  dataStr.concat(inString.charAt(2));
                  dataStr.concat(inString.charAt(3));
                }

                if ((inString[7]<='9' && inString[7]>='0')&&(inString[4]<='9' && inString[4]>='0') && (inString[5]<='9' && inString[5]>='0')&&(inString[2]<='9' && inString[2]>='0') && (inString[2]<='9' && inString[2]>='0')) {
                  break;
                }
                else {
                  dataStr="";
                }
           }
           else
           {
              delay(500);
           }
        }
      return(dataStr);

}

String getWind(int dato){
      String dataStr="";
      char cdata [10];
      int lung=0;
      String inString;
      char buff[10];
      int my_array[] = {0x82,0x96,0x8A,0x9E,0xF2};
        for (int ritenta=0; ritenta<10; ritenta++){
            dataStr="";
            inString=Leggi(my_array);
            if (inString.length()>5){
              if (dato==0){
                 dataStr.concat(inString.charAt(7));
                 buff[0]=inString[4];
                 buff[1]=inString[5];
                 int tmp=(strtol(buff,NULL,16));
                 if (tmp<=9){
                   dataStr.concat("0");
                 }

                 dataStr.concat(tmp); // converts a HEX string to long
                 dataStr.concat(dataStr.charAt(2));
                 dataStr.setCharAt(2, '.');
                if ((inString[4]<='9' && inString[4]>='0')&&(inString[5]<='9' && inString[5]>='0')) {
                  break;
                }
                else {
                  dataStr="";
                }
              }
              else
              {
                 buff[0]=inString[6];
                 buff[1]=0;
                 int tmp=((strtol(buff,NULL,16))*22.5);
                 dataStr.concat(tmp);
                if ((tmp>=0)&&(tmp<=360)) {
                  break;
                }
                else {
                  dataStr="";
                  ritenta=0;
                }
              }
           }
           else
           {
               delay(500);
           }
        }

      if (dato==0){    //se richiedo la velocità convertoin miglia orarie    

           if (dataStr.length()>2)
           {
                  dataStr.toCharArray(cdata, (dataStr.length()+1));
                  float fdata=(atof(cdata)*2.23);
                  if (fdata<1000){lung=6;}
                  if (fdata<100){lung=5;}
                  if (fdata<10){lung=4;}
                  dtostrf(fdata,lung,2,cdata);
                  dataStr=cdata;
          }
          else
          {
            dataStr="";
          }
      }

      return(dataStr);
}

String getRain(int dato){
       String dataStr="";
      char cdata [10];
      int lung=0;
      String inString;
            int my_array[6];
      if (dato==1){      //pioggia 1 ora
        my_array[0] = (0x82);
        my_array[1] = (0x92);
        my_array[2] = (0xAE);
        my_array[3] = (0x92);
        my_array[4] = (0xDA);
      }
       else
      {
        my_array[0] = (0x82);      //0497
        my_array[1] = (0x96);
        my_array[2] = (0xA6);
        my_array[3] = (0x9E);
        my_array[4] = (0xD6);
      }
        for (int ritenta=0; ritenta<10; ritenta++){
            dataStr="";
            inString=Leggi(my_array);
            if (inString.length()>5){
                dataStr.concat(inString.substring(6,8));
                dataStr.concat(inString.substring(4,6));
                if ((inString[6]<='9' && inString[6]>='0')&&(inString[7]<='9' && inString[7]>='0') && (inString[4]<='9' && inString[4]>='0')&&(inString[5]<='9' && inString[5]>='0') && (inString[2]<='9' && inString[2]>='0')&& (inString[3]<='9' && inString[3]>='0')) {
                  break;
                }
                else {
                  dataStr="";
                }
           }
           else
           {
               delay(500);
           }
        }

         if (dataStr.length()>2)
      {  

          dataStr.toCharArray(cdata, (dataStr.length()+1));
            //Serial.print("cdata ");
            //Serial.println(cdata);
          float fdata=(atof(cdata)*2.54);  //in pollici
          if (fdata<1000){lung=6;}
          if (fdata<100){lung=5;}
          if (fdata<10){lung=4;}
          dtostrf(fdata,lung,2,cdata);
          dataStr=cdata;
      }
      else
      {
        dataStr="";
      }

      return(dataStr);
}

String getDew(){

      String inString;
      String dataStr="";
      char cdata [10];
      int lung=0;
      char buff[10];

      //Serial.println("leggo pioggia 1h ");
      int my_array[] = {0x82,0x8E,0xB2,0xBA,0xFA};
        for (int ritenta=0; ritenta<10; ritenta++){
            dataStr="";
            inString=Leggi(my_array);
            if (inString.length()>5){            

                (inString.substring(4,6)).toCharArray(buff,3);
                dataStr.concat((atoi(buff))-30);
                dataStr.concat(".");
                dataStr.concat(inString.substring(2,4));  //estraggo le decine e unità della temperatura
               if (((inString[4]<='9' && inString[4]>='0')&&(inString[5]<='9' && inString[5]>='0')) && ((inString[2]<='9' && inString[2]>='0')&&(inString[3]<='9' && inString[3]>='0'))) {
                   break;
                }
                else {
                  dataStr="";
                }
           }
           else
           {
              delay(500);
           }
        }

      if (dataStr.length()>2)
      {

          dataStr.toCharArray(cdata, dataStr.length()+1);
          float fdata=(atof(cdata)*1.800+32.000);
            if (fdata<1000){lung=7;}
            if (fdata<100){lung=6;}
            if (fdata<10){lung=5;}
            dtostrf(fdata,lung,3,cdata);

          dataStr=cdata;
            }
      else
      {
        dataStr="";
      }

      return(dataStr);
}

For the connection we uses the serial port pins 2 and 3 of module Arduino for this reason we have used the library NewSoftSerial that lets you emulate a UART using the generic contact I/O such as serial lines.
Periodically, the Arduino microcontroller polls the weather station and stores the data for the date, time, outside temperature, outside humidity, wind speed and direction, rain fell in one hour and 24 hours, the atmospheric pressure and dew point. The constant UPDATE_INTERVAL defines after how many seconds Arduino public the data collected on the site www.wunderground.com.
In order to publish the data of the control unit on this site, as already mentioned, you must have an account, once registered, there is assigned an ID that will be introduced during the connection to the site in order to proceed with publication.
In the sketch for the Arduino you must enter your ID and password, so that the publication will be successful, otherwise our system will point to the site but will not get access.
For the publication of data is sufficient to recall the page http://weatherstation.wunderground.com/weatherstation/updateweatherstation.php,
passing data to the URL. For example, you have to compose a string like this:

http://weatherstation.wunderground.com/weatherstation/updateweatherstation.php?ID=KCASANFR5&PASSWORD=XXXXXX&dateutc=2000-01-01+10&winddir=230&windspeedmph=12&windgustmph=12&tempf=70&rainin=0&baromin=29.1&dewptf=68.2&humidity=90&weather=&clouds=&softwaretype=vws%20versionxx&action=updateraw.

As you see, the user ID and password are inserted in the string. The data temperature should be expressed in Fahrenheit degrees and the wind speed must be in mph (miles per hour). The conversion of the data read by the control unit is made directly from the sketch, so as to spare you the burden to proceed with the manual calculation.

The use of the site www.wunderground.com for the publication of meteorological data is free and subject only to the rules of the provider, there are also advanced features, including the addition of photos and images from a webcam filming on location is the weather station and sent through the Internet.


Arduino hacker conjures NES and Etch-a-sketch wonderment (video)

You never know when that creative spark will ignite in your brain and compel you to sketch out some ideas. But when that genius moment finally arrives, you might consider grabbing your original Nintendo controller, quickly wiring it up to an Arduino board, connecting that to some motors and then using those to drive the dials on an Etch-a-Sketch. Modder Alpinedelta32 tries it in the video after the break and it turns out to be a breeze -- and so much more tactile than other idea-capturing devices.

Continue reading Arduino hacker conjures NES and Etch-a-sketch wonderment (video)

Arduino hacker conjures NES and Etch-a-sketch wonderment (video) originally appeared on Engadget on Fri, 25 Nov 2011 22:01:00 EST. Please see our terms for use of feeds.

Permalink | Email this | Comments

Comunikino, an Arduino based communication system


“Social things” have replaced traditional ways of communication like sms and mails. One day i needed a new, fast, mobile and snappy way of communication. So i made Comunikino.

http://www.youtube.com/watch?v=Y9fqseT9PI0

It consists of two main parts, a script in python that runs on the PC and a box that goes on desktop connected through an USB cable used for data and power (no external power needed if you use a 500mA capable usb port!). You need to create a mailbox  for Comunikino with pop access, i raccomend to use gmail as many providers don’t offer pop access for free mailboxes.

Using Comunikino is simple, just send a mail to its mailbox and the subject will be printed to its LCD (max 16 chars). Who reads the message can use one of three Comunikino’s buttons to send a mail back to the address setted in python script to say yes, no or readed (this button can also to be used to say: “hey! I’m thinking of you”). Simple, isn’t it?

Schematics

Built instructions

You will need:

Amount Part Type Properties
1 Arduino I’ve used a 2009
1 Basic Servo
1 LCD screen I’ve used a 16×2 LCD based on SPLC780D chip which is totally compatible with Arduino LCD library that is made for HD44780 chip. Its voltage must be 5V!
3 Push-button Momentary normally open push button
1 Rotary Potentiometer Rotary Shaft Potentiometer; see datasheet for maximum resistance
1 Metal or plastic box I used a 13,5×7,5×5,5 cm metal box but you can use anything similar.

First of all the box. You should cut it as images below.

LCD mounting:

Now fix arduino and buttons like this:

Mounting servo:

Putting things together (you can note a recycled hard disk flat cable used to connect LCD, ricycling is good!):

The flag can be made by wood, mdf, or cardboard:

Setting up software

Now download Comunikino's software (430) (Linux and windows version inside) and configure python script with the data of the mailbox you have created for Comunikino (gmail is highly recommended). You can do this just editing the script with a text editor. At the beginning you will find variables that you have to change, read comments for explanation! You need also to download and burn into Arduino the sketch into the zip (no modification needed here).  Remember, before launching python script you have to connect Comunikino to PC or it will quit with an error. I advice you to leave Comunikino linked to the computer and make the script run on start up. Comunikino will inform you that it is ready to communicate with a mail every time computer is turned on.

Comunikino is ready!

I want to upgrade this device with advanced features. I want to create a better software with GUI and a nice looking box. Help me!

Eraclitux 24 Nov 23:43
arduino  idea  project  projects  python  sketch  

Comunikino, an Arduino based communication system


“Social things” have replaced traditional ways of communication like sms and mails. One day i needed a new, fast, mobile and snappy way of communication. So i made Comunikino.

It consists of two main parts, a script in python that runs on the PC and a box that goes on desktop connected through an USB cable used for data and power (no external power needed if you use a 500mA capable usb port!). You need to create a mailbox  for Comunikino with pop access, i raccomend to use gmail as many providers don’t offer pop access for free mailboxes.

Using Comunikino is simple, just send a mail to its mailbox and the subject will be printed to its LCD (max 16 chars). Who reads the message can use one of three Comunikino’s buttons to send a mail back to the address setted in python script to say yes, no or readed (this button can also to be used to say: “hey! I’m thinking of you”). Simple, isn’t it?

Schematics

Built instructions

You will need:

Amount Part Type Properties
1 Arduino I’ve used a 2009
1 Basic Servo
1 LCD screen I’ve used a 16×2 LCD based on SPLC780D chip which is totally compatible with Arduino LCD library that is made for HD44780 chip. Its voltage must be 5V!
3 Push-button Momentary normally open push button
1 Rotary Potentiometer Rotary Shaft Potentiometer; see datasheet for maximum resistance
1 Metal or plastic box I used a 13,5×7,5×5,5 cm metal box but you can use anything similar.

First of all the box. You should cut it as images below.

LCD mounting:

Now fix arduino and buttons like this:

Mounting servo:

Putting things together (you can note a recycled hard disk flat cable used to connect LCD, ricycling is good!):

The flag can be made by wood, mdf, or cardboard:

Setting up software

Now download Comunikino's software (122) (Linux and windows version inside) and configure python script with the data of the mailbox you have created for Comunikino (gmail is highly recommended). You can do this just editing the script with a text editor. At the beginning you will find variables that you have to change, read comments for explanation! You need also to download and burn into Arduino the sketch into the zip (no modification needed here).  Remember, before launching python script you have to connect Comunikino to PC or it will quit with an error. I advice you to leave Comunikino linked to the computer and make the script run on start up. Comunikino will inform you that it is ready to communicate with a mail every time computer is turned on.

Comunikino is ready!

Perhaps you may find interesting:

Eraclitux 24 Nov 23:43
arduino  idea  project  projects  python  sketch  

Insert Coin: Twine connects your whole world to the internet

In Insert Coin, we look at an exciting new tech project that requires funding before it can hit production. If you'd like to pitch a project, please send us a tip with "Insert Coin" as the subject line.

Wouldn't it be great if your laundry emailed you when it had finished? You got a tweet every time the room got too cold, or your basement sent you a text if it began to flood? "Easy," says the Arduino expert in the peanut gallery, but what about those with neither the time nor inclination to solder and program it from scratch? Fortunately, the gentlemen who founded Supermechanical feel our pain and have just the tonic for our maladies -- head on past the break to find out more.

Continue reading Insert Coin: Twine connects your whole world to the internet

Insert Coin: Twine connects your whole world to the internet originally appeared on Engadget on Thu, 24 Nov 2011 12:18:00 EST. Please see our terms for use of feeds.

Permalink | Email this | Comments

Googly Eye Arduino Shield proves geeks just wanna have fun (video)

Look, not every Arduino accessory has to be useful. Heck, some of them don't have to do anything at all except, perhaps, make you smile. And that's all the Googly Eye Arduino Shield promises to provide -- a little cheer and personality to add to your latest hack or project. The $7 shield is simply a platform with stacking headers, so you put another shield on top if you like, that sports a pair of googly eyes. Best of all, it's completely customizable. The kit comes with two pairs of different sized peepers which you can place wherever you want. Add all four if you like! The blank white slate leaves you plenty of room to doodle, add a smile, eyelashes or, if you simply must ruin it by adding functionality, a mini breadboard. You can see the Evil Mad Scientist-made shield in action after the break but, honestly, if you're not sold yet you never will be (also, you probably don't have a soul).

Continue reading Googly Eye Arduino Shield proves geeks just wanna have fun (video)

Googly Eye Arduino Shield proves geeks just wanna have fun (video) originally appeared on Engadget on Wed, 23 Nov 2011 04:16:00 EST. Please see our terms for use of feeds.

Permalink | Email this | Comments