We create an application based on Arduino, that allows you to control brightness and color of a RGB strip LED via local network or Internet through a WiFi or Ethernet shield

How it works
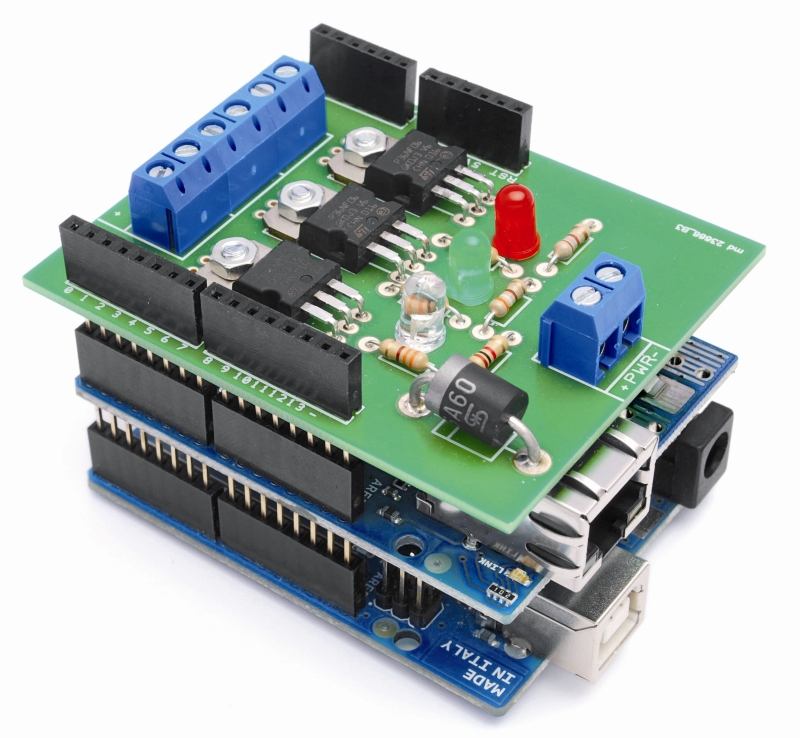
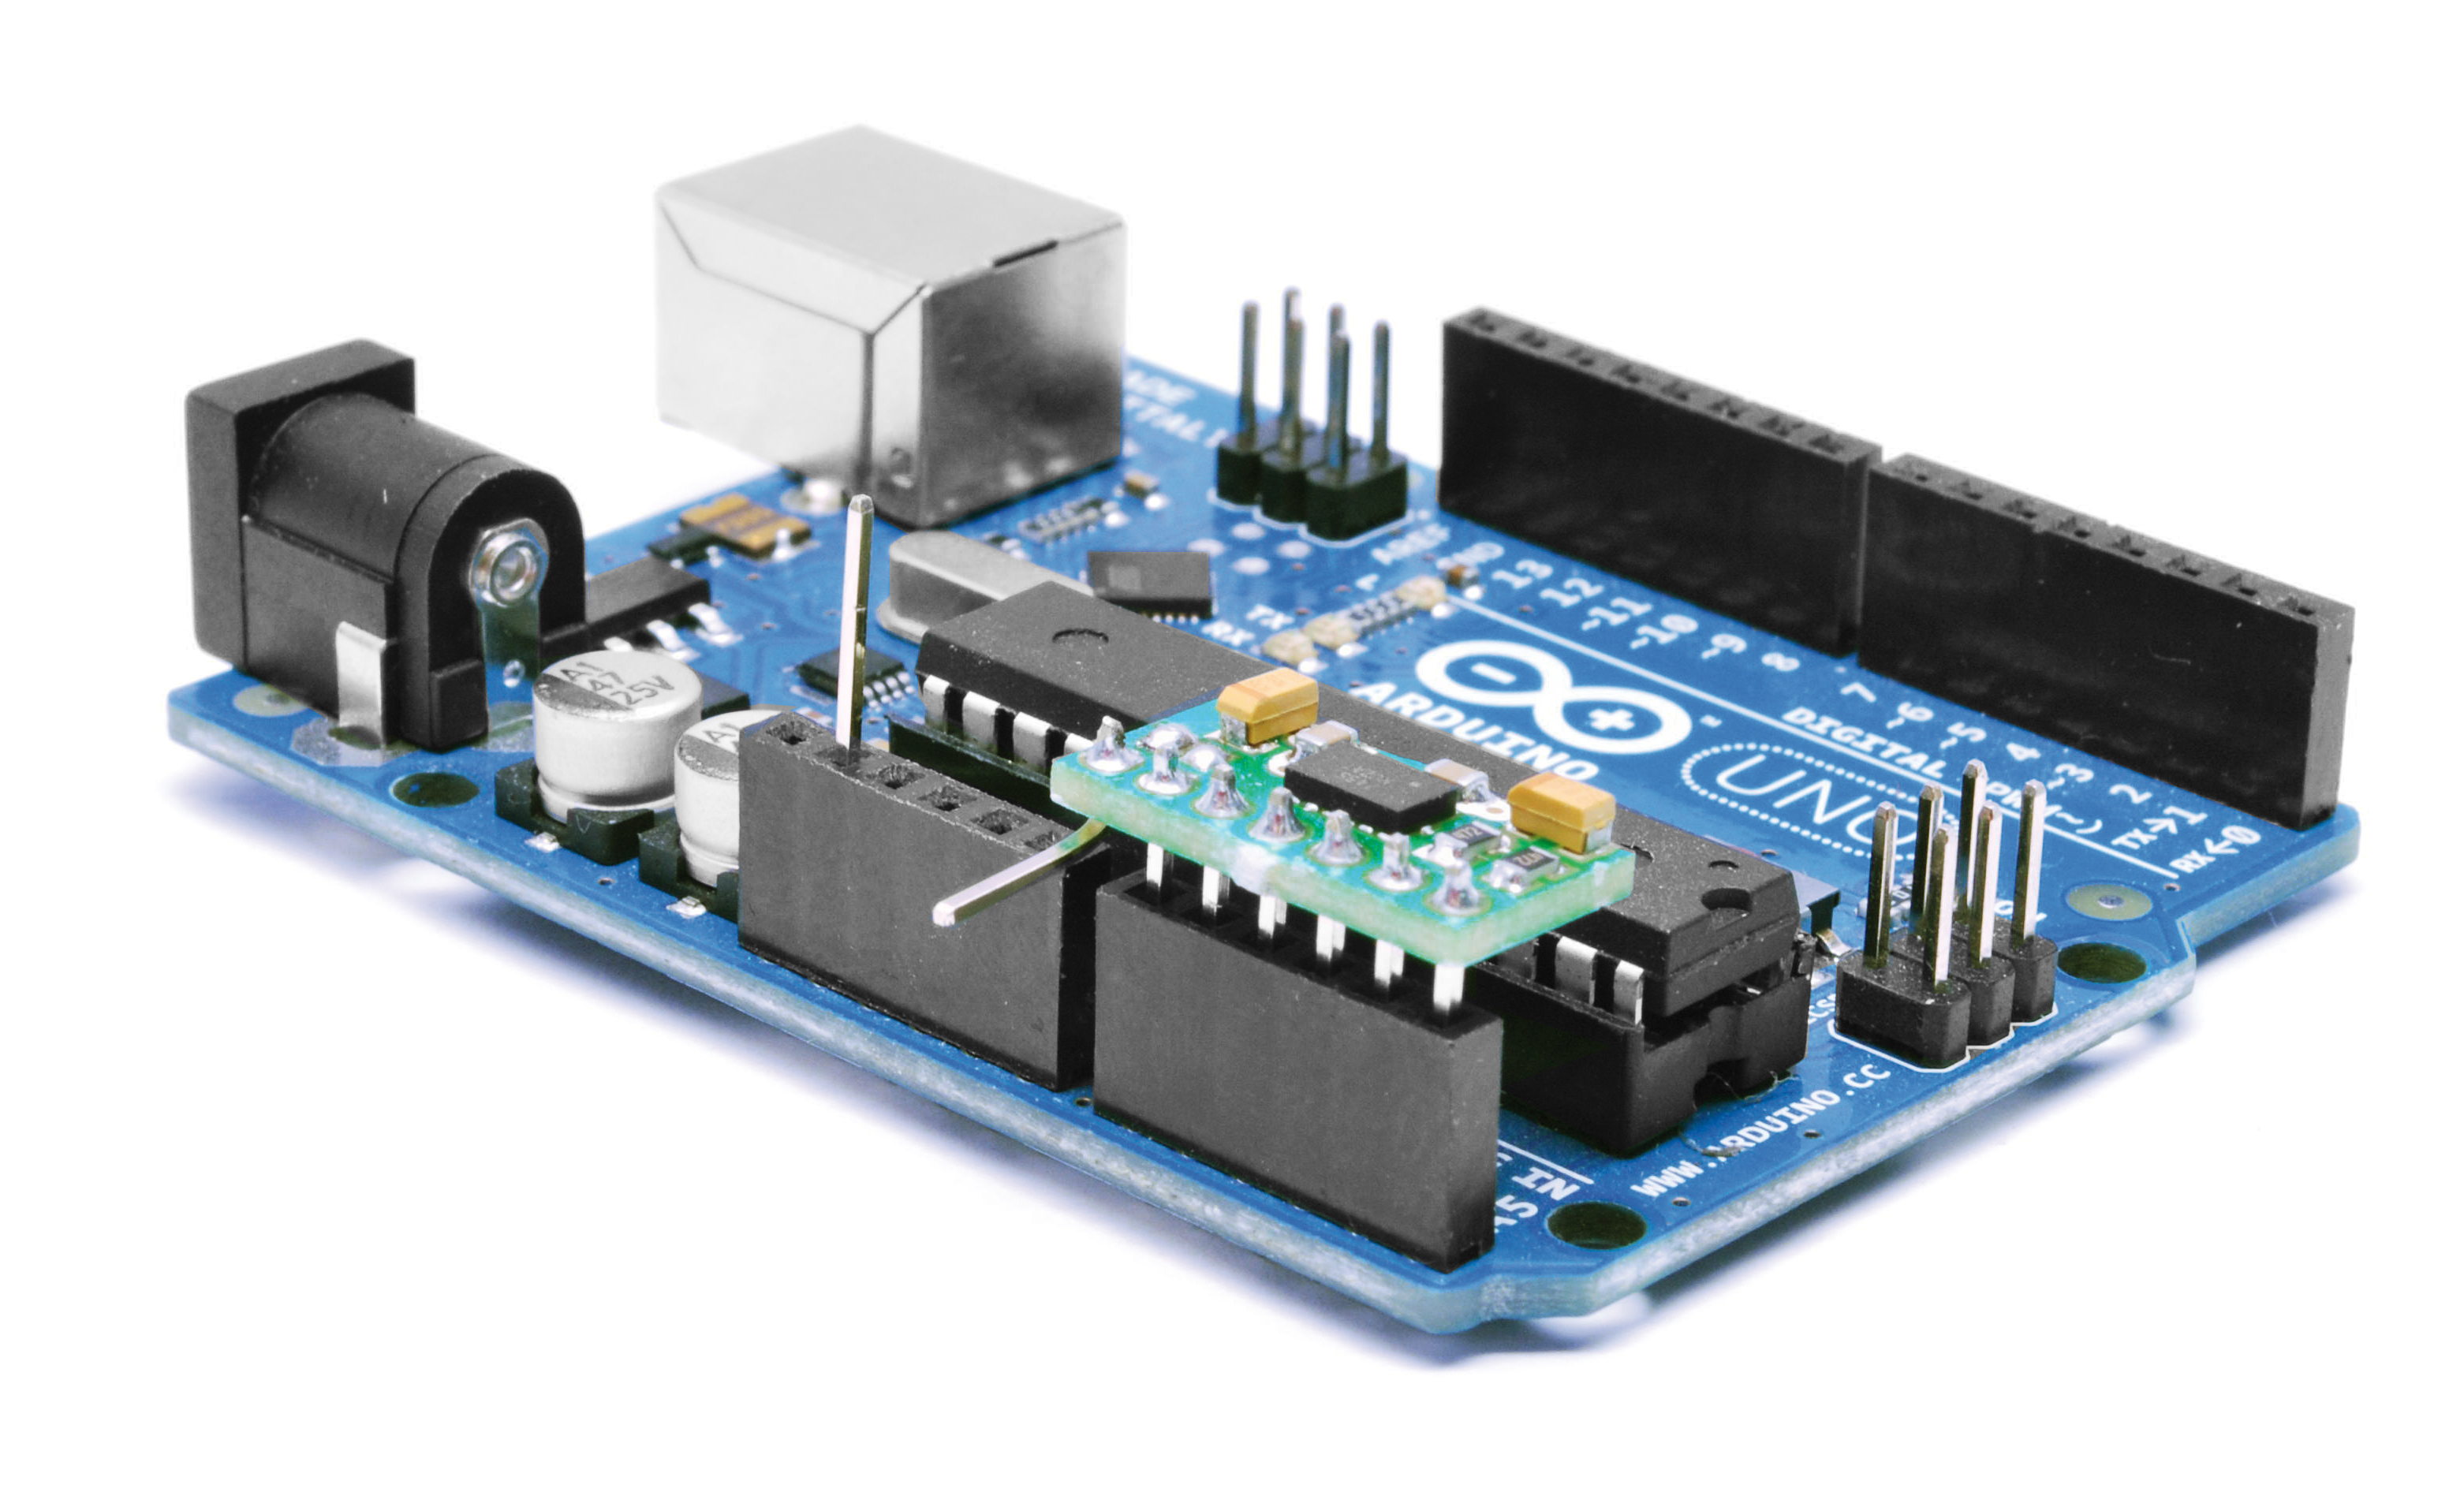
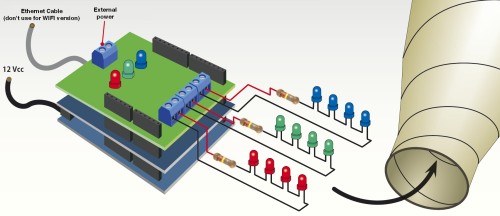
The system that we propose is based on the Arduino UNO, on which are mounted two shield: the Ethernet or WIFI Shield, which provides the connection to LAN, and the RGB shield which mounts three power drivers to control the LED strip.
In Arduino must be loaded different sketch depending of the type of connection you choose (Ethernet or WiFi). The sketch allows you to manage communication via LAN and create a web interface (which will come to those who try to access via a local network) and run the commands received.
Arduino is like a web server, an HTML page is showed through a browser, by introducing into the address bar the IP address corresponding to the ethernet/WIFI shield.
This means that the lamp can be turned on and controlled by any device on the network or remotely via the Internet. The web page shows the current setting of R, G, B of the lamp and allows you to edit them.
The shield RGB
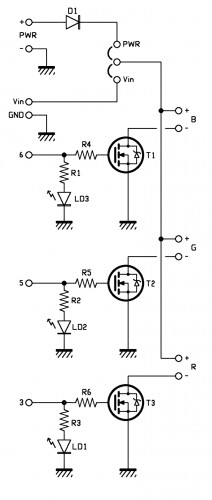
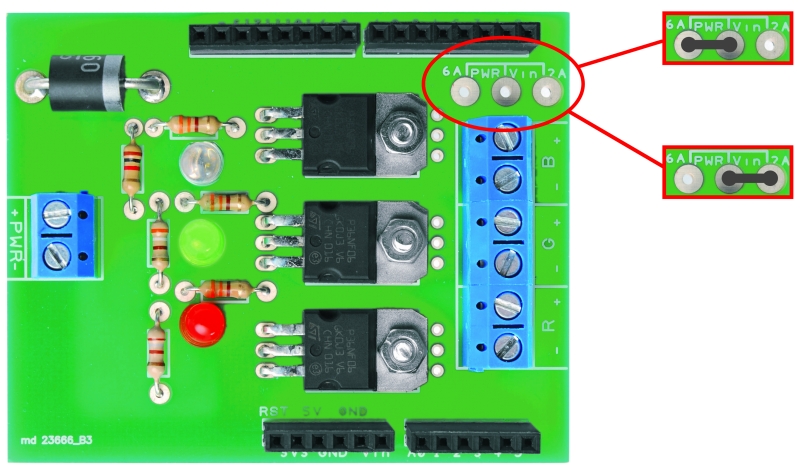
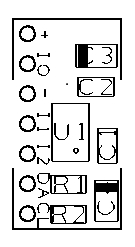
Arduino controls the LED channels by a shield very simple, containing three MOSFET enhancement-mode n-channel type P36NF06; each MOSFET is driven on the gate, through a resistor, with the logic signal that Arduino sends. To be precise, pin 3 controls T3 (red), pin 5 controls T2 (green) and pin 6 controls T1 (blue), each line has a status LED, polarized by a limiting resistor (LEDs indicate how it is behaving this channel). Note that Arduino controls the individual transistors by PWM signals, which duty cycle determines the presence and intensity of a certain color; more precisely, the width of the pulses can changes from a minimum to a maximum to decide how much light should be the group of LEDs of the respective color.

The drain of each MOSFET controls the load which must be connected with the anode to the positive line of the common power supply (+); for each channel there is a connector with a positive contact (goes on line common) and a negative (corresponding to the respective drain MOSFET).
We have provided the possibility to power the LEDs in two ways: with the power drawn by Arduino contact Vin (in which case you should close the jumper on Vin) or with a voltage supplied to the terminal PWR (PWR jumper closed on), you can opt for the first solution if you think your lamps absorbs less than 1.5 amps, but if you need more power you have give power apart from the shield, with a suitable power supply.
Note that by closing the jumper on Vin, the Arduino must be supplied at 12 V with a power supply capable of delivering all the current required.

R1: 1 kohm
R2: 390 ohm
R3: 180 ohm
R4: 330 ohm
R5: 330 ohm
R6: 330 ohm
T1: STP36NE06
T2: STP36NE06
T3: STP36NE06
LD1: Led 5 mm blue
LD2: Led 5 mm green
LD3: Led 5 mm red
D1: 6A600
- Screw a 2
R1: 1 kohm
R2: 390 ohm
R3: 180 ohm
R4: 330 ohm
R5: 330 ohm
R6: 330 ohm
T1: STP36NE06
T2: STP36NE06
T3: STP36NE06
LD1: Led 5 mm blu (510LB7C)
LD2: Led 5 mm verde
LD3: Led 5 mm rosso
D1: 6A600
Varie:
- Screw 2 via(4 pz.)
- Strip M/F 6 via (2 pz.)
- Strip M/F 8 via (2 pz.)
The sketch
/* IKEA Dudero mods WIFI Version

 created 2011
 by Boris Landoni

 This example code is in the public domain.

http://www.open-electronics.org

http://www.futurashop.it

http://blog.elettronicain.it/

 */

// Inclusione Libreria per Server Web WiFi
#include <WiServer.h>
#include <avr/pgmspace.h>
#include <EEPROM.h>

int red = 3;    // RED LED connected to PWM pin 3
int green = 5;    // GREEN LED connected to PWM pin 5
int blue = 6;    // BLUE LED connected to PWM pin 6
int r=50; int g=100; int b=150;
int rup; int gup; int bup;
int fader=0;
int inc=10;
String inString = String(50);
char buffer[160]; // make sure this is large enough for the largest string it must hold

// Definizione Parametri Rete Wireless
#define WIRELESS_MODE_INFRA	1  // Infrastrutturata (basata su Access Point)
#define WIRELESS_MODE_ADHOC	2  // Ad-hoc (senza Access Point)

unsigned char local_ip[] = {192, 168, 0, 89};      // Indirizzo IP
unsigned char gateway_ip[] = {192, 168, 0, 254};	    // Indirizzo gateway IP
unsigned char subnet_mask[] = {255, 255, 255, 0};   // Subnet Mask
const prog_char ssid[] PROGMEM = {"AP_FES"};	    // SSID access point

// Selezione tipo di cifratura rete Wireless
unsigned char security_type = 3;  // 0 -> nessuna cifratura
                                  // 1 -> cifratura WEP
                                  // 2 -> cifratura WPA
                                  // 3 -> cifratura WPA2

// Password cifratura per WPA/WPA2 (max. 64 cratteri)
const prog_char security_passphrase[] PROGMEM = {"12345678"};

// Password cifratura per WEP 128-bit keys
prog_uchar wep_keys[] PROGMEM = {0x01, 0x02, 0x03, 0x04, 0x05, 0x06, 0x07, 0x08, 0x00, 0x00, 0x00, 0x00, 0x00,
				 0x00, 0x00, 0x00, 0x00, 0x00, 0x00, 0x00, 0x00, 0x00, 0x00, 0x00, 0x00, 0x00,
				 0x00, 0x00, 0x00, 0x00, 0x00, 0x00, 0x00, 0x00, 0x00, 0x00, 0x00, 0x00, 0x00,
				 0x00, 0x00, 0x00, 0x00, 0x00, 0x00, 0x00, 0x00, 0x00, 0x00, 0x00, 0x00, 0x00};

// Selezione tipo di rete Wireless infrastrutturata
unsigned char wireless_mode = WIRELESS_MODE_INFRA;

// Variabili per lunghezza SSID e password di cifratura
unsigned char ssid_len;
unsigned char security_passphrase_len;

prog_char string_0[] PROGMEM  = "<html><head><title>Boris's Project</title></head><script language=\"javascript\"> var alphaStr = \"0123456789ABCDEF\";";
prog_char string_1[] PROGMEM  = "var alphaArr = [\"0\",\"1\",\"2\",\"3\",\"4\",\"5\",\"6\",\"7\",\"8\",\"9\",\"A\",\"B\",\"C\",\"D\",\"E\",\"F\"]; var RGB = [";
prog_char string_2[] PROGMEM  = "];function pulsRED(){document.bgColor='#FF0000';RGB = [255,0,0]}function pulsGRE(){document.bgColor='#00FF00';RGB = [0,255,0]}";
prog_char string_3[] PROGMEM  = "function pulsBLU(){document.bgColor='#0000FF';RGB = [0,0,255]}function pulsYEL(){document.bgColor='#FFFF00';RGB = [255,255,0]}";
prog_char string_4[] PROGMEM  = "function pulsPIN(){document.bgColor='#FF00FF';RGB = [255,0,255]}function pulsCEL(){document.bgColor='#00FFFF';RGB = [0,255,255]}";
prog_char string_5[] PROGMEM  = "function pulsWHI(){document.bgColor='#FFFFFF';RGB = [255,255,255]}";
prog_char string_6[] PROGMEM  = " ";
prog_char string_7[] PROGMEM  = "function HEX_from_RGB(){document.bgColor = '#' + DEC_to_HEX(RGB[0]) + DEC_to_HEX(RGB[1]) + DEC_to_HEX(RGB[2]);}";
prog_char string_8[] PROGMEM  = "function adjRED(incr){	RGB[0] += incr;	if (RGB[0] > 255) RGB[0] = 255;	if (RGB[0] < 0) RGB[0] = 0;}";
prog_char string_9[] PROGMEM  = "function adjGRN(incr)	{RGB[1] += incr;if (RGB[1] > 255) RGB[1] = 255;	if (RGB[1] < 0) RGB[1] = 0;}";
prog_char string_10[] PROGMEM  = "function adjBLU(incr)	{RGB[2] += incr;if (RGB[2] > 255) RGB[2] = 255;	if (RGB[2] < 0) RGB[2] = 0;}";
prog_char string_11[] PROGMEM = "function setRED(r) { RGB[0] = r; } function setGRN(g) { RGB[1] = g; } function setBLU(b) { RGB[2] = b; }";
prog_char string_12[] PROGMEM = "function newRGB() { HEX_from_RGB(); } </script> <script language=\"javascript\"> var i_a; ";
prog_char string_13[] PROGMEM = "function DEC_to_HEX(dec) {var n_ = Math.floor(dec / 16); var _n = dec - n_ * 16; return alphaArr[n_] + alphaArr[_n];	}";
prog_char string_14[] PROGMEM = "function HEX_to_DEC(hex){var n_ = alphaStr.indexOf(hex.substring(0,1)); var _n = alphaStr.indexOf(hex.substring(1,2)); return n_ * 16 + _n;	}";
prog_char string_15[] PROGMEM = "function updateFields(){var d = document.colForm;d.r.value = RGB[0];	d.g.value = RGB[1];	d.b.value = RGB[2];	}";
prog_char string_16[] PROGMEM = "function setRGB(){var d = document.colForm; var R = d.r.value;	var G = d.g.value;	var B = d.b.value;";
prog_char string_17[] PROGMEM = "setRED(parseInt(R));	setGRN(parseInt(G));	setBLU(parseInt(B));	newRGB(); updateFields();} </script>";
prog_char string_18[] PROGMEM = "</head><body><center><form method=GET, name=\"colForm\"><h1>The INTERNET RGB LAMP</h1> <table> <tr> <td valign=\"top\"> <input type=\"text\" name=\"r\"> ";
prog_char string_19[] PROGMEM = "<input type=\"text\" name=\"g\"> <input type=\"text\" name=\"b\"> <input type=\"button\" value=\"Calculate\" onclick=\"setRGB();\">";
prog_char string_20[] PROGMEM = " </td></tr> <tr><td><CENTER><input type=\"button\" class=\"tweak\" value=\"Red+\" onclick=\"adjRED(i_a);newRGB();updateFields();\">";
prog_char string_21[] PROGMEM = "<input type=\"button\" class=\"tweak\" value=\"Green+\" onclick=\"adjGRN(i_a);newRGB();updateFields();\"><input type=\"button\" class=\"tweak\" value=\"Blue+\"";
prog_char string_22[] PROGMEM = "onclick=\"adjBLU(i_a);newRGB();updateFields();\"> <select name=\"inc\" onchange=\"i_a = parseInt(document.colForm.inc.options";
prog_char string_23[] PROGMEM = "[document.colForm.inc.selectedIndex].value);\"> <option value=\"1\"";//selected
prog_char string_24[] PROGMEM = ">inc/speed = 1x <option value=\"5\"";
prog_char string_25[] PROGMEM = ">inc/speed = 5x <option value=\"10\"";
prog_char string_26[] PROGMEM = ">inc/speed = 10x <option value=\"25\"";
prog_char string_27[] PROGMEM = ">inc/speed = 25x <option value=\"50\"";
prog_char string_28[] PROGMEM = ">inc/speed = 50x <option value=\"100\"";
prog_char string_29[] PROGMEM = ">inc/speed = 100x <option value=\"150\"";
prog_char string_30[] PROGMEM = ">inc/speed = 150x <option value=\"200\"";
prog_char string_31[] PROGMEM = ">inc/speed = 200x <option value=\"250\"";
prog_char string_32[] PROGMEM = ">inc/speed = 250x</select><input type=";
prog_char string_33[] PROGMEM = "\"button\" class=\"tweak\" value=\"Red-\" onclick=\"adjRED(0-i_a);newRGB();updateFields();\"><input type=\"button\" class=\"tweak\" value=\"Green-\"";
prog_char string_34[] PROGMEM = "onclick=\"adjGRN(0-i_a);newRGB();updateFields();\"><input type=\"button\" class=\"tweak\" value=\"Blue-\" onclick=\"adjBLU(0-i_a);newRGB();updateFields();\">";
prog_char string_35[] PROGMEM = "</CENTER></td> <tr><td><CENTER>Fader<input type=\"radio\" name=\"fad\" value=\"1\"";
prog_char string_36[] PROGMEM = "/> On<input type=\"radio\" name=\"fad\" value=\"0\" ";
prog_char string_37[] PROGMEM = "/> Off</CENTER></td></tr> </tr></td> </tr> <input type=\"submit\" style=\" width:80;height:44px;background-color:FF0000;\" onclick=\"pulsRED();updateFields();\";>";
prog_char string_38[] PROGMEM = "<input type=\"submit\" style=\" width:80;height:44px;background-color:00FF00;\" onclick=\"pulsGRE();updateFields();\";>";
prog_char string_39[] PROGMEM = "<input type=\"submit\" style=\" width:80;height:44px;background-color:0000FF;\" onclick=\"pulsBLU();updateFields();\";>";
prog_char string_40[] PROGMEM = "<input type=\"submit\" style=\" width:80;height:44px;background-color:FFFF00;\" onclick=\"pulsYEL();updateFields();\";>";
prog_char string_41[] PROGMEM = "<input type=\"submit\" style=\" width:80;height:44px;background-color:FF00FF;\" onclick=\"pulsPIN();updateFields();\";>";
prog_char string_42[] PROGMEM = "<input type=\"submit\" style=\" width:80;height:44px;background-color:00FFFF;\" onclick=\"pulsCEL();updateFields();\";>";
prog_char string_43[] PROGMEM = "<input type=\"submit\" style=\" width:80;height:44px;background-color:FFFFFF;\" onclick=\"pulsWHI();updateFields();\";>";
prog_char string_44[] PROGMEM = "<tr><td><CENTER><input type=\"submit\" value=\"Set colors\"></CENTER></td></tr>   ";
prog_char string_45[] PROGMEM = "</table> </form> <script language=\"javascript\">newRGB(); updateFields(); ";
prog_char string_46[] PROGMEM = "i_a = parseInt(document.colForm.inc.options[document.colForm.inc.selectedIndex].value);</script>";
prog_char string_47[] PROGMEM = "<font size= 2>Powered by Open-Electronics.org - Boris Landoni</font>"; //please don't remove  ";
prog_char string_48[] PROGMEM  = "<br></center></body></html>";
prog_char string_49[] PROGMEM  = "";
prog_char string_50[] PROGMEM  = "";
prog_char string_51[] PROGMEM  = "";

PROGMEM const char *string_table[] = // change "string_table" name to suit
{
string_0,
string_1,
string_2,
string_3,
string_4,
string_5,
string_6,
string_7,
string_8,
string_9,
string_10,
string_11,
string_12,
string_13,
string_14,
string_15,
string_16,
string_17,
string_18,
string_19,
string_20,
string_21,
string_22,
string_23,
string_24,
string_25,
string_26,
string_27,
string_28,
string_29,
string_30,
string_31,
string_32,
string_33,
string_34,
string_35,
string_36,
string_37,
string_38,
string_39,
string_40,
string_41,
string_42,
string_43,
string_44,
string_45,
string_46,
string_47,
string_48,
string_49,
string_50,
string_51
};

void setup()
{
  // start the Ethernet connection and the server:
// Inizializzo WiServer (Gestione_Richieste_Web per creare/trasmettere pagine HTML)
      WiServer.init (Gestione_Richieste_Web);
      // Inizializzo porta seriale
      Serial.begin (9600);
      WiServer.enableVerboseMode (false);

      Serial.println("Serial READY");
      Serial.println("WiFi READY");
      Serial.println("Server READY");

      r = EEPROM.read(1);
      g = EEPROM.read(2);
      b = EEPROM.read(3);
      inc = EEPROM.read(4);
      fader = EEPROM.read(5);
}

void loop()  {

    // Avvio WiServer
  WiServer.server_task();

  delay(10);

  if (fader==1){
    funcfader();
  }

}

// Gestione diverse richieste provenienti dal WEB
// INPUT:   URL pagina web richiesta
// OUTPUT:  Flag URL riconosciuto/non riconosciutoo
boolean Gestione_Richieste_Web (char* URL) {
  Serial.print("Richiesta Web - URL->");
  Serial.println(URL);

  // Se URL richiesto corrisponde a "/" (pagina index)
  if (strcmp (URL, "/") == 0) {
    // Secondo gli I/O creo e invio le pagine Web
    Serial.println("pagina index");
    printWebPage();

    // Ritorno URL è stato riconosciuto
    return true;
  }    // Chiusura if URL richieso corrisponde a "/" (pagina index)

  // Se URL richieso corrisponde a "?OPERATION=ACCENDI_ROSSO
  if (strncmp (URL, "/?r=*",4) == 0) {

    Serial.println("pagina operazione");

                char colorArr[5];
                String temp="";
                inString=URL;
                Serial.print("inString: ");
                Serial.println(inString);

                int Pos_r = inString.indexOf("r");
                int Pos_g = inString.indexOf("g");
                int Pos_b = inString.indexOf("b");
                int Pos_i = inString.indexOf("inc");
                int Pos_f = inString.indexOf("fad");
                int End = inString.indexOf("HTTP");
                Serial.print("Pos_r: ");
                Serial.println(Pos_r);
                Serial.print("Pos_g: ");
                Serial.println(Pos_g);
                Serial.print("Pos_b: ");
                Serial.println(Pos_b);
                Serial.print("Pos_i: ");
                Serial.println(Pos_i);
                Serial.print("Pos_f: ");
                Serial.println(Pos_f);
                Serial.print("End: ");
                Serial.println(End);
                if(Pos_r>=0){
                   temp=inString.substring((Pos_r+2), (Pos_g-1));
                   temp.toCharArray(colorArr, 5);
                   r=(atoi(colorArr));
                   Serial.print("red: ");
                   Serial.println(r);
                   EEPROM.write(1, r);
                }
                if(Pos_g>=0){
                   temp=inString.substring((Pos_g+2), (Pos_b-1));
                   temp.toCharArray(colorArr, 5);
                   g=(atoi(colorArr));
                   Serial.print("green: ");
                   Serial.println(g);
                   EEPROM.write(2, g);
                }

                if(Pos_b>=0){
                   temp=inString.substring((Pos_b+2), (Pos_i-1));
                   temp.toCharArray(colorArr, 5);
                   b=(atoi(colorArr));
                   Serial.print("blue: ");
                   Serial.println(b);
                   EEPROM.write(3, b);
                }

                if(Pos_i>=0){
                   temp=inString.substring((Pos_i+4), (Pos_f-1));
                   temp.toCharArray(colorArr, 5);
                   inc=(atoi(colorArr));
                   Serial.print("inc: ");
                   Serial.println(inc);
                   EEPROM.write(4, inc);
                }

                if(Pos_f>=0){
                   temp=inString.substring((Pos_f+4), (End-1));
                   temp.toCharArray(colorArr, 5);
                   fader=(atoi(colorArr));
                   Serial.print("fader: ");
                   Serial.println(fader);
                   EEPROM.write(5, fader);
                }

               if ((Pos_r>=0)&&(Pos_g>=0)&&(Pos_b>=0)) {
                 rgb(r,g,b);
               }

    // Secondo gli I/O creo e invio le pagine Web
    printWebPage();

    // Ritorno URL è stato riconosciuto
    return true;
  }    // Chiusura if URL richieso corrisponde a "?OPERATION=ACCENDI_ROSSO"

  // Ritorno URL non riconosciuto
  return false;
}

 void printWebPage2()
{
      int tmp=0;
      Serial.println("printWebPage");
      // send a standard http response header

//      WiServer.print("HTTP/1.1 200 OK");
//      WiServer.print("Content-Type: text/html");
//      WiServer.print();

      //strcpy_P(buffer, (char*)pgm_read_word(&(string_table[0]))); // Necessary casts and dereferencing, just copy.
      //WiServer.print( buffer );
      //Serial.println( buffer );
      for (int i = 0; i < 51; i++)
      {
          //strcpy_P(buffer, (char*)pgm_read_word(&(string_table[i]))); // Necessary casts and dereferencing, just copy.
          //WiServer.print( buffer );
          WiServer.print_P((char*)pgm_read_word(&(string_table[i])));
          //Serial.println( buffer );
          //delay(500);
      }

}

void printWebPage()
{
      int tmp=0;
      Serial.println("printWebPage");
      // send a standard http response header
      //WiServer.print_P("HTTP/1.1 200 OK");
      //WiServer.print_P("Content-Type: text/html");

      //strcpy_P(buffer, (char*)pgm_read_word(&(string_table[0]))); // Necessary casts and dereferencing, just copy.
      WiServer.print_P((char*)pgm_read_word(&(string_table[0])));
      //Serial.println( buffer );
      for (int i = 1; i < 51; i++)
      {
          /*if (i==9)
          {
              strcpy_P(buffer, (char*)pgm_read_word(&(string_table[i])));  //butto tutto nell'array buffer
              for (tmp=0 ; tmp < sizeof(buffer); tmp++)
              {
                if (buffer[tmp]=='#')
                {
                  //Serial.println( "trovato ##### " );

                }

              }
          }
          else
          {
            strcpy_P(buffer, (char*)pgm_read_word(&(string_table[i]))); // Necessary casts and dereferencing, just copy.
          }*/
          //strcpy_P(buffer, (char*)pgm_read_word(&(string_table[i]))); // Necessary casts and dereferencing, just copy.
          WiServer.print_P((char*)pgm_read_word(&(string_table[i])));
          //Serial.println( buffer );
          if (i==1)
          {
            char tmpstr[4];
            WiServer.print( itoa(r,tmpstr,10) );
            //Serial.println( itoa(r,tmpstr,10) );
            WiServer.print( "," );
            //Serial.println("," );
            WiServer.print( itoa(g,tmpstr,10) );
            //Serial.println( itoa(g,tmpstr,10) );
            WiServer.print( "," );
            //Serial.println( "," );
            WiServer.print( itoa(b,tmpstr,10) );
            //Serial.println( itoa(b,tmpstr,10) );
          }

          if (i==23){if (inc==1){WiServer.print("selected");}}
          if (i==24){if (inc==5){WiServer.print("selected");}}
          if (i==25){if (inc==10){WiServer.print("selected");}}
          if (i==26){if (inc==25){WiServer.print("selected");}}
          if (i==27){if (inc==50){WiServer.print("selected");}}
          if (i==28){if (inc==100){WiServer.print("selected");}}
          if (i==29){if (inc==150){WiServer.print("selected");}}
          if (i==30){if (inc==200){WiServer.print("selected");}}
          if (i==31){if (inc==250){WiServer.print("selected");}}

          if (i==35)
          {
            if (fader==1){
              WiServer.print("checked");
            }
          }
          if (i==36)
          {
            if (fader==0){
              WiServer.print("checked");
            }
          }
      }
     Serial.println("FINE printWebPage");

}

void funcfader(){
    Serial.println("fader");
    if (rup==1){r+=1;}
    else{r-=1;}
    if (r>=255){rup=0;}
    if (r<=0){rup=1;}

    if (gup==1){g+=1;}
    else{g-=1;}
    if (g>=255){gup=0;}
    if (g<=0){gup=1;}

    if (bup==1){b+=1;}
    else{b-=1;}
    if (b>=255){bup=0;}
    if (b<=0){bup=1;}

    delay(inc*2);
    rgb(r, g, b);
}

void rgb(int r, int g, int b)
{

  Serial.print("RGB: ");
  Serial.print(r);
  Serial.print(" ");
  Serial.print(g);
  Serial.print(" ");
  Serial.print(b);
  if (r>255) r=255;
  if (g>255) g=255;
  if (b>255) b=255;
  if (r<0) r=0;
  if (g<0) g=0;
  if (b<0) b=0;

  analogWrite(red, r);
  analogWrite(green, g);
  analogWrite(blue, b);
}
";
prog_char string_48[] PROGMEM = "<br></center></body></html>";
prog_char string_49[] PROGMEM = "";
prog_char string_50[] PROGMEM = "";
prog_char string_51[] PROGMEM = "";
PROGMEM const char *string_table[] = // change "string_table" name to suit
{
string_0,
string_1,
string_2,
string_3,
string_4,
string_5,
string_6,
string_7,
string_8,
string_9,
string_10,
string_11,
string_12,
string_13,
string_14,
string_15,
string_16,
string_17,
string_18,
string_19,
string_20,
string_21,
string_22,
string_23,
string_24,
string_25,
string_26,
string_27,
string_28,
string_29,
string_30,
string_31,
string_32,
string_33,
string_34,
string_35,
string_36,
string_37,
string_38,
string_39,
string_40,
string_41,
string_42,
string_43,
string_44,
string_45,
string_46,
string_47,
string_48,
string_49,
string_50,
string_51
};
void setup()
{
// start the Ethernet connection and the server:
// Inizializzo WiServer (Gestione_Richieste_Web per creare/trasmettere pagine HTML)
WiServer.init (Gestione_Richieste_Web);
// Inizializzo porta seriale
Serial.begin (9600);
WiServer.enableVerboseMode (false);
Serial.println("Serial READY");
Serial.println("WiFi READY");
Serial.println("Server READY");
r = EEPROM.read(1);
g = EEPROM.read(2);
b = EEPROM.read(3);
inc = EEPROM.read(4);
fader = EEPROM.read(5);
}
void loop() {
// Avvio WiServer
WiServer.server_task();
delay(10);
if (fader==1){
funcfader();
}
}
// Gestione diverse richieste provenienti dal WEB
// INPUT: URL pagina web richiesta
// OUTPUT: Flag URL riconosciuto/non riconosciutoo
boolean Gestione_Richieste_Web (char* URL) {
Serial.print("Richiesta Web - URL->");
Serial.println(URL);
// Se URL richiesto corrisponde a "/" (pagina index)
if (strcmp (URL, "/") == 0) {
// Secondo gli I/O creo e invio le pagine Web
Serial.println("pagina index");
printWebPage();
// Ritorno URL è stato riconosciuto
return true;
} // Chiusura if URL richieso corrisponde a "/" (pagina index)
// Se URL richieso corrisponde a "?OPERATION=ACCENDI_ROSSO
if (strncmp (URL, "/?r=*",4) == 0) {
Serial.println("pagina operazione");
char colorArr[5];
String temp="";
inString=URL;
Serial.print("inString: ");
Serial.println(inString);
int Pos_r = inString.indexOf("r");
int Pos_g = inString.indexOf("g");
int Pos_b = inString.indexOf("b");
int Pos_i = inString.indexOf("inc");
int Pos_f = inString.indexOf("fad");
int End = inString.indexOf("HTTP");
Serial.print("Pos_r: ");
Serial.println(Pos_r);
Serial.print("Pos_g: ");
Serial.println(Pos_g);
Serial.print("Pos_b: ");
Serial.println(Pos_b);
Serial.print("Pos_i: ");
Serial.println(Pos_i);
Serial.print("Pos_f: ");
Serial.println(Pos_f);
Serial.print("End: ");
Serial.println(End);
if(Pos_r>=0){
temp=inString.substring((Pos_r+2), (Pos_g-1));
temp.toCharArray(colorArr, 5);
r=(atoi(colorArr));
Serial.print("red: ");
Serial.println(r);
EEPROM.write(1, r);
}
if(Pos_g>=0){
temp=inString.substring((Pos_g+2), (Pos_b-1));
temp.toCharArray(colorArr, 5);
g=(atoi(colorArr));
Serial.print("green: ");
Serial.println(g);
EEPROM.write(2, g);
}
if(Pos_b>=0){
temp=inString.substring((Pos_b+2), (Pos_i-1));
temp.toCharArray(colorArr, 5);
b=(atoi(colorArr));
Serial.print("blue: ");
Serial.println(b);
EEPROM.write(3, b);
}
if(Pos_i>=0){
temp=inString.substring((Pos_i+4), (Pos_f-1));
temp.toCharArray(colorArr, 5);
inc=(atoi(colorArr));
Serial.print("inc: ");
Serial.println(inc);
EEPROM.write(4, inc);
}
if(Pos_f>=0){
temp=inString.substring((Pos_f+4), (End-1));
temp.toCharArray(colorArr, 5);
fader=(atoi(colorArr));
Serial.print("fader: ");
Serial.println(fader);
EEPROM.write(5, fader);
}
if ((Pos_r>=0)&&(Pos_g>=0)&&(Pos_b>=0)) {
rgb(r,g,b);
}
// Secondo gli I/O creo e invio le pagine Web
printWebPage();
// Ritorno URL è stato riconosciuto
return true;
} // Chiusura if URL richieso corrisponde a "?OPERATION=ACCENDI_ROSSO"
// Ritorno URL non riconosciuto
return false;
}
void printWebPage2()
{
int tmp=0;
Serial.println("printWebPage");
// send a standard http response header
// WiServer.print("HTTP/1.1 200 OK");
// WiServer.print("Content-Type: text/html");
// WiServer.print();
//strcpy_P(buffer, (char*)pgm_read_word(&(string_table[0]))); // Necessary casts and dereferencing, just copy.
//WiServer.print( buffer );
//Serial.println( buffer );
for (int i = 0; i < 51; i++)
{
//strcpy_P(buffer, (char*)pgm_read_word(&(string_table[i]))); // Necessary casts and dereferencing, just copy.
//WiServer.print( buffer );
WiServer.print_P((char*)pgm_read_word(&(string_table[i])));
//Serial.println( buffer );
//delay(500);
}
}
void printWebPage()
{
int tmp=0;
Serial.println("printWebPage");
// send a standard http response header
//WiServer.print_P("HTTP/1.1 200 OK");
//WiServer.print_P("Content-Type: text/html");
//strcpy_P(buffer, (char*)pgm_read_word(&(string_table[0]))); // Necessary casts and dereferencing, just copy.
WiServer.print_P((char*)pgm_read_word(&(string_table[0])));
//Serial.println( buffer );
for (int i = 1; i < 51; i++)
{
/*if (i==9)
{
strcpy_P(buffer, (char*)pgm_read_word(&(string_table[i]))); //butto tutto nell'array buffer
for (tmp=0 ; tmp < sizeof(buffer); tmp++)
{
if (buffer[tmp]=='#')
{
//Serial.println( "trovato ##### " );
}
}
}
else
{
strcpy_P(buffer, (char*)pgm_read_word(&(string_table[i]))); // Necessary casts and dereferencing, just copy.
}*/
//strcpy_P(buffer, (char*)pgm_read_word(&(string_table[i]))); // Necessary casts and dereferencing, just copy.
WiServer.print_P((char*)pgm_read_word(&(string_table[i])));
//Serial.println( buffer );
if (i==1)
{
char tmpstr[4];
WiServer.print( itoa(r,tmpstr,10) );
//Serial.println( itoa(r,tmpstr,10) );
WiServer.print( "," );
//Serial.println("," );
WiServer.print( itoa(g,tmpstr,10) );
//Serial.println( itoa(g,tmpstr,10) );
WiServer.print( "," );
//Serial.println( "," );
WiServer.print( itoa(b,tmpstr,10) );
//Serial.println( itoa(b,tmpstr,10) );
}
if (i==23){if (inc==1){WiServer.print("selected");}}
if (i==24){if (inc==5){WiServer.print("selected");}}
if (i==25){if (inc==10){WiServer.print("selected");}}
if (i==26){if (inc==25){WiServer.print("selected");}}
if (i==27){if (inc==50){WiServer.print("selected");}}
if (i==28){if (inc==100){WiServer.print("selected");}}
if (i==29){if (inc==150){WiServer.print("selected");}}
if (i==30){if (inc==200){WiServer.print("selected");}}
if (i==31){if (inc==250){WiServer.print("selected");}}
if (i==35)
{
if (fader==1){
WiServer.print("checked");
}
}
if (i==36)
{
if (fader==0){
WiServer.print("checked");
}
}
}
Serial.println("FINE printWebPage");
}
void funcfader(){
Serial.println("fader");
if (rup==1){r+=1;}
else{r-=1;}
if (r>=255){rup=0;}
if (r<=0){rup=1;}
if (gup==1){g+=1;}
else{g-=1;}
if (g>=255){gup=0;}
if (g<=0){gup=1;}
if (bup==1){b+=1;}
else{b-=1;}
if (b>=255){bup=0;}
if (b<=0){bup=1;}
delay(inc*2);
rgb(r, g, b);
}
void rgb(int r, int g, int b)
{
Serial.print("RGB: ");
Serial.print(r);
Serial.print(" ");
Serial.print(g);
Serial.print(" ");
Serial.print(b);
if (r>255) r=255;
if (g>255) g=255;
if (b>255) b=255;
if (r<0) r=0;
if (g<0) g=0;
if (b<0) b=0;
analogWrite(red, r);
analogWrite(green, g);
analogWrite(blue, b);
}
/* IKEA Dudero mods Ethernet Version

 created 2011
 by Boris Landoni

 This example code is in the public domain.

http://www.open-electronics.org

http://www.futurashop.it

http://blog.elettronicain.it/

 */

#include <SPI.h>
#include <Ethernet.h>
#include <avr/pgmspace.h>
#include <EEPROM.h>

int red = 3;    // RED LED connected to PWM pin 3
int green = 5;    // GREEN LED connected to PWM pin 5
int blue = 6;    // BLUE LED connected to PWM pin 6
int r=50; int g=100; int b=150;
int rup; int gup; int bup;
int fader=0;
int inc=10;
String inString = String(50);
char buffer[160]; // make sure this is large enough for the largest string it must hold

byte mac[] = {  0x90, 0xA2, 0xDA, 0x00, 0x1D, 0x89 };
byte ip[] = { 192,168,0,88 };
byte gateway[] = { 192, 168, 0, 1 };
byte subnet[] = { 255, 255, 255, 0 };

/*

*/

prog_char string_0[] PROGMEM  = "<html><head><title>Boris's Project</title></head><script language=\"javascript\"> var alphaStr = \"0123456789ABCDEF\";";
prog_char string_1[] PROGMEM  = "var alphaArr = [\"0\",\"1\",\"2\",\"3\",\"4\",\"5\",\"6\",\"7\",\"8\",\"9\",\"A\",\"B\",\"C\",\"D\",\"E\",\"F\"]; var RGB = [";
prog_char string_2[] PROGMEM  = "];function pulsRED(){document.bgColor='#FF0000';RGB = [255,0,0]}function pulsGRE(){document.bgColor='#00FF00';RGB = [0,255,0]}";
prog_char string_3[] PROGMEM  = "function pulsBLU(){document.bgColor='#0000FF';RGB = [0,0,255]}function pulsYEL(){document.bgColor='#FFFF00';RGB = [255,255,0]}";
prog_char string_4[] PROGMEM  = "function pulsPIN(){document.bgColor='#FF00FF';RGB = [255,0,255]}function pulsCEL(){document.bgColor='#00FFFF';RGB = [0,255,255]}";
prog_char string_5[] PROGMEM  = "function pulsWHI(){document.bgColor='#FFFFFF';RGB = [255,255,255]}";
prog_char string_6[] PROGMEM  = "";
prog_char string_7[] PROGMEM  = "function HEX_from_RGB(){document.bgColor = '#' + DEC_to_HEX(RGB[0]) + DEC_to_HEX(RGB[1]) + DEC_to_HEX(RGB[2]);}";
prog_char string_8[] PROGMEM  = "function adjRED(incr){	RGB[0] += incr;	if (RGB[0] > 255) RGB[0] = 255;	if (RGB[0] < 0) RGB[0] = 0;}";
prog_char string_9[] PROGMEM  = "function adjGRN(incr)	{RGB[1] += incr;if (RGB[1] > 255) RGB[1] = 255;	if (RGB[1] < 0) RGB[1] = 0;}";
prog_char string_10[] PROGMEM  = "function adjBLU(incr)	{RGB[2] += incr;if (RGB[2] > 255) RGB[2] = 255;	if (RGB[2] < 0) RGB[2] = 0;}";
prog_char string_11[] PROGMEM = "function setRED(r) { RGB[0] = r; } function setGRN(g) { RGB[1] = g; } function setBLU(b) { RGB[2] = b; }";
prog_char string_12[] PROGMEM = "function newRGB() { HEX_from_RGB(); } </script> <script language=\"javascript\"> var i_a; ";
prog_char string_13[] PROGMEM = "function DEC_to_HEX(dec) {var n_ = Math.floor(dec / 16); var _n = dec - n_ * 16; return alphaArr[n_] + alphaArr[_n];	}";
prog_char string_14[] PROGMEM = "function HEX_to_DEC(hex){var n_ = alphaStr.indexOf(hex.substring(0,1)); var _n = alphaStr.indexOf(hex.substring(1,2)); return n_ * 16 + _n;	}";
prog_char string_15[] PROGMEM = "function updateFields(){var d = document.colForm;d.r.value = RGB[0];	d.g.value = RGB[1];	d.b.value = RGB[2];	}";
prog_char string_16[] PROGMEM = "function setRGB(){var d = document.colForm; var R = d.r.value;	var G = d.g.value;	var B = d.b.value;";
prog_char string_17[] PROGMEM = "setRED(parseInt(R));	setGRN(parseInt(G));	setBLU(parseInt(B));	newRGB(); updateFields();} </script>";
prog_char string_18[] PROGMEM = "</head><body><center><form method=GET, name=\"colForm\"><h1>The INTERNET RGB LAMP</h1> <table> <tr> <td valign=\"top\"> <input type=\"text\" name=\"r\"> ";
prog_char string_19[] PROGMEM = "<input type=\"text\" name=\"g\"> <input type=\"text\" name=\"b\"> <input type=\"button\" value=\"Calculate\" onclick=\"setRGB();\">";
prog_char string_20[] PROGMEM = " </td></tr> <tr><td><CENTER><input type=\"button\" class=\"tweak\" value=\"Red+\" onclick=\"adjRED(i_a);newRGB();updateFields();\">";
prog_char string_21[] PROGMEM = "<input type=\"button\" class=\"tweak\" value=\"Green+\" onclick=\"adjGRN(i_a);newRGB();updateFields();\"><input type=\"button\" class=\"tweak\" value=\"Blue+\"";
prog_char string_22[] PROGMEM = "onclick=\"adjBLU(i_a);newRGB();updateFields();\"> <select name=\"inc\" onchange=\"i_a = parseInt(document.colForm.inc.options";
prog_char string_23[] PROGMEM = "[document.colForm.inc.selectedIndex].value);\"> <option value=\"1\"";//selected
prog_char string_24[] PROGMEM = ">inc/speed = 1x <option value=\"5\"";
prog_char string_25[] PROGMEM = ">inc/speed = 5x <option value=\"10\"";
prog_char string_26[] PROGMEM = ">inc/speed = 10x <option value=\"25\"";
prog_char string_27[] PROGMEM = ">inc/speed = 25x <option value=\"50\"";
prog_char string_28[] PROGMEM = ">inc/speed = 50x <option value=\"100\"";
prog_char string_29[] PROGMEM = ">inc/speed = 100x <option value=\"150\"";
prog_char string_30[] PROGMEM = ">inc/speed = 150x <option value=\"200\"";
prog_char string_31[] PROGMEM = ">inc/speed = 200x <option value=\"250\"";
prog_char string_32[] PROGMEM = ">inc/speed = 250x</select><input type=";
prog_char string_33[] PROGMEM = "\"button\" class=\"tweak\" value=\"Red-\" onclick=\"adjRED(0-i_a);newRGB();updateFields();\"><input type=\"button\" class=\"tweak\" value=\"Green-\"";
prog_char string_34[] PROGMEM = "onclick=\"adjGRN(0-i_a);newRGB();updateFields();\"><input type=\"button\" class=\"tweak\" value=\"Blue-\" onclick=\"adjBLU(0-i_a);newRGB();updateFields();\">";
prog_char string_35[] PROGMEM = "</CENTER></td> <tr><td><CENTER>Fader<input type=\"radio\" name=\"fad\" value=\"1\"";
prog_char string_36[] PROGMEM = "/> On<input type=\"radio\" name=\"fad\" value=\"0\" ";
prog_char string_37[] PROGMEM = "/> Off</CENTER></td></tr> </tr></td> </tr> <input type=\"submit\" style=\" width:80;height:44px;background-color:FF0000;\" onclick=\"pulsRED();updateFields();\";>";
prog_char string_38[] PROGMEM = "<input type=\"submit\" style=\" width:80;height:44px;background-color:00FF00;\" onclick=\"pulsGRE();updateFields();\";>";
prog_char string_39[] PROGMEM = "<input type=\"submit\" style=\" width:80;height:44px;background-color:0000FF;\" onclick=\"pulsBLU();updateFields();\";>";
prog_char string_40[] PROGMEM = "<input type=\"submit\" style=\" width:80;height:44px;background-color:FFFF00;\" onclick=\"pulsYEL();updateFields();\";>";
prog_char string_41[] PROGMEM = "<input type=\"submit\" style=\" width:80;height:44px;background-color:FF00FF;\" onclick=\"pulsPIN();updateFields();\";>";
prog_char string_42[] PROGMEM = "<input type=\"submit\" style=\" width:80;height:44px;background-color:00FFFF;\" onclick=\"pulsCEL();updateFields();\";>";
prog_char string_43[] PROGMEM = "<input type=\"submit\" style=\" width:80;height:44px;background-color:FFFFFF;\" onclick=\"pulsWHI();updateFields();\";>";
prog_char string_44[] PROGMEM = "<tr><td><CENTER><input type=\"submit\" value=\"Set colors\"></CENTER></td></tr>   ";
prog_char string_45[] PROGMEM = "</table> </form> <script language=\"javascript\">newRGB(); updateFields(); ";
prog_char string_46[] PROGMEM = "i_a = parseInt(document.colForm.inc.options[document.colForm.inc.selectedIndex].value);</script>";
prog_char string_47[] PROGMEM = "<font size= 2>Powered by Open-Electronics.org - Boris Landoni</font>"; //please don't remove  ";
prog_char string_48[] PROGMEM  = "<br></center></body></html>";
prog_char string_49[] PROGMEM  = "";
prog_char string_50[] PROGMEM  = "";
prog_char string_51[] PROGMEM  = "";

PROGMEM const char *string_table[] = // change "string_table" name to suit
{
string_0,
string_1,
string_2,
string_3,
string_4,
string_5,
string_6,
string_7,
string_8,
string_9,
string_10,
string_11,
string_12,
string_13,
string_14,
string_15,
string_16,
string_17,
string_18,
string_19,
string_20,
string_21,
string_22,
string_23,
string_24,
string_25,
string_26,
string_27,
string_28,
string_29,
string_30,
string_31,
string_32,
string_33,
string_34,
string_35,
string_36,
string_37,
string_38,
string_39,
string_40,
string_41,
string_42,
string_43,
string_44,
string_45,
string_46,
string_47,
string_48,
string_49,
string_50,
string_51
};

// Initialize the Ethernet server library
// with the IP address and port you want to use
// (port 80 is default for HTTP):
Server server(80);

void setup()
{
  // start the Ethernet connection and the server:
      Serial.begin(9600);
      Ethernet.begin(mac, ip,gateway,subnet);
      server.begin();
      Serial.println("Serial READY");
      Serial.println("Ethernet READY");
      Serial.println("Server READY");
      r = EEPROM.read(1);
      g = EEPROM.read(2);
      b = EEPROM.read(3);
      inc = EEPROM.read(4);
      fader = EEPROM.read(5);
}

void loop()  {
//  // fade in from min to max in increments of 5 points:
//  for(int fadeValue = 0 ; fadeValue <= 255; fadeValue +=5) {
//    // sets the value (range from 0 to 255):
//    //analogWrite(red, fadeValue);
//    // wait for 30 milliseconds to see the dimming effect
//    rgb(fadeValue,fadeValue,fadeValue);
//    delay(30);
//  }
//
//  // fade out from max to min in increments of 5 points:
//  for(int fadeValue = 255 ; fadeValue >= 0; fadeValue -=5) {
//    // sets the value (range from 0 to 255):
//    //analogWrite(red, fadeValue);
//    // wait for 30 milliseconds to see the dimming effect
//    rgb(fadeValue,fadeValue,fadeValue);
//    delay(30);
//  }

  if (fader==1){
    funcfader();
  }

      Client client = server.available();

      if (client) {
        Serial.println("client");
        // an http request ends with a blank line
        boolean current_line_is_blank = true;
        while (client.connected()) {

          if (client.available()) {

            char c = client.read();
            if (inString.length() < 50) {
            inString.concat(c);

            }

            if (c == '\n' && current_line_is_blank) {
                char colorArr[5];
                String temp="";
                Serial.print("inString: ");
                Serial.println(inString);

                int Pos_r = inString.indexOf("r");
                int Pos_g = inString.indexOf("g");
                int Pos_b = inString.indexOf("b");
                int Pos_i = inString.indexOf("inc");
                int Pos_f = inString.indexOf("fad");
                int End = inString.indexOf("HTTP");
                Serial.print("Pos_r: ");
                Serial.println(Pos_r);
                Serial.print("Pos_g: ");
                Serial.println(Pos_g);
                Serial.print("Pos_b: ");
                Serial.println(Pos_b);
                Serial.print("Pos_i: ");
                Serial.println(Pos_i);
                Serial.print("Pos_f: ");
                Serial.println(Pos_f);
                Serial.print("End: ");
                Serial.println(End);

                if(Pos_r>=0){
                   temp=inString.substring((Pos_r+2), (Pos_g-1));
                   temp.toCharArray(colorArr, 5);
                   r=(atoi(colorArr));
                   Serial.print("red: ");
                   Serial.println(r);
                   EEPROM.write(1, r);
                }
                if(Pos_g>=0){
                   temp=inString.substring((Pos_g+2), (Pos_b-1));
                   temp.toCharArray(colorArr, 5);
                   g=(atoi(colorArr));
                   Serial.print("green: ");
                   Serial.println(g);
                   EEPROM.write(2, g);
                }

                if(Pos_b>=0){
                   temp=inString.substring((Pos_b+2), (Pos_i-1));
                   temp.toCharArray(colorArr, 5);
                   b=(atoi(colorArr));
                   Serial.print("blue: ");
                   Serial.println(b);
                   EEPROM.write(3, b);
                }

                if(Pos_i>=0){
                   temp=inString.substring((Pos_i+4), (Pos_f-1));
                   temp.toCharArray(colorArr, 5);
                   inc=(atoi(colorArr));
                   Serial.print("inc: ");
                   Serial.println(inc);
                   EEPROM.write(4, inc);
                }

                if(Pos_f>=0){
                   temp=inString.substring((Pos_f+4), (End-1));
                   temp.toCharArray(colorArr, 5);
                   fader=(atoi(colorArr));
                   Serial.print("fader: ");
                   Serial.println(fader);
                   EEPROM.write(5, fader);
                }

               if ((Pos_r>=0)&&(Pos_g>=0)&&(Pos_b>=0)) {
                 rgb(r,g,b);
               }
            printWebPage( &client);
            break;
            }
            if (c == '\n') {
            // we're starting a new line
            current_line_is_blank = true;
            } else if (c != '\r') {
            // we've gotten a character on the current line
            current_line_is_blank = false;
            }
          }
        }
        // give the web browser time to receive the data
        delay(1);

        inString = "";
        client.stop();
      }

}

void printWebPage(Client *client)
{
      int tmp=0;
      Serial.println("printWebPage");
      // send a standard http response header
      client->println("HTTP/1.1 200 OK");
      client->println("Content-Type: text/html");
      client->println();

      strcpy_P(buffer, (char*)pgm_read_word(&(string_table[0]))); // Necessary casts and dereferencing, just copy.
      client->println( buffer );
      //Serial.println( buffer );
      for (int i = 1; i < 51; i++)
      {
          /*if (i==9)
          {
              strcpy_P(buffer, (char*)pgm_read_word(&(string_table[i])));  //butto tutto nell'array buffer
              for (tmp=0 ; tmp < sizeof(buffer); tmp++)
              {
                if (buffer[tmp]=='#')
                {
                  //Serial.println( "trovato ##### " );

                }

              }
          }
          else
          {
            strcpy_P(buffer, (char*)pgm_read_word(&(string_table[i]))); // Necessary casts and dereferencing, just copy.
          }*/
          strcpy_P(buffer, (char*)pgm_read_word(&(string_table[i]))); // Necessary casts and dereferencing, just copy.
          client->println( buffer );
          if (i==1)
          {
            client->print( r );client->print( "," );client->print( g );client->print( "," );client->print( b );
          }

          if (i==23){if (inc==1){client->print("selected");}}
          if (i==24){if (inc==5){client->print("selected");}}
          if (i==25){if (inc==10){client->print("selected");}}
          if (i==26){if (inc==25){client->print("selected");}}
          if (i==27){if (inc==50){client->print("selected");}}
          if (i==28){if (inc==100){client->print("selected");}}
          if (i==29){if (inc==150){client->print("selected");}}
          if (i==30){if (inc==200){client->print("selected");}}
          if (i==31){if (inc==250){client->print("selected");}}

          if (i==35)
          {
            if (fader==1){
              client->print("checked");
            }
          }
          if (i==36)
          {
            if (fader==0){
              client->print("checked");
            }
          }
//          switch(i){
//
//              case 1:
//                  //itoa (tempC, buffer, 10); client->print( buffer ); Serial.print( buffer ); client->print( "," ); Serial.print( "," ); itoa ((int(tempC * 100) % 100), buffer, 10); client->print( buffer ); Serial.print( buffer ); break;
//              case 2:
//                  //if(digitalRead(rele)) st4=41;
//                  //else st4=42;
//                  //strcpy_P(buffer, (char*)pgm_read_word(&(string_table[st4]))); client->println( buffer ); Serial.println( buffer ); break;
//              case 3:
//                  //strcpy_P(buffer, (char*)pgm_read_word(&(string_table[st6]))); client->println( buffer ); Serial.println( buffer ); break;
//              case 4:
//              case 5:
//              case 6:
//          }
          delay(30);
      }

}

void funcfader(){
    Serial.println("fader");
    if (rup==1){r+=1;}
    else{r-=1;}
    if (r>=255){rup=0;}
    if (r<=0){rup=1;}

    if (gup==1){g+=1;}
    else{g-=1;}
    if (g>=255){gup=0;}
    if (g<=0){gup=1;}

    if (bup==1){b+=1;}
    else{b-=1;}
    if (b>=255){bup=0;}
    if (b<=0){bup=1;}

    delay(inc*2);
    rgb(r, g, b);
}

void rgb(int r, int g, int b)
{

  Serial.print("RGB: ");
  Serial.print(r);
  Serial.print(" ");
  Serial.print(g);
  Serial.print(" ");
  Serial.print(b);
  if (r>255) r=255;
  if (g>255) g=255;
  if (b>255) b=255;
  if (r<0) r=0;
  if (g<0) g=0;
  if (b<0) b=0;

  analogWrite(red, r);
  analogWrite(green, g);
  analogWrite(blue, b);
}
The web page

We conclude seeing the commands and reports available on the web page, there are buttons to issue commands, the option radio to select mode and some boxes where you write parameters. We start from the top, where we find the seven buttons, each relating to a color: each of them set in the lamp the combination of the LEDs R, G and B to obtain the corresponding color; receiving the command Arduino sets its color. Below these buttons are three boxes, with the Calculate button to the right: from left to right, they represent the colors red, green and blue. In each box, you can write, with a number between 0 and 255, the intensity that we have employed the same light, for example, typing 255 in the middle box we illuminate at full intensity green light.
The value in each cell can be varied with the buttons below Red+ Green+ and Blue+ (which increases the light intensity, respectively, red, green and blue) or by Red- Green- and Blue- buttons that reduce the intensity. Clicking on the Calculate button, see what color will obtain, whereas with Set colors send a request for setting the color intensity corresponding to the combination of the three boxes.
The last section of the web page is that of the fader: it is the effect of color change continues, activated by clicking in the option box next to On the same name (Fader) to disable this function you must click Off. By activating the fader, we will see the light of the lamp shades change cyclically from the currently set color, you can also choose between multiple execution speed of the cycle, the drop down menu which is accessed by clicking the middle box inc/speed was above a Fader section.
To build the project